Changing the Project View’s Start/Finish Dates for OnePager Pro for Version 7.0
Contents
Overview
1) Projects, Microsoft Project source plans, and project views have Start/Finish Dates. Task and milestones have Start/End Dates.
2) The purpose of this article is to demonstrate how to manage the Start/Finish Dates for a OnePager Pro project view.
3) Start/Finish Dates can be set and edited from:
- a) Your Microsoft Project source plans where OnePager Pro examines the earliest task/milestone Start Date and the latest task/milestone End Date to establish the Start/Finish Date boundaries for the new or updated project views. The exact Start/Finish Dates for the project view are determined by the rules just stated but modified to dates that correspond to the first and last full Tic Unit shown in the Lowest Level Time Axis.
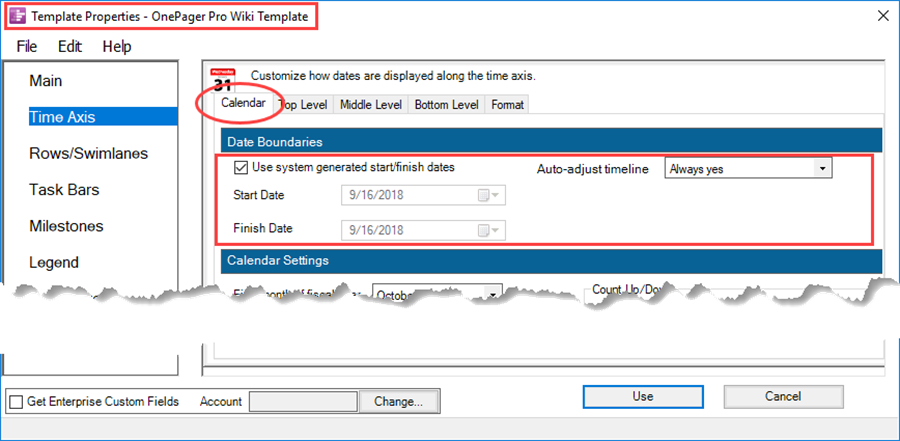
- b) The Start/Finish Date control settings in your OnePager Pro Template form Time Axis tab’s Calendar sub-tab in the Date Boundaries control group before a project view is created as shown here:
- c) The Start/Finish Date control settings you edit after a project view is created in the OnePager Pro View tab on the ribbon in the Dates control group highlighted below:

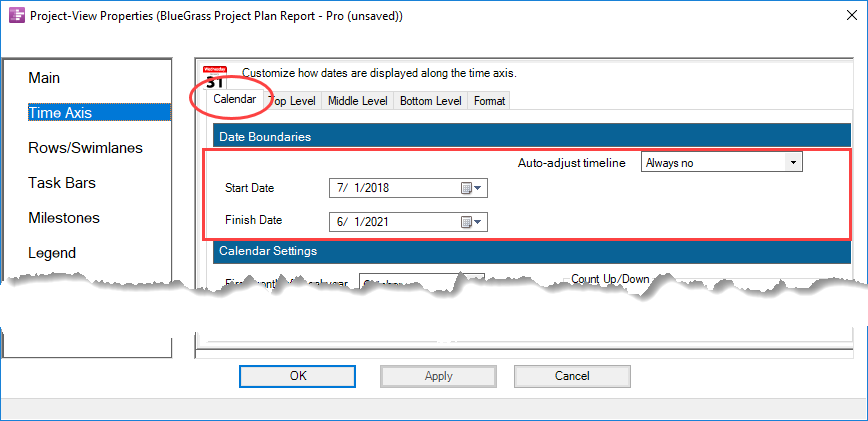
- d) The Start/Finish Date control settings you edit in the Project-View Properties (PVP) form Time Axis tab’s Calendar sub-tab in the Date Boundaries control group after a project view is created shown below:
Managing Start/Finish Dates
Editing Template Form Start/Finish Date Settings
1) OnePager Pro provides the capability for you to preset the Start/Finish Date boundaries for subsequently created project view before any project views are created.
Use System Generated Start/Finish Dates
2) You have the option to establish a Template form option that allows OnePager Pro to establish the Start/Finish Dates for project views automatically. You can also override this option and establish your own Start/Finish Dates in the Template form for permanent use with the Template.
3) The default option, however, is to let OnePager Pro determine the Start/Finish Date boundaries automatically through the software’s examination of the task/milestone structure in your source plan.
- a) OnePager Pro distributed Template form settings in the Time Axis tab Date Boundaries control group are that the Use system generated start/finish dates checkbox is checked ON as shown here:

- b) When the Use system generated start/finish dates checkbox is checked ON, the Template form’s Start Date and Finish Date, shown above, are disabled.
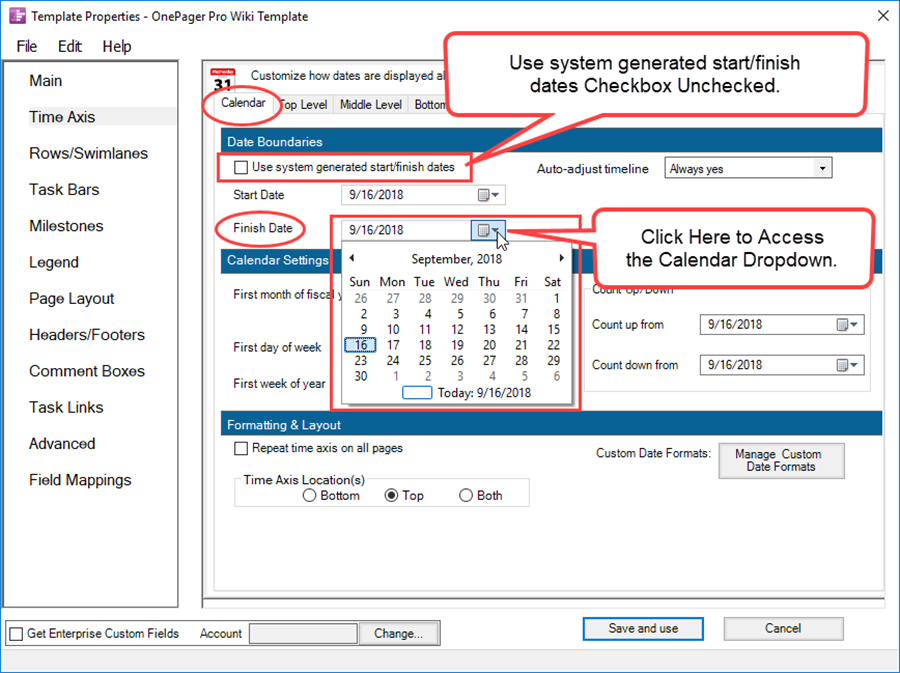
- c) If you uncheck the Use system generated start/finish dates checkbox, setting it to OFF, the form’s Start Date and Finish Date windows are enabled and you can set your own desired Start and Finish Dates using the standard Calendar dropdown as shown below:
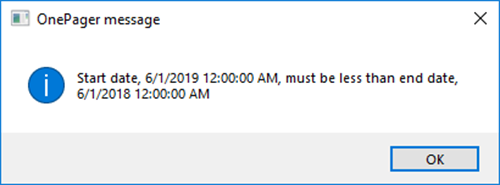
- d) Resetting Start and Finish Dates in the Template form requires that the Finish Date is later in the timeline than the Start Date setting. If the Finish Date is earlier than the Start Date or vice versa, OnePager Pro provides the warning message below when you attempt to click the Save and use button on the PVP form:
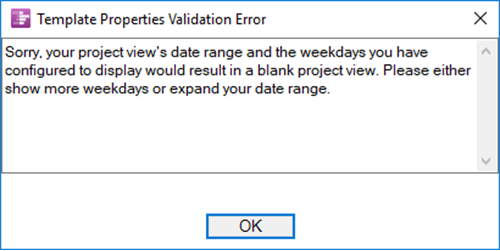
- e) Clicking the OK button the above form returns you to the Template form where you can make the correction.
- f) Assuming the Start Date and Finish Dates are appropriately sequenced with the Use system generated start/finish dates checkbox unchecked (OFF), your settings are used by OnePager Pro to establish the timespan for subsequent project views using the Template form.
Auto-Adjust Timeline Options
4) The Auto-adjust timeline dropdown in the Template form Time Axis tab Date Boundaries control group is useful in managing Template form created Start/Finish Dates.
5) The Auto-adjust timeline dropdown option list is shown below:
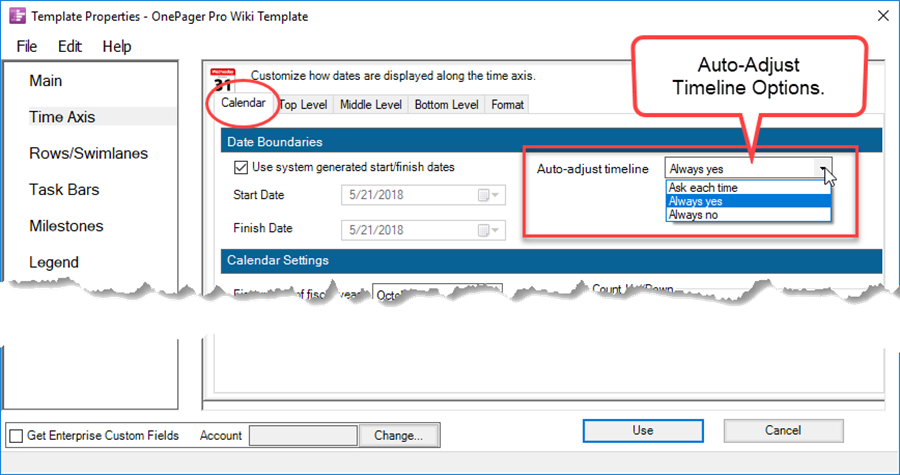
- a) The dropdown menu lets you direct OnePager Pro to automatically change the Start/Finish Date boundaries of the project view when it is re-opened or updated and finds that some tasks or milestones lie outside the original Start/Finish Date boundaries.
- b) The options are provided so that OnePager Pro either asks you each time it finds this situation, always makes the change to Start/Finish Date boundaries, or never makes the change and proceeds with the previous Start/Finish Date boundaries.
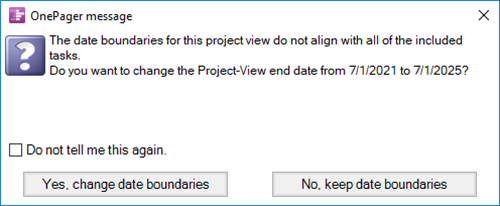
- i) If you select the first option, Ask each time, OnePager Pro displays the Message form below with the information you need to make one of the choices provided as shown in the example below:
- ii) If you select the Always yes option, the default setting, OnePager Pro automatically adjusts the Start/Finish Date boundaries for you and proceeds.
- iii) If you select Always no, OnePager Pro does not adjust the Start/Finish Date boundaries if tasks or milestones are outside the current boundaries and proceeds.
- c) OnePager can also detect that the timeline needs to be shortened as well as lengthened.
- d) OnePager Pro under the Always yes option adjusts the Start/Finish Date boundaries of the project view to smallest Tic Unit on the Time Axis (rounded to the nearest whole Tic Unit). For example, if the smallest Tic Unit of the Time Axis is Months, OnePager Pro sets the Start Date boundary at the first day of the Month and the Finish Date boundary to the last day of the Month.
- e) If the Use system generated start/finish dates checkbox is unchecked or OFF in the Template form, Time Axis tab’s Calendar sub-tab, OnePager Pro ignores the Auto-adjust timeline options.
Other Considerations
6) Copying a project view to become a Template does not fix the Start/Finish Date boundaries.
- a) Any project view, whether created from a Template with fixed Start/Finish Date boundaries or not, becomes a Template with the Use system generated start/finish dates checkbox checked ON.
- b) For more information on this process, please see the information at: Making a Template from a Project View. 24.6.1-70
7) Any Template with fixed Start/Finish Date boundaries can only be modified with respect to editing the fixed Start/Finish Date boundaries by opening the Template, assuring that the Use system generated start/finish dates checkbox is checked OFF, and then setting the new Start/Finish Date boundaries after which the revised Template form must be saved.
8) These Use system generated start/finish dates can always be edited once the project view is created by going to the PVP form’s Time Axis tab’s Calendar sub-tab in the Date Boundaries control group where you can manually edit the Start Date and Finish Date boundaries for the project view as shown below:
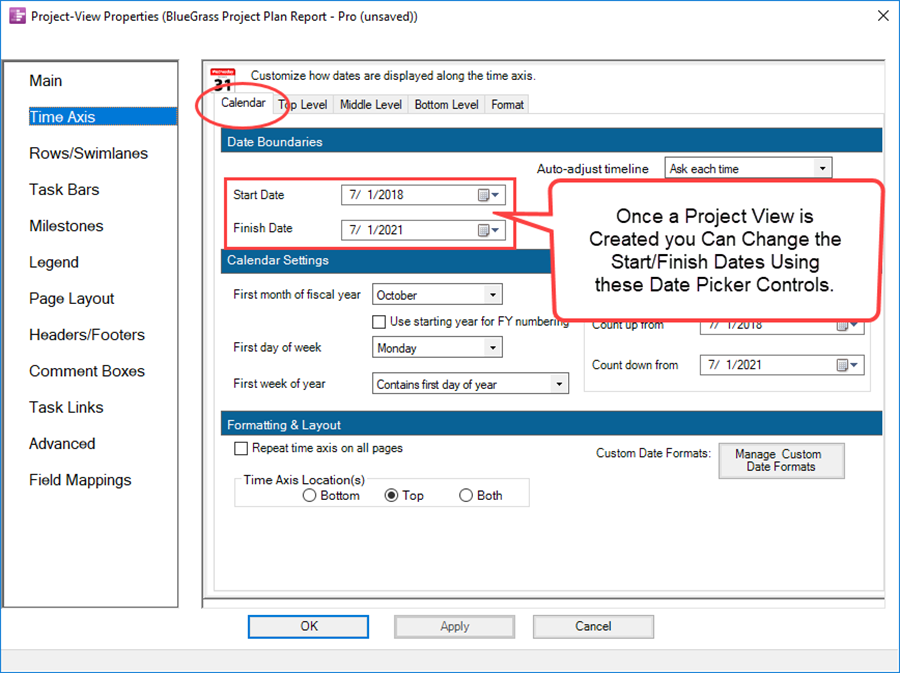
9) All other controls on this sub-tab of the Template form operate as described for the PVP form’s Time Axis tab’s Calendar sub-tab.
10) Any settings edited in the Template form Time Axis tab’s Calendar sub-tab in the Calendar Settings and Formatting & Layout control groups are populated into the PVP form’s Time Axis tab’s Calendar sub-tab and its settings in the Calendar Settings and Formatting & Layout control groups.
Editing Project-View Properties Form Start/Finish Date Settings
Start/Finish Date Settings
11) As mentioned above, initial PVP form Time Axis tab, Date Boundaries control group settings are determined in one of three ways.
- a) Typically, the Start/Finish Dates for the new project view are calculated from the task/milestone data in the source plan.
- b) Further, the Auto-adjust timeline default option in the PVP form is set to the Always no option so that source plan data drive the first setting of the Start/Finish Date boundaries for the project view as in the example below:

- c) Above, the Start Date is set to the start date of the first Quarter that the earliest task’s Start Date occupies and the Finish Date is set to the start date of the first Month following the End Date of the latest task shown in the project view as examples. The Start and Finish Date portions of the project view are shown in portions below:

12) The PVP form Time Axis tab Calendar sub-tab’s Date Boundaries control group can be used to edit the Start/Finish Date boundaries of the project view as follows:
- a) Access the PVP form by clicking the Project-View Properties button on the OnePager Pro Home tab’s ribbon and navigate to the Time Axis tab where the current Start/Finish Date boundaries controls reside.
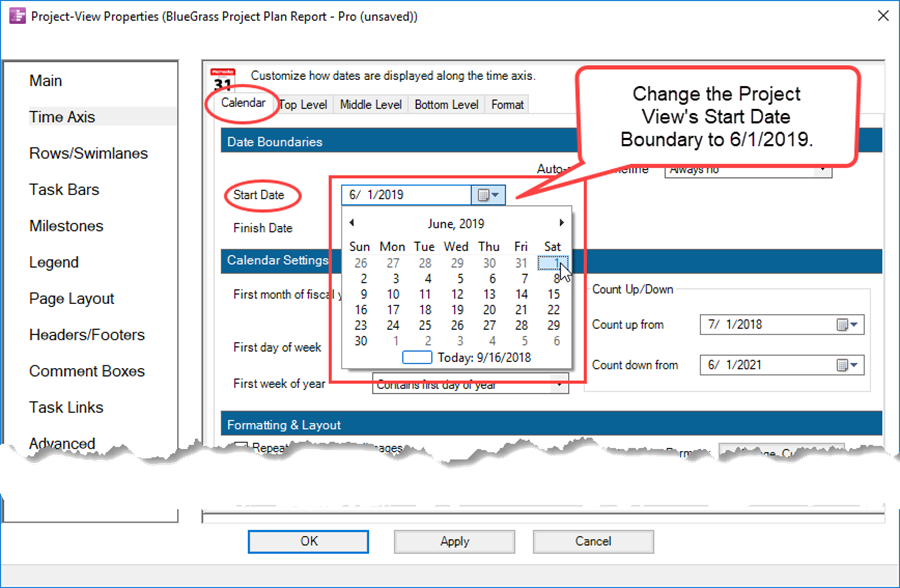
- b) Next, click the Start Date dropdown and change the Start Date to 6/1/2019 as shown here:
- c) When you click the PVP form’s Apply or OK button, the project view’s Start Date boundary moves to the right as shown here:

- d) The same set of steps can be used to edit the Finish Date boundary as well.
13) As with the discussion related to the Start/Finish Date boundaries in the Template form, any attempt to set a Finish Date earlier than a Start Date or vice versa in the PVP form’s Time Axis tab causes OnePager Pro to issue the warning message like the one shown below:

Auto-Adjust Timeline Options in the PVP Form
14) The Auto-adjust timeline dropdown options are relevant in situations where you are creating multiple snapshots or updating snapshots from your source plan where the source plan’s Start/Finish Date boundaries can change.
15) When a project view is first created, the Start/Finish Date boundary settings shown in the PVP form are set in accordance with the associated controls in the Template form.
- a) After the project view is created, the settings for the Start/Finish Date boundaries are shown and the default setting for the Auto-adjust timeline is Always yes. With this setting, OnePager Pro automatically adjusts the timeline’s Start/Finish Date boundaries if, in a new snapshot or updated snapshot, the software detects that these dates are required to change in the project view.
- b) If, after creating the project view, you use the PVP form Time Axis tab Calendar sub-tab’s controls or the ribbon’s View tab controls to change either the Start Date or Finish Date, OnePager Pro changes the default setting for the Auto-Adjust timeline to Always no. This is done because you are taking control of the Start/Finish Date boundary settings and it is presumed that you want OnePager Pro to no longer participate.
- c) Of course, you do have the ability to change the Auto-adjust timeline option to Ask each time if you desire.
16) Please see the discussion at: Auto-Adjust Timeline Options 22.3.1-70 pertaining to the control in the Template form.
Editing Start/Finish Date Settings in the Project View
17) OnePager Pro added a new control to the OnePager Pro View tab ribbon as shown below:

18) After a project view is created or updated, you can edit either the Start or Finish Date boundary or both by using these two controls and their dropdown menu as illustrated here:

19) As with the discussion related to the Start/Finish Date boundaries in the Template and PVP forms, any attempt to set a Finish Date earlier than a Start Date or vice versa causes OnePager Pro to issue the warning message like the message shown below:
Related Links
Showing Different Units of Time for OnePager Pro 22.1.1-70
Labeling Time Axis Levels for OnePager Pro 22.1.5-70
Switching Time Axis Levels for OnePager Pro 22.3.5-70
Managing the Current Template 24.6.1-70
(22.3.1-70)