Data-Driven Task Links for OnePager Express for Version 7.0
Contents
- 1 OnePager Express Enhancements for Data-Driven Task Links
- 2 OnePager Express' Template Properties and Chart Properties Forms
- 3 OnePager’s Data-Driven Task Link Import Process
- 4 Importing Data-Driven Task Links to a Chart
- 5 Using Task Link Filter Rules
- 6 Thinking About Showing and Hiding Data-Driven Task Links
- 7 Editing Data-Driven Task Links With the Task Links Properties Form
- 8 Task Links and Virtual Summary Tasks
- 9 Task Links and Absorbing Tasks
- 10 Changes to Task Links when Moving Task/Milestones, Rows, or Swimlanes
- 11 Behavior of Data-Driven Task Links When Adding or Replacing Snapshots
- 12 Saving OnePager Express 7.0 Charts to Previous Versions
- 13 Opening Previous Versions of OnePager using OnePager 7.0
- 14 Other Topics
- 14.1 Task Link Property Edits that Cause Connection Line Re-Routing
- 14.2 Deleting or Changing Predecessor Data in Your Source Plans
- 14.3 Source Plan Tasks and Data-Driven Task Links
- 15 Related Links
OnePager Express Enhancements for Data-Driven Task Links
OnePager Express can now import Dependency values on tasks from Microsoft Excel source plans where the syntax format selection for specifying predecessor relationships corresponds to the Microsoft Project standards or the syntax format selection used by Oracle’s Primavera P6.
OnePager Express is designed to process Task Links that are specified as predecessors ONLY.
OnePager Express' Template Properties and Chart Properties Forms
The implementation of Data-driven Task Links and enhancements made to manual Task Links required enhancements to the OnePager Express Template Properties and Chart Properties form’s Event tabs. This Event Links tab is renamed as the Task Links tab in both forms with enhanced controls to support the new capabilities of Data-driven Task Links.
Before going further into this article, it is recommended that you first review the article at: Linking Task and Milestone Using Manual and Data-Driven Task Links (Portal)
The Template Properties Form's Task Links Tab for OnePager Pro
The Template Properties form Task Links tab for OnePager Express is a little different from that of OnePager Pro since Microsoft Excel source plans do not have a unique field defined for Predecessors or Successors. In the Template Properties form’s Task Links tab, the Import predecessors checkbox is normally unchecked or OFF meaning that the Data-driven Task Link import feature is turned OFF. For Microsoft Excel source plans, you must tell OnePager Express which field in your source plan to use and what syntax format selection to use for the Predecessors field’s format.
The Template Properties form’s Task Link tab for OnePager Express is shown below with the dropdown menu of possible Predecessor source plan fields:
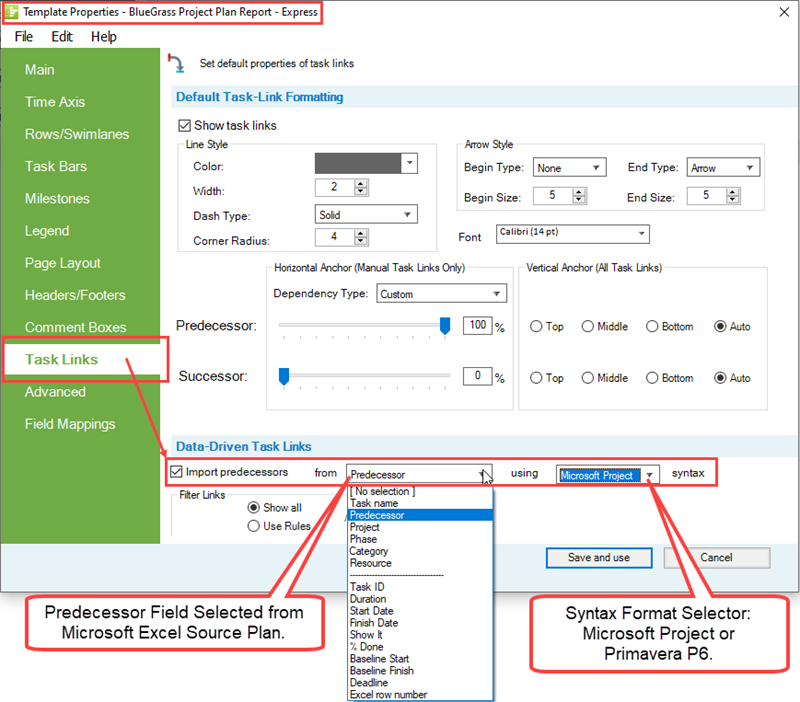
The OnePager Express Template Properties form Task Link tab picks up the list of possible Predecessor fields if a Microsoft Excel source plan is loaded. Otherwise the dropdown list is minimized if no source plan is loaded.
There are two syntax format selections for Microsoft Excel source plans. These are:
- 1) The standard Microsoft Project Predecessor/Successor field syntax, or
- 2) The Oracle Primavera P6 Predecessor syntax.
OnePager Express assumes that the designated Predecessors field from the Microsoft Excel source plan is used for the Data-driven Task Link information source. OnePager Express only imports predecessor data from the designated Microsoft Excel predecessor field. Although OnePager Express does not import Successor data from your source plan, successor information is the inverse on predecessor information found in your source plan. This approach guaranties that all your Data-driven Task Links are based on valid information from your Microsoft Excel source plan.
Template Properties Form’s Task Link Tab’s Controls
OnePager Express supports the visual representation of all four Task Link Dependency Types including Finish-to-Start (FS), Finish-to-Finish (FF), Start-to-Finish (SF), and Start-to-Start (SS) with proper Begin and End point shape placement on the Predecessor and Successor task bars/milestone symbols. It is assumed that if Data-driven Task Links are imported they are to be shown so the Show task links checkbox is checked ON. Additionally in the Default Task-Link Formatting control group shown above, there are established settings for Line Styles, Arrow Styles, and Font properties
There are controls available to globally set the Horizontal Anchor positions for manual Task Link’s Begin and End point shapes for all Dependency Types along the Predecessor or Successor task’s timespan as shown by the slider bars in the illustration above. For all Task Links (manual and Data-driven) you are able to globally set the Vertical Anchor positions of a Task Link’s Begin and End point shapes on the Top, Middle, or Bottom of the Predecessor and Successor task/milestone.
You can choose to let OnePager determine the Vertical Anchor positions by selecting the Auto options. In the Data-Driven Task Links control group shown above, the default setting for the Import predecessors checkbox is unchecked or OFF. This is done so that new charts are not created with all available Data-driven Task Links information imported and shown unless you specifically direct such an action through the Template Properties form. You are given the opportunity to import Data-driven Task Links information using the same controls in the Chart Properties form’s Task Links tab in the Data-Driven Task Links control group after the chart is created.
When the Import predecessors checkbox is checked ON in the Template Properties form’s Task Link tab, you have the option to Show all Data-driven Task Links or use the Task Link Filer Rules capability by clicking the Use Rules radio button. Selecting the Use Rules radio button enables the Manage Rules button which is used to access the Task Link Filter Rules form. This form allows you to establish a set of rules to govern how Data-driven Task Links are shown.
Controls for Importing Task Link Data
In the Template Properties form’s Task Links tab, the Import predecessors checkbox is normally unchecked or OFF meaning that the Data-driven Task Link import feature is turned OFF. The OnePager Express Chart Properties form Task Links tab picks up the list of possible Predecessor fields if a Microsoft Excel source plan is loaded.
It makes an attempt to pick an available Microsoft Excel field that most closely resembles a predecessor field for the chart.
The same two syntax format selection choices for Microsoft Excel source plans are available in the Chart Properties form Task Links tab. These are:
- 1) The standard Microsoft Project Predecessor/Successor field syntax, or
- 2) The Oracle Primavera P6 Predecessor syntax.
For more information on Task Link Filtering Rules, please see the article at: Using Task Link Filtering Rules for Showing/Hiding Task Links for OnePager Express
The Chart Properties Task Links Tab for OnePager Express
The Chart Properties form’s Task Links tab is almost identical to that in the Template Properties form and is shown below:
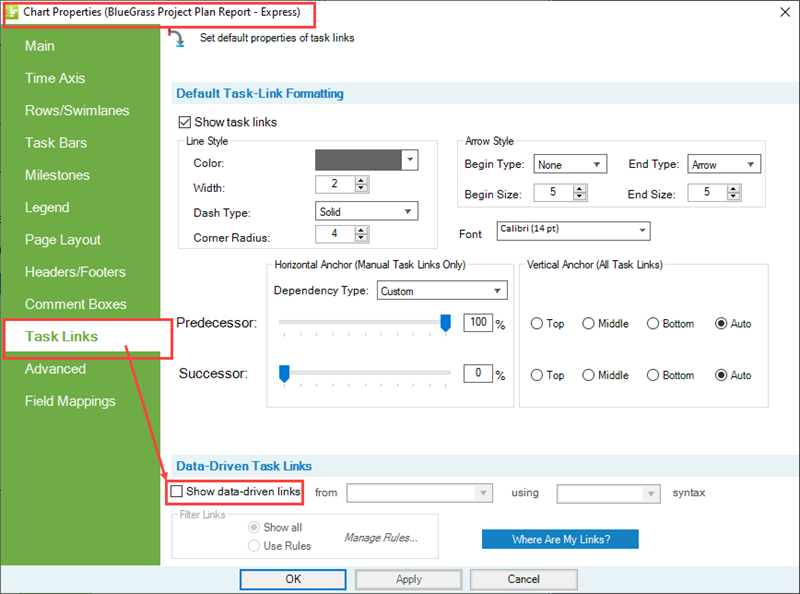
In the Chart Properties form’s Task Links tab’s Data-driven Task Links control group shown above, the Import and show links checkbox is normally unchecked or OFF. The Import and show links checkbox is disabled in the Chart Properties form until the Show task links checkbox at the top of the form is checked ON. Checking the Import and show links checkbox to ON when its enabled and then clicking the OK button imports the Data-driven Task Links from the Microsoft Excel source plan and displays them in the chart.
Checking the Import and show links checkbox ON also enables the from and using windows so that you can tell OnePager Express the source of Task Link data to be imported. After Data-driven Task Links are imported and showing in the chart, you have the option with the Chart Properties form's Task Links tab to control the further showing or hiding of all Data-driven Task Links with the renamed Show data-driven links checkbox as shown below:
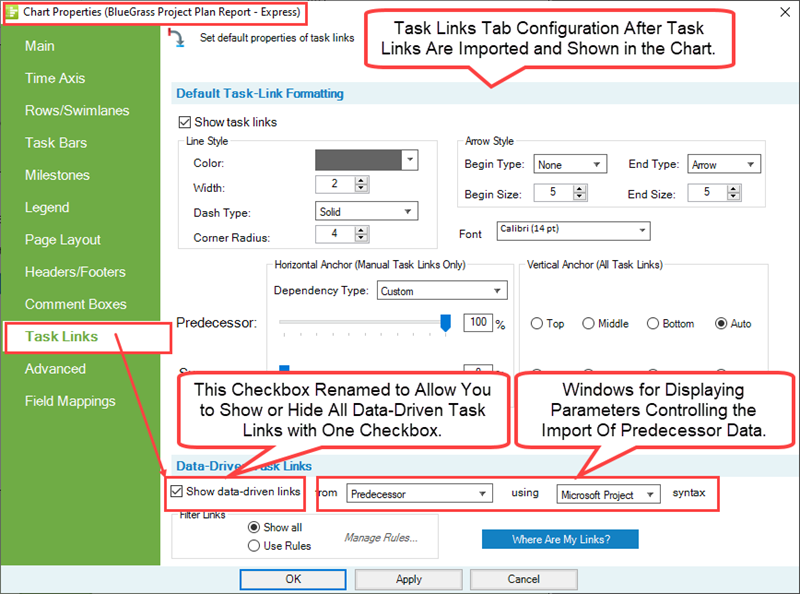
Checking the Show data-driven links checkbox ON shows all imported Data-driven Task Links while checking this checkbox OFF hides all Data-driven Task Links. If the Import predecessors checkbox is checked ON in the Template Properties form Task Links tab’s Data-driven Task Links control group, Data-driven Task Links are imported and the corresponding checkbox in the Chart Properties form’s Task Links tab is also checked ON.
Chart Properties Form’s Task Link Tab’s Controls
The controls in the Chart Properties form Task Link tab’s Default Task-Link Formatting control group are the same as the controls in the Template Properties form Task Link tab’s Default Task Link Formatting control group for One Pager Express. The differences in Task Link tab are only in the Data-Driven Task Links control groups for OnePager Express.
For more information for using the OnePager Express Chart Properties form's Task Links tab's controls, please see the article at: Editing Task Links with the Chart Properties Form for OnePager Express
OnePager’s Data-Driven Task Link Import Process
Below is a brief overview of the OnePager Express import process for Data-driven Task Links.
Capabilities
OnePager Express can import standard predecessor field data from Microsoft Excel source plans and show them in a chart totally under your control. The capability to show Data-driven Task Links imported from your source plans can present some significant opportunities for helping to tell your schedule story. You can use Data-driven Task Links directly imported from your source plans without needing to manually create them.
OnePager Express ONLY imports available Dependency data from source plans when you turn the Task Links feature ON (i.e., Check the Import predecessors checkbox ON in the Template Properties form Task Link tab’s Data-driven Task Links control group). You can later, after the chart is created, import data-driven Task Links by going to the Chart Properties form Task Links tab and checking the Show data-driven links checkbox ON and specifying if you want to Show all data-driven Task Links or use Task Link Filter rules to selectively show imported data-driven Task Links. You have the capability to individually control the showing or hiding of Data-driven Task Links. You have the capability to individually edit the properties of Data-driven and manual Task Links.
Cautions and Challenges
These capabilities, however, present some challenges.
Showing too many Data-driven Task Links clutters the chart; potentially concealing important information. Too many Data-driven Task Links can make graphics potentially difficult for your audiences to see. The OnePager Task Links capability is designed to cope with these challenges through several mechanisms. By default, OnePager Express is typically launched with the Data-driven Task Link feature turned OFF. The default Off setting approach prevents the creation of a cluttered chart initially or a cluttered snapshot further on when the original chart is updated.
OnePager Express ONLY imports available Dependency data from your source plan when the feature is turned ON in either the Template Properties or Chart Properties form. Additionally, OnePager Express does not show any Data-driven Task Links unless their associated task bars/milestone symbols are Flagged for import and are within the chart's Start/Finish Date boundaries.
The Task Links tabs, is an addition to the Template Properties and Chart Properties forms so you have global control over all Task Links properties globally and in the chart. Any Task Link, either manual or Data-driven can be individually selected and edited in the chart.
Manually editing any Task Link turns it into a maverick Task Link. You have the capability to easily construct a Daisy Chain of manual Task Links. After carefully determining how many and which Task Links to show in your schedule discussion chart, you can set the Task Links feature ON. You can use the Task Link feature’s editing controls to determine which Task Links to show or hide and how they should look.
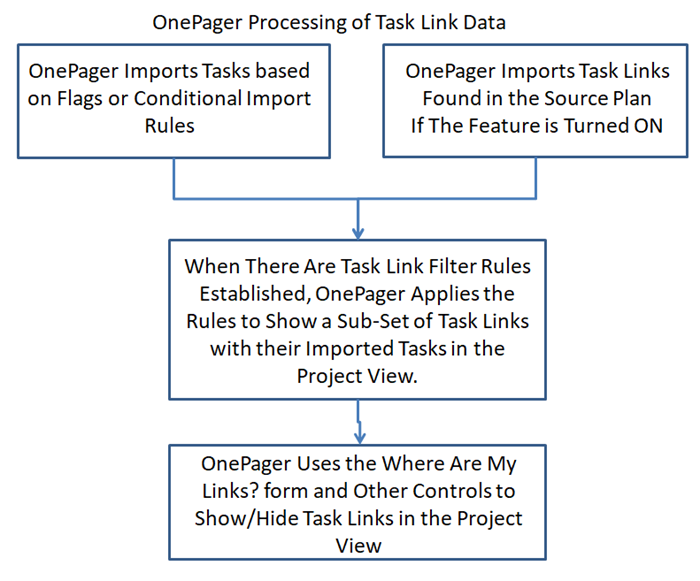
Import Process Summary
The flow chart below shows, in general, how OnePager processes data-driven Task Links with imported task/milestones under your control:
Importing Data-Driven Task Links to a Chart
Chart Properties Form Settings
The Chart Properties form Task Links tab’s Import and show links checkbox, like the corresponding Import predecessors checkbox in the Template Properties form, is unchecked or OFF. If you decide to check the Import and show links checkbox ON after the chart is created and click the OK button on the Chart Properties form, OnePager Express goes to the source plan and imports the Data-driven Task Links information and shows them. Subsequent accesses to the Chart Properties form’s Task Links tab show the form changed as highlighted below:

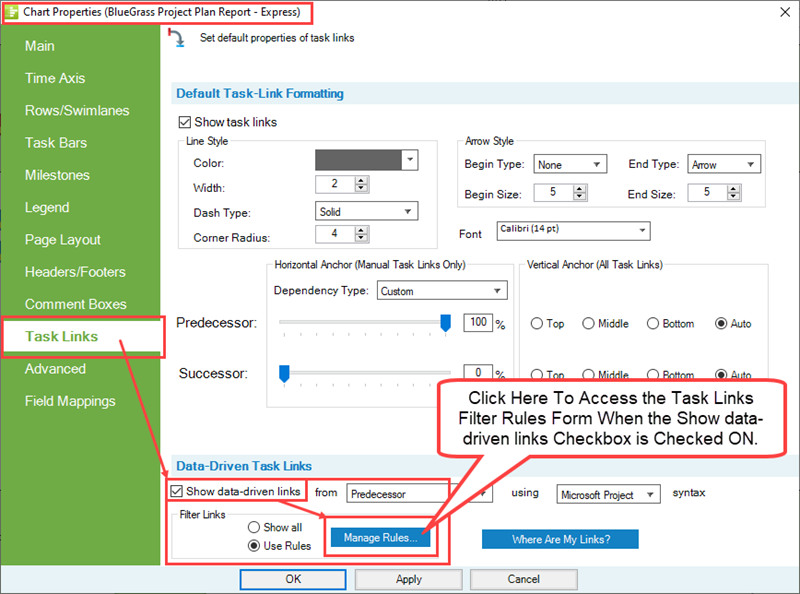
As shown above, the checkbox is now focused on showing or hiding Data-driven Task Links as the predecessor data are already imported. Unchecking the Show data-driven links checkbox OFF as it is now labeled hides all Data-driven Task Links once you click the Apply or OK button on the Chart Properties form. Although hidden, the Data-driven Task Links can be re-shown by rechecking the Show data-driven links checkbox ON and again clicking the OK button on the Chart Properties form. There is an additional control in the Data-driven Task Links control group in the Chart Properties form Task Link tab – the Where Are My Links? button as shown in the Chart Properties form’s Task Links tab above.
Tracking Task Links with the Where Are My Links? Form
OnePager provides a form that records all Task Links both Data-driven and manual associated with the chart. This form, called the Where Are My Links? form can be accessed from the OnePager ribbon's Home tab by clicking the Show/Hide dropdown in the Editing control group on the tab as shown below:

Clicking the Where Are My Links? command accesses the form as shown below:
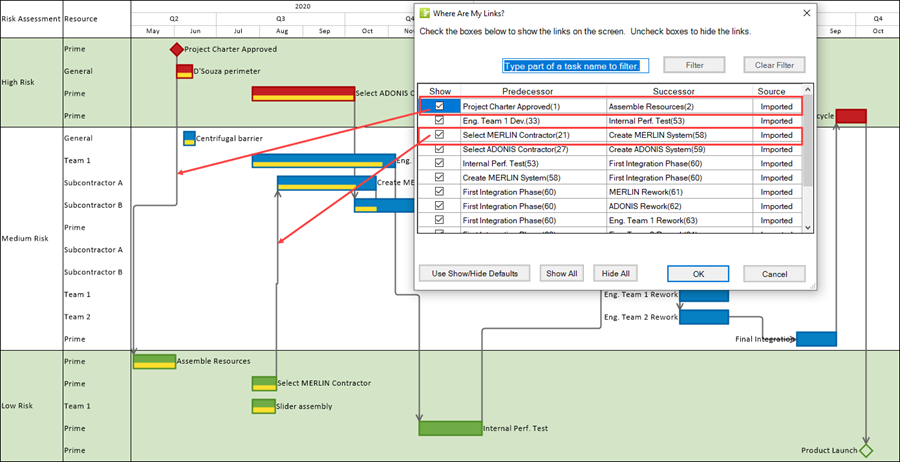
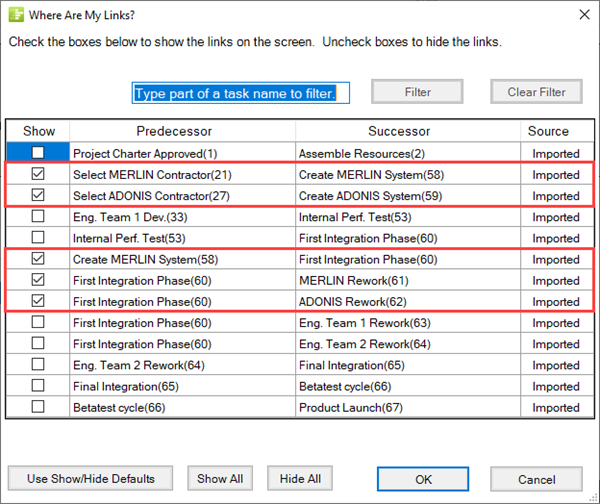
The form above has an entry for each Data-driven Task Link and manual Task Link in the snapshot. If the Task Link is shown in the snapshot, the checkbox in the Show column is checked ON. The source plan names and Task ID of each pair of Predecessor and Successor task bars are shown in the form and the last column (Source) tells you if the Task Link was imported as a Data-driven Task Link or created as a manual Task Link. You can use the checkboxes in the Show column to edit the show/hide status of any entry in the form. Un-checking an entry’s Show column checkbox OFF hides the Task Link once you’ve clicked the OK button at the bottom of the form.
The four (4) columns in the form can be sorted by clicking on the column’s header.
Sorting on the Show column means that you are sorting between checked and unchecked entries.
Sorting on the Predecessor or Successor columns means that you are sorting alphanumerically on the contents of the entire field. Because of the relationship between these two columns, sorting on the Predecessor column, for example, brings along the corresponding Successor entry and vice versa.
Sorting on the Source column means that you are sorting between Imported and Manual entries.
The three buttons at the bottom of the Where Are My Links? form are shortcut buttons which operates as follows:
- 1) Use Show/Hide Defaults: When this button is clicked all Task Links in the snapshot have their properties reverted to the global settings in the Chart Properties form’s Task Links tab.
- 2) Show All: Clicking this button makes all Task Links visible by setting the entire Show column’s checkboxes to check ON.
- 3) Hide All: Clicking this button hides all Task Links by setting the entire Show column’s checkboxes to unchecked or OFF.
The contents in the Where Are My Links? form are specific to each snapshot as Task Links are snapshot-dependent. Given the Microsoft Excel based BlueGrass Project Plan Report - Express being used here and the set of Task Links contained and shown in the Where Are My Links? form above, the chart looks like this:
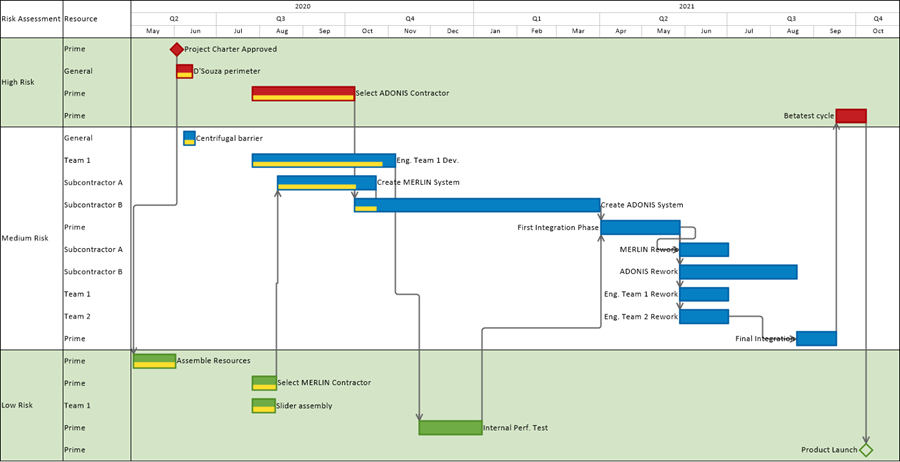
Data-driven Task Links are shown in a color based upon the default settings established in the distributed Template Properties forms and carried forward to the Chart Properties form when this chart is created.
OnePager does its best to position the Predecessor to Successor connection lines to avoid overlapping other graphics. Task Links are shown behind task bars/milestone symbols but in front of task bar/milestone symbol labels. This positioning of Task Links in the Z-Levels can be edited. You also have the capability to manually select individual Data-driven Task Links and use drag and drop techniques to route the connection lines between pairs of task bars/milestone symbols.
Using Task Link Filter Rules
Since some Microsoft Excel source plans can be fully constrained, that is, have many tasks with Predecessor data, importing all Data-driven Task Links can lead to a cluttered chart. Additionally, showing all Data-driven Task Links might distract from the goals of your schedule conversation.
Accessing the Task Link Filter Rules Form
To deal with this, OnePager has a Task Link Filtering rule capability that allows you to establish conditions under which Data-driven Task Links are shown as described below:
You have options in the Chart Editor to show all Data-driven Task Links, show only those that meet your specified Task Link Filtering rules conditions or show only those Task Links that you specifically desire to show. The Task Link Filter Rules form is provided for you to add, edit, and delete your Task Link Filter rules to control showing or hiding of individual Task Links. The Task Link Filter Rules form is accessed by going to the Chart Properties form’s Task Links tab and first clicking the Use Rules radio button in the Data-driven Task Links control group and then clicking the Manage Rules button as shown here:
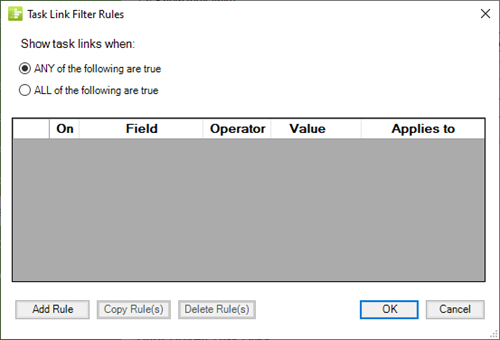
The Task Link Filter Rules form is shown below:
Example
To demonstrate this capability, suppose you want to only show Data-driven Task Links that relate to the ADONIS and MERLIN Subcontractor’s activities in the BlueGrass Project Plan Report – Express chart. First, the chart with all the Data-driven Task Links showing looks like this with some adjustment made to row height:

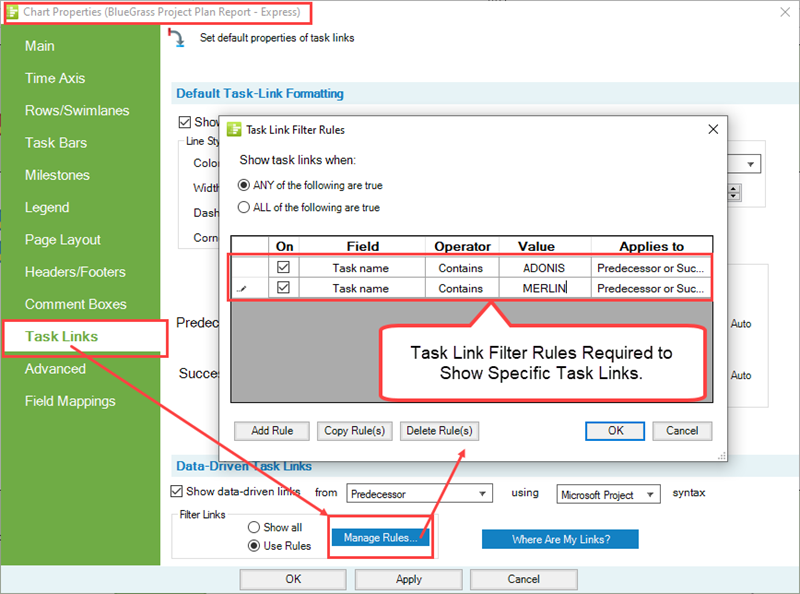
Next, go to the Chart Properties form Task Links tab and first checking the Use Rules radio button followed by clicking the Manage Rules... button. Shown in the form below are the two rules needed to filter Data-driven Task Links and restrict the showing of Data-driven Task Links to only those tasks/milestones involving the ADONIS and MERLIN Subcontractors:
When you click the OK button on the Task Link Filter Rules form and click either the Apply or OK button on the Chart Properties form, the resulting chart looks like this with a little adjustment made to row height:
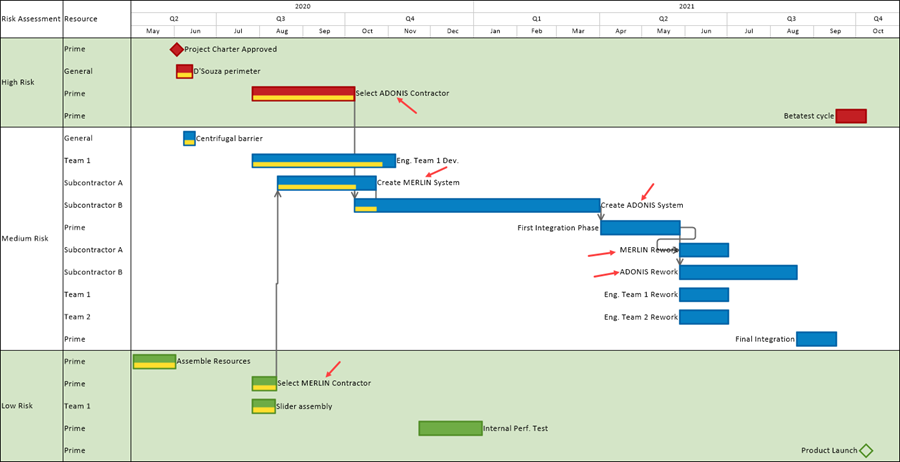
The chart above is less cluttered and focused on those tasks/milestones (both Predecessor and Successor) that apply to the two subcontractors of interest.
Note further that the individual Data-driven Task Link manual editing features are used in the above chart to assure that the Data-driven Task Links involved show their connection line routing clearly between predecessor and successor. Finally, if you look at the Where Are My Links? form you can see which entries are shown and which are hidden:
Globally Editing With Task Link Filter Rules
In the Template Properties Form
You can establish Task Link properties in the Template Properties form’s Task Links tab as mentioned above. These Task Link properties are applied to all charts created with the Template Properties. What is important to note with OnePager is that you have the option in the Template Properties form’s Task Link tab to define Task Link Filter rules prior to creating any chart. As long as the defined Task Link Filter rules remain defined in the Template Properties form, these rules are always applied as the chart is initially created.
A sample Template Properties form with defined Task Link Filter rules is shown below:
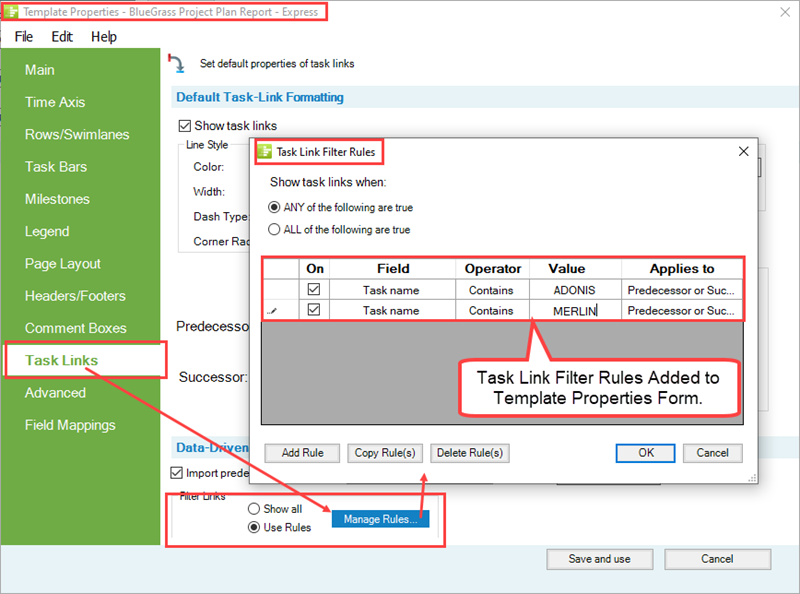
To access the Task Link Filter Rules form, the Import predecessors checkbox must be checked ON, and the Use Rules radio button selected. This enables the Manage Rules… button so you can click it and access the Task Link Filter Rules form. Use the Add Rules, Copy Rule(s), and Delete Rules(s) buttons to create and manage your rule entries. Any Microsoft Excel field imported by OnePager Express can be used in the Field column of the above form.
The Operator and Value columns are tailored to the type of the Field column selection and the dropdowns are provided accordingly.
The Applies to column lets you select if you want the rule to apply to only Predecessor task, Successor task, or both.
The Show task links when: set of radio buttons allow you to establish either an OR relationship between the active Task Link Filter rules or an AND relationship between the rules.
This operates the same as with the Conditional Import Rules form. When you have the rules defined, click the OK button on the Task Link Filter Rules form and the Save and use button on the Template Properties form to save the rules and other Template Properties form settings. When this Template Properties form is used to create a chart, the settings pertaining to Task Links are incorporated into the Chart Properties form of the chart and can be refined once the chart is created as noted in the next section.
In the Chart Properties Form
As mentioned above, the Chart Properties form takes its initial Task Link settings from the Template Properties form used to create the initial chart. Task Link property settings can be edited at any time after the chart is created by accessing the Chart Properties form’s Task Links tab and making the setting edits desired. Once the edits are applied, they are incorporated into the chart.
This also applies to Task Link Filter rules. Task Link Filtering is applied to the chart when it is created if the Template Properties form’s Task Links tab was set up with Task Link Filtering rules. Once the chart is created you can access the Chart Properties form’s Task Link tab and edit any Task Link Filtering rules. When you make such an edit, click OK in the Chart Properties form’s Task Link Filter Rules form and click Apply or OK in the Chart Properties form. OnePager goes back to the source plan and re-imports the source plan’s Predecessor information and applies the Task Link Filter rules from the Chart Properties form. If you edit Task Link Filter rules in the Chart Properties form’s Task Link tab, the modified Task Link Filer rules remain in effect for each subsequent snapshot created for the chart. As with any other settings in the Chart Properties form you can edit the settings in the Task Links tab without impacting the settings made to the original Template Properties form.
For more detailed information on Task Link Filter rules, please see the article at: Using Task Link Filtering Rules for Showing/Hiding Task Links for OnePager Express
Thinking About Showing and Hiding Data-Driven Task Links
There are five (5) operational considerations to keep in mind when showing Task Links using the Data-driven Task Link feature.
The Default Setting is OFF
The feature is by default turned OFF in all OnePager distributed Template Properties and must be specifically turned ON for the feature to operate. The Import predecessors checkbox in the Data-driven Task Links control group shown in the Template Properties form’s Task Link tab is for this purpose.
When to Turn the Feature ON or OFF
Your decision to turn the feature ON or OFF can be made before or after charts are created and even after several snapshots are added.
Task Links are Snapshot-Dependent
Data-driven Task Links and manual Task Links are snapshot-dependent.
Formatting of Task Links is consistent across all snapshots, but you do have the ability to show or hide individual Task Links differently between snapshots.
Import Conventions
For Data-driven Task Links to show, both the predecessor and successor tasks must be imported and at least partially within the chart’s Start/Finish Dates boundaries. OnePager shows Data-driven Task Links between task bars that are partially visible in the chart. OnePager also shows Data-driven Task Links to off-page task bars/milestone symbols as long as one of the pair of predecessor/successor task imported is within the chart’s Start/Finish Dates boundaries.
OnePager Does Not Handle Lag Times
Please note that lag times do not change the appearance of Data-driven Task Link visualizations.
Editing Data-Driven Task Links With the Task Links Properties Form
Discussed above was an overview of editing Data-driven Task Links globally using the Template Properties or Chart Properties forms. Individual Data-driven Task Links can be edited in the Chart Editor by first selecting the Data-driven Task Link with a right click to access its task link right-click context menu and then clicking the Properties... command as shown below:

The Task Link Properties form is discussed below along with the methods available for selecting Task Links for editing. The controls in for editing Task Links globally with the Template Properties and Chart Properties forms and editing individual Task Links with the Task Link Properties form are the same.
For more information on editing individual Task Links for the Chart Properties form, please see the article at: Editing Task Links with the Chart Properties Form for OnePager Express
The Task Link Properties Form
Once Data-driven Task Links are imported and shown. they can individually be selected and edited as mentioned earlier with a combination of the right-click to access the task link right-click context menu and a click on the Properties … command to access the Task Link Properties form shown below:
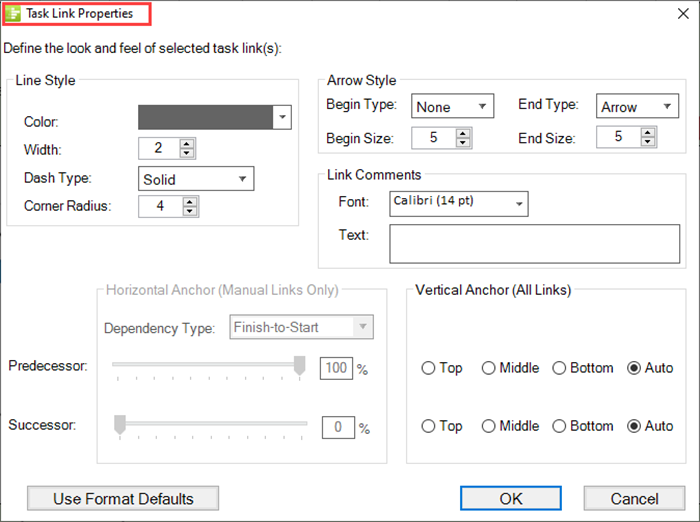
The Task Links Properties form contains the same controls for editing Task Links as shown above in the Template Properties and Chart Properties forms. When edits are made in the Task Links Properties form and the OK button at the bottom of the for is clicked, the edits are applied to the selected Task Links only. When you do this, the selected and edited Task Links are considered mavericks and the rules for snapshot-dependency applies. You can restore a maverick Task Link(s) later by selecting them and clicking the Use Format Defaults button at the bottom of the Task Link Properties form and clicking OK.
Selecting and Re-Positioning Individual Task Links
You can individually select a Data-driven Task Link which, depending on its connection line routing, displays green and/or yellow grab points for your mouse. The green grab points are Begin and End point shapes for the Task Link and the yellow grab points are points where you can use your mouse to drag and drop the connection line as shown here with a slight change in the organization of the example chart:

Using the yellow grab points you can make manual adjustments to the connection line routing of a Data-driven Task Link as demonstrated below:

The green grab points are used to re-position the Begin and End point shapes of the Data-driven Task Link on its Predecessor or Successor task bar/milestone symbol as shown below:

Making these and other manual edits to an individual Task Link makes the Task Link a maverick. As shown in the Task Link Properties form above, a maverick Task Link can be restored to the default settings in the Chart Properties form by clicking the Use Format Defaults button provided in the form.
Selecting Multiple Task Links
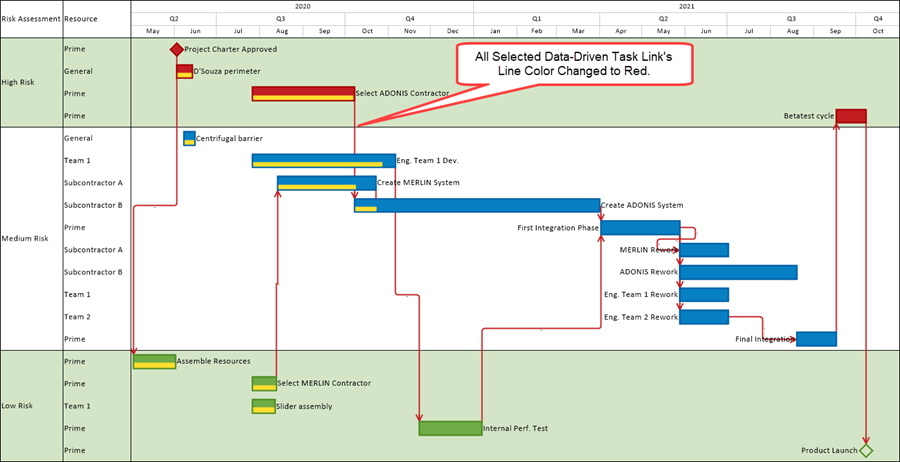
You can use your mouse to select multiple Task Links for editing using the same procedures as used to select multiple task bars/milestone symbols, Rows, Swimlanes, and Time Axis Level Cells by combining the pointing of your mouse to the Task Link in combination with the CTL+Left-Click. The SHIFT+Left-Click operation is not enabled for selecting Task Links. The CTL+Left-Click technique is recommended if you want to edit the Task Link properties of multiple (but not all) Task Links such as their connection line color, arrow head shape, or connection line dash type, for example.
Since Task Link connection lines are generally not configured or routed the same, it is not possible to select multiple Task Links and use the drag and drop method on the connection lines to reroute them manually. As an example, suppose you have the BlueGrass Project Plan Report – Express chart with all Data-driven Task Links showing as illustrated above. Using your mouse with the CTL+Left-Click selects several Data-driven Task Links.
When the first Task Link is selected, it is highlighted with green grab points at the Begin and End point shapes and yellow grab points along the connection line if the routing has multiple corners. When you select the second, third, and so on Task Link using this method, the selected multiple Task Links are highlighted with only green grab points as shown below:
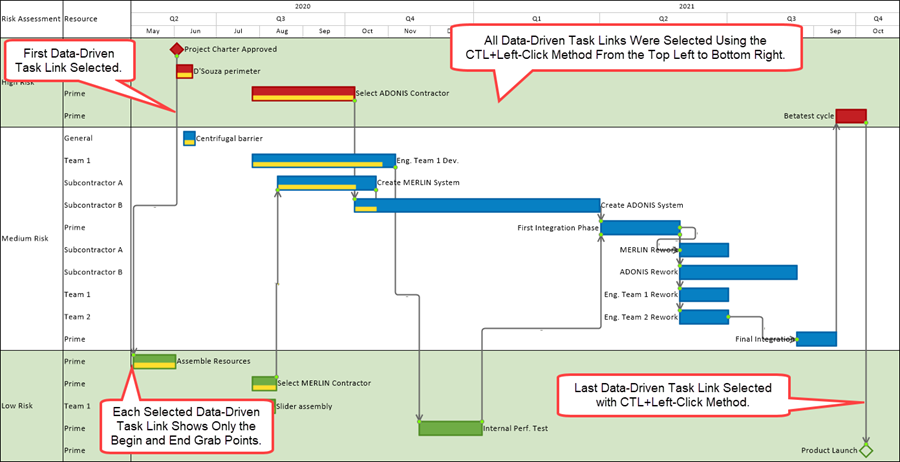
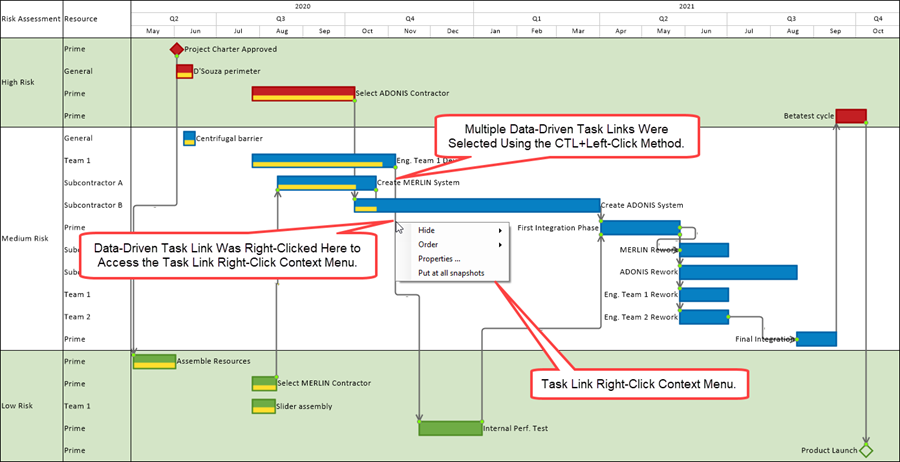
When multiple Task Links are selected they cannot be re-positioned although you can access the task link right-click context menu and use the context menu commands that apply to all selected multiple Task Links. When multiple Task Links are selected and one or more are mavericks, meaning that their properties differ, if you access the Task Link Properties form, the content windows and setting in the form appear null where there are different settings among the selected multiple Task Links.
Making any edits to the selected multiple Task Links applies the edit to all selected Task Links.
The Task Link Right-Click Context Menu
To edit selected Task Links, right-click on any of the Task Links to access the task link right-click context menu and click on the desired command as shown here:
Properties ... Command
If you click the Properties … command, the Task Link Properties form appears as shown here:
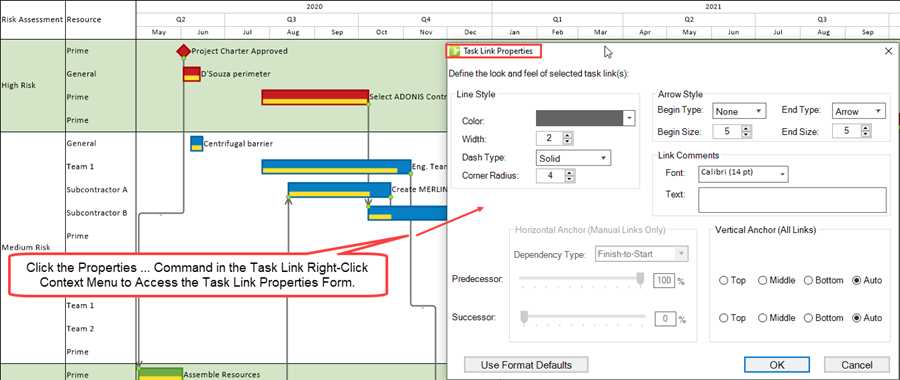
To complete the example, you can edit the Color: dropdown in the Line Style sub-group to red and click OK on the form and get the result shown below:
Hide Commands
The task link right-click context menu's Hide command permits you to hide the Task Link in either At this snapshot or At all snapshots. The Hide command as used with Task Links operates the same way as with Free boxes.
Order Task Link Context Menu Commands
The task link right-click context menu's Order command permits you to order the Task Link within the Z-Levels in a manner similar to how Free boxes and Comment boxes are ordered in the chart. As with Order commands used throughout OnePager, there are four (4) options available: Bring to front. Send to back, Bring forward, and Send backward.
Put in all Snapshots Command
The task link right-click context menu's Put in all snapshots command also operates in the same way as the corresponding commands for the Free box and the Comment box.
After Completing Edits Using the Task Link Right-Click Context Menu
After completing the edit operation above, the selected Task Links remain selected in case you want to make more edits. Clicking anywhere in open space disables the selections. Using this technique, you can select multiple Data-driven Task Links as well as manual Task Links in one multiple selection operation and perform edits on all selected Task Links. Making any formatting edits to Task Links either singly or in a multiple selection operation makes them Task Links mavericks. You can restore multiply selected Task Links back to their default formatting by accessing the Task Links Properties form shown above and clicking the Use Format Defaults button followed by clicking the OK button.
The Select all Task Links Command in the Home Ribbon
There is a feature available for you to select all Task Links shown in the chart. This handy feature uses the OnePager Express ribbon’s Home tab. To select all Task Links (data-driven and manual) in one operation, go to the OnePager Express ribbon’s Home tab in the Editing group and click the Select all dropdown and then click the Task Links option as shown below:

This action highlights (selects) all visible Task Links. If you right-click on any selected Task Link to access the task link right-click context menu (depending on the Task Link type you right-clicked), you can access the Task Link Properties form and edit all the selected Task Link in one operation or used the commands in the task link right-click context menu.
Task Links and Virtual Summary Tasks
As a review, a Virtual Summary Task (VST) is a summary task created by OnePager that does not exist in a Microsoft Excel source plan. It represents the Start date and End date of two or more constituent task bars or milestone symbols. In this respect the VST is a OnePager Summary task.
For more information on creating and using the VST feature, please see the article at: Creating and Managing Virtual Summary Tasks
When OnePager creates a VST, it computes the Start and End Dates of a VST as its constituent task bar dates change from snapshot to snapshot. It also constructs Baselines, Percent Complete Bars, and Critical Path Segments for task bars being summarized. When Task Links exist on constituent task bars (whether manual or Data-driven Task Links), and those constituent task bars are turned into a VST, the Task Links become hidden. Upon Unmaking the VST, the Task Links are again shown with their constituent task bars. When Task Links are added to a VST (which can only be done with manual Task Links), and that VST is then broken up (i.e., unmade), the manual Task Links previously created are deleted permanently.
Task Links and Absorbing Tasks
A review of the OnePager Absorption feature is provided here. The idea is to absorb one task bar or milestone symbol into another task bar or milestone symbol, leaving behind a Comment box (or perhaps several Comment boxes) to indicate the presence of the Absorbed task bars/milestone symbols.
For more information on Absorbing one task into another, please see the article at: Absorbing one task into another for instructions on how to perform the absorption function.
In addition, to properly use the function, there are two control options found in the Template and Chart Properties form at the Advanced tab in the Display options group of controls called Allow absorption and Show absorbed dates checkboxes as shown below:
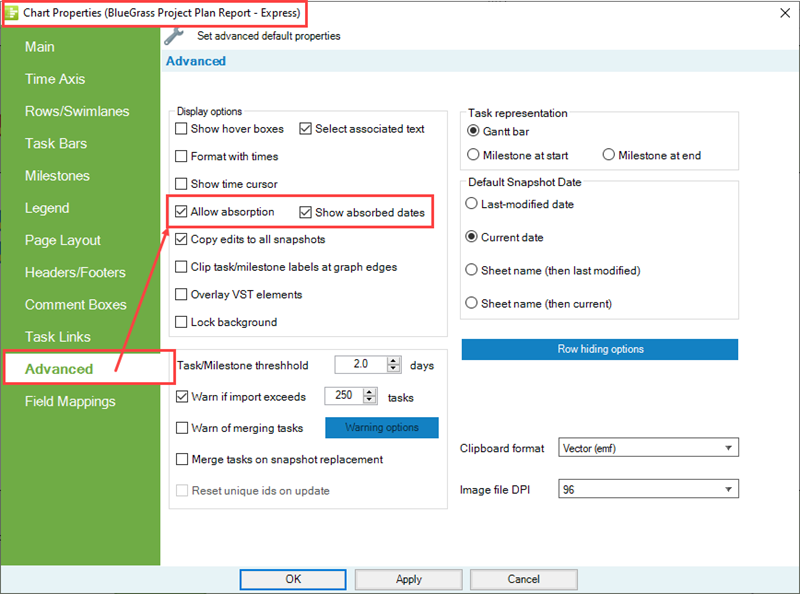
The Allow absorption checkbox must be checked ON for the absorb feature to operate. The Show absorbed dates checkbox tells OnePager to access the Absorption Options form so you can select where to attach the replacement Comment box: At end date, At start date, or At both start and end date.
For more information on Advanced tab's controls, please see the article at: Advanced Tab-OnePager Express
When Task Links exist on constituent task bars/milestone symbols being Absorbed (whether manual or Data-driven Task Links), their Task Links become hidden. Upon Unabsorbing the constituent task bars/milestone symbols, the Task Links are again shown with their constituent task bars. Any Task Links that are attached to the task bars/milestone symbols receiving the Absorbed task bars/milestone symbols remain showing.
When the Unabsorb task command is executed, the Task Links on the task bars/milestone symbols receiving the Absorbed task bars/milestone symbols remain showing. When Task Links are added to a task bar/milestone symbol that was Absorbed into (which can only be done with manual Task Links), and that Absorbed task bar/milestone symbol construct is later broken down (i.e., using the Unabsorb task command), the manual Task Links previously created on the Absorbed into task bar/milestone symbol remains showing. It is not possible to add a manual Task Link to a constituent task bar/milestone symbol that was Absorbed because that absorbed task bar/milestone symbol are only represented by a Comment Box after the Absorb function is complete.
Changes to Task Links when Moving Task/Milestones, Rows, or Swimlanes
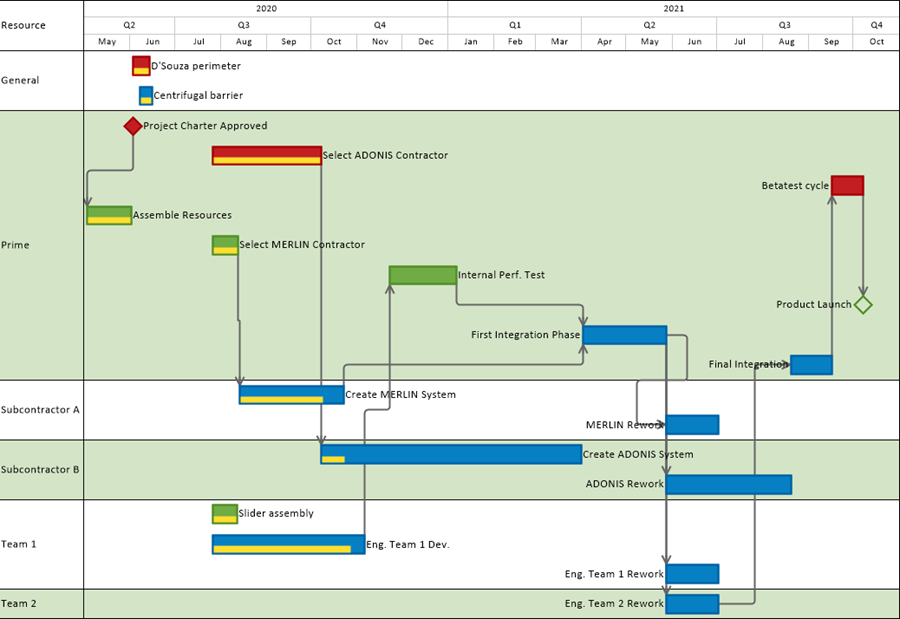
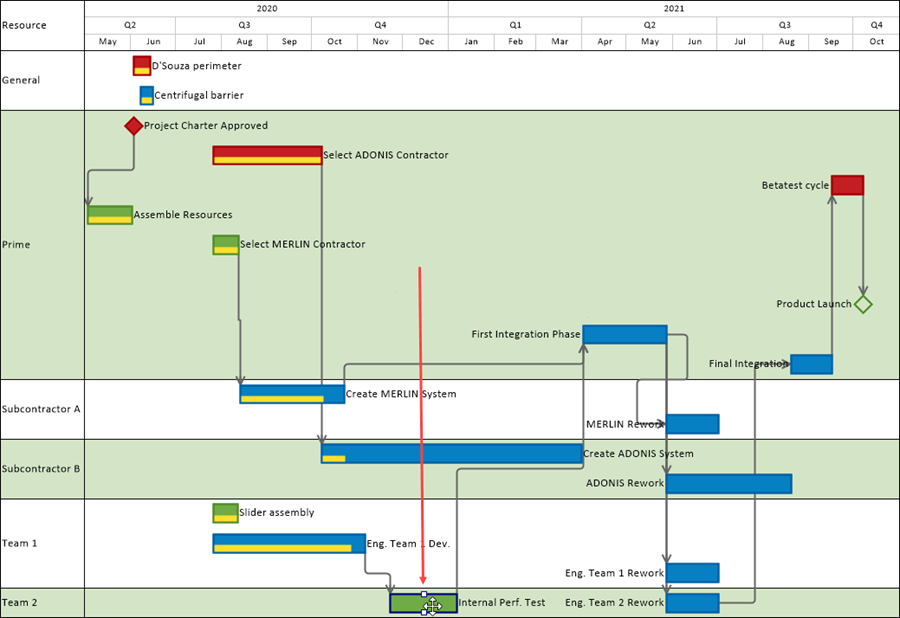
You have the capability when editing the chart to move task bars/milestone symbols up or down from Row to Row as well as to move Rows and Swimlanes with their respective content of task bars/milestone symbols up or down in the chart. When you make any of these three edits, Data-driven and manual Task Links that are showing have their Task Link connection line geometry changed to retain the properties of the individual Task Links involved. Given the portion of a chart with Data-driven Task Links showing, what follows are three examples of how the chart changes when task bars/milestone symbols, row, and swimlanes are moved:
Starting Chart with Task Links
Here is a reorganized char using the same Microsoft Excel source plan before any task bars/milestone symbols, rows, or swimlanes are moved:
Task Links After A Task Bar Is Moved to the Bottom Row
After moving the Internal Perf. Test task bar to the bottom row of the chart above, the result looks like this:
Task Links After a Row is Moved to the Above Last Row
Starting from the original chart shown above with the Left#1 row for Risk Assessment added, move the selected rows shown below to above the last row in the chart.
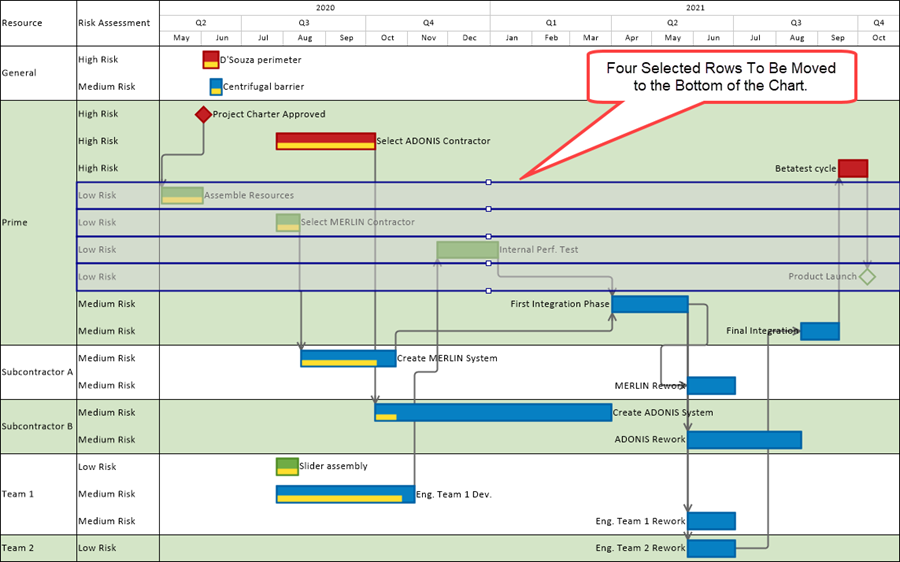
When this operation that individually moves each of the designated rows to the bottom of the chart is completed the chart looks like the one below:
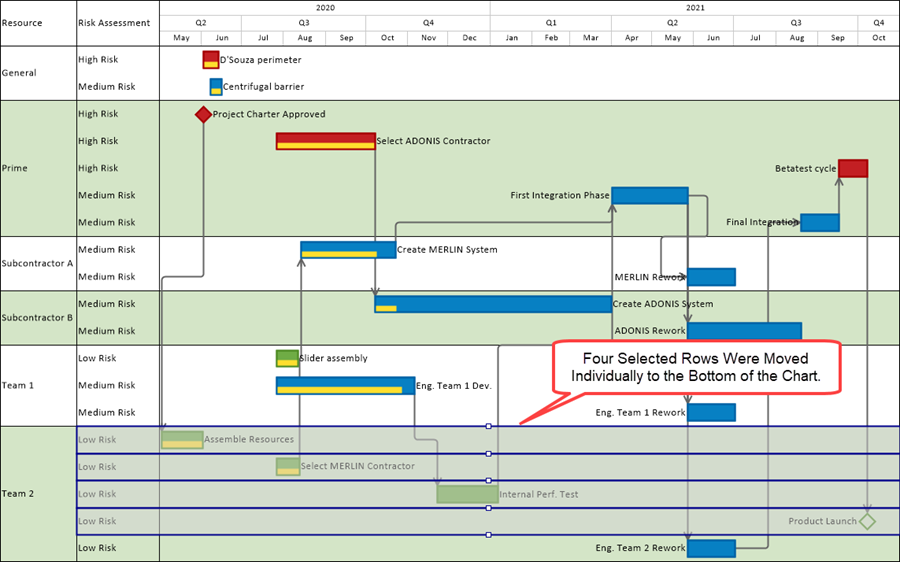
Task Links After a Swimlane is Moved Down
Finally, from the original chart, move the Prime Contractor swimlane to a position between the Subcontractor B and the Team 1 swimlanes. When completed, this chart looks like the following:
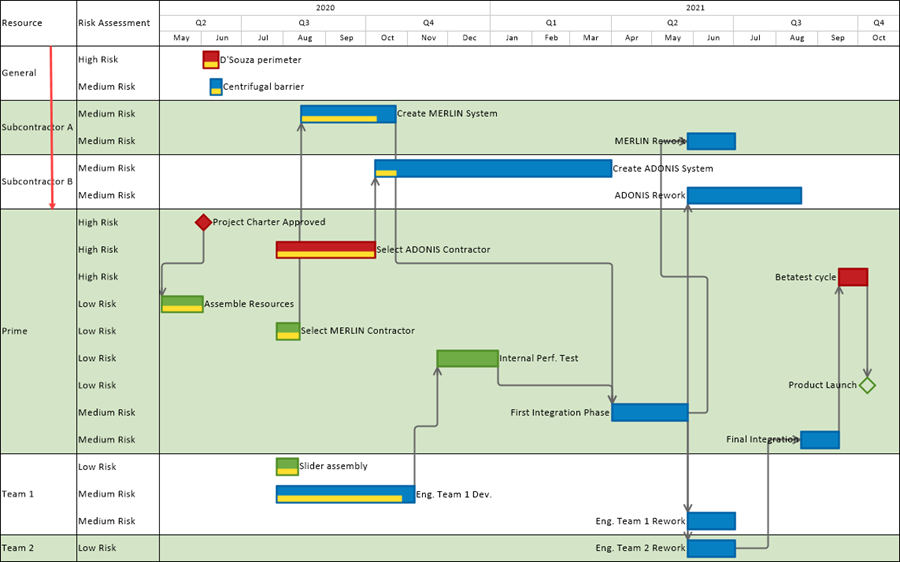
In the cases above, OnePager attempts to route the Data-driven and manual Task Link connection lines so as to minimize their length and avoid conflicts with other graphics in the Chart Editor.
Behavior of Data-Driven Task Links When Adding or Replacing Snapshots
OnePager Express updates the presentation of Data-driven Task Links in snapshots when you perform one of the Update workflows.
These Update workflows include:
- 1) Performing a Replace-Dates, Replace-Dates and Progress, or Replace-All Properties for a snapshot.
- 2) Creating a NEW snapshot.
For the Replace-All Properties workflow there are two (2) situations that are specifically handled by OnePager. If you make a change to a Predecessor task in the source plan (e.g., by changing a Start-to-Finish dependency to Finish-to-Finish), OnePager makes the change to the Task Link Dependency Type during the Update. If the change involves no longer specifying a source plan Predecessor task/milestone for a Successor source plan task/milestone, the Replace-All Properties workflow deletes the Data-driven Task Link from all snapshots.
For the NEW and REPLACE-Dates workflows, OnePager hides the Data-driven Task Link in the subject snapshot when there is no source plan Predecessor task/milestone specified. OnePager does not process lag time for data-driven Task Links.
Saving OnePager Express 7.0 Charts to Previous Versions
As with previous releases of OnePager Express you have the option to save charts (i.e., .TAM files) to previous versions. To save a chart to a previous OnePager Express version, go to the OnePager Express ribbon’s File tab and click the Save as tab which accesses the Save as chart window. Click the Save as type: dropdown and you’ll see the options as shown below:
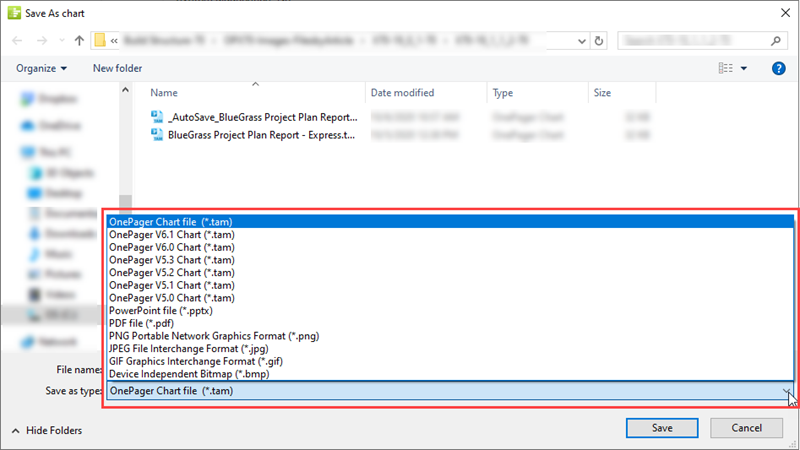
When saving a chart with Data-driven Task Links, it should be recognized that the Data-driven Task Link information is lost when the chart is saved to Version 6.0 or earlier version of OnePager Express and subsequently opened. Manual Task Links, however, are converted to Event Links which are compatible with previous versions. Manual Task Links converted to Event Links retain manual Task Link properties including connection line color, Dash type, and font properties. All other properties of manual Task Links converted to Event Links are lost. Enhancements made to manual Task Links like Begin and End point shapes and connection line Dash types are lost when saving to a previous version from version 7.0.
For more information on sharing chart, please see the articles at: Sharing Charts (Portal)
Opening Previous Versions of OnePager using OnePager 7.0
Opening a chart created with OnePager Express versions previous to version 7.0 with OnePager Express 7.0 provides a chart where only previously inserted Event Links, if any, are converted to manual Task Links. If a chart is being opened but was originally created with OnePager Express 7.0 and saved as a previous version, no Data-driven Task Links are available to be shown. If you open a previous version of a chart and subsequently update the chart using OnePager Express 7.0 with a source plan that contains Predecessor/Successor information, OnePager Express 7.0 imports this Dependency information if the update method is Replace All Properties. Subsequent to the update, the chart is able to show Data-driven Task Links. Any Event Links present in the previous version of the chart being opened with OnePager Express 7.0 shows these links as manual Task Links.
Other Topics
Task Link Property Edits that Cause Connection Line Re-Routing
When making edits to individual Data-driven or manual Task Links, some edits can cause connection line routing changes to the Task Link’s being edited (or mavericks). Other edits may or may not cause changes in Task Link connection line routing.
The following Task Link properties that do not cause Task Link connection line routing changes are:
- 1) Line color
- 2) Line width
- 3) Line Dash type
- 4) Corner Radius (Note: Corner Radii edits can cause routing changes in some circumstances if there isn’t adequate space to make the connection line turn required with the desired Corner Radii.)
- 5) Begin point shape
- 6) End point shape
- 7) Font type
- 8) Text content
Depending on how the above list of properties is edited, there can be a slight shift in the routing of the connection line but no rerouting is expected.
The following properties of Task Links that cause Task Link connection line routing to change are edits to:
- 1) Begin point size
- 2) Horizontal anchor point position (Predecessor or Successor)
- 3) Vertical anchor point position (Predecessor or Successor)
- 4) Relationship type
Deleting or Changing Predecessor Data in Your Source Plans
As stated previously, all Task Links, both Data-driven and manual, are snapshot-dependent. When Data-driven Task Link information is imported, it appears in all snapshots where both task bars/milestone symbols are present and unhidden and where it satisfies the Task Link Filter rules. If you select the Show All radio button, OnePager ignores the Task Link Filter rules and shows every imported predecessor value as a Data-driven Task Link. Otherwise, OnePager uses the Task Link Filter rules to determine which Data-driven Task Links to show.
Data-driven Task Links can be hidden in individual snapshots by using the individual Task Link editing features. This does not change the properties of the Data-driven Task Link; it merely changes whether the Data-driven Task Link is shown or hidden. If you change the Predecessor field’s data in your Microsoft Excel source plan (e.g. adding a new Data-driven Task Link, pointing to a different source plan Predecessor task, or changing a Task Link Dependency Type like from Finish-to-Start to a Start-to-Start instead), you must perform a Replace All Properties UPDATE operation to re-sync Data-driven Task Links with OnePager. This is because the underlying predecessor data for Data-driven Task Links are snapshot-dependent.
However there are two (2) exceptions to the rules covered above that deal with situations. You can delete Predecessor data values or change a Predecessor data value in your source plan. And then, either Add a new snapshot or perform a Replace-dates UPDATE on the current snapshot. The cases for deleting a Predecessor data value and changing a Predecessor data value in your source plan are discussed below.
Exception 1: Deleting a Predecessor Data Value for a New or Replaced Snapshots
If, after creating a chart, you go back to your Microsoft Excel source plan and delete a Predecessor data value or values and follow this action by creating a NEW snapshot or performing a Replace-dates UPDATE in the current snapshot, OnePager handles this action by:
- 1) Hiding the corresponding deleted Data-driven Task Link in the NEW snapshot or the current snapshot after the Replace-dates UPDATE is completed.
- 2) The Data-driven Task Link remains in other snapshots and can be shown or hidden using the controls in the Where Are My Links? form or by editing the Task Link Filter rules.
Once the NEW snapshot is created or the current snapshot undergoes the Replace-dates operation, the deleted Data-driven Task Link cannot be unhidden using the controls in the Where Are My Links? form. The Where Are My Links? form still contains an entry for the deleted Data-driven Task Link for the subject snapshot but the checkbox used for show/hide status is disabled and a tool tip is provided to clarify this. Furthermore, the deleted Data-driven Task Link cannot be shown as a result of an edit to the Task Link Filter rules or a change to the Predecessor data value in the source plan that drives the Task Link Filter rules.
The deleted Data-driven Task Link from this point on does not behave as other hidden data-driven Task Links behave. If you later re-add the previously deleted Predecessor data value back into your source plan before again performing a Replace-dates UPDATE on the subject snapshot, the previously deleted Data-driven Task Link changes status from permanently hidden as described above to showing if it is mavericked to be shown or if this Data-driven Task Link meets the Task Link Filter rules.
Exception 2: Changing a Predecessor Data Value for a New or Replaced Snapshot
OnePager treats the changing of a Predecessor data value in your Microsoft Excel source plan the same as a delete and add of a Predecessor data value. This situation is the same as adding a new Predecessor data value to a source plan and then either adding a NEW snapshot or performing the Replace-dates operation.
Source Plan Tasks and Data-Driven Task Links
Data-driven Task Links are associated with their predecessor and successor task/milestones in your source plan and in the chart. When OnePager imports Data-driven Task Links, their representation is dependent on whether their associated source plan task/milestones are imported or later hidden. There are three (3) conditions related to source plan task/milestone representation that are explained below:
Condition 1: De-Flagging and Flagging Task for Import and Data-Driven Task Links
If a source plan task is de-flagged from a snapshot, any UPDATE to the snapshot does not include the de-flagged task. If the de-flagged source plan task is a member of a Data-driven Task Link pair, for example, since the de-flagged source plan task is no longer present in the Updated snapshot, the associated Data-driven Task Link is hidden because one or more of its constituent tasks are not present. If a source plan task is newly flagged for import into a snapshot, any UPDATE to the snapshot includes the associated Data-driven Task Links if either all Data-driven Task Links are being shown or the newly flagged task’s Data-driven Task Link meet the Task Link Filter rules.
Condition 2: The Copy Edits to All Snapshots (CTAS) Feature and Data-Driven Task Links
The CTAS (Copy to All Snapshots) feature affects how maverick edits of task/milestone color, shape, and other properties are propagated to other snapshots. For Data-driven Task Links, CTAS, when ON, controls the honoring of some Data-driven Task Link properties and is ignored for others as follows:
CTAS is ignored for formatting all Task Links because all Task Link formatting is snapshot-dependent.
CTAS is honored for showing/hiding Data-driven Task Links when the Where Are My Links? form is used for this purpose.
- 1) If you use the Where Are My Links? form to maverick a Data-driven Task Link, for example, when CTAS is ON, the Data-driven Task Link shows in all snapshots.
- 2) If CTAS is OFF, in this example, the Data-driven Task Link only shows in the current snapshot.
CTAS is also honored when you are editing the geometry of all Task Links using the Chart Properties form’s Task Links tab such as the Vertical Anchor positions on Predecessor and Successor tasks.
Condition 3: Showing or Hiding Predecessor and Successor Tasks and their Data-Driven Task Links
Hiding Predecessor or Successor Task/Milestone(s)
If you hide a predecessor or successor source plan task/milestone that was previously imported:
- 1) The task bar/milestone symbol is hidden,
- 2) Any associated Task Links are hidden, and
The Where Are My Links? form contains an entry or entries for the associated Task Link(s) with the Show column’s checkbox unchecked or OFF. The Where’s My Stuff!? form also has an entry or entries for any of the hidden task bar/milestone symbol(s). You are not able to check the Show checkbox for such an entry in the Where Are My Links? form to restore the Data-driven Task Link to the show status as long as its associated task bar/milestone symbol(s) remain hidden.
A tool tip is provided when you hover the mouse over the Show column checkbox under these conditions.
To restore the hidden Task Link(s) to the show status you must first unhide the task bar/milestone symbol(s) by either:
- 1) Using the Where’s My Stuff!? form to unhide the hidden task/milestone(s),
- 2) Use the OnePager ribbon’s Show/Hide dropdown list’s Show All Task/Milestones command, or
- 3) Use the UNDO command on the OnePager ribbon if you are able.
Once the hidden task bar/milestone symbol(s) are in the show status, their Task Links are changed to the show status as well.
Importing New Task/Milestone
If, on the other hand, a predecessor or successor source plan task in the source plan is never imported, the Where Are My Links? form does not have any entry since there isn’t a Data-driven Task Link to be unhidden. If you change the source plan Flag field so the predecessor/successor task/milestone in the source plan can be imported and perform a snapshot UPDATE, the Data-driven Task Link is shown and there is an entry in the Where Are My Links? form.
Related Links
Conditional Import Filters (Portal)
Using Task Link Filtering Rules for Showing/Hiding Task Links for OnePager Express
Managing Hidden Tasks and Milestones Using "Where's My Stuff?!"
Using the Where Are My Links? Form for OnePager Express
Conditional Formatting (Portal)
Absorbing one task into another
Creating and Managing Virtual Summary Tasks
(19.1.1.2-70)