Editing Text Columns or Swimlane Labels for Version 7.0
Contents
Overview
When text column cells and swimlane cells appear in the chart their contents are determined by data imported from your Microsoft Project or Microsoft Excel source plan. It may be necessary on occasion to edit the contents of these cells to support your schedule presentation goals and objectives.
It is not necessary to go back to your source plan and change the data and re-import that data to change text column cells or swimlane cells; changes can be made to individual or a set of selected cells in the Chart Editor. Within the Chart Editor, you can use the text column right-click context menu’s Edit text and Properties … commands or the swimlane level right-click context menu’s Edit swimlane label and Properties … commands to edit labels as well as other label properties.
For more information on using the text column cell label or swimlane level cell label properties, please see the articles at:
| Editing Row Properties |
| Editing Row Swimlane Properties |
In addition to editing text column cells and swimlane cells using the right-click context menu commands, you can edit Font properties and Alignment settings of text column cells and swimlane cells using controls on the OnePager Home ribbon tool bar tab’s Font and Alignment control groups. Since being able to edit requires first selecting the cells to edit, it may be beneficial to review the sections on selection methods for text column cells and swimlane cells at: Selection Methods Available for Multiple Text Columns and Selection Methods Available for Multiple Swimlane Levels
Whenever you make a change to a text column cell or swimlane cell, the edited cell becomes a maverick.
Editing Text Column Cells
Editing Individual Text Column Cells Using the Edit text Form
For the purpose of illustration, we’ll use the OnePager Pro chart below containing three swimlane levels and two text columns:
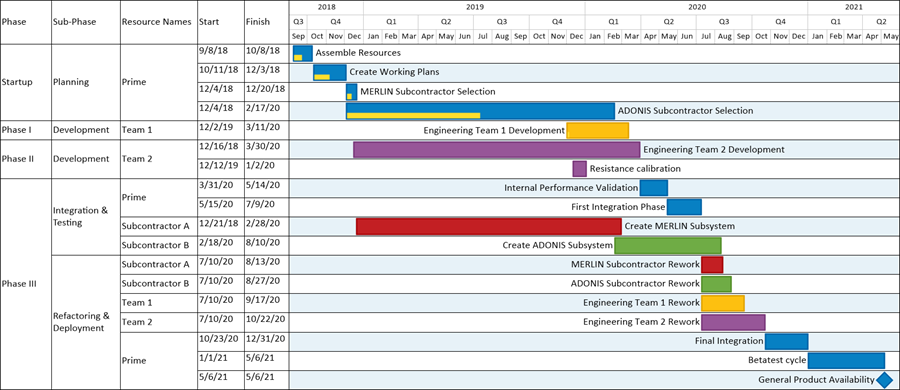
To edit the value of an individual text column cell, right-click the text column cell to access the text column right-click context menu shown below:

After accessing the text column right-click context menu, click the Edit text command shown above to access the Enter text form and its Enter text window that contains the current contents of the selected text column cell as shown here:

To change the contents of the selected text column cell using the above Enter text form, type in the desired text into the Enter text window and click the OK button when finished.

After clicking OK button on the Enter text form, the selected text column cell remains selected and the text in the cell is changed as shown below:

Editing Multiple Text Column Cells Using the Edit text Form
Editing the cells of multiple text columns is similar to editing an individual cell except that more cells are selected and the change made in the Edit text form’s window is applied to all selected cells. If we select a sequence of text column cells using the SHIFT+Left-Click method to select the cells, right-click in one of the selected cells to access the text column right-click context menu, and then click the Edit text command, the chart looks like this:

Changing the text in the Edit text window to “Started” and clicking the OK button on the form, changes the text in the selected text column cells as shown below:

The same results as shown above can be achieved when individual text column cells are selected to become a set of multiple text column cells using the CTL+Left-Click selection method.
Editing Swimlane Cells
1) In the illustrations above for editing text column cells, you are able to select individual text column or multiple text column cells and use the Edit text form to change the selected cell values. The same process can be used for changing the values for individual swimlane cells or multiple swimlane cells depending on the selection method you use. The examples that follow illustrate how you can change individual and multiple swimlane cells in the chart.
Editing Individual Swimlane Level Cell Labels Using the Edit text Form
For the purpose of illustration, we’ll use the same OnePager Pro chart below containing three swimlane levels and two text columns:

To edit the value of an individual swimlane cell, right-click the swimlane cell to access the context menu shown below:

After accessing the context menu, click the Edit swimlane label command shown above to access the Enter text form and its Enter text window that contains the current contents of the selected swimlane cell as shown here:

To change the contents of the selected swimlane cell using the above Enter text form, type in the desired text into the Enter text window and click the OK button when finished.

After clicking OK on the Enter text form, the selected swimlane cell remains selected and the text in the cell is changed as shown below:

Editing Multiple Swimlane Cells Using the Edit text Form
Editing the values of multiple swimlane cells is similar to editing an individual swimlane cell except that more cells are selected and the change made in the Edit text form is applied to all selected cells. If we select a sequence of swimlane cells using the SHIFT+Left-Click method to select the cells, right-click in one of the selected cells to access the context menu, and then click the Edit swimlane label command, the chart looks like this:
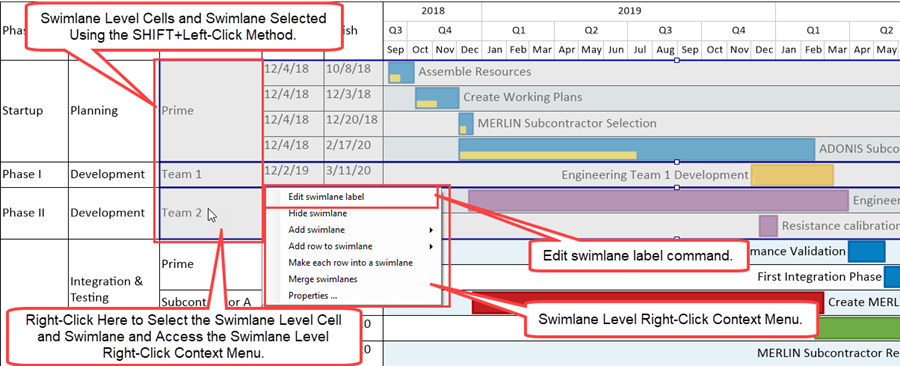
Changing the contents of the Edit text window to “Planning/Development Team” and clicking the OK button on the form, changes the text in the selected swimlane cells as shown below:
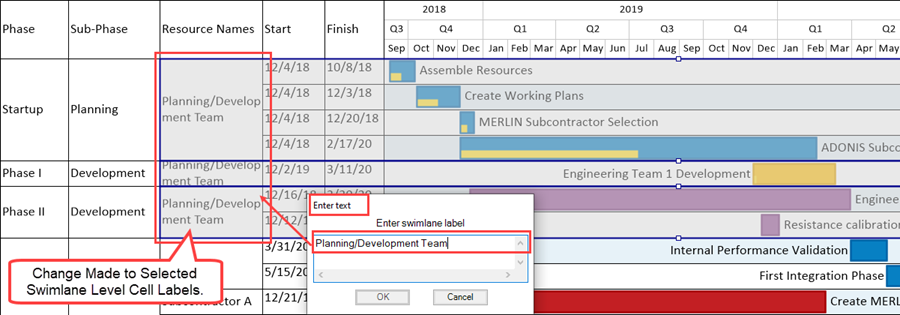
The same results as shown above can be achieved when individual swimlane cells are selected to become a set of multiple swimlane cells using the CTL+Left-Click selection method.
Editing Text Column Cells or Swimlane Cells Using the Home Ribbon Tool Bar’s Controls
When either single or multiple text column cells or swimlane cells are selected, they can be edited in terms of their Font properties and text Alignment using the Font and Alignment control groups on the OnePager Home ribbon tool bar tab as shown below:

Whenever you select a single or multiple cell, the two control groups above are enabled and you can use any of the controls shown above to edit the text in the selected cell or cells.
Editing Font Properties of Text Column Cells or Swimlane Cells
Using the edited multiple swimlane cells from the previous sub-section above as an example, we can decrease the font size of the selected cells as shown below:
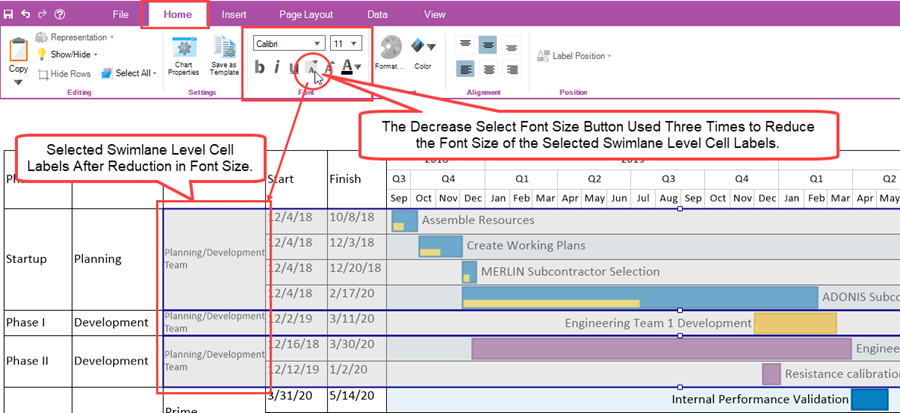
Once the desired text column cells or swimlane cells are selected, you can use the Font control group’s buttons to edit the value to Bold, Italics, or Underline; increase or decrease the font size; or access the standard Color Chooser form and change the color of the label itself. When there are multiple text column cells or swimlane cells selected, the edit is applied to all selected text.
Additionally, you can change the font type and its size by using the dropdown windows appearing above the six buttons in the control group. All these font properties are available in the Font properties form accesses by selecting a task bar/milestone symbol text, time axis cell text, or text within comment boxes as just a few examples.
Any edits made to cell labels using the Home ribbon tool bar tab’s controls are applied to all selected text. The methodology described above applies as well to editing the Font properties of text column cell labels.
Editing Alignment Properties of Text Column Cell Labels or Swimlane Level Cell Labels
As mentioned, when a text column cell or swimlane cell is selected, the Alignment control group on the Home ribbon tool bar tab is enabled so you can change the position of the text within the selected cell. If we continue with the example from the previous sub-section, we can change the position of all the selected text to vertically centered and horizontally centered in their respective cells by clicking the two center buttons in each row of the Alignment control group as shown here:
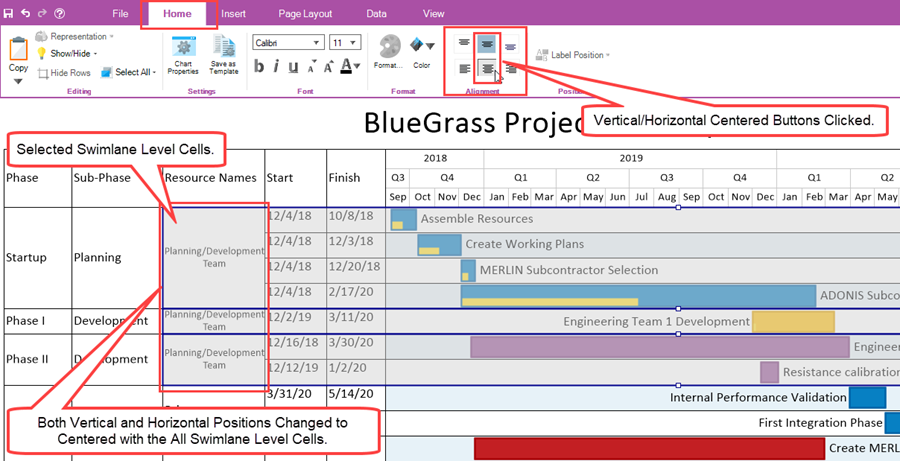
All the swimlane cells selected in the chart above are repositioned so that their text is positioned in the center vertically and horizontally within the cell.
Related Links
Manual Editing Task/Milestone Shapes and Text Labels (Portal)
Creating and Editing Rows and Swimlanes (Portal)
About OnePager's Rows and Swimlanes
Collecting, Formatting, and Sorting Task/Milestones into Rows
Creating, Formatting, and Sorting Swimlanes Levels
Editing Text Columns or Swimlane Labels
Resizing the Width of Text Columns and Swimlanes
Zebra Striping for Rows and Swimlanes for OnePager Pro
Zebra Striping for Rows and Swimlanes for OnePager Express
Editing with the Chart Properties form (Portal)
(12.3.1-70)