Managing Conditional Formatting Rules for OnePager for Version 7.1
Contents
Introduction
Illustrations used in this article are from OnePager Pro using data from Microsoft Project but the feature's function, controls, and manual edits apply equally to other OnePager editions that import from data sources like Microsoft Excel, Smartsheet, and Oracle Primavera P6.
About Editing Conditional Formatting Rules in the Form
The reconfiguration of the Conditional Formatting Rules form and the procedure for adding Conditional Formatting rules are covered in the first two sub-sections in the article at: Adding Conditional Formatting Rules
The Conditional Formatting rules can be editing, added to, copied, or deleted at any time. You can also un-check the On field checkboxes to disable any particular rule from being applied. Finally, you can change the priority ordering of rule application by editing the sequence numbers in the Priority Action column.
Editing Rules in the Chart Properties Form Versus the Template Properties Form
Editing a rule in Chart Properties form causes all current and future snapshots belonging to the chart to be impacted by the Conditional Formatting rule edit. Editing a rule in Template Properties form has no impact on any existing charts created before the Template Properties form was edited, but has an impact on conditional formatting of any future charts made from the edited Template Properties form.
Editing Existing Conditional Formatting Rules in the Grid
Once a conditional formatting rule is successfully entered into the Conditional Formatting Rules form's grid, it can be edited individually by using your mouse to click on the grid cell of the rule you wish to edit. The grid cell in turn responds in accordance with the type of cell it happens to be and either allows you to enter text, access a dropdown list, or access a OnePager form.
Editing the selected grid cell, then, is a matter of changing the information in the grid cell as described in the article at: Adding Conditional Formatting Rules
To assist in editing, the Conditional Formatting Rules form has three (3) buttons in the lower left of the form as shown here:
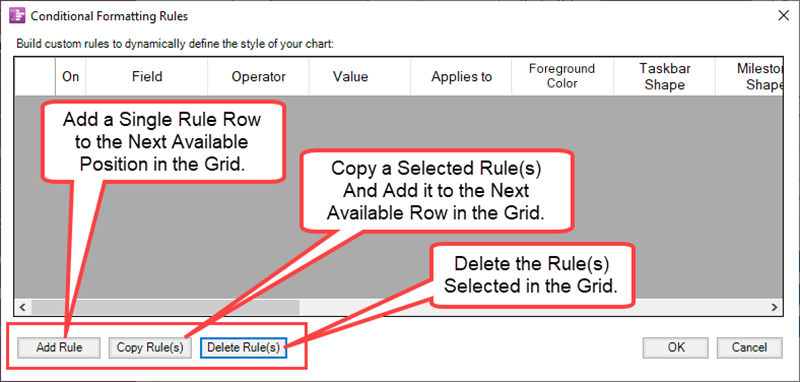
The remainder of this article deals with these three (3) action buttons and how they are used in the conditional formatting rule editing process.
Add A Rule
To add a rule to the Conditional Formatting rule grid first access the Conditional Formatting Rule form through either the Template Properties or Chart Properties form's Task Bars or Milestones tabs. Clicking the Manage Rules... button at the bottom of the tab accesses the Conditional Formatting Rules form in its empty grid state if this is the first access of the form. To add a blank rule to the Conditional Formatting Rules form, click the Add Rule button at the bottom of the form and a blank rule row is placed in the grid as shown below:
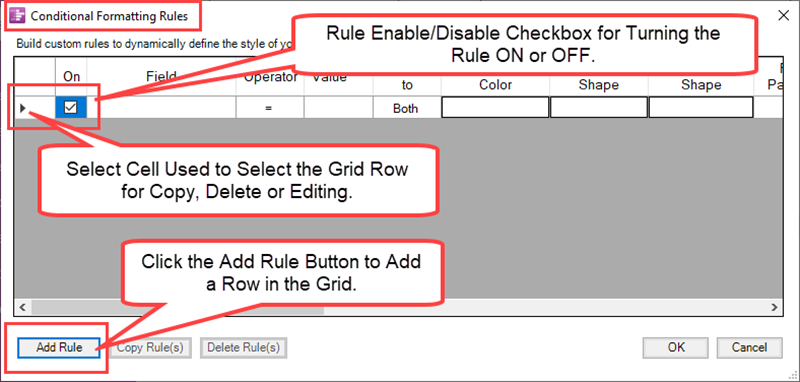
Once added the rule can be populated with data entered in the Condition columns and Action columns as required. After all rules are added (or when editing is complete), click the OK button at the bottom of the form to have the rule or rules saved in the Template Properties form or applied to the current chart.
Copy Rule(s)
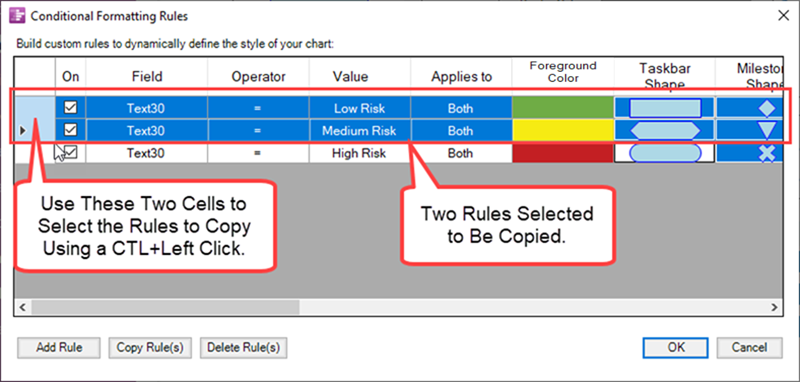
The Copy Rule(s) button is provided to assist you in constructing additional rules that are similar to existing rules. To copy a rule or rules, select the rows you want to copy either singly or as multiple-rows in the standard manner and click the Copy Rule(s) button. This action adds the copied rule or rules verbatim to the next available row position in the grid. You can now edit columns in the copied rows by selecting and making edits to grid cell's contents in any order. When you click the OK button at the bottom right of the form, these added rules are in effect. The example below show a set of selected rules that are copied and subsequently modified:
Select Rule(s) to Be Copied
Use the left most column to select the rules you desire to copy. This can be done by individual grid row or in combination with the CTRL key and/or the Shift key.
Click Copy Rule(s) Button
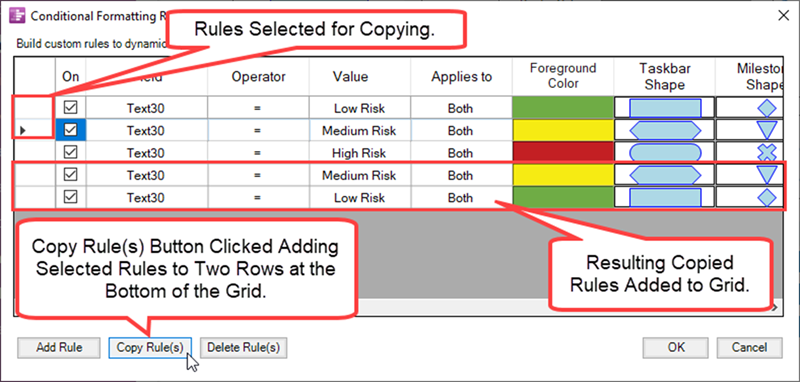
To complete the copy function after the rules to be copied are selected, click the Copy Rules(s) button.
Modify Copied Rules
After the copied rules appear in the form as shown above you can edit any of them as desired. The Copy Rule(s) function is a short cut technique when not all the grid cells of a new rule need to be edited. Click the OK button at the bottom of the form to complete the process.
Delete Rule(s)
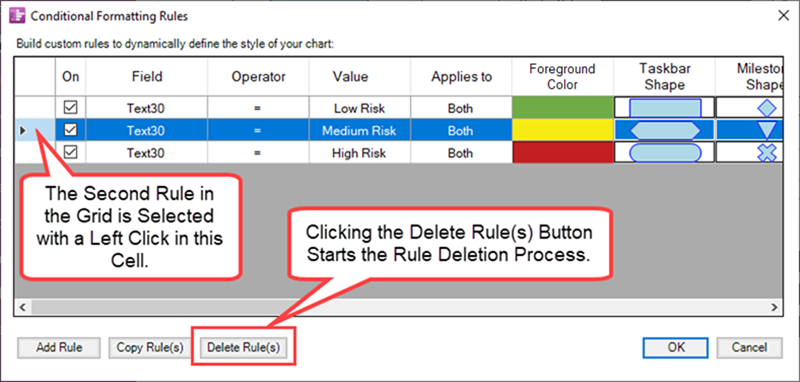
Whenever you are in the Conditional Formatting Rules form, you can delete a rule or several rules by first selecting them by left clicking (or CTL+Left-Click for multiple-rule selection) in the left most grid cell of the grid row.
Selecting the Rule or Rules to Delete from the Grid
Once the desired conditional formatting rules are selected, click the Delete Rule(s) button at the bottom of the form to initiate the process as shown below:
OnePager Message Form
When the Delete Rule(s) button is clicked, OnePager displays a OnePager message form requesting that you respond to this question: Are you sure you to delete the selected rule? as shown below:
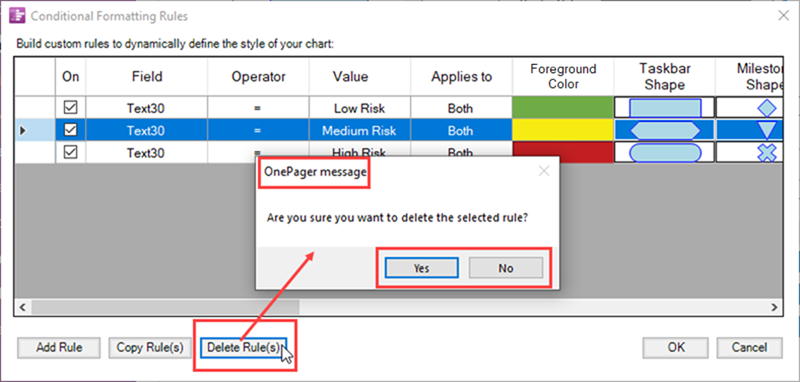
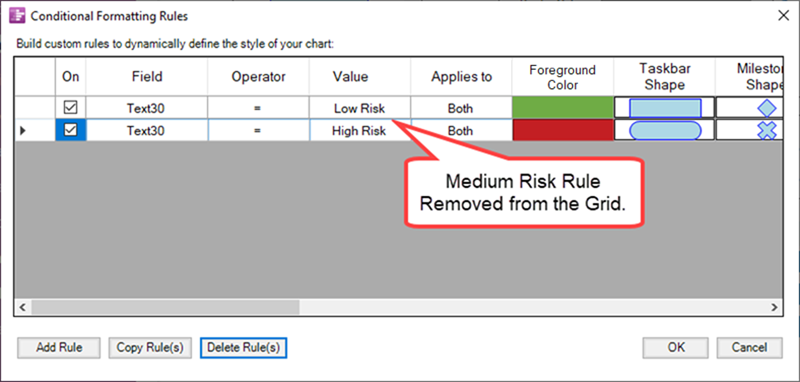
If you are sure, click the Yes button and the selected rule(s) are removed from the grid as shown in the example here:
If you decide you do not want to delete the selected rule(s), click the No button and the OnePager message disappears and the Conditional Formatting Rules form remains unchanged with the rules in question remaining selected.
Related Links
Conditional Import Filters (Portal)
Manual Editing Task/Milestone Shapes and Text Labels (Portal)
Changing Individual Task/Milestone Properties (Color, Shapes, Labels, etc.)
Modifying Decorations on Tasks/Milestones (Portal)
Conditional Formatting Overview
Adding Conditional Formatting Rules
Legend Editing Controls for OnePager
Editing with the Chart Properties form (Portal)
Gallery of Gradient and Hash Fill Patterns
Gallery of Dynamic Shapes and Emoji Symbols
(11.9.1-71)