Merging Swimlanes for Version 7.0
Contents
- 1 Overview
- 2 Merging Swimlanes – One Swimlane Level Chart
- 3 Merging Swimlanes – Two Swimlane Level Chart
- 4 Merging Swimlanes – Three Swimlane Level Chart
- 4.1 Merging Swimlane from the Left#1 Swimlane Level Cells – Three Swimlane Level Chart
- 4.2 Merging Swimlane from the Left#2 Swimlane Level Cells – Three Swimlane Level Chart
- 4.3 Merging Swimlane from the Left#3 Swimlane Level Cells – Three Swimlane Level Chart
- 4.4 Merging Swimlane with Equal Number of Rows – Three Swimlane Level Chart
- 5 Related Links
Overview
Like making each row into a swimlane, there may be several good reasons to merge two or more swimlanes into a single swimlane at the various swimlane levels. This may be to consolidate like sets of swimlanes with their member rows into a single swimlane level cell or to reposition like swimlane level cells to a different position in the chart.
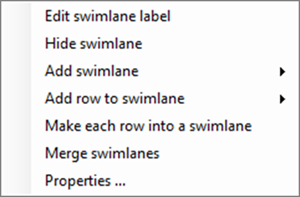
The command, Merge swimlane, is in the swimlane level right-click context menu shown below:
In order to use the swimlane level right-click context menu, the chart must have at least one swimlane level defined and showing and two or more swimlanes of interest must be selected in the same swimlane level.
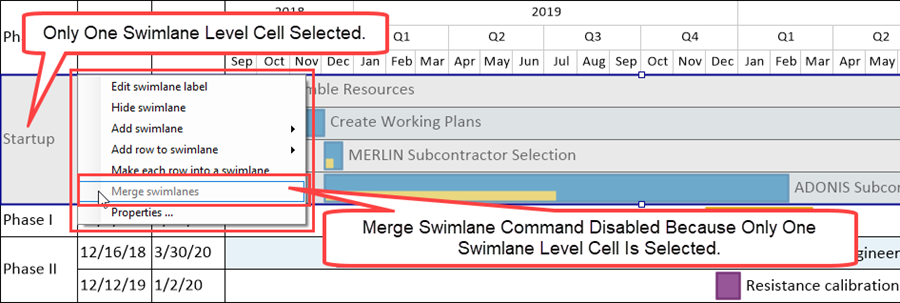
The Merge swimlane command is disabled when the swimlane level right-click context menu is accessed and only one swimlane level cell is defined and showing in the chart as illustrated below where the Left#1 swimlane level is defined and shown:
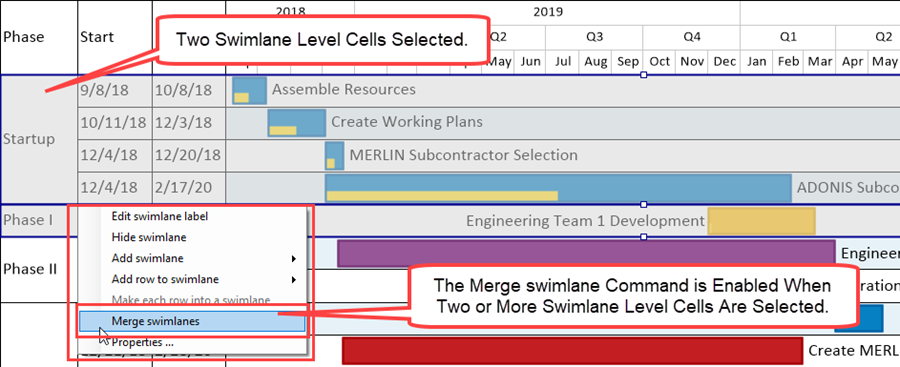
The Merge swimlanes command is enabled when two or more swimlane level cells are selected as shown below:
Since you can configure OnePager charts with up to three swimlane levels, how swimlane level cells are merged depends on the membership of the selected swimlane level cells in the swimlane levels defined in the chart.
This article discusses the various possible configurations for selected swimlane level cells and how the Merge swimlane command produces a consistent result in terms of the configuration of the new merged swimlane, its resulting position in the chart, and the labels assigned to the new merged swimlane level cell.
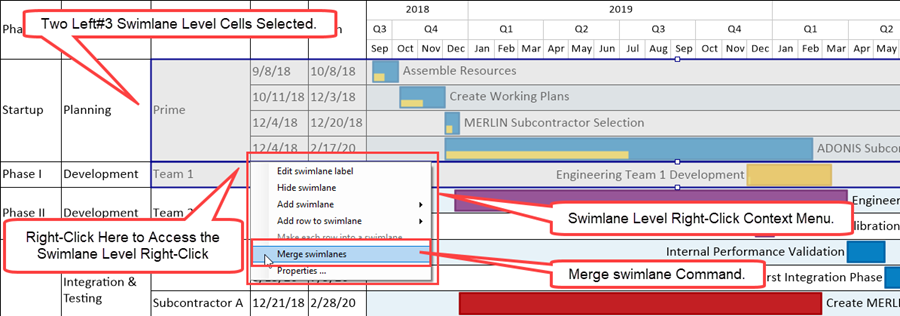
Depending on the original configuration of the chart and the number of swimlane levels defined and showing, the results of applying the Merge swimlane command follows a consistent pattern discussed in this article. As an example, we can start by illustrating the results from merging swimlane level cells from the Left#3 swimlane level in the sequence shown below.
- 1) Start by selecting the top two swimlane level cells in the illustration below where these selected two swimlane level cells are members of all three defined and shown swimlane levels.
- 2) The swimlane level right-click context menu is accessed, and the Merge swimlane command is enabled as shown here:
- 3) When the Merge swimlane command is clicked, the result is shown here:
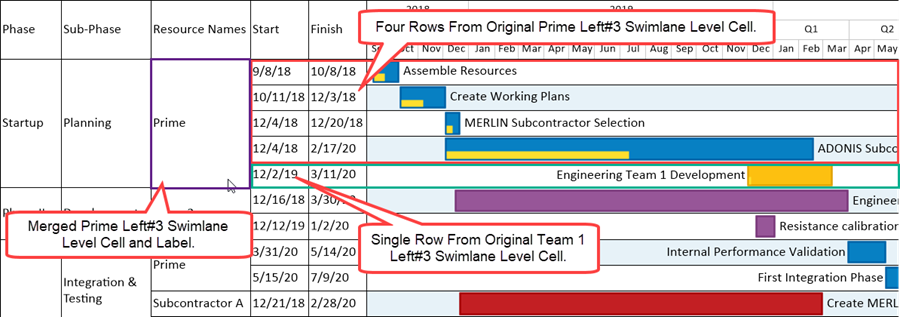
The end result in the illustration above is the creation of a new merged Prime Left#3 swimlane level cell positioned in the same place as the original Prime Left#3 swimlane level cell with the new merged swimlane level cell displaying the label of the original Prime Left#3 swimlane level cell’s label.
Swimlane level cells can be merged at the any swimlane level. In the illustration above, the lowest swimlane level is Left#3.
- In the illustration above the two participating Left#3 swimlane level cells selected are not members of the same Left#2 or Left#1 swimlane level cells.
- As shown in the illustration above, the Prime Left#3 swimlane level cell retains its membership in its original Left#2 and Left#1 swimlane level cells because the Prime Left#3 swimlane level cell contained four rows while the Team 1 Left#3 swimlane level cell contained just one row.
- OnePager attempts to assign the merged swimlane’s label at a lower swimlane level to its original higher level swimlanes (Left#1 and Left#2) based on the modal selected swimlane level cell determined by the highest number of row. In this case, the modal Left#3 swimlane level cell was the Prime Left#3 swimlane level cell because it has four member rows.
- When OnePager cannot exactly determine a modal swimlane level cell, the label assigned to the resulting merged swimlane level cell is made at random using the participating selected swimlane level cells.
Multiple swimlanes can be selected and the Merge swimlane command used to create a new merged swimlane. When selecting swimlane level cells, OnePager only allows selection in the same swimlane level.
Merging Swimlanes – One Swimlane Level Chart
To better illustrate how the merge swimlane command operates in the multiple swimlane level environment, we start with the situation where one swimlane level is defined and showing in the chart. In the sub-sections that follow, we start with the Left#1 swimlane level defined and showing as the simplest case and proceed step-wise to demonstrated OnePager’s Merge swimlane command when there are two and then three swimlane levels defined and showing in the chart.
Merging Swimlanes from Left#1 Swimlane Level Cells – One Swimlane Level Chart
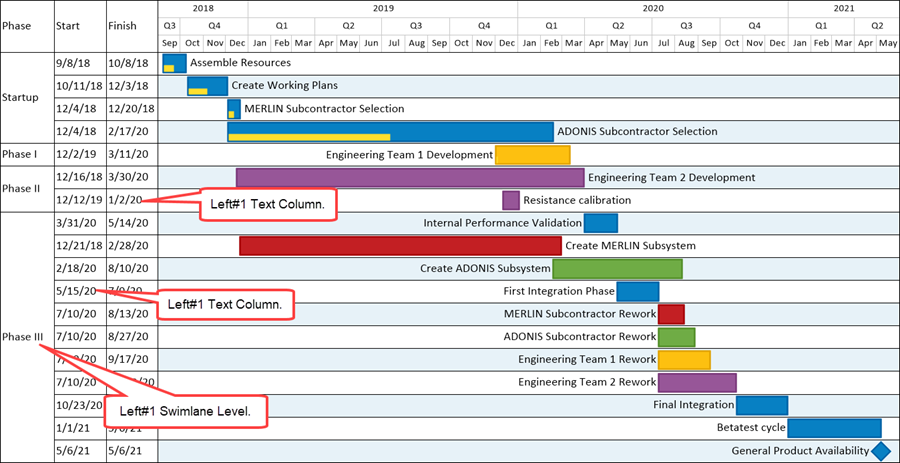
Merging swimlanes can be illustrated in the one swimlane level chart shown here as a starting point:
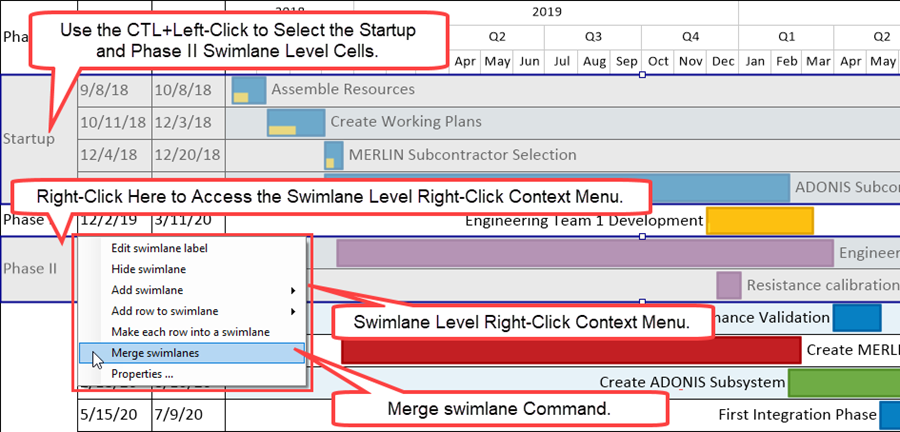
Suppose you want to take the Startup swimlane and merge it with the Phase II swimlane. To do this, select the Startup and Phase II swimlanes using the CTL+Left-Click method, right-click in one of the selected swimlane level cells to access the swimlane level right-click context menu, and prepare to click the Merge swimlane command as shown below:
Clicking the Merge swimlane command reconfigures chart is shown here:
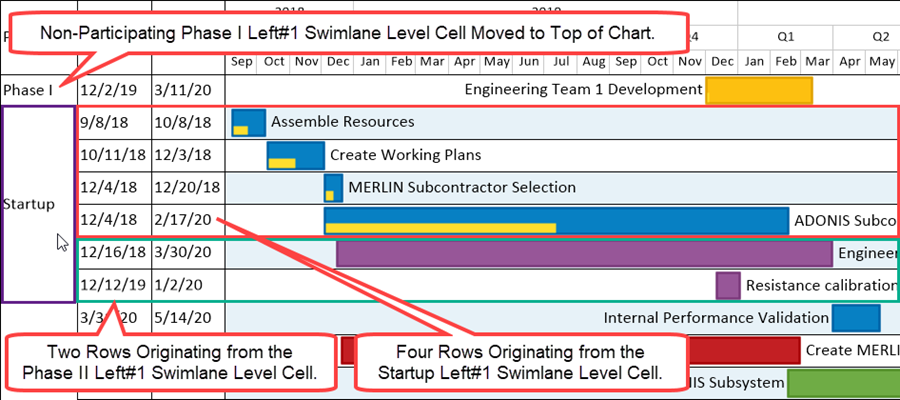
When selected swimlanes are merged within an existing swimlane level cell, OnePager places the new merged swimlane in close proximity to the original selected modal swimlane level cell to avoid major reconfiguration of the chart. OnePager assumes that the reason for merging swimlanes is that, in most schedule presentation situations, the new merged swimlanes will be re-positioned elsewhere in the chart and potentially the new merged swimlane level cell label will be edited. As a result, you have the option to retain the new merged swimlane in the OnePager designated position or move the new merged swimlane using the drag and drop method to a different position in the chart.
For more information on moving swimlanes, please see the article at: Moving Swimlanes
Once the new merged swimlane is created containing the selected original swimlanes shown above, the new merged swimlane can be edited the same as any other swimlane in the chart. Edits can include changing the label in the Left#1 swimlane level cell, dragging and dropping the new merged swimlane to another position in the chart, or changing its background color in some fashion.
For more information on editing rows and swimlanes, please see the two articles at: Editing Row Properties and Editing Swimlane Properties
Note that in the above example, the Phase I Left#1 swimlane level cell originally resided between the Startup and Phase II Left#1 swimlane level cells. Since the Phase I Left#1 swimlane level cell did not participate in the merge swimlanes operation, OnePager, in this example, pulled the merging swimlanes together keeping the order of the rows as intact as possible. This resulted in moving the Startup Left#1 swimlane level cells and its row down to the above the Phase II Left#1 swimlane level cell. The result is that the Phase I Left#1 swimlane level cell now appears at the top of the chart.
Merging Swimlanes from Left#2 or Left#3 Swimlane Level Cells – One Swimlane Level Chart
Whenever there is only one swimlane level defined and showing in the chart, regardless of whether it is Left#1, Left#2, or Left#3 swimlane level, the example provided above in the previous sub-section applies.
Merging Swimlanes – Two Swimlane Level Chart
In the sub-sections that follow, we add the Left#2 swimlane level to the already present Left#1 swimlane level. Adding the Left#2 swimlane level to the original chart gives us a chart with this configuration:
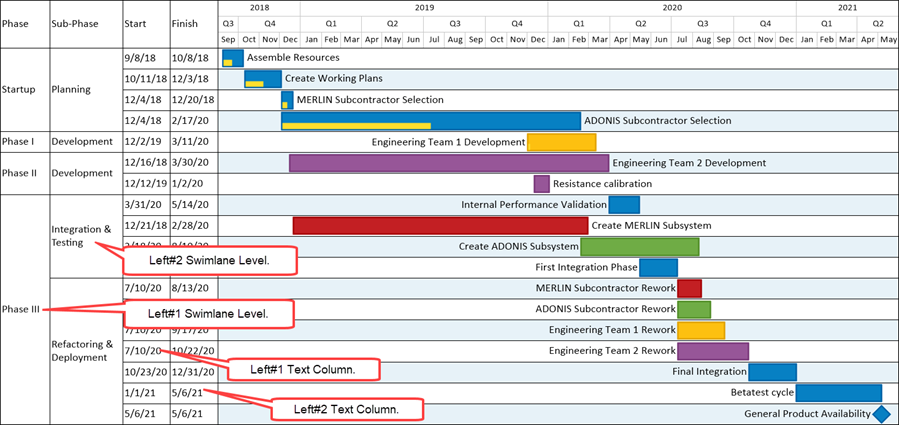
Merging Swimlane from the Left#1 Swimlane Level Cells – Two Swimlane Level Chart
In a chart with two swimlane levels where the Left#1 swimlane level is the highest level swimlane (left-most swimlane level), the results from merging swimlanes in this case is the same as in the one swimlane level chart explained in the previous section. The rows in the selected Left#1 swimlane level cells are merged into one swimlane level cell and the new merged Left#2 swimlane level cell’s label is based on the modal number of rows in the various participating original selected Left#1 swimlane level cells.
Using an adaptation of the example in the previous section, if we select the Startup Left#1 swimlane level cell and the Phase II Left#1 swimlane level cell for our example, the selected Left#1 swimlane level cells look like this:
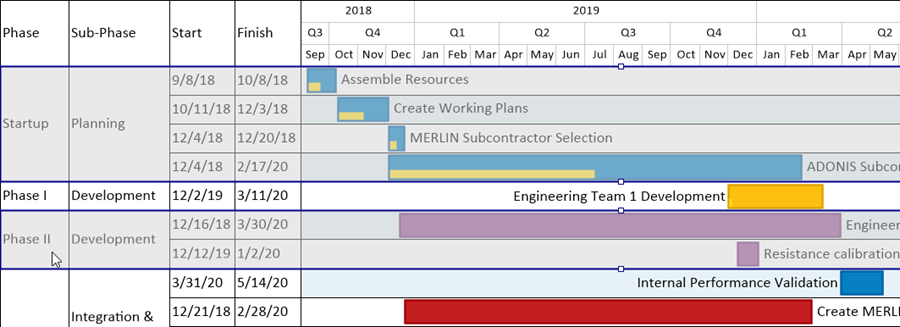
Above, the selection of the two swimlanes is made in the Left#1 swimlane level cells. Both the selected Left#1 and Left#2 swimlane level cell’s labels are different so the merged Left#1 and Left#2 swimlane level cell’s labels depends on the modal number of rows in the two selected sets of swimlane level cells. Four rows for the Startup/Planning Left#1/Left#2 swimlane level cells and two rows for the Phase II/Development Left#1/Left#2 swimlane level cells.
Continuing the process of accessing the swimlane level right-click context menu by right-clicking in one of the selected Left#1 swimlane level cells (perhaps the Phase II Left#1 swimlane level cell’s label) and clicking the Merge swimlanes command, produces this result:
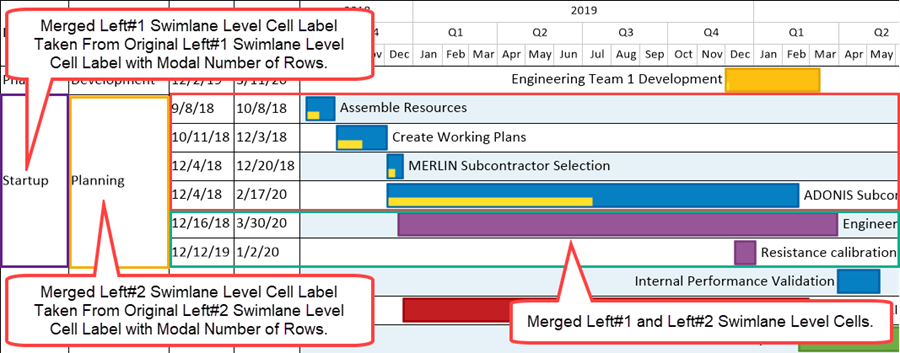
As shown above, the six rows are merged into one swimlane level cell at the Left#1 and Left#2 swimlane levels and the respective Left#1 and Left#2 swimlane level cell’s labels are taken from the swimlane level cell labels containing the modal number of rows. The new merged swimlane level cell is positioned in the chart as close to its original position as possible and the rows within the merged swimlane level cell retain their original ordering. This being the case, OnePager places the intervening, non-participating Phase I/Development Left#1/Left#2 swimlane level cell at the top of the chart.
Merging Swimlane from the Left#2 Swimlane Level Cells – Two Swimlane Level Chart
If we change the above example and make the same selections but use the Left#2 swimlane level cells, the selected swimlanes look like this:
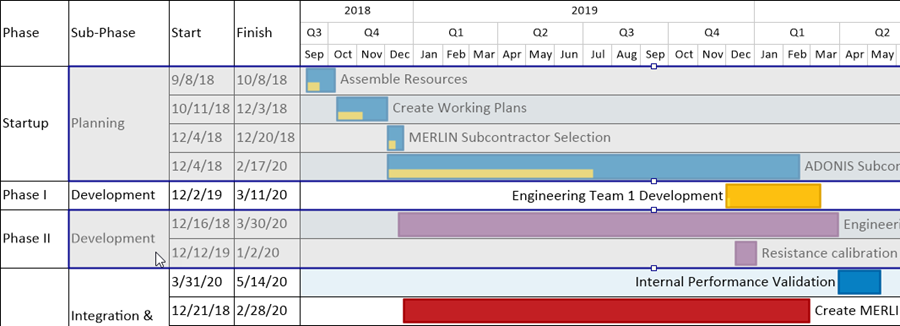
In the example above, the two swimlanes are selected from the Left#2 swimlane level cells. As in the previous sub-section, both the selected Left#1 and Left#2 swimlane level cell’s labels are different so the merged Left#1 and Left#2 swimlane level cell’s labels depends on the modal number of rows in the two selected sets of swimlane level cells. Four rows for the Startup/Planning Left#1/Left#2 swimlane level cells and two rows for the Phase II/Development Left#1/Left#2 swimlane level cells.
Continuing the process of accessing the swimlane level right-click context menu by right-clicking in one of the selected Left#2 swimlane level cells (perhaps the Development Left#2 swimlane level cell’s label) and clicking the Merge swimlanes command, produces this result:

As shown above, the six rows are merged into one swimlane level cell at the Left#1 and Left#2 swimlane levels and the respective Left#1 and Left#2 swimlane level cell’s labels are taken from the swimlane level cell labels containing the modal number of rows. The new merged swimlane level cell is positioned in the chart as close to its original position as possible and the rows within the merged swimlane level cell retain their original ordering. This being the case, OnePager places the intervening, non-participating Phase I/Development Left#1/Left#2 swimlane level cell at the top of the chart.
Merging Swimlane with Equal Number of Rows – Two Swimlane Level Chart
The two sets of examples in the two sub-sections above established that selecting two or more Left#1 or Left#2 swimlane level cells does not depend on which swimlane level cells (Left#1 or Left#2) are selected. Additionally, the concept of modal number of rows governing the resulting merged swimlane level cell’s labels was also demonstrated.
This sub-section shows the results when swimlane level cells are selected that have an equal number of rows and how this determines the merged swimlane level cell’s labels.
Since selecting in either the Left#1 or Left#2 swimlane level cells is moot, so we’ll select two swimlane level cells with equal number of rows form the Left#2 swimlane level as shown below:
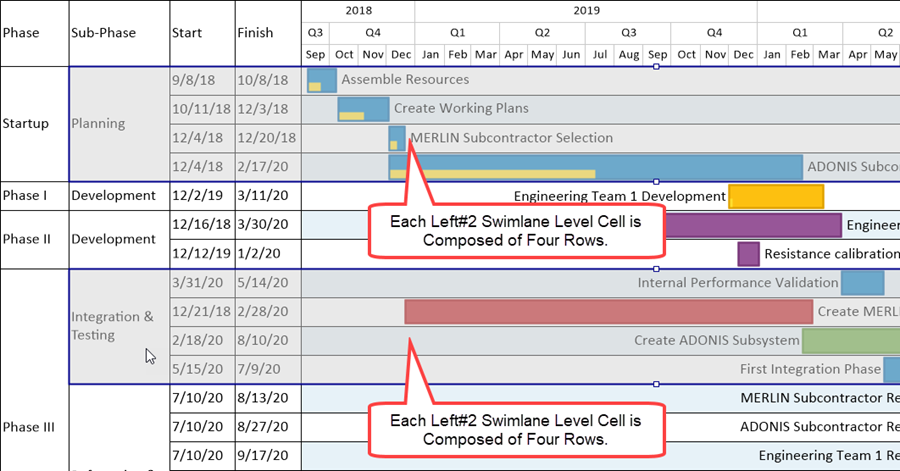
Continuing the process of accessing the swimlane level right-click context menu by right-clicking in one of the selected Left#2 swimlane level cells (perhaps the Integration & Testing Left#2 swimlane level cell’s label) and clicking the Merge swimlanes command, produces this result:
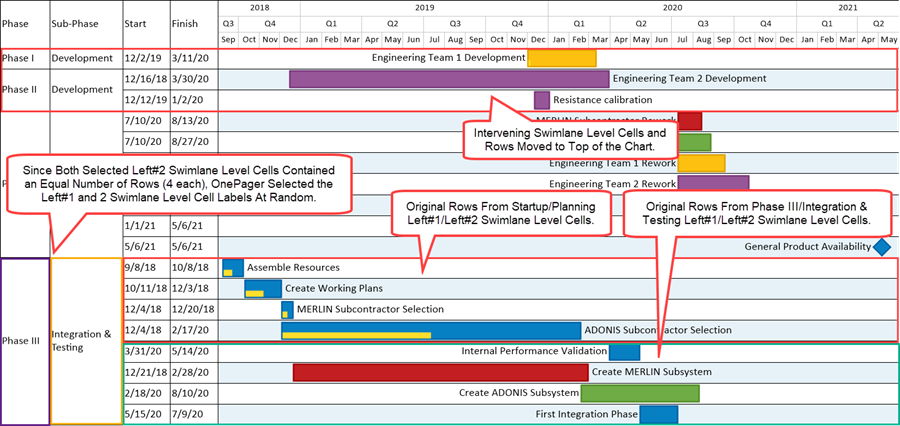
As shown above, the eight rows are merged into one swimlane level cell at the Left#1 and Left#2 swimlane levels and the respective Left#1 and Left#2 swimlane level cell’s labels are taken from the swimlane level cell labels containing the same number of rows. The new merged swimlane level cell is positioned at the bottom of the chart in this case, and the ordering of rows is retained within the original swimlane level cell’s configuration. OnePager places the intervening, non-participating (Phase I/Phase II)/Development Left#1/Left#2 swimlane level cells at the top of the chart.
The choices for the merged Left#1 and Left#2 swimlane level cell’s labels are made by OnePager at random since the participating original swimlane level cells both have an equal number of rows and there is no establish mode. As mentioned earlier in this article, OnePager assumes that after swimlane level cells are merged that actions will subsequently be taken to editing the merged swimlane level cell’s labels, move the merged swimlane level cells to a different position in the chart, or do some other form of row or swimlane level editing.
Merging Swimlanes – Three Swimlane Level Chart
In the sub-sections that follow, we add the Left#3swimlane level to the already present Left#1 and Left#2 swimlane levels. Adding the Left#3 swimlane level to the original chart gives us a chart with this configuration:
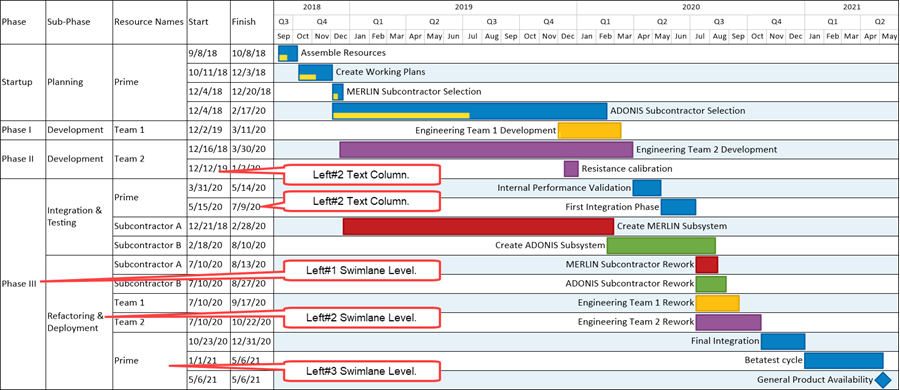
If you’ve followed along through the discussions involving configurations of one and two swimlane levels in the chart, you can rightly suspect that the various combinations involving three swimlane levels with selected swimlanes follows a recurring pattern.
Merging Swimlane from the Left#1 Swimlane Level Cells – Three Swimlane Level Chart
If we change the example from the previous section and make the same selections but use the Left#1 swimlane level cells, the selected swimlanes look like this:
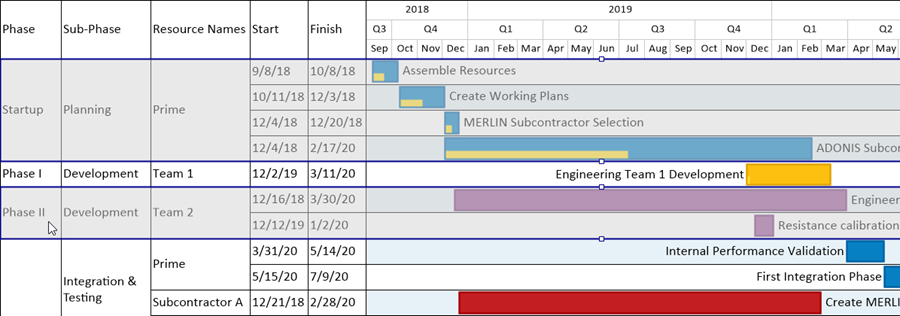
In the example above, the two swimlanes are selected from the Left#1 swimlane level cells.
As in the previous sub-section, both the selected Left#1, Left#2, and Left#3 swimlane level cell’s labels are different, so the merged Left#1, Left#2, and Left#3 swimlane level cell’s labels depends on the modal number of rows in the two selected sets of swimlane level cells. Four rows for the Startup/Planning/Prime Left#1/Left#2/Left#3 swimlane level cells and two rows for the Phase II/Development/Team 2 Left#1/Left#2/Left#3 swimlane level cells.
Continuing the process of accessing the swimlane level right-click context menu by right-clicking in one of the selected Left#1 swimlane level cells (perhaps the Phase II Left#1 swimlane level cell’s label) and clicking the Merge swimlanes command, produces this result:
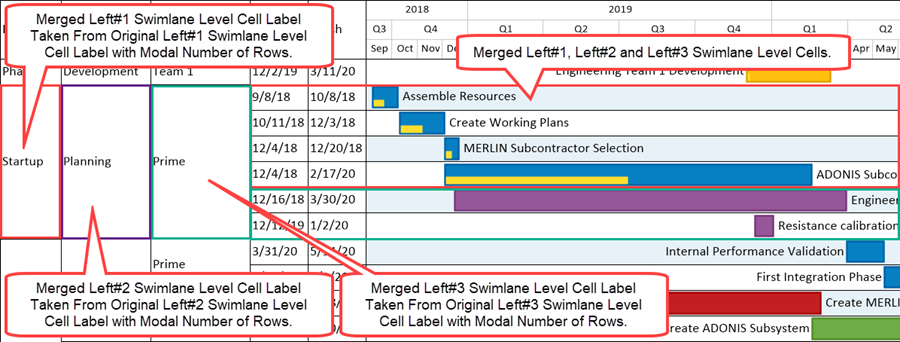
As shown above, the six rows are merged into one swimlane level cell at the Left#1, Left#2, and Left#3 swimlane levels and the respective Left#1, Left#2, and Left#3 swimlane level cell’s labels are taken from the swimlane level cell labels containing the modal number of rows. The new merged swimlane level cell is positioned in the chart as close to its original position as possible and the rows within the merged swimlane level cell retain their original ordering. This being the case, OnePager places the intervening, non-participating Phase I/Development/Team 1 Left#1/Left#2/Left#3 swimlane level cell at the top of the chart.
Merging Swimlane from the Left#2 Swimlane Level Cells – Three Swimlane Level Chart
If we change the above example and make the same selections but use the Left#2 swimlane level cells, the selected swimlanes look like this:
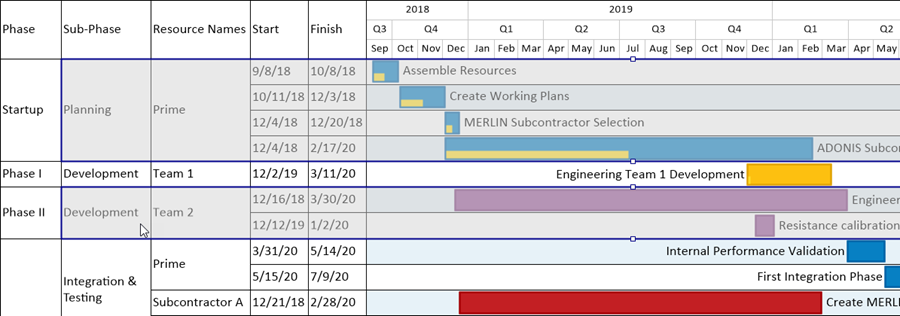
In the example above, the two swimlanes are selected from the Left#2 swimlane level cells.
As in the previous sub-section, both the selected Left#1, Left#2, and Left#3 swimlane level cell’s labels are different so the merged Left#1, Left#2, and Left#3 swimlane level cell’s labels depends on the modal number of rows in the two selected sets of swimlane level cells. Four rows for the Startup/Planning/Prime Left#1/Left#2/Left#3 swimlane level cells and two rows for the Phase II/Development/Team 2 Left#1/Left#2/Left#3 swimlane level cells.
Continuing the process of accessing the swimlane level right-click context menu by right-clicking in one of the selected Left#2 swimlane level cells (perhaps the Development Left#2 swimlane level cell’s label) and clicking the Merge swimlanes command, produces this result:

As shown above, the six rows are merged into one swimlane level cell at the Left#1, Left#2, and Left#3 swimlane levels and the respective Left#1, Left#2, and Left#3 swimlane level cell’s labels are taken from the swimlane level cell labels containing the modal number of rows. The new merged swimlane level cell is positioned in the chart as close to its original position as possible and the rows within the merged swimlane level cell retain their original ordering. This being the case, OnePager places the intervening, non-participating Phase I/Development/Team 1 Left#1/Left#2/Left#3 swimlane level cell at the top of the chart.
Merging Swimlane from the Left#3 Swimlane Level Cells – Three Swimlane Level Chart
If we again change the above example and make the same selections but use the Left#3 swimlane level cells, the selected swimlanes look like this:
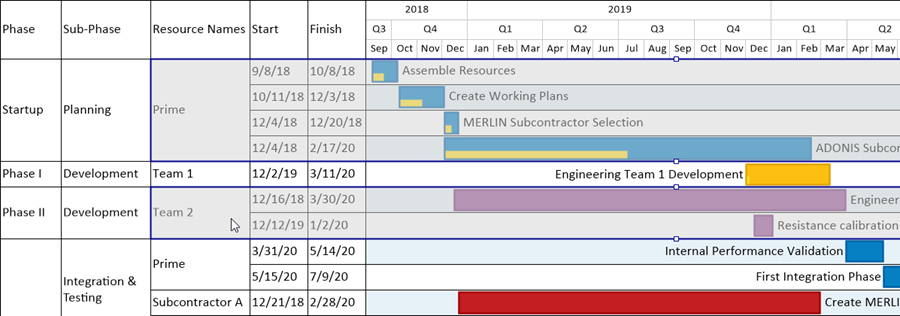
In the example above, the two swimlanes are selected from the Left#3 swimlane level cells.
As in the previous sub-section, as expected, both the selected Left#1, Left#2, and Left#3 swimlane level cell’s labels are different so the merged Left#1, Left#2, and Left#3 swimlane level cell’s labels depends on the modal number of rows in the two selected sets of swimlane level cells. Four rows for the Startup/Planning/Prime Left#1/Left#2/Left#3 swimlane level cells and two rows for the Phase II/Development/Team 2 Left#1/Left#2/Left#3 swimlane level cells.
Continuing the process of accessing the swimlane level right-click context menu by right-clicking in one of the selected Left#3 swimlane level cells (perhaps the Team 2 Left#3 swimlane level cell’s label) and clicking the Merge swimlanes command, produces this result:

As shown above, the six rows are merged into one swimlane level cell at the Left#1, Left#2, and Left#3 swimlane levels and the respective Left#1, Left#2, and Left#3 swimlane level cell’s labels are taken from the swimlane level cell labels containing the modal number of rows. The new merged swimlane level cell is positioned in the chart as close to its original position as possible and the rows within the merged swimlane level cell retain their original ordering. This being the case, OnePager places the intervening, non-participating Phase I/Development/Team 1 Left#1/Left#2/Left#3 swimlane level cell at the top of the chart.
Merging Swimlane with Equal Number of Rows – Three Swimlane Level Chart
The three sets of examples in the three sub-sections above established that selecting two or more Left#1 or Left#2 or Left#3 swimlane level cells does not depend on which swimlane level cells (Left#1 or Left#2 or Left#3) are selected. Additionally, the concept of modal number of rows governing the resulting merged swimlane level cell’s labels was also demonstrated.
This sub-section shows the results when swimlane level cells are selected that have an equal number of rows and how this determines the merged swimlane level cell’s labels.
Since selecting in either the Left#1, Left#2, or Left#3 swimlane level cells is moot, we’ll select two swimlane level cells with equal number of rows form the Left#2 swimlane level as shown below:
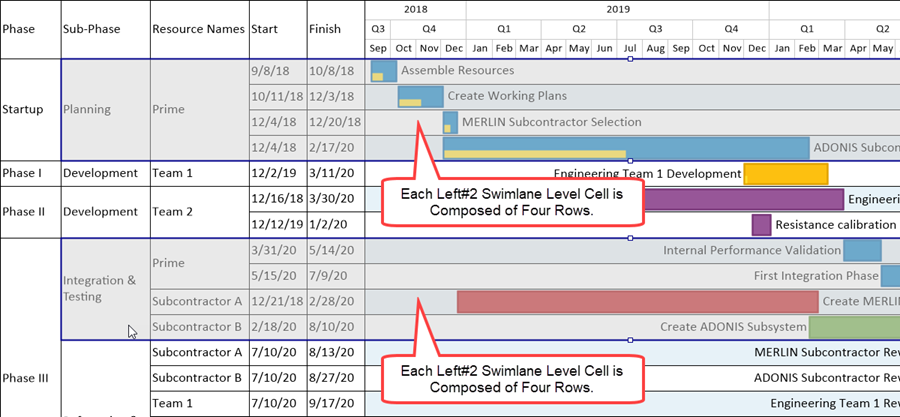
Continuing the process of accessing the swimlane level right-click context menu by right-clicking in one of the selected Left#2 swimlane level cells (perhaps the Integration & Testing Left#2 swimlane level cell’s label) and clicking the Merge swimlanes command, produces this result:
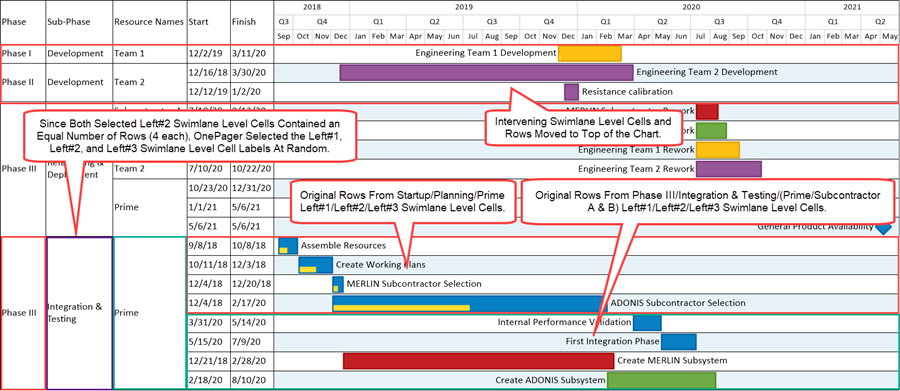
As shown above, the eight rows are merged into one swimlane level cell at the Left#1, Left#2, and Left#3 swimlane levels and the respective Left#1, Left#2, and Left#3 swimlane level cell’s labels are taken from the swimlane level cell labels containing the same number of rows. The new merged swimlane level cell is positioned at the bottom of the chart in this case, and the ordering of rows is retained within the original swimlane level cell’s configuration.
OnePager places the intervening, non-participating (Phase I/Phase II)/Development/(Team 1/Team2) Left#1/Left#2/Left#3 swimlane level cells at the top of the chart. The choices for the merged Left#1 and Left#2 swimlane level cell’s labels are made by OnePager at random since the participating original swimlane level cells both have an equal number of rows and there is no establish mode.
Note carefully that in the bottom set of selected swimlane level cells in the original chart at the Left#3 swimlane level consist of three swimlanes with three different Left#3 swimlane level cell labels – Prime, Subcontractor A, and Subcontractor B. In the illustration above with the merged swimlane level cells, OnePager selected Prime for the Left#3 swimlane level cell’s label because the original Prime Left#3 swimlane level cell has two rows while the Subcontractor A and B Left#3 swimlane level cells have only one row each. OnePager, as expected, selected Prime for the merged Left#3 swimlane level cell’s label because Prime is the model label.
As mentioned earlier in this article, OnePager assumes that after swimlane level cells are merged that actions will subsequently be taken to editing the merged swimlane level cell’s labels, move the merged swimlane level cells to a different position in the chart, or do some other form of row or swimlane level editing.
Related Links
Manual Editing Task/Milestone Shapes and Text Labels (Portal)
Creating and Editing Rows and Swimlanes (Portal)
About OnePager's Rows and Swimlanes
Collecting, Formatting, and Sorting Task/Milestones into Rows
Creating, Formatting, and Sorting Swimlanes Levels
Creating and Formatting Text Columns
Editing Text Columns or Swimlane Labels
Manually Hiding and Unhiding Swimlane Levels
Resizing the Width of Text Columns and Swimlanes
Hiding and Unhiding Rows and Swimlanes
Making Each Row into a Swimlane
Merging Swimlanes
Zebra Striping for Rows and Swimlanes for OnePager Pro
Zebra Striping for Rows and Swimlanes for OnePager Express
Editing with the Chart Properties form (Portal)
(12.21.1-70)