Showing Different Units of Time for Version 6.0
Contents
About Different Time Units
OnePager lets you specify up to three levels of time axis annotation as shown below:

Main Tab Time Axis Controls
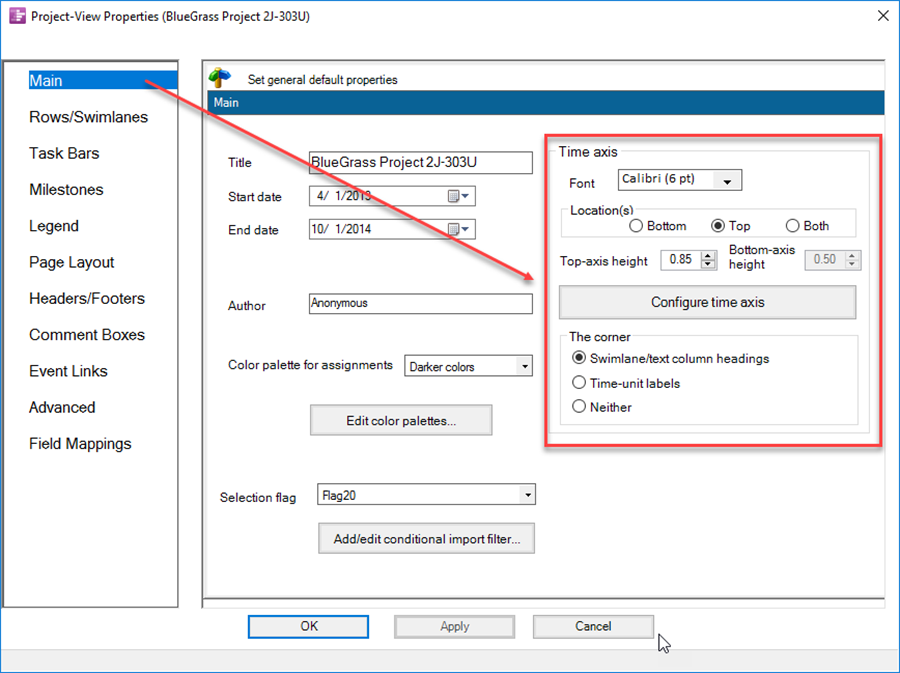
1) To control time axis annotation beyond the simple one level case, go to the Project-View Properties (PVP) form and the Main tab.
2) Then, go to the Time axis section in the upper right.

- a) Font. Provides access to the standard Font properties form where the font style, font size, font text color, and the controls for Bold, Italic, and Underline can be set or changed.
- b) Location. Lets you to select the position of the time axis which may be set at the bottom, top or at both locations in the project view.
- c) Top Axis Height. Lets you change the height of the time axis configuration at the top of the project view. The set increments are in user units which are either in inches or centimeters depending on the Microsoft Windows culture settings.
- d) Bottom Axis Height. Lets you change the height of the time axis configuration at the bottom of the project view. The set increments are in user units which are either in inches or centimeters depending on the Microsoft Windows culture settings.
Configure Time Axis Button
3) The Configure time axis button provides access to the Advanced time-axis features form shown below with its four tabs. You can also right click anywhere on the time axis to see these forms.
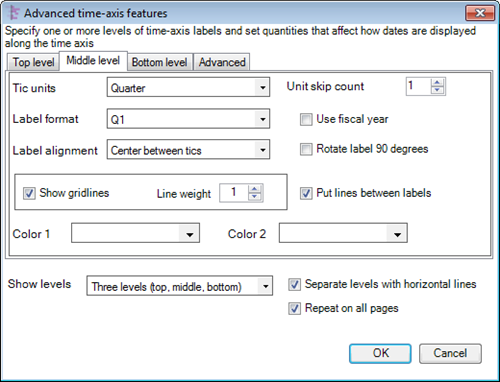
4) The Middle level tab on the "Advanced time-axis features form is shown below:

5) At the bottom of each Advanced time-axis features tab shown above, you can use Show levels dropdown to choose whether you want one, two, or three levels of time axis annotation.
6) Use the Separate levels with horizontal lines checkbox to put a separation line between levels on the time axis in the project view.
7) The middle level is the only level displayed if you choose to have just one level.
Top Level, Middle Level, and Bottom Level Controls
8) For each time axis level, you can specify the following information:
- a) Tic units. The time unit between each tic mark (tic units). Examples are Year, Quarter, Month, and Week.
- b) Unit skip count. How many time units to skip between labels (normally 1).
- c) Label format. How the date information is displayed (label format). These label formats are very similar to those used in Microsoft Project. Examples are Feb, F, February, and Feb ‘08.
- d) Use fiscal year. This checkbox, when checked, let you use fiscal year formats. Please use the following links for more information on OnePager processing of fiscal year:
| Using Fiscal Years and Weeks for OnePager Pro | Using Fiscal Years and Weeks for OnePager Express |
- e) Label assignment. How the labels are aligned. The most common choice is to center the labels between tic marks, as is shown above.
- f) Rotate label 90 degrees. When this checkbox is checked, the label will be rotated into a vertical position.
- g) Show gridlines. When this checkbox is checked, OnePager will draw a long vertical gridline from top to bottom of the graph for each tic unit.
- h) Line weight. This control lets you specify how thick to make gridlines.
- i) Put lines between labels. When this checkbox is checked, OnePager separates each time unit by a vertical line, as is shown above in the first illustration of a three levels time axis annotation.
9) At the bottom of the form are additional choices that apply to all levels.
- a) Separate levels with horizontal lines. If the Separate levels with horizontal lines checkbox is checked, OnePager draws horizontal lines that separate the levels, as shown in the example at the start of this article. The horizontal lines are thin so as not to overpower the gridlines in the project view.
- b) Repeat on all pages. When this checkbox is checked, OnePager will place the time axis on all pages in a multi-page output.
Advanced Tab Controls
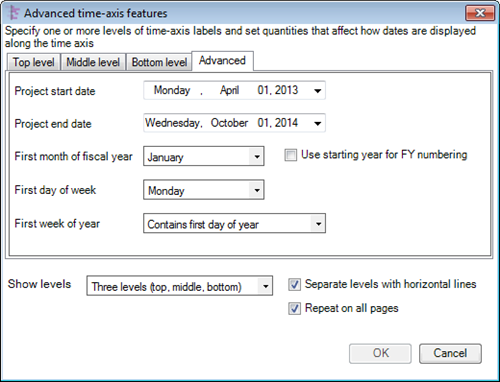
10) The Advanced tab form below lets you control more properties of time axis labeling:

- a) Project start and end dates. These two windows are used as reference dates for computing the number of weeks (or months) from the beginning or end of the project.
- b) First month of fiscal year. Specifies the month in which the fiscal year begins.
- c) Use starting year for FY numbering. This checkbox when checked, tells OnePager whether the fiscal year is called by the name of the calendar year in which it starts.
- i) Normally this is unchecked, so that the fiscal year is called by the name of the calendar year in which it ends.
- ii)For more information on how OnePager represents detailed aspects of the fiscal year on the time axis, please use the Related Links section below in this article.
- d) First day of week. Use this window control to tell OnePager when each week starts, when the time unit is weeks.
- e) First week of the year. Use this window control to tell OnePager if the first week of the year Contains first day of the year or if the first week of the year Is the first full week of the year where you have previously designated the First day of the week as described above.
The Corner
The Corner control group, shown in the Main tab of the Project-View Properties (PVP), is described in detail at the following links:
| Labeling the Corner for OnePager Pro | Labeling the Corner for OnePager Express |
Related Links
Using Fiscal Years and Weeks for OnePager Pro
Using Fiscal Years and Weeks for OnePager Express
Creating a Countdown to Project End by Months on the Time Axis for OnePager Pro
Creating a Countdown to Project End by Months on the Time Axis for OnePager Express
Changing the Time Axis Background Color
Labeling the Corner for OnePager Pro
Labeling the Corner for OnePager Express
(22.1.1-60)