Using the OnePager "Data" Tab's "Selected file(s)" Button for Version 7.0
Contents
Overview
The purpose of this article is to acquaint you with the features and usage of the OnePager Data ribbon tool bar tab’s Selected file(s) button. The Selected file(s) button is used to verify that the source plan(s) associated with the open chart are correct. Once verified, the Pull operation for snapshot replacement or addition can proceed. Additionally, when a problem is detected, the functionality under this button is useful for making fixes.
For convenience, the term used henceforth for the set of source plans associated with a chart is source packet. The OnePager Data ribbon tool bar tab is shown below. Please note that this article covers the use of this feature for both OnePager Pro (OPP) and Express (OPX) and applies equally well to the Add-in and Desktop applications of each.

What is a Pull Operation?
A Pull operation starts in the Chart Editor. That is, you already have OnePager running and decide to update the open chart or (rarely) create a new chart. In contrast, a Push operation begins in the OnePager Pro Start from which you make a new chart or update an existing chart. We added the Pull operation because we found that OnePager users were often creating a chart and finding something in the source plan that they needed to change. After recognizing the need for a change, they are going back to the source plan, making the change, and then re-launching OnePager to update the chart. The Pull operation lets you open a chart and update it repeatedly as you edit its source plan. After each set of changes to the source plan(s), you can quickly see the effect in the Chart Editor by using the OnePager Data ribbon tool bar tab to Pull the source plan changes into the chart. For an explanation of the Pull operation please consult the articles listed in the Related Links section at the end of this article.
Managing Source Plans (Microsoft Project or Microsoft Excel) Using the Data Tab's Select File(s) Feature
Validating a Source Plan
To validate source plans in a source packet follow the steps below. All examples in this article use the OPP Add-in application. The feature works the same for the OPP desktop, OPX Add-in, and OPX desktop application as well.
- 1) Launch OPP from Microsoft Project and use the OnePager Pro Start form to open a chart. For an example, when you are done with this step the Chart Editor looks like this with the OnePager Data ribbon tool bar tab active:
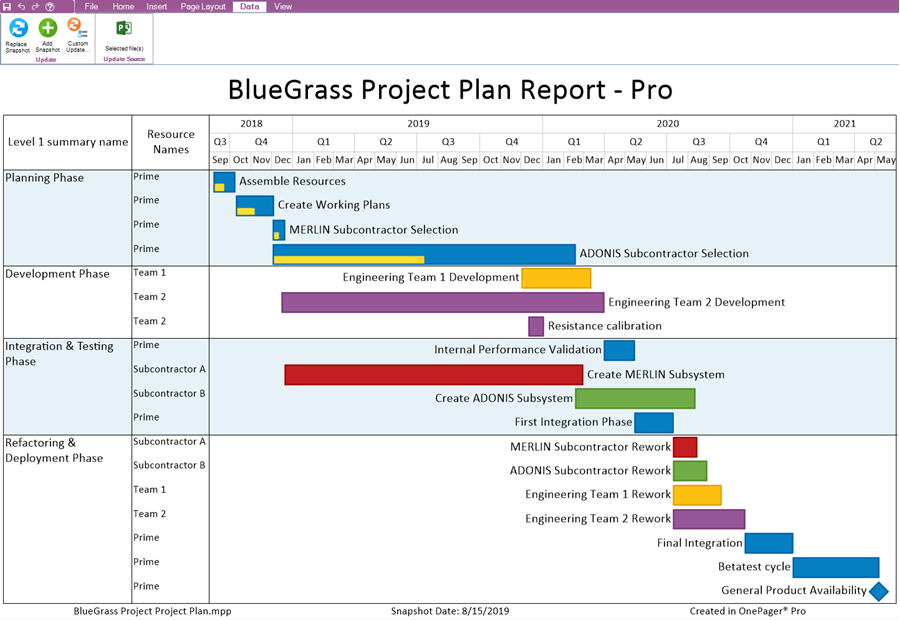
- 2) Click the Selected file(s) button shown above. This launches the Data source selection form shown below. Please notice that there is a file name in the window along with the date modified, file type, and size. If you hover your mouse over the file name, OnePager displays the file’s path name as shown below:
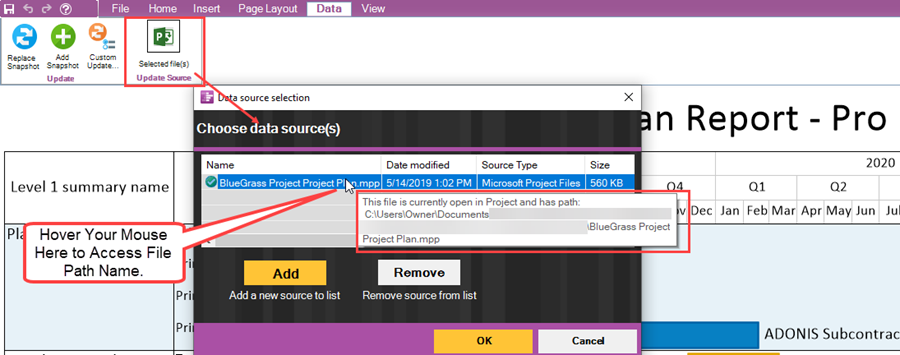
- 3) By examining the path name you can make sure that the file is the one you want to use for the update. The path name for the source plan and the path name are stored in the .TAM file for all charts created with or updated by OnePager.
Locating a Source Plan
On occasion, you may have moved a source plan to another folder. If you do, the path name stored for the .TAM file for the chart may not match where the relocated .TAM file is actually now stored. The Selected file(s) button, when clicked in this case, returns a message notifying you that OnePager could not locate the .TAM file using the path name stored in the .TAM file. In this situation, the form looks like this:
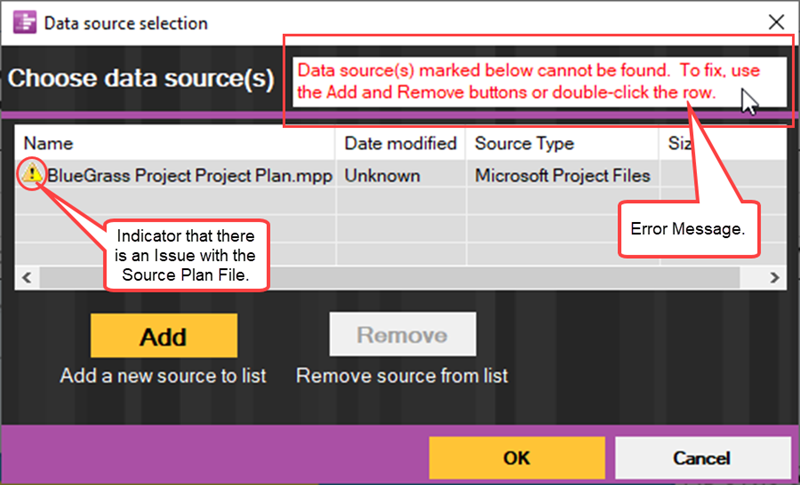
The instructions in the form are to double-click on the file name. This accesses a Change path… form which shows the location of the .TAM file as it is known by the chart (.TAM file path). If the file name in the Change path... form is incorrect, you can search, browse, or go directly to where the desired .TAM file is actually located. This is shown below:
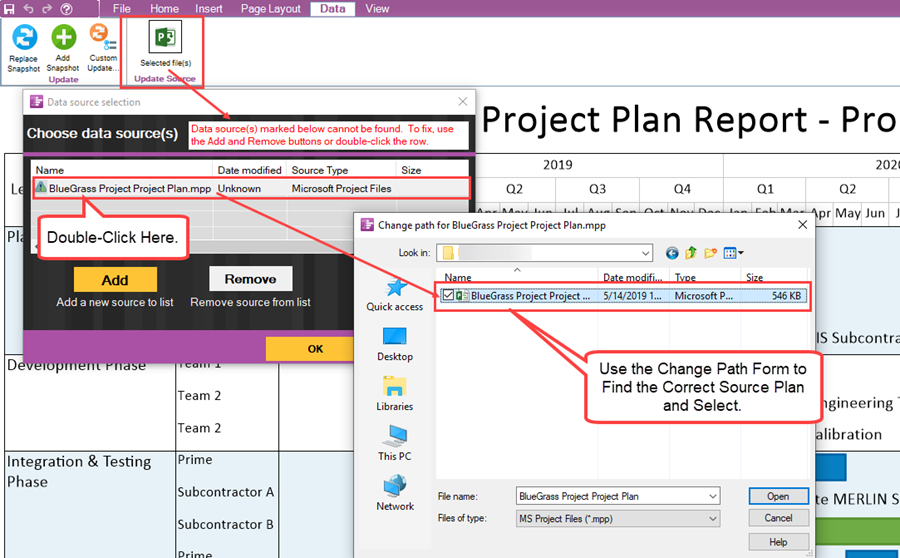
After locating the desired .TAM file, select it from the Change path… form and click Open. This restores the correct path name into the .TAM file and into the Data source selection form. As a result of the action, the Data source selection form is updated to looks like this:
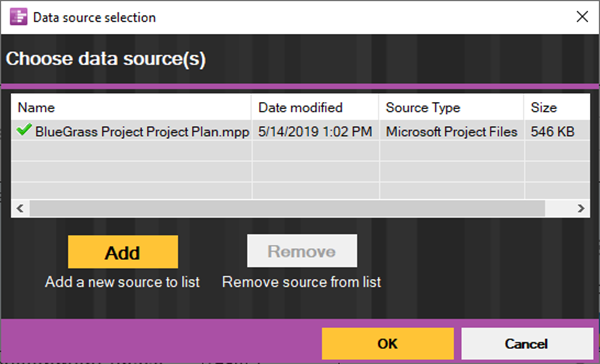
The green check mark shown in the Data source selection form above indicates that the .TAM file exists and its file name and path name are stored in the .TAM.
Adding a Source Plan
There is an Add button on the Data source selection form. This can be used in two (2) ways:
- 1) To create a multi-file chart.
- 2) Or, as the first step in replacing a source plan followed by the Remove button used to remove the unwanted .TAM file.
For instructions on creating multiple-project charts, please see the articles at: Creating Various Multi-Charts with OnePager Pro and Express (Portal)
Changing a Source Plan
You can change a source plan file name for many reasons pertaining to your update processes. The most common reason is for maintaining versions of your source plans as separately named source plans but to continue using a single OnePager .TAM file to represent the project through time. Using a series of source plans to record changes in a project at the source plan level is a commonly used technique which preserves the history of the project at the source plan level. Using OnePager's snapshot capability is a way of recording the progress of the project at in a single location (.TAM file). However, using this technique requires some caution and a good deal of care to make sure that snapshots, if updated, are done so with the correct source plan. Using this techniques requires that you change the source plan file name correctly in the Data source selection form.
An Example
Changing a source plan entry in the Data source selection form is a matter of adding the new source plan into a new entry in the grid and removing the old source plan from an existing entry in the grid. Suppose we use the Microsoft Project BlueGrass Project Plan as our initial source plan and call it the BlueGrass Project Plan - Baseline. Our approach in this project is to update the BlueGrass Project Plan - Baseline source plan periodically and save it under a new source plan file name each time it is updated. For example, after the first reporting period, we update the BlueGrass Project Plan - Baseline source plan with new start/finish dates and percent complete values and save it as BlueGrass Project Plan -Period 1. This approach is repeated at the end of each project reporting period and a new Microsoft Project source plan file is created and saved with its unique source plan file name that includes the Period number. Our goal is to create a set of snapshots associated with the original BlueGrass Project Plan - Baseline source plan such that the .TAM file contains all the snapshots, in one place (.TAM file), for all reporting period.
Establishing the Baseline
The first step is to create the baseline source plan using the BlueGrass Project Plan in its initial state and saving it as a Microsoft Project source plan file under the file name of BlueGrass Project Plan - Baseline. For the purpose of this example, the only changes to the source plan that are made are to the %Complete field. Starting with the BlueGrass Project Plan - Baseline source plan all %Complete values are 0%. In successive reporting periods, the project administrator updates the %Complete field in successive copies of the original source plan as the project proceeds. As the starting point, on 9/8/2018 the BlueGrass Project Plan - Baseline source plan looks like this:
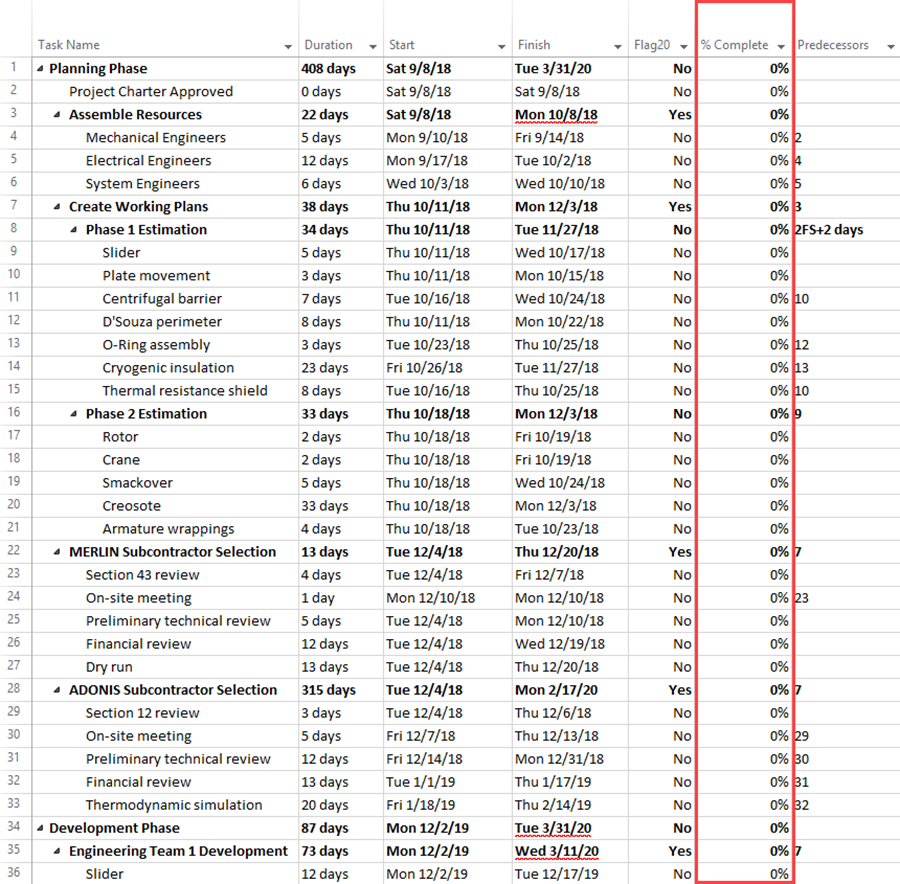
At this point in the project all %Complete values are 0%. The next step is to create the first snapshot for the project using the BlueGrass Project Plan - Baseline as the source plan and name the resulting .TAM file - BlueGrass Project Plan Report - Pro. This is done in the conventional way by launching OnePager Pro and creating a new snapshot with the NEW option on the OnePager choices form. The first snapshot looks like this;
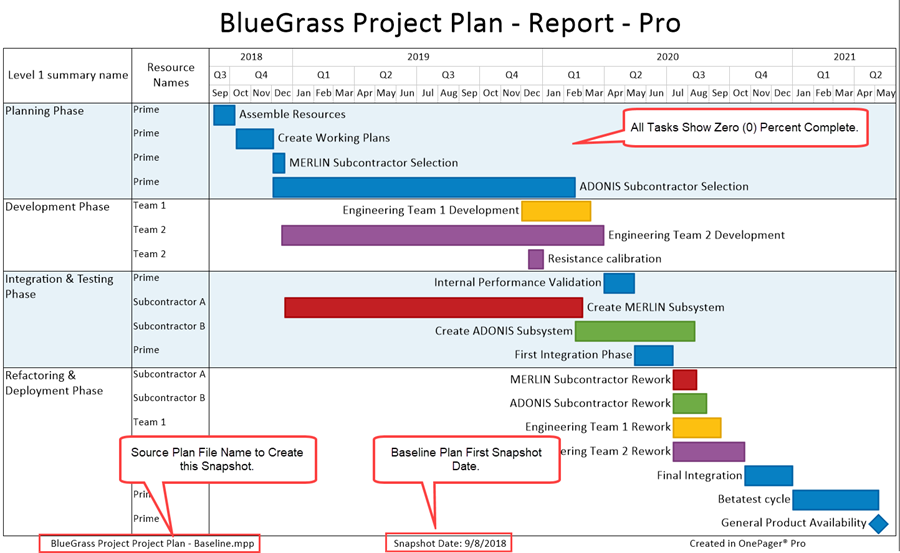
To continue the example, suppose the end of 1/1/2019 the BlueGrass Project Plan - Baseline source plan is updated with current %Complete values and saved as BlueGrass Project Plan - Period 1. As a result of the update to this source plan it now looks like this:
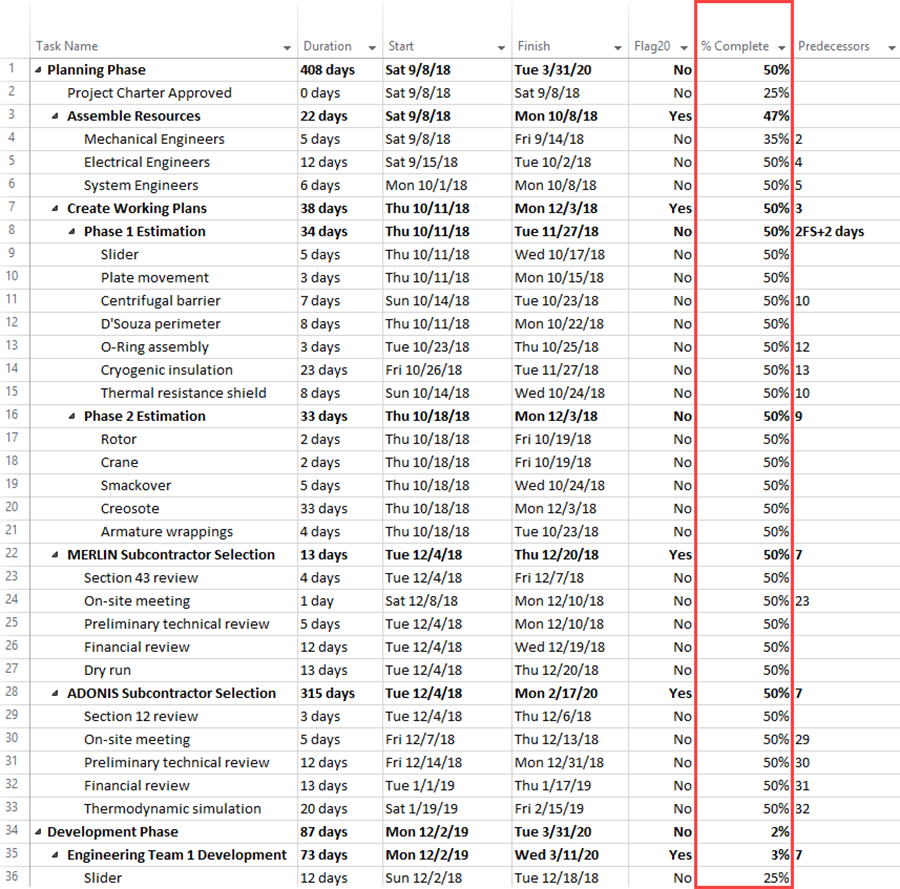
The notable changes are in the %Complete field of the source plan.
Adding a Snapshot to the Baseline .TAM Using An Updated Source Plan
With the Period 1 source plan updated, we want to create a snapshot with the same look and feel as our first snapshot using the data from the BlueGrass Project Plan - Period 1 source plan. The purpose is to make sure that the new period snapshot resides with the first snapshot created at the beginning of the project.
Changing the Source Plan in the Data source select Form
The following steps are required to do this: Launch Microsoft Project with the original source plan - BlueGrass Project Plan - Baseline and launch OnePager Pro so you can OPEN the OnePager Pro .TAM that was first created - BlueGrass Project Plan Report - Pro. This action displays the BlueGrass Project Plan Report - Pro's first snapshot shown in the illustration above. Since we want to create a new snapshot using the BlueGrass Project Plan - Period 1 source plan as our input, we need to change the source plan to reflect that our source comes from Period 1. Next, go to the OnePager Data ribbon tool bar tab and click the Select file(s) button which accesses the Data source selection form with the BlueGrass Project Plan - Baseline source plan in the top entry of the grid as shown here:
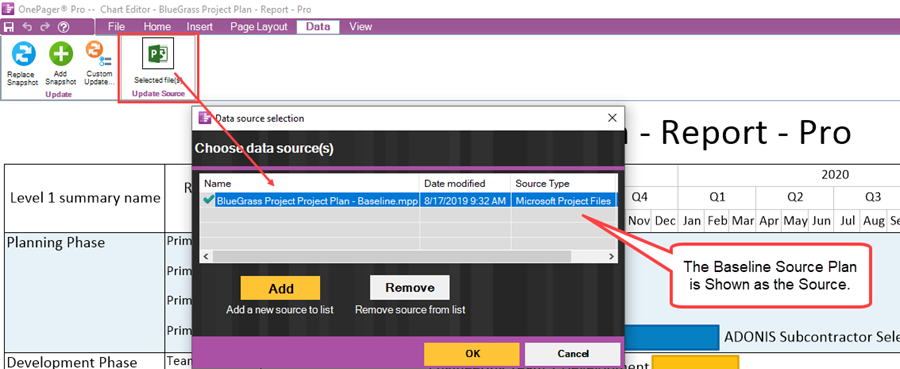
At this point we need to change the source plan file name in the form to the BlueGrass Project Plan - Baseline source plan before we can add a snapshot to the .TAM file being displayed in the Chart Editor which belongs to the BlueGrass Project Plan - Baseline source plan file. Recall that we want all progress snapshots to reside in the Baseline .TAM file for convenience. To accomplish this, click the Add button in the Data source selection form which accesses the Windows Open form where both source plans used in this example are located as shown below:
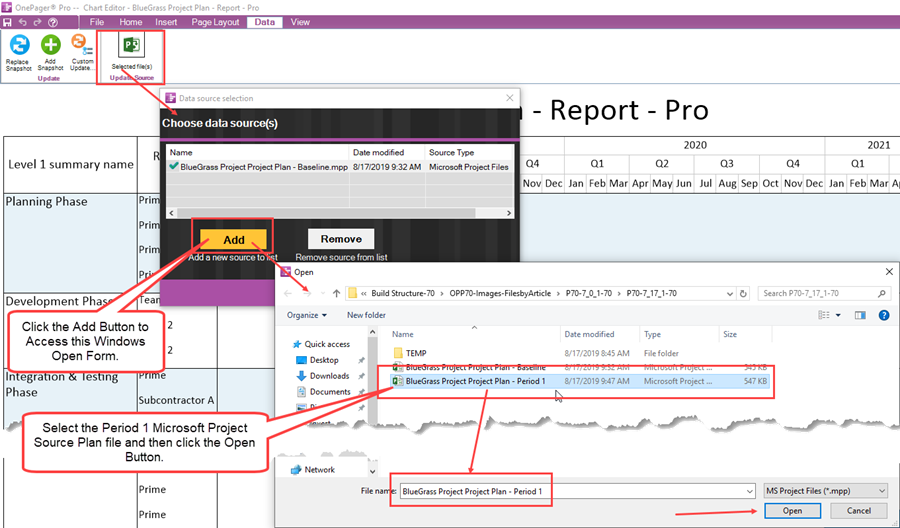
At the end of this step the Data source selection form has two entries - the first for the Baseline source plan and a second for the Period 1 source plan as shown below:
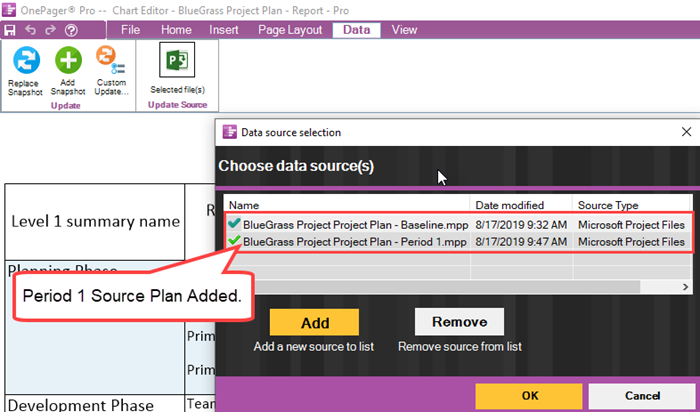
To complete the change source plan process, select the Baseline entry in the Data source selection form and click the Remove button in the form as shown here:
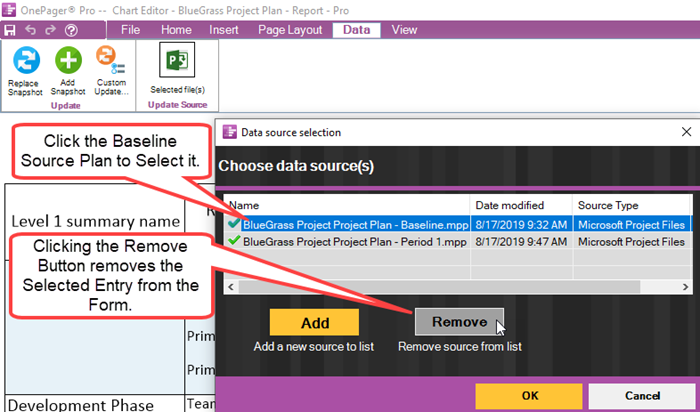
After clicking the Remove button the form looks like this:
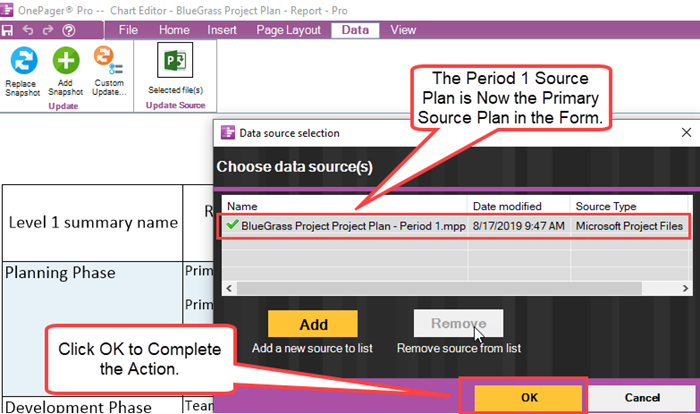
Adding the New Snapshot using the Add Snapshot Button
Once the Data source selection form is updated as shown above, it is not appropriate to add the new snapshot to the .TAM file being displayed in the Chart Editor. Recall that the current .TAM file is part of the Microsoft Project BlueGrass Project Plan - Baseline source plan file so the new snapshot is added to this .TAM file as follows. After the Data source selections form's OK button is clicked, the form is closed. The next step is to click the Add snapshot button on the OnePager Data ribbon tool bar tab. Performing this action displays the calendar with the date of the current snapshot highlighted as shown below:
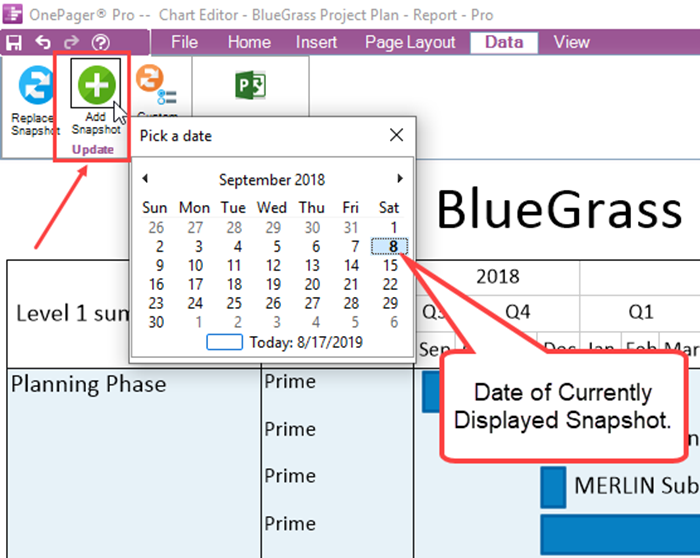
Since we want the new snapshot date to be 1/1/2019, use the calendar controls to move the calendar to that date as shown here:
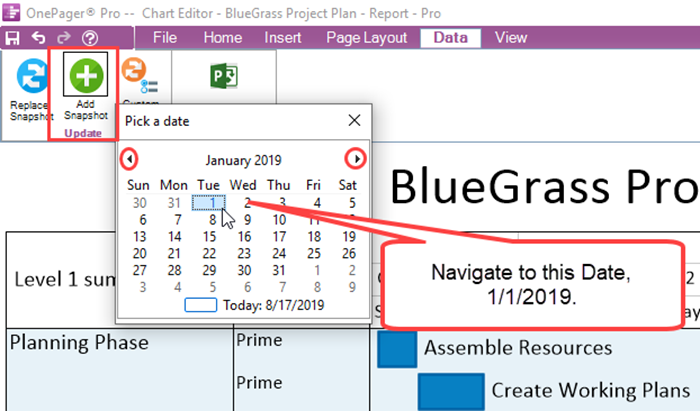
When the 1/1/2019 calendar date is clicked, OnePager performs a series of operations. First, it closes the calendar form - not shown below. Second, it goes to the active Microsoft Project source plan file that is present in the Data source selection form, shown above, at the time the form is closed and accesses the data in that active Microsoft Project source plan file which in this case is the BlueGrass Project Plan - Period 1 source plan. Last, OnePager displays the added snapshot in the Chart Editor as shown below:
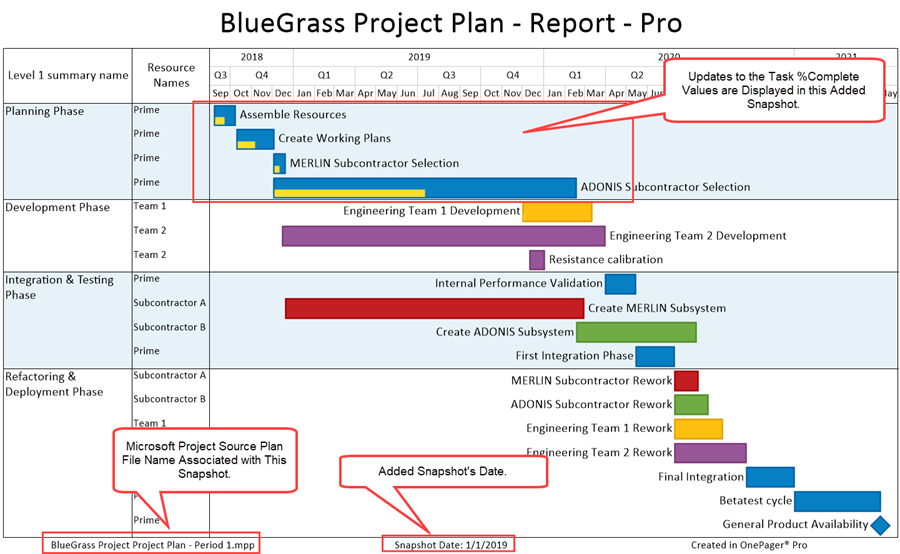
Continuing the Procedure Throughout the Project
This same sequence of steps can be repeated throughout the remainder of the project. As the project proceeds and snapshots are added, they all have the same look and feel and can be compared within the Chart Editor, individually saved, or copied to individual slides in a PowerPoint presentation.
Accessing Snapshots from the Chart Editor
To access all available snapshots in the chart, in this case the chart for BlueGrass Project Plan - Baseline, use the OnePager Pro View ribbon tool bar tab's Snapshots control group as shown here:

Use the two arrow buttons to switch between snapshots. Click the List All button to access the Select snapshots form showing the dates of all snapshots associated with the chart as shown here:
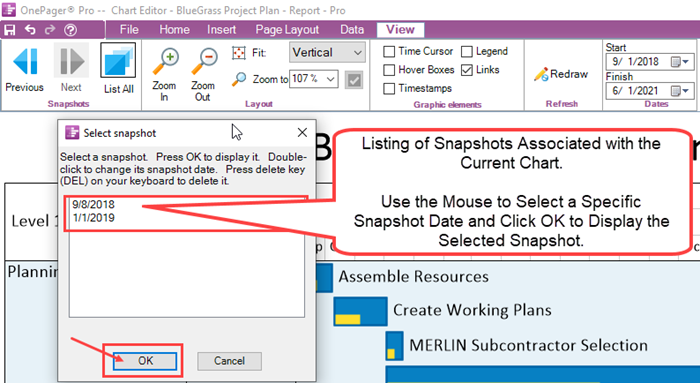
As snapshots are added to the chart the listing increases. For more information on managing charts and snapshots, please see the article at: Snapshots (Versioning)
Related Links
Creating a NEW Chart via Pull Operation - OnePager Pro
Creating a NEW Chart via Pull Operation - OnePager Express
REPLACING a Snapshot via Pull Operation - OnePager Pro
REPLACING a Snapshot via Pull Operation - OnePager Express
ADDING a Snapshot via Pull Operation - OnePager Pro
ADDING a Snapshot via Pull Operation - OnePager Express
Custom Update (Replacing) of a Snapshot via Pull Operation - OnePager Pro
Custom Update (Replacing) of a Snapshot via Pull Operation - OnePager Express
Creating Various Multi-Charts with OnePager Pro and Express (Portal)
(7.17.1-70)