Difference between revisions of "Testing Article1"
| Line 1: | Line 1: | ||
| − | == | + | ==Overview== |
| − | + | OnePager Pro and Express can create Gantt charts or Timeline layout charts by '''collecting''' tasks from your '''source plans''' and placing them into '''rows''' in your OnePager Pro or Express charts. A Gantt chart, in this context, is organized such that each row contains only one task. A Timeline layout, on the other hand, can have multiple tasks in a single row, based upon a field that you specify from your '''source plan'''. In a timeline layout, tasks that share the same value for a given field will automatically appear together in the same row. | |
| − | === | + | ===Gantt Chart and Timeline Layout Chart Examples=== |
| − | + | The Gantt chart and Timeline layout chart shown below are examples of each chart layout organization: | |
| − | <center>[[File:P70- | + | <center>'''Gantt Chart'''</center> |
| − | <!--<center>P70- | + | <center>[[File:P70-12_0_1-(1)-06092020.png]]</center> |
| + | <!--<center>P70-12_0_1-(1)-06092020.png</center>--> | ||
| − | + | The visual characteristic of the Gantt chart above is that all tasks are placed in their own individual '''row'''. | |
| − | <center>[[File:P70- | + | <center>'''Timeline Layout Chart'''</center> |
| − | <!--<center>P70- | + | <center>[[File:P70-12_01_1-(21)-06222020.png]]</center> |
| + | <!--<center>P70-12_01_1-(21)-06222020.png</center>--> | ||
| − | + | The Timeline layout chart above has all task bars and milestone symbols associated with the same Project organized into a single '''row '''in the chart. These task bars and milestone symbols are all associated with the same field value (in this case '''Project '''name). The arrangement shown above is sometimes called a '''ribbon'''. | |
| − | + | ===Gantt Chart Versus Timeline Layout Chart Selection=== | |
| − | + | Both chart layout organizations have uses in supporting schedule conversations and the controls and examples provided in this article for '''managing rows''' are here to help you implement your choices. Typically, when building a Microsoft Project or Excel '''source plan''' you have a mental picture of how the '''source plan '''should look when presented visually. Accordingly, we find that users structure their '''source plans''' initially with the '''intent''' of creating '''either''' a Gantt chart '''or''' a Timeline Layout chart. OnePager Pro and Express version 7.0 are structured to support the '''creation''', '''formatting''', and '''editing''' of both the Gantt charts and Timeline Layout charts. | |
| − | + | This series of articles assumes that the reader is interested in '''creating''', '''formatting''', and '''editing''' either a Gantt chart or Timeline Layout chart for a specific purpose and can consult the appropriate sub-section of this article when considering the controls available in the '''Chart Properties''' form’s '''Rows/Swimlanes '''tab’s '''Rows''' control group. | |
| − | + | ==Microsoft Project and Microsoft Excel Source Plans== | |
| − | + | The '''Chart Properties '''form’s '''Rows/Swimlanes''' tab are essentially the same for OnePager Pro version 7.0 and OnePager Express version 7.0. The controls described in this article and the remainder in the series applies to both Microsoft Project and Excel '''source plans imported '''into OnePager Pro and Excel, respectively. Where there are differences between Microsoft Project and Excel, there is a separate article covering specifically the requirements for using the features with Microsoft Excel. | |
| − | + | ==Creating Gantt Charts== | |
| − | + | In this and following sub-sections, it is assumed that you have '''created''' or are '''using''' a distributed '''Template Properties''' form that supports either the Gantt chart or Timeline layout chart. Accordingly, this article and the others articles that make up this series deals with '''creating''' and '''editing''' charts with the assumption that an appropriate '''Template Properties''' form is selected as the starting point. The Gantt chart is the most typical task bar/milestone symbol organization used in general practice. | |
| − | + | The '''Chart Properties '''form’s '''Rows/Swimlanes '''tab is shown below with the '''Rows''' control group highlighted for the discussion that follows: | |
| − | : | + | <center>[[File:P70-12_01_1-(1)-06122020.png]]</center> |
| + | <!--<center>P70-12_01_1-(1)-06122020.png</center>--> | ||
| − | + | In the illustration above, the '''Gantt chart (one task per row)''' radio button is selected indicating that the chart is intended to be a Gantt chart with one task bar/milestone symbol per '''row'''. With this decision made, the next step is to determine how '''imported source plan''' tasks/milestones and their '''rows''' are '''sorted''' in the chart. | |
| − | + | There are two options available to provide maximum flexibility: | |
| − | + | :1) '''Sort rows like Project''' or | |
| − | + | :2) '''Sort on field:''' where you have the further option to select the '''source plan field''' to control the '''sorting of rows''' and controls to determine which direction (lowest to highest or highest to lowest) the '''sort on rows''' is done. | |
| − | + | The '''Row Border Formatting…''' button is discussed in this article at this link: [[Collecting, Formatting, and Sorting Task/Milestones into Rows for Version 7.0#Row Border Formatting | Row Border Formatting]] <!-12.01.1-70--> | |
| − | + | ===Sort Rows Like Project=== | |
| − | + | Typically, Microsoft Project '''source plans '''are organized by ascending task/milestone '''start dates'''. | |
| − | : | + | :1) Microsoft Project provides an '''ID field''' where the '''source plan '''tasks are numbered sequentially from the top of the Microsoft Project grid to the bottom. OnePager Pro keys on the '''ID field''' for '''sorting rows like Project'''. |
| − | : | + | :2) Microsoft Excel does not provide a corresponding internal sequence field as described for Microsoft Project. Our recommendation is that for Microsoft Excel '''source plans''' that you provide such a field which can be used for this purpose. OnePager Express looks for such a field which is typically called '''Task ID''', but any name suffices. |
| − | + | '''Sorting rows like Project''' takes place within the entire chart when there are '''no swimlane levels''' defined. '''Sorting rows like Excel''' where a '''sequence field''' is not found or defined results in the chart being sorted from the '''source plan’s''' top '''row '''to the bottom '''row'''. | |
| − | + | However, when '''multiple swimlane levels''' are present in the chart, the '''Sort rows like Project''' is performed within the '''lowest swimlane level '''defined even if these '''multiple swimlane levels''' are '''hidden'''. In this respect, the '''multiple swimlane levels''' defined in the chart dictate the chart’s overall visual organization which can be controlled in the '''Swimlanes''' control group of the '''Chart Properties '''form’s '''Rows/Swimlanes '''tab. | |
| − | + | For more information on the '''controls for managing multiple swimlane levels''', please see the article at: [[Creating, Formatting, and Sorting Swimlane Levels for Version 7.0 | Creating, Formatting, and Sorting Swimlane Levels]] <!-12.02.1-70--> | |
| − | + | The organization of the chart in terms of '''sorting rows''' is more visible when the '''Sort on field: '''option is used as discussed next. | |
| − | + | ===Sort Rows Like Project – Basic Example=== | |
| − | + | The most basic Gantt chart with no '''text columns''' and no '''swimlanes''' looks like this: | |
| − | + | ||
| − | + | <center>[[File:P70-12_01_1-(1A)-06152020.png]]</center> | |
| + | <!--<center>P70-12_01_1-(1A)-06152020.png</center>--> | ||
| − | + | The chart above provides the most basic project information by displaying the '''task bar name labels''' and the '''time axis''' so that '''task bar start/finish dates''' can be seen. Adding '''swimlanes '''and informative '''text columns '''can enhance the information content of the chart and help focus an audience’s attention to the specific issues of the schedule presentation. | |
| − | + | For more information on '''Managing Swimlane Levels''', please see the article at: [[Creating, Formatting, and Sorting Swimlane Levels for Version 7.0 | Creating, Formatting, and Sorting Swimlane Levels]] <!-12.02.1-70--> | |
| − | + | For more information on '''Managing Text Columns''', please see the article at: [[Creating and Formatting Text Columns for Version 7.0 | Creating and Formatting Text Columns]] <!-12.03.1-70--> | |
| − | <!- | + | |
| − | + | ===Sort on Field:=== | |
| − | + | When the '''Sort on field:''' radio button is clicked, the window below the radio button and the two directional buttons are '''enabled'''. The '''default '''setting for Microsoft Project '''source plans''' is the '''ID field'''. | |
| − | + | For Microsoft Excel '''source plans''', OnePager Express attempts to find a '''source plan field''' in the Microsoft Excel file that is a numeric sequential file. | |
| − | + | :1) Accordingly, we recommend to OnePager Express users that you add a sequential '''numeric field''' to your Microsoft Excel '''source plans '''specifically for this purpose. | |
| − | + | :2) Users typically add a numeric field called '''Task ID''' and populate it in their Microsoft Excel '''source plans''' sequentially. | |
| − | + | When the '''Sort on field''' radio button is clicked, the '''enabled '''sub-control groups looks like this with the window’s dropdown selected: | |
| − | :2) | + | <center>[[File:P70-12_01_1-(2)-06122020.png]]</center> |
| + | <!--<center>P70-12_01_1-(2)-06122020.png</center>--> | ||
| − | + | The dropdown list shown above is divided into two parts with the '''fields''' above the '''dotted line''' being those Microsoft Project '''source plan fields''' specifically '''imported '''into OnePager Pro because these '''fields '''are mentioned as settings in the '''Chart Properties''' form. Below the '''dotted line''', you have the option to scroll down and select any other of the remaining '''source plan fields''' to which OnePager has access. | |
| − | For | + | For a list of all the Microsoft '''source plan fields''' that OnePager Pro has access, please see the article at: [[Microsoft Project Fields Available to OnePager Pro for Version 7.0 | Microsoft Project Fields Available to OnePager Pro]] <!-29.0.1-70--> |
| − | + | To the immediate right of the dropdown window are two directional buttons that specify the direction of the '''Sort on field:''' operation: (1) '''Top to Bottom (Lowest to Highest) – A to Z''' or (2) '''Bottom to Top (Highest to Lowest) – Z to A''' as shown below: | |
| − | + | <center>[[File:P70-12_01_1-(2A)-06222020.png]]</center> | |
| + | <!--<center>P70-12_01_1-(2A)-06222020.png</center>--> | ||
| − | + | The '''default '''setting is '''Top to Bottom (Lowest to Highest) – A to Z'''. '''Numeric''', '''date''', and '''Boolean''' Microsoft Project '''source plan fields''' are processed in a similar way as '''alphabetical fields'''. As discussed above, the '''Sort on field: '''option is conditional on the definition of '''one or more multiple swimlane levels''' in the chart. '''Sorting of rows''' is done when '''multiple swimlane levels''' are present at the '''lowest swimlane level'''. That is, '''sorting of rows''' is performed within the '''lowest swimlane level''' defined for the chart. | |
| − | + | For more information on the '''controls for managing multiple swimlane levels''', please see the article at: [[Creating, Formatting, and Sorting Swimlane Levels for Version 7.0 | Creating, Formatting, and Sorting Swimlane Levels]] <!-12.02.1-70--> | |
| − | <!- | + | |
| − | === | + | ===Sort On Field: - Examples=== |
| − | + | ====Example 1==== | |
| − | + | As a first example, there are no '''swimlane levels''' in the chart below with the '''three''' '''text columns '''showing: | |
| − | + | <center>[[File:P70-12_01_1-(3-1)-06122020.png]]</center> | |
| + | <!--<center>P70-12_01_1-(3-1)-06122020.png</center>--> | ||
| − | + | Since there are no '''swimlane levels''' defined, all task bars/milestone symbols are considered in total as the basis of the '''Sort on field: '''option using the '''source plan’s ID field''' sorted from lowest to highest. | |
| − | + | ====Example 2==== | |
| − | + | ||
| − | + | As a second example, we can reverse the '''sort order''' by clicking on the right-most directional button '''(Bottom to Top – Highest to Lowest)'''. When this is done, the chart looks like this after the sort is complete: | |
| − | + | <center>[[File:P70-12_01_1-(4)-06122020.png]]</center> | |
| + | <!--<center>P70-12_01_1-(4)-06122020.png</center>--> | ||
| − | + | ====Example 3==== | |
| − | + | For a third example, suppose we add a '''swimlane level''' and leave the third '''text column – ID''' to compare with previous '''sort operations'''. When we add the '''Level 1 summary name '''as the '''swimlane''', '''Sort rows on field: ID in Ascending Order (Lowest to Highest)''', and make sure that the '''sort''' for the '''Level 1 summary name swimlane''' is '''Sort swimlanes like Project''' the result is shown here: | |
| − | + | <center>[[File:P70-12_01_1-(5)-06122020.png]]</center> | |
| + | <!--<center>P70-12_01_1-(5)-06122020.png</center>--> | ||
| − | + | The illustration above shows that '''rows are sorted within each swimlane''' in '''ascending order''' by the '''source plan’s ID field'''. To better reinforces how '''row order''' is done within each '''swimlane''', reversing the '''order for row sorting by ID field''' to '''descending order (highest to lowest)''' is shown in the last example. | |
| − | + | ====Example 4==== | |
| − | + | For the last example, we can reverse the '''sort direction for the rows''' to '''descending order (highest to lowest)''', and with all other settings remaining the same, the chart looks like this: | |
| − | + | <center>[[File:P70-12_01_1-(6)-06122020.png]]</center> | |
| + | <!--<center>P70-12_01_1-(6)-06122020.png</center>--> | ||
| − | + | ====Summary for Sort on Field:==== | |
| − | + | Rows are always '''ordered''' within the '''swimlanes''', so when the number of '''swimlane levels '''or '''number of swimlanes changes''', expect to see changes in the '''row ordering'''. Adding '''swimlanes or swimlane levels''' to a chart in the context of '''row sorting''' has a tendency to complicate this discussion significantly. | |
| − | + | For more information on '''managing swimlane levels''', please see the article at: [[Creating, Formatting, and Sorting Swimlane Levels for Version 7.0 | Creating, Formatting, and Sorting Swimlane Levels]] <!-12.02.1-70--> | |
| − | + | ==Creating Timeline Layout Charts== | |
| − | + | Timeline layout charts are useful where the purpose is to track progress from milestone to milestone for many activities that are homogeneous and underway simultaneously. For example, the two illustrations below are examples of Timeline layout charts where the first organizes '''source plan''' tasks into projects and the second organizes multiple projects (shown as task bars) into programs: | |
| − | + | ===Multi-Project Timeline Layout Chart Example=== | |
| − | <center>[[File:P70- | + | <center>[[File:P70-12_01_1-(10)-06172020.png]]</center> |
| − | <!--<center>P70- | + | <!--<center>P70-12_01_1-(10)-06172020.png</center>--> |
| − | + | ===Multi-Program Timeline Layout Chart Example=== | |
| − | <center>[[File:P70- | + | <center>[[File:P70-12_01_1-(11)-06172020.png]]</center> |
| − | <!--<center>P70- | + | <!--<center>P70-12_01_1-(11)-06172020.png</center>--> |
| − | + | The Multi-Project Timeline layout chart and Multi-Program Timeline layout chart above, consist of OnePager task bars arranged horizontally in a '''ribbon-like''' sequence for each of the chart '''rows''' shown. | |
| − | + | OnePager Pro and Express support the Timeline layout chart format with a distributed '''Template Properties''' forms called '''Birds on a Wire Chart''' that can be used as a reference for creating your own tailored '''Template Properties '''form for this format. | |
| − | + | ===Template Properties Form Settings for Timeline Layout Chart=== | |
| − | + | What distinguishes Timeline layout charts from Gantt charts in OnePager is that the radio button for '''Timeline (multiple task per row) '''is selected in the '''Rows/Swimlanes''' tab of the '''Template Properties''' form shown below | |
| − | + | <center>[[File:P70-12_01_1-(12)-06192020.png]]</center> | |
| + | <!--<center>P70-12_01_1-(12)-06192020.png</center>--> | ||
| − | + | The '''Align task on''' window is provided as a dropdown list of '''source plan field names''' from which you can select the '''source plans '''task’s '''property or variable''' upon which OnePager creates the '''rows''' with the multiple task bars that appear in the Timeline layout chart. | |
| − | + | ||
| − | + | The Timeline layout chart is best applied to situations where '''source plan '''tasks do not overlap with respect to '''start/finish dates''' allowing OnePager to display them in the Timeline layout chart sequentially from left to right in their assigned '''rows'''. | |
| − | + | Where '''source plan '''tasks have '''start/finish dates''' that result in OnePager rendering them as '''overlapping''' in their assigned '''rows''', you can remedy this by checking the '''Stagger overlapping tasks''' checkbox '''ON'''. | |
| − | + | ====Creating a Timeline Layout Chart==== | |
| − | + | As mentioned earlier, a Timeline layout chart has a specific purpose; one of which is to show milestone symbols on a timeline reflecting a chart being discussed at a high level. The Microsoft Project '''source plan''' shown below shows task bars at the '''Level 1 summary name '''level and milestone symbols at the level below: | |
| − | <center> | + | <center>[[File:P70-12_01_1-(13)-06192020.png]]</center> |
| − | + | <!--<center>P70-12_01_1-(13)-06192020.png</center>--> | |
| − | + | ||
| − | + | ||
| − | + | ||
| − | + | ||
| − | + | ||
| − | </center> | + | |
| − | + | Using a “Birds on a Wire” configured '''Template Properties '''form such as the one shown above with the '''Timeline '''radio button clicked in the '''Rows/Swimlanes '''tab’s '''Rows''' control group, we create the Timeline layout chart shown here: | |
| − | + | <center>[[File:P70-12_01_1-(14)-06192020.png]]</center> | |
| + | <!--<center>P70-12_01_1-(14)-06192020.png</center>--> | ||
| − | + | In the above Timeline layout chart, milestone symbols are organized by Project which is the '''source plans Level 1 summary name field''' and all milestone symbols are on individual '''rows''' for each '''Level 1 summary name field value'''. We can bring in the '''source plan’s summary tasks''' by modifying the '''source plan '''by changing all their '''Flag20 '''entries to '''Yes '''and build a '''replacement '''Timeline layout chart that looks like this: | |
| − | + | ||
| − | + | <center>[[File:P70-12_01_1-(15)-06192020.png]]</center> | |
| + | <!--<center>P70-12_01_1-(15)-06192020.png</center>--> | ||
| − | + | The above illustration does, indeed, place all task bars and milestone symbols in the same '''row''' but because of the '''color '''selection''' '''and the placement of the '''task bar name labels''' for the milestone symbols some '''task bar name labels '''for milestone symbols are '''hidden'''. This situation can be addressed by clicking the '''Stagger overlapping tasks''' checkbox to '''ON''' in the '''Chart Properties '''form’s '''Rows/Swimlanes '''tab’s '''Rows '''control group as shown here: | |
| − | + | ||
| − | + | <center>[[File:P70-12_01_1-(16)-06192020.png]]</center> | |
| + | <!--<center>P70-12_01_1-(16)-06192020.png</center>--> | ||
| − | + | Clicking the '''Stagger overlapping tasks''' checkbox to '''ON''' changes the Timeline layout chart to look like this: | |
| − | + | <center>[[File:P70-12_01_1-(17)-06192020.png]]</center> | |
| + | <!--<center>P70-12_01_1-(17)-06192020.png</center>--> | ||
| − | + | Of course, there is some '''editing''' that can be done to place the milestone symbols in the above chart back over the summary task bars. | |
| − | + | [[Conditional Formatting for Version 7.0 (Portal) | Conditional Formatting]] <!-11.0.1-70--> can be used to change the '''fill color''' of the milestone symbols in the chart above by assigning a specific '''color''' to each category of milestone symbol. Changing the '''fill color '''of each of the three sets of milestone symbols for each of the four projects (A through D) changes the Timeline layout chart to look like this: | |
| − | <!-- | + | |
| − | + | <!-- | |
| + | :1) Select each of the three milestone symbols in groups and use the '''Paint Bucket''' on the '''Home '''ribbon tool bar tab to change their '''fill color''' as shown here: | ||
| − | + | <center>[[File:P70-12_01_1-(18)-06212020.png]]</center> | |
| + | <center>P70-12_01_1-(18)-06212020.png</center> | ||
| + | --> | ||
| + | <center>[[File:P70-12_01_1-(19)-06212020.png]]</center> | ||
| + | <!--<center>P70-12_01_1-(19)-06212020.png</center>--> | ||
| − | ''' | + | At this point it would be a simple matter to uncheck the '''Stagger overlapping task '''checkbox to '''OFF''' to put all the milestone symbols back into the same '''row''' as the summary task bars. |
| − | + | ||
| − | + | If you glance back to that illustration above, you see that many of the milestone symbols are '''hidden behind''' the task bars. This is because milestone symbol’s '''Z-ordering on the screen''' and in any '''media output '''does not let them show in the '''graph.''' Changing the '''Z-ordering''' of the milestone symbols by '''bringing them to the front''' remedies this situation. To accomplish this, select all milestone symbols with the '''CTL+Left-Click '''technique, right-click on one of these selected milestone symbols to access the '''task bars '''right-click '''context menu''', and click the '''Order '''command and its '''Bring to front''' sub-command as shown here: | |
| − | + | ||
| − | + | <center>[[File:P70-12_01_1-(20)-06212020.png]]</center> | |
| + | <!--<center>P70-12_01_1-(20)-06212020.png</center>--> | ||
| − | ''' | + | At the completion of the above operation, go back to the '''Chart Properties '''form’s '''Rows/Swimlanes''' tab’s '''Rows''' control group and uncheck the '''Stagger overlapping task '''checkbox '''OFF'''. After a few '''editing '''steps to take care of the '''task bar name label collisions''', the results are shown below: |
| − | + | <center>[[File:P70-12_01_1-(21)-06222020.png]]</center> | |
| + | <!--<center>P70-12_01_1-(21)-06222020.png</center>--> | ||
| − | ====Other | + | ====Links to Other Information on Timeline Layout Charts==== |
| − | + | For more information on '''Timeline Layout Charts''', please use the links below: | |
| − | + | :* [https://www.onepager.com/support/faqs/faq-115-timeline-layout--lining-up-multiple-tasks-in-one-row.html Timeline Layout - Lining Up Multiple Tasks in One Row] | |
| − | + | ||
| − | + | :* [https://www.onepager.com/howto/project-timeline.html How to: Build a Project Timeline from Microsoft Project Using OnePager Pro]] | |
| − | + | :* [https://www.onepager.com/howto/swimlane_project_timelines.html How to: Make a Timeline with Swimlanes Using Data from Microsoft Project] | |
| − | [ | + | :* [https://youtu.be/rp2KVyndCNQ YouTube Video: Building a Project Timeline with Swimlanes] |
| − | + | ==Row Border Formatting== | |
| − | + | The third sub-control group found in the '''Rows''' control group of the '''Rows/Swimlanes '''tab of the '''Chart Properties''' form is the '''Row Border Formatting… '''button. Clicking the '''Row Border Formatting… '''button accesses the '''Row Formatting '''form shown below: | |
| − | [[ | + | <center>[[File:P70-12_01_1-(9)-06162020.png]]</center> |
| + | <!--<center>P70-12_01_1-(9)-06162020.png</center>--> | ||
| − | + | '''Row formatting''' consists only of '''formatting borders for rows''' globally in the chart. In order for '''row borders '''to show in the chart and '''graph''', the '''Show Row Borders''' checkbox must be checked''' ON'''. When the '''Show Row Borders '''checkbox is checked '''ON''', the '''Color''', '''Width''', and '''Dash:''' controls are '''enabled'''. Click the '''Color''' dropdown button accesses the standard '''Color Chooser '''form where you can select the '''line color''' for the '''row border'''. The '''Width dial control''' lets you set the '''width '''of the '''row border’s '''line''' '''in terms of the selected '''standard measure (centimeters or inches)'''. Finally, the '''Dash: '''dropdown has five (5) line '''dash types''' to select from including '''Solid''', '''Dot''', '''Dash''', '''Dash dot''', and '''Dash dot dot'''. | |
| − | [[ | + | Since '''row borders '''can be '''shared with swimlane level borders''', the subject of '''managing these two border types''' in the chart is the subject of a separate article located at this link: [[Row and Swimlane Borders for Version 7.0 | Row and Swimlane Borders ]] <!-12.04.1-70--> |
| − | + | ==Related Links== | |
| − | [[ | + | [[Creating, Formatting, and Sorting Swimlane Levels for Version 7.0 | Creating, Formatting, and Sorting Swimlane Levels]] <!-12.02.1-70--> |
| − | [[ | + | [[Creating and Formatting Text Columns for Version 7.0 | Creating and Formatting Text Columns]] <!-12.03.1-70--> |
| − | [[ | + | [[Row and Swimlane Borders for Version 7.0 | Row and Swimlane Borders ]] <!-12.04.1-70--> |
| − | [[ | + | [[Microsoft Project Fields Available to OnePager Pro for Version 7.0 | Microsoft Project Fields Available to OnePager Pro]] <!-29.0.1-70--> |
| − | (12. | + | [https://www.onepager.com/support/faqs/faq-115-timeline-layout--lining-up-multiple-tasks-in-one-row.html Frequently Asked Question: Timeline Layout: Lining Up Multiple Tasks in One Row] |
| + | |||
| + | [https://www.onepager.com/howto/project-timeline.html How to: Build a Project Timeline from Microsoft Project Using OnePager Pro] | ||
| + | |||
| + | [https://www.onepager.com/howto/swimlane_project_timelines.html How to: Make a Timeline with Swimlanes Using Data from Microsoft Project] | ||
| + | |||
| + | [https://youtu.be/rp2KVyndCNQ YouTube Video: Building a Project Timeline with Swimlanes] | ||
| + | |||
| + | (12.01.1-70) | ||
[[Category:Version 7.0]] | [[Category:Version 7.0]] | ||
| − | |||
| − | |||
| − | |||
[[Category:Charts]] | [[Category:Charts]] | ||
| + | [[Category:Templates]] | ||
| + | [[Category:Chart Properties Form]] | ||
| + | [[Category:Ribbon]] | ||
| + | [[Category:Editing a Chart]] | ||
| + | [[Category:OnePager - Tool Bar]] | ||
[[Category:Task/Milestone Editing]] | [[Category:Task/Milestone Editing]] | ||
[[Category:Rows and Swimlanes]] | [[Category:Rows and Swimlanes]] | ||
| − | [[Category:Swimlane | + | [[Category:Multiple Swimlane Levels]] |
[[Category:Text Columns]] | [[Category:Text Columns]] | ||
| + | [[Category:Swimlane Labels]] | ||
[[Category:Row/Swimlane Borders]] | [[Category:Row/Swimlane Borders]] | ||
| + | [[Category:Labels]] | ||
| + | [[Category:Name Label Collision Avoidance]] | ||
| + | [[Category:Snapshots]] | ||
| + | [[Category:Snapshot Dependent/Independent]] | ||
| + | [[Category:Row Stripes]] | ||
| + | [[Category:Swimlane Stripes]] | ||
[[Category:OnePager Pro]] | [[Category:OnePager Pro]] | ||
| − | |||
Revision as of 15:59, 14 January 2021
Contents
Overview
OnePager Pro and Express can create Gantt charts or Timeline layout charts by collecting tasks from your source plans and placing them into rows in your OnePager Pro or Express charts. A Gantt chart, in this context, is organized such that each row contains only one task. A Timeline layout, on the other hand, can have multiple tasks in a single row, based upon a field that you specify from your source plan. In a timeline layout, tasks that share the same value for a given field will automatically appear together in the same row.
Gantt Chart and Timeline Layout Chart Examples
The Gantt chart and Timeline layout chart shown below are examples of each chart layout organization:
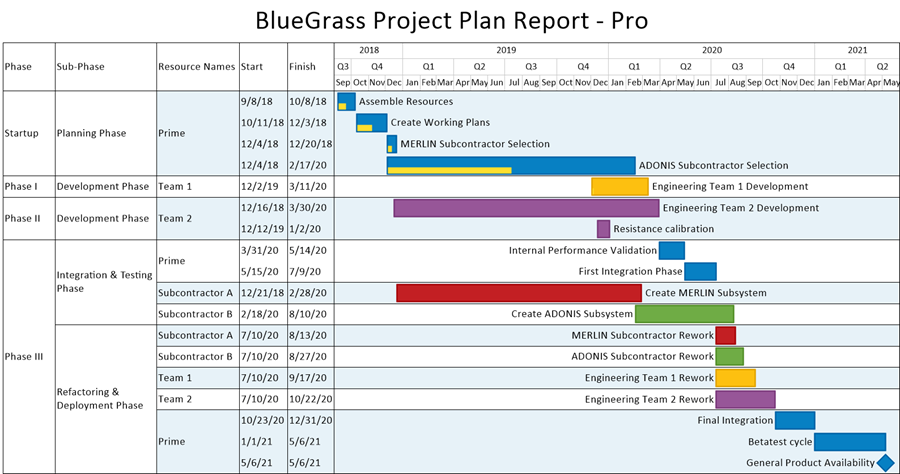
The visual characteristic of the Gantt chart above is that all tasks are placed in their own individual row.
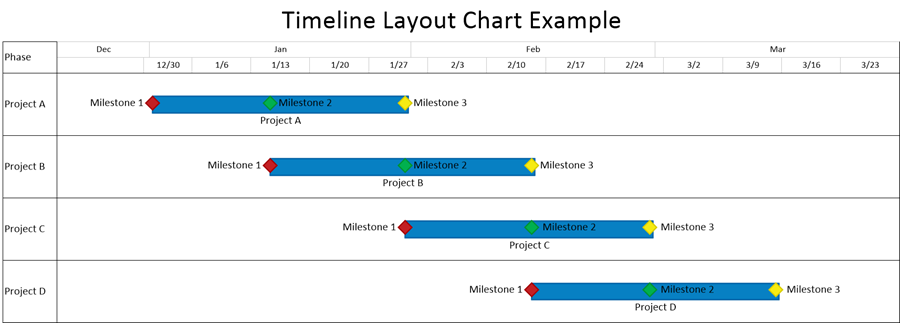
The Timeline layout chart above has all task bars and milestone symbols associated with the same Project organized into a single row in the chart. These task bars and milestone symbols are all associated with the same field value (in this case Project name). The arrangement shown above is sometimes called a ribbon.
Gantt Chart Versus Timeline Layout Chart Selection
Both chart layout organizations have uses in supporting schedule conversations and the controls and examples provided in this article for managing rows are here to help you implement your choices. Typically, when building a Microsoft Project or Excel source plan you have a mental picture of how the source plan should look when presented visually. Accordingly, we find that users structure their source plans initially with the intent of creating either a Gantt chart or a Timeline Layout chart. OnePager Pro and Express version 7.0 are structured to support the creation, formatting, and editing of both the Gantt charts and Timeline Layout charts.
This series of articles assumes that the reader is interested in creating, formatting, and editing either a Gantt chart or Timeline Layout chart for a specific purpose and can consult the appropriate sub-section of this article when considering the controls available in the Chart Properties form’s Rows/Swimlanes tab’s Rows control group.
Microsoft Project and Microsoft Excel Source Plans
The Chart Properties form’s Rows/Swimlanes tab are essentially the same for OnePager Pro version 7.0 and OnePager Express version 7.0. The controls described in this article and the remainder in the series applies to both Microsoft Project and Excel source plans imported into OnePager Pro and Excel, respectively. Where there are differences between Microsoft Project and Excel, there is a separate article covering specifically the requirements for using the features with Microsoft Excel.
Creating Gantt Charts
In this and following sub-sections, it is assumed that you have created or are using a distributed Template Properties form that supports either the Gantt chart or Timeline layout chart. Accordingly, this article and the others articles that make up this series deals with creating and editing charts with the assumption that an appropriate Template Properties form is selected as the starting point. The Gantt chart is the most typical task bar/milestone symbol organization used in general practice.
The Chart Properties form’s Rows/Swimlanes tab is shown below with the Rows control group highlighted for the discussion that follows:
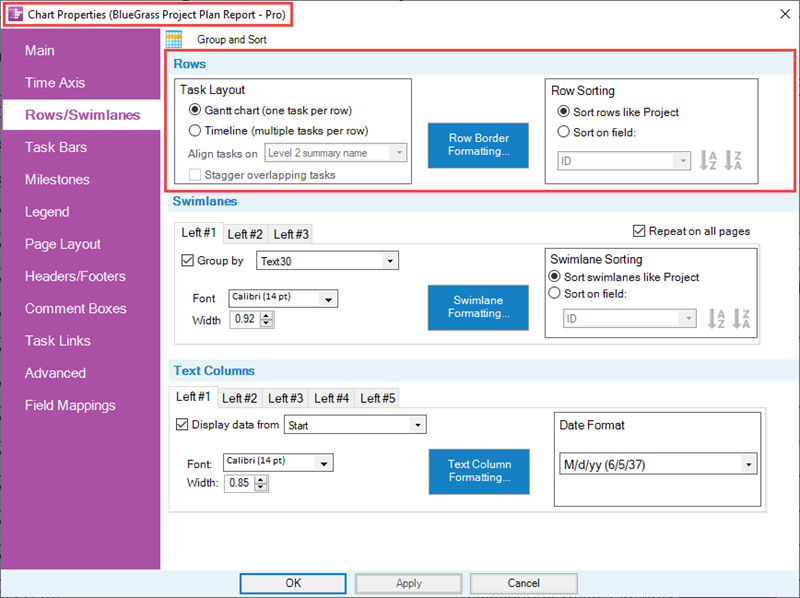
In the illustration above, the Gantt chart (one task per row) radio button is selected indicating that the chart is intended to be a Gantt chart with one task bar/milestone symbol per row. With this decision made, the next step is to determine how imported source plan tasks/milestones and their rows are sorted in the chart.
There are two options available to provide maximum flexibility:
- 1) Sort rows like Project or
- 2) Sort on field: where you have the further option to select the source plan field to control the sorting of rows and controls to determine which direction (lowest to highest or highest to lowest) the sort on rows is done.
The Row Border Formatting… button is discussed in this article at this link: Row Border Formatting <!-12.01.1-70-->
Sort Rows Like Project
Typically, Microsoft Project source plans are organized by ascending task/milestone start dates.
- 1) Microsoft Project provides an ID field where the source plan tasks are numbered sequentially from the top of the Microsoft Project grid to the bottom. OnePager Pro keys on the ID field for sorting rows like Project.
- 2) Microsoft Excel does not provide a corresponding internal sequence field as described for Microsoft Project. Our recommendation is that for Microsoft Excel source plans that you provide such a field which can be used for this purpose. OnePager Express looks for such a field which is typically called Task ID, but any name suffices.
Sorting rows like Project takes place within the entire chart when there are no swimlane levels defined. Sorting rows like Excel where a sequence field is not found or defined results in the chart being sorted from the source plan’s top row to the bottom row.
However, when multiple swimlane levels are present in the chart, the Sort rows like Project is performed within the lowest swimlane level defined even if these multiple swimlane levels are hidden. In this respect, the multiple swimlane levels defined in the chart dictate the chart’s overall visual organization which can be controlled in the Swimlanes control group of the Chart Properties form’s Rows/Swimlanes tab.
For more information on the controls for managing multiple swimlane levels, please see the article at: Creating, Formatting, and Sorting Swimlane Levels <!-12.02.1-70-->
The organization of the chart in terms of sorting rows is more visible when the Sort on field: option is used as discussed next.
Sort Rows Like Project – Basic Example
The most basic Gantt chart with no text columns and no swimlanes looks like this:
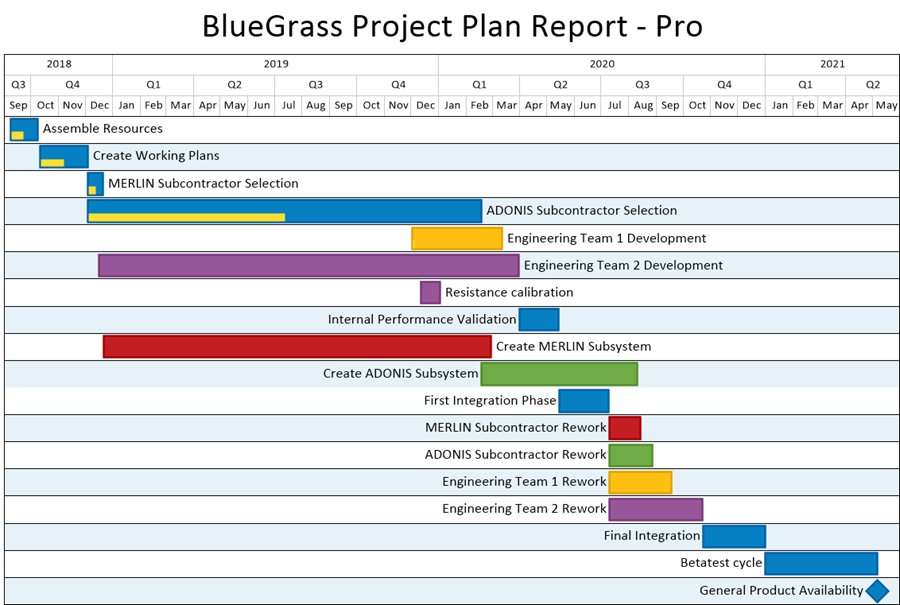
The chart above provides the most basic project information by displaying the task bar name labels and the time axis so that task bar start/finish dates can be seen. Adding swimlanes and informative text columns can enhance the information content of the chart and help focus an audience’s attention to the specific issues of the schedule presentation.
For more information on Managing Swimlane Levels, please see the article at: Creating, Formatting, and Sorting Swimlane Levels <!-12.02.1-70-->
For more information on Managing Text Columns, please see the article at: Creating and Formatting Text Columns <!-12.03.1-70-->
Sort on Field:
When the Sort on field: radio button is clicked, the window below the radio button and the two directional buttons are enabled. The default setting for Microsoft Project source plans is the ID field.
For Microsoft Excel source plans, OnePager Express attempts to find a source plan field in the Microsoft Excel file that is a numeric sequential file.
- 1) Accordingly, we recommend to OnePager Express users that you add a sequential numeric field to your Microsoft Excel source plans specifically for this purpose.
- 2) Users typically add a numeric field called Task ID and populate it in their Microsoft Excel source plans sequentially.
When the Sort on field radio button is clicked, the enabled sub-control groups looks like this with the window’s dropdown selected:
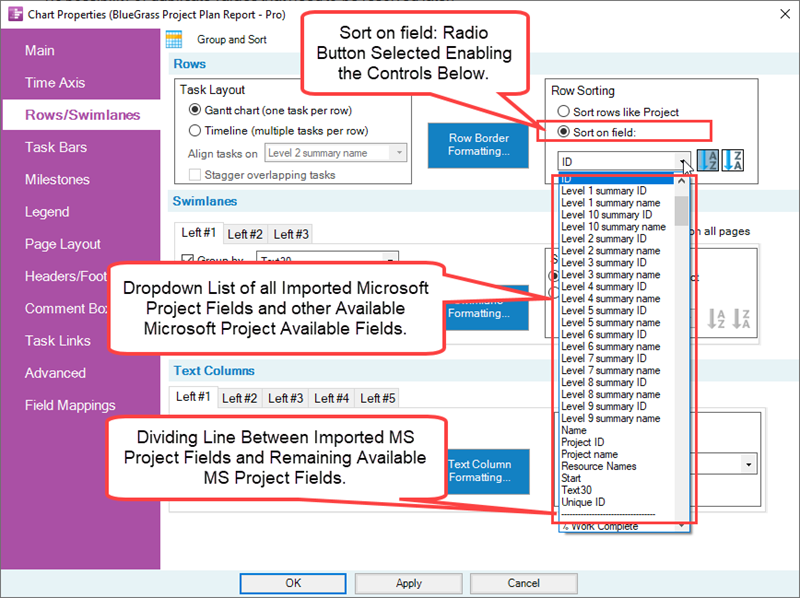
The dropdown list shown above is divided into two parts with the fields above the dotted line being those Microsoft Project source plan fields specifically imported into OnePager Pro because these fields are mentioned as settings in the Chart Properties form. Below the dotted line, you have the option to scroll down and select any other of the remaining source plan fields to which OnePager has access.
For a list of all the Microsoft source plan fields that OnePager Pro has access, please see the article at: Microsoft Project Fields Available to OnePager Pro <!-29.0.1-70-->
To the immediate right of the dropdown window are two directional buttons that specify the direction of the Sort on field: operation: (1) Top to Bottom (Lowest to Highest) – A to Z or (2) Bottom to Top (Highest to Lowest) – Z to A as shown below:
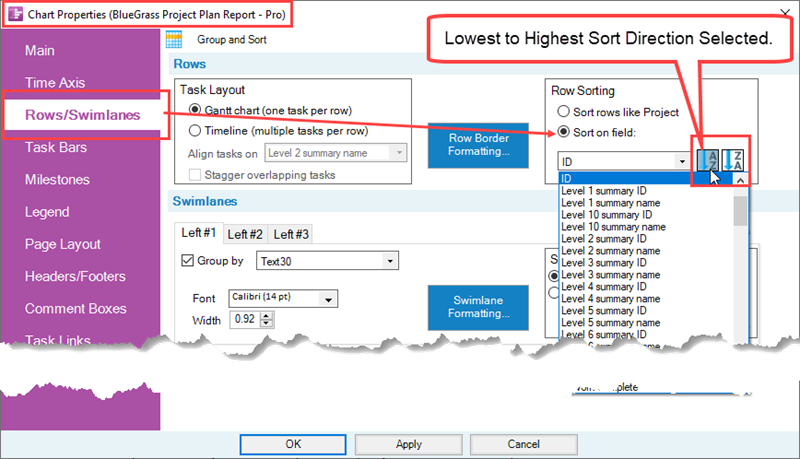
The default setting is Top to Bottom (Lowest to Highest) – A to Z. Numeric, date, and Boolean Microsoft Project source plan fields are processed in a similar way as alphabetical fields. As discussed above, the Sort on field: option is conditional on the definition of one or more multiple swimlane levels in the chart. Sorting of rows is done when multiple swimlane levels are present at the lowest swimlane level. That is, sorting of rows is performed within the lowest swimlane level defined for the chart.
For more information on the controls for managing multiple swimlane levels, please see the article at: Creating, Formatting, and Sorting Swimlane Levels <!-12.02.1-70-->
Sort On Field: - Examples
Example 1
As a first example, there are no swimlane levels in the chart below with the three text columns showing:
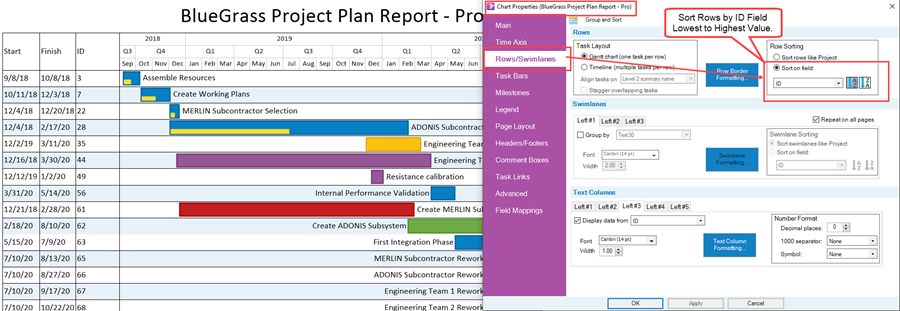
Since there are no swimlane levels defined, all task bars/milestone symbols are considered in total as the basis of the Sort on field: option using the source plan’s ID field sorted from lowest to highest.
Example 2
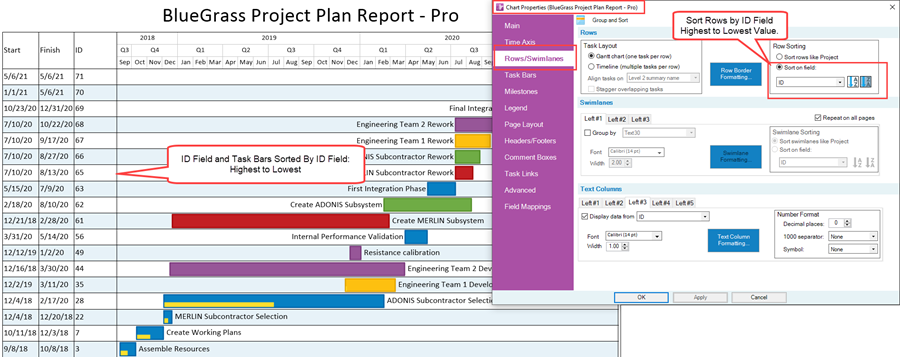
As a second example, we can reverse the sort order by clicking on the right-most directional button (Bottom to Top – Highest to Lowest). When this is done, the chart looks like this after the sort is complete:
Example 3
For a third example, suppose we add a swimlane level and leave the third text column – ID to compare with previous sort operations. When we add the Level 1 summary name as the swimlane, Sort rows on field: ID in Ascending Order (Lowest to Highest), and make sure that the sort for the Level 1 summary name swimlane is Sort swimlanes like Project the result is shown here:
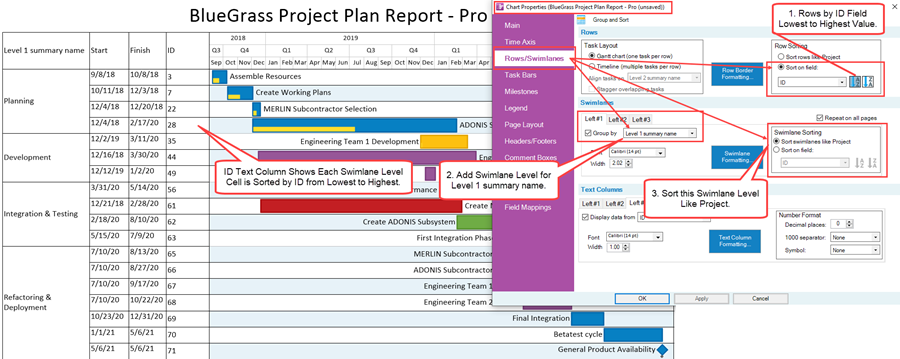
The illustration above shows that rows are sorted within each swimlane in ascending order by the source plan’s ID field. To better reinforces how row order is done within each swimlane, reversing the order for row sorting by ID field to descending order (highest to lowest) is shown in the last example.
Example 4
For the last example, we can reverse the sort direction for the rows to descending order (highest to lowest), and with all other settings remaining the same, the chart looks like this:
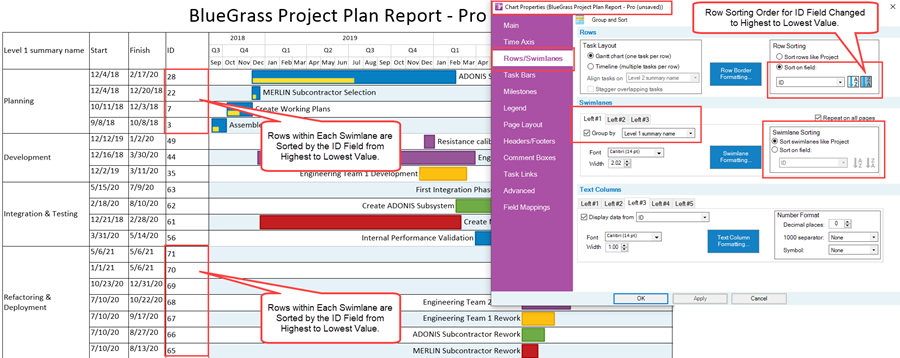
Summary for Sort on Field:
Rows are always ordered within the swimlanes, so when the number of swimlane levels or number of swimlanes changes, expect to see changes in the row ordering. Adding swimlanes or swimlane levels to a chart in the context of row sorting has a tendency to complicate this discussion significantly.
For more information on managing swimlane levels, please see the article at: Creating, Formatting, and Sorting Swimlane Levels <!-12.02.1-70-->
Creating Timeline Layout Charts
Timeline layout charts are useful where the purpose is to track progress from milestone to milestone for many activities that are homogeneous and underway simultaneously. For example, the two illustrations below are examples of Timeline layout charts where the first organizes source plan tasks into projects and the second organizes multiple projects (shown as task bars) into programs:
Multi-Project Timeline Layout Chart Example

Multi-Program Timeline Layout Chart Example
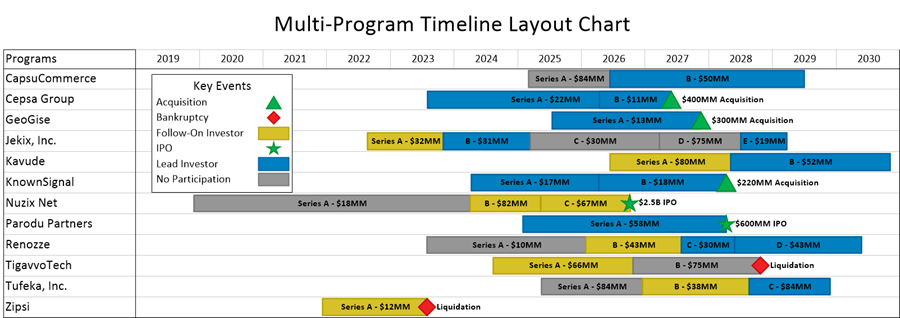
The Multi-Project Timeline layout chart and Multi-Program Timeline layout chart above, consist of OnePager task bars arranged horizontally in a ribbon-like sequence for each of the chart rows shown.
OnePager Pro and Express support the Timeline layout chart format with a distributed Template Properties forms called Birds on a Wire Chart that can be used as a reference for creating your own tailored Template Properties form for this format.
Template Properties Form Settings for Timeline Layout Chart
What distinguishes Timeline layout charts from Gantt charts in OnePager is that the radio button for Timeline (multiple task per row) is selected in the Rows/Swimlanes tab of the Template Properties form shown below
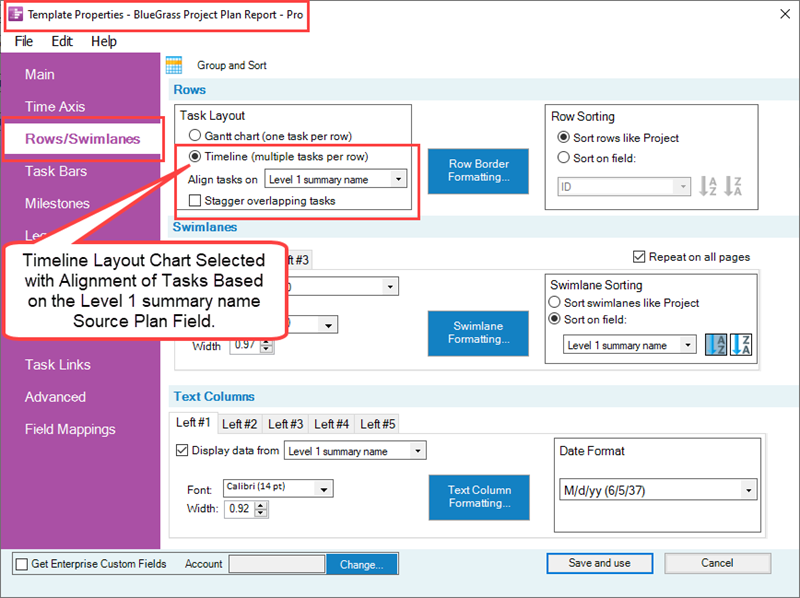
The Align task on window is provided as a dropdown list of source plan field names from which you can select the source plans task’s property or variable upon which OnePager creates the rows with the multiple task bars that appear in the Timeline layout chart.
The Timeline layout chart is best applied to situations where source plan tasks do not overlap with respect to start/finish dates allowing OnePager to display them in the Timeline layout chart sequentially from left to right in their assigned rows.
Where source plan tasks have start/finish dates that result in OnePager rendering them as overlapping in their assigned rows, you can remedy this by checking the Stagger overlapping tasks checkbox ON.
Creating a Timeline Layout Chart
As mentioned earlier, a Timeline layout chart has a specific purpose; one of which is to show milestone symbols on a timeline reflecting a chart being discussed at a high level. The Microsoft Project source plan shown below shows task bars at the Level 1 summary name level and milestone symbols at the level below:
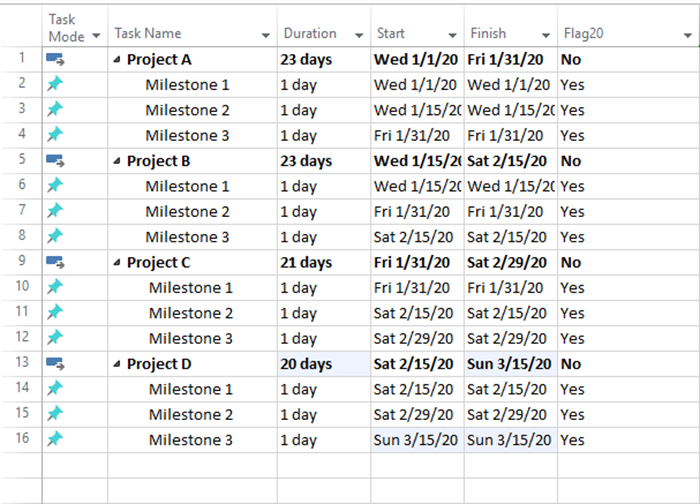
Using a “Birds on a Wire” configured Template Properties form such as the one shown above with the Timeline radio button clicked in the Rows/Swimlanes tab’s Rows control group, we create the Timeline layout chart shown here:

In the above Timeline layout chart, milestone symbols are organized by Project which is the source plans Level 1 summary name field and all milestone symbols are on individual rows for each Level 1 summary name field value. We can bring in the source plan’s summary tasks by modifying the source plan by changing all their Flag20 entries to Yes and build a replacement Timeline layout chart that looks like this:

The above illustration does, indeed, place all task bars and milestone symbols in the same row but because of the color selection and the placement of the task bar name labels for the milestone symbols some task bar name labels for milestone symbols are hidden. This situation can be addressed by clicking the Stagger overlapping tasks checkbox to ON in the Chart Properties form’s Rows/Swimlanes tab’s Rows control group as shown here:
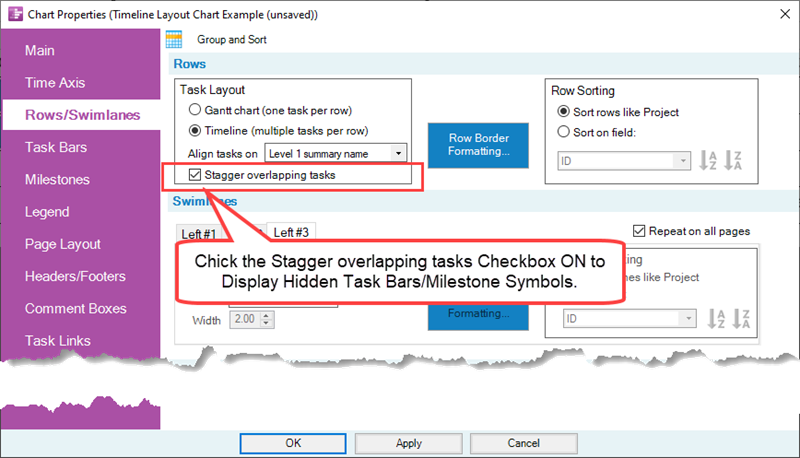
Clicking the Stagger overlapping tasks checkbox to ON changes the Timeline layout chart to look like this:

Of course, there is some editing that can be done to place the milestone symbols in the above chart back over the summary task bars.
Conditional Formatting <!-11.0.1-70--> can be used to change the fill color of the milestone symbols in the chart above by assigning a specific color to each category of milestone symbol. Changing the fill color of each of the three sets of milestone symbols for each of the four projects (A through D) changes the Timeline layout chart to look like this:

At this point it would be a simple matter to uncheck the Stagger overlapping task checkbox to OFF to put all the milestone symbols back into the same row as the summary task bars.
If you glance back to that illustration above, you see that many of the milestone symbols are hidden behind the task bars. This is because milestone symbol’s Z-ordering on the screen and in any media output does not let them show in the graph. Changing the Z-ordering of the milestone symbols by bringing them to the front remedies this situation. To accomplish this, select all milestone symbols with the CTL+Left-Click technique, right-click on one of these selected milestone symbols to access the task bars right-click context menu, and click the Order command and its Bring to front sub-command as shown here:

At the completion of the above operation, go back to the Chart Properties form’s Rows/Swimlanes tab’s Rows control group and uncheck the Stagger overlapping task checkbox OFF. After a few editing steps to take care of the task bar name label collisions, the results are shown below:

Links to Other Information on Timeline Layout Charts
For more information on Timeline Layout Charts, please use the links below:
Row Border Formatting
The third sub-control group found in the Rows control group of the Rows/Swimlanes tab of the Chart Properties form is the Row Border Formatting… button. Clicking the Row Border Formatting… button accesses the Row Formatting form shown below:
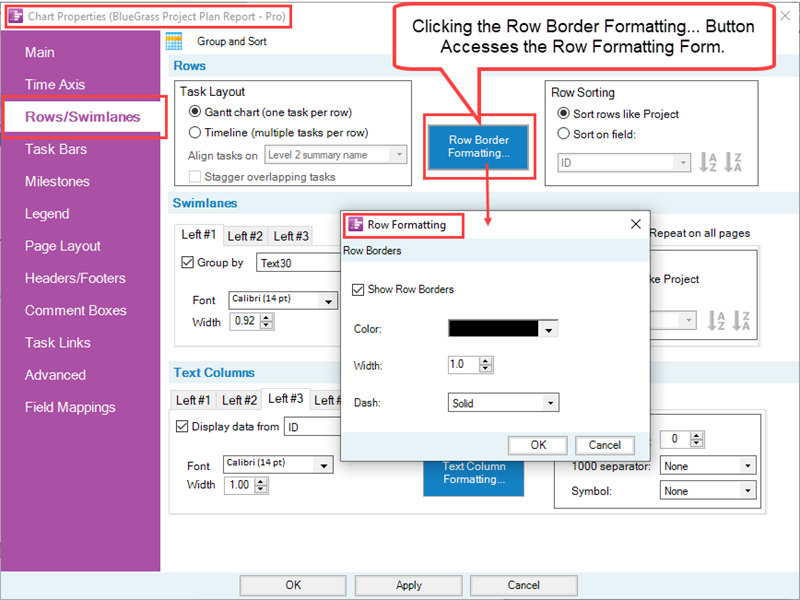
Row formatting consists only of formatting borders for rows globally in the chart. In order for row borders to show in the chart and graph, the Show Row Borders checkbox must be checked ON. When the Show Row Borders checkbox is checked ON, the Color, Width, and Dash: controls are enabled. Click the Color dropdown button accesses the standard Color Chooser form where you can select the line color for the row border. The Width dial control lets you set the width of the row border’s line in terms of the selected standard measure (centimeters or inches). Finally, the Dash: dropdown has five (5) line dash types to select from including Solid, Dot, Dash, Dash dot, and Dash dot dot.
Since row borders can be shared with swimlane level borders, the subject of managing these two border types in the chart is the subject of a separate article located at this link: Row and Swimlane Borders <!-12.04.1-70-->
Related Links
Creating, Formatting, and Sorting Swimlane Levels <!-12.02.1-70-->
Creating and Formatting Text Columns <!-12.03.1-70-->
Row and Swimlane Borders <!-12.04.1-70-->
Microsoft Project Fields Available to OnePager Pro <!-29.0.1-70-->
Frequently Asked Question: Timeline Layout: Lining Up Multiple Tasks in One Row
How to: Build a Project Timeline from Microsoft Project Using OnePager Pro
How to: Make a Timeline with Swimlanes Using Data from Microsoft Project
YouTube Video: Building a Project Timeline with Swimlanes
(12.01.1-70)
- Version 7.0
- Charts
- Templates
- Chart Properties Form
- Ribbon
- Editing a Chart
- OnePager - Tool Bar
- Task/Milestone Editing
- Rows and Swimlanes
- Multiple Swimlane Levels
- Text Columns
- Swimlane Labels
- Row/Swimlane Borders
- Labels
- Name Label Collision Avoidance
- Snapshots
- Snapshot Dependent/Independent
- Row Stripes
- Swimlane Stripes
- OnePager Pro