Difference between revisions of "Testing Article1"
| Line 1: | Line 1: | ||
| − | == | + | ==Overview== |
| − | + | The '''Chart Properties ''' form’s '''Time Axis '''tab has three (3) sub-tabs that provide controls for each '''Time Axis Level'''. | |
| − | + | For more information on '''Showing Different Time Units''', please see the article at: [[Showing Different Time Units of Time for OnePager Pro for Version 7.0 | Showing Different Units of Time for OnePager Pro]] <!--22.1.1-70--> | |
| − | + | The '''Chart Properties''' form '''Time Axis '''tab’s three '''Time Axis Level '''sub-tabs contain essentially the same controls and look like this: | |
| − | + | ||
| − | + | <center>[[File:P70-21_17_1-70-(2)-10242020.png]]</center> | |
| + | <!--<center>P70-21_17_1-70-(2)-10242020.png</center>--> | ||
| − | + | Within each of these sub-tabs (i.e., '''Top''', '''Middle''', and '''Bottom''') there are six (6) control groups: (1) '''Show this level '''checkbox, (2) '''Re-Order Levels''' (3) '''Labels''', (4) '''Formatting''', (5) '''Background Color(s)''', and (6) '''Size'''. The controls provided in the '''Chart Properties '''form’s '''Time Axis '''tab and the three (3) sub-tabs considered here are the same as the corresponding sub-tabs in the '''Template Properties '''form’s '''Time Axis '''tab. For completeness, the '''Show this level''' checkbox that appears in the '''Top''', '''Middle''', and '''Bottom''' sub-tabs of the '''Template Properties''' and '''Chart Properties''' form’s '''Time Axis '''tab can be used to '''show '''or '''hide''' the corresponding '''Time Axis Level''' in the chart. At least '''one''' '''Time Axis Level '''must be '''shown'''. | |
| − | + | An attempt to '''hide '''all three '''Time Axis Levels''' accesses the message below: | |
| − | + | <center>[[File:P70-22_1_5-70-(2)-10282020.png]]</center> | |
| + | <!--<center>P70-22_1_5-70-(2)-10282020.png</center>--> | ||
| − | + | The '''Re-Order Levels''' up and down arrows are provided so that you can '''exchange '''the location of '''Time Axis Levels''' with the up to three '''levels '''provided. | |
| − | + | For more information on '''Re-Ordering Time Axis Levels''', please see the article at: [[Re-Ordering Time Axis Levels for OnePager Pro for Version 7.0 | Re-Ordering Time Axis Levels for OnePager Pro]] <!--22.3.5-70--> | |
| − | + | For more information on the '''Formatting '''control group, which supports '''formatting Time Axis Level and Cell borders''', please see the article at: [[Changing the Time Axis Borders for OnePager Pro for Version 7.0 | Changing the Time Axis Borders for OnePager Pro]] <!--22.1.7-70--> | |
| − | <!-- | + | |
| − | + | The '''Size '''control group, found in the lower right corner of the tab, which controls changing the '''vertical height''' of the '''Time Axis Level''' is a dial control whose units are either in inches or centimeters depending on the type of '''Template Properties''' form being used to create the chart. Variations in '''Time Axis Level height''' can be useful for emphasizing the '''Time Axis Level, '''for providing vertical space for large '''Label fonts''', or for providing the necessary vertical space for '''rotated Time Axis Level labels'''. Changes to the '''Size (Height:) '''control applies to all '''cells '''in the '''Time Axis Level'''. The purpose of this article is to describe the '''Label''' sub-group and how its controls can be used for '''editing''' of the chart through the use of the '''Chart Properties '''form and the '''Chart Editor'''. | |
| − | ==Editing | + | ==Editing Time Axis Level Properties with the Chart Properties Form== |
| − | ===For | + | Within each sub-tab are controls for '''Time Axis Level Labels''' as in previous OnePager versions. |
| + | |||
| + | <center>[[File:P70-22_1_5-70-(3)-10282020.png]]</center> | ||
| + | <!--<center>P70-22_1_5-70-(3)-10282020.png</center>--> | ||
| + | |||
| + | ===Tic Units=== | ||
| + | |||
| + | A '''Tic''' is the '''vertical border''' outlining a '''Time Axis Cell'''. A '''Tic unit''' is the space between the two '''vertical borders''' that define a '''Time Axis Cell'''. The '''Tic units''' dropdown for each '''Time Axis Level''' consist of the same options as shown below: | ||
| + | |||
| + | <center>[[File:P70-22_1_5-70-(4)-10282020.png]]</center> | ||
| + | <!--<center>P70-22_1_5-70-(4)-10282020.png</center>--> | ||
| + | |||
| + | ===Label Format=== | ||
| + | |||
| + | The '''Label format''' dropdown provides the OnePager list of all available '''Label formats''' specific to the '''Tic Unit'''. The '''Label format''' list is enhanced to give you the '''advanced''' capability to define your own '''Custom Date Format''' as shown in the illustration below. | ||
| + | |||
| + | :1) Note the item in the list below called '''Add Custom Format…'''. | ||
| + | |||
| + | :2) '''Selecting''' the '''Add Custom Format… '''option takes you to the '''Custom Date Format '''feature. | ||
| + | |||
| + | <center>[[File:P70-22_1_5-70-(5)-10282020.png]]</center> | ||
| + | <!--<center>P70-22_1_5-70-(5)-10282020.png</center>--> | ||
| + | |||
| + | For more information on the '''Custom Date Format '''feature, please see the article at: [[The Custom Date Format Feature for OnePager Pro for Version 7.0 | The Custom Date Format Feature for OnePager Pro]] <!--22.5.1-70--> | ||
| + | |||
| + | ===Label Alignment=== | ||
| + | |||
| + | The '''Label alignment''' dropdown provides '''Label format text alignment options''' for each '''tic unit '''in the '''Time Axis Level Cells'''. | ||
| + | |||
| + | <center>[[File:P70-22_1_5-70-(6)-10282020.png]]</center> | ||
| + | <!--<center>P70-22_1_5-70-(6)-10282020.png</center>--> | ||
| + | |||
| + | ===Label Font Properties=== | ||
| + | |||
| + | Clicking the '''Label font '''dropdown accesses the standard OnePager '''Font properties''' form as shown below: | ||
| + | |||
| + | <center>[[File:P70-22_1_5-70-(7)-10282020.png]]</center> | ||
| + | <!--<center>P70-22_1_5-70-(7)-10282020.png</center>--> | ||
| + | |||
| + | The '''Font properties '''form allows you to '''edit''' the way the '''text''' in the selected '''Time Axis Level text '''appears with regard to '''font type''', '''color''', '''size''', and settings for '''Bold''', ''Italics'', and [[Underline]]. With OnePager you are able to '''maverick '''the '''Label font''' properties of each '''Time Axis Level Cell''' by using the '''time axis''' right-click '''context menu’s Format cell …''' command and '''Font properties '''form. | ||
| + | |||
| + | ===Unit Skip Count=== | ||
| + | |||
| + | The '''Unit skip count '''determines the number of '''time units''' that are skipped between '''Time Axis Level Labels'''. Normally the '''Unit skip count '''is set to 1 as shown below: | ||
| + | |||
| + | <center>[[File:P70-22_1_5-70-(8)-10282020.png]]</center> | ||
| + | <!--<center>P70-22_1_5-70-(8)-10282020.png</center>--> | ||
| + | |||
| + | To illustrate an '''edit''', if you set the '''Middle Time Axis Level’s''' '''Unit skip count''' to a higher value of 2, the '''Time Axis Middle Level '''looks like this: | ||
| + | |||
| + | <center>[[File:P70-22_1_5-70-(9)-10282020.png]]</center> | ||
| + | <!--<center>P70-22_1_5-70-(9)-10282020.png</center>--> | ||
| + | |||
| + | In the above illustration the '''Middle Level Time Axis '''is no longer consistent with the '''Top '''or '''Bottom Level Time Axes''' with respect to '''Unit skip counts'''. To avoid confusion, it is recommended not '''showing '''the '''Bottom Level Time Axis''' as illustrated below: | ||
| + | |||
| + | <center>[[File:P70-22_1_5-70-(10)-10282020.png]]</center> | ||
| + | <!--<center>P70-22_1_5-70-(10)-10282020.png</center>--> | ||
| + | |||
| + | As with other '''Time Axis Level '''and '''Cell properties''', any '''edits''' made to a '''Time Axis Level '''or '''Cell property''' is made to the corresponding element of a '''Floating Time Axis''' as shown below: | ||
| + | |||
| + | <center>[[File:P70-22_1_5-70-(11)-10282020.png]]</center> | ||
| + | <!--<center>P70-22_1_5-70-(11)-10282020.png</center>--> | ||
| + | |||
| + | For more information on the '''Floating Time Axis''', please see the article at: [[The Floating Time Axis Feature for OnePager Pro for Version 7.0 | The Floating Time Axis Feature for OnePager Pro]] <!--22.3.9-70--> | ||
| + | |||
| + | ===Use Fiscal Year Checkbox=== | ||
| + | |||
| + | The '''Use fiscal year''' checkbox, when checked '''ON''', tells OnePager to apply '''Fiscal Year/Week''' dates as applicable. The controls for '''Fiscal Year/Week '''designations are found in the '''Chart Properties '''form '''Time Axis '''tab’s '''Calendar '''sub-tab in the '''Calendar Settings '''group as discussed above. | ||
| + | |||
| + | For more information on formulating '''Fiscal Year Time Axis Levels''', please see the article at: [[Using Fiscal Years and Weeks for OnePager Pro for Version 7.0 | Using Fiscal Years and Weeks for OnePager Pro]] <!--22.2.1-70--> | ||
| + | |||
| + | ===Rotate Label 90 Degrees Checkbox=== | ||
| + | |||
| + | The '''Rotate label 90 degrees '''checkbox found in the '''Top''', '''Middle''', and '''Bottom''' '''Levels '''sub-tabs of the '''Chart Properties '''form’s '''Time Axis '''tab allows you to represent the various '''Time Axis Level Cell’s text''' contents rotated 90 degrees clockwise as shown below: | ||
| + | |||
| + | <center>[[File:P70-22_1_5-70-(12)-10282020.png]]</center> | ||
| + | <!--<center>P70-22_1_5-70-(12)-10282020.png</center>--> | ||
| + | |||
| + | ==Editing Time Axis Level Properties in the Chart Editor== | ||
| + | |||
| + | ===Tic Units, Label Formats, and Label Alignments=== | ||
The controls in the '''Chart Properties '''form’s '''Time Axis '''tab can be accessed directly by right-clicking on any '''Time Axis Cell''' to access the '''time axis''' right-click '''context menu '''and then clicking the '''Time-axis properties…''' command as shown below: | The controls in the '''Chart Properties '''form’s '''Time Axis '''tab can be accessed directly by right-clicking on any '''Time Axis Cell''' to access the '''time axis''' right-click '''context menu '''and then clicking the '''Time-axis properties…''' command as shown below: | ||
| − | <center>[[File: | + | <center>[[File:P70-22_1_5-70-(13)-10282020.png]]</center> |
| − | <!--<center> | + | <!--<center>P70-22_1_5-70-(13)-10282020.png</center>--> |
| − | After clicking the '''Time-axis properties… '''command, the '''Chart Properties '''form’s '''Time Axis '''tab is accessed at the '''Level '''of the selected '''cell(s) '''so you can '''edit''' the | + | After clicking the '''Time-axis properties… '''command, the '''Chart Properties '''form’s '''Time Axis '''tab is accessed at the '''Level '''of the selected '''cell(s) '''so you can '''edit''' any '''Time Axis Level Label property'''. You also have the capability at this point to click to another '''Time Axis Level '''tab in the '''Chart Properties '''form and make '''edits''' to any of those '''Label '''group controls. These '''edits''', when '''applied''' by clicking the '''Apply '''or '''OK '''button on the '''Chart Properties '''form, change any of the values you '''edited''' in the '''Label '''control group. It should be noted that changing the value of the '''Tic Units dropdown''' makes a corresponding change to the list of values available for the '''Label format dropdown'''. |
| − | + | The following are three examples of available '''Label format''' for '''Years''', '''Months''', and '''Weeks''': | |
| − | + | ====Years Example==== | |
| − | + | :1) '''Chart Properties '''form '''Time Axis '''tab’s '''Top '''sub-tab with the '''Tic Unit '''selected for '''Years''': | |
| − | <center>[[File: | + | <center>[[File:P70-22_1_5-70-(14)-10282020.png]]</center> |
| − | <!--<center> | + | <!--<center>P70-22_1_5-70-(14)-10282020.png</center>--> |
| − | + | ====Months Example==== | |
| − | + | :2) '''Chart Properties '''form '''Time Axis '''tab’s '''Middle '''sub-tab with the '''Tic Unit '''selected for '''Months''': | |
| − | + | ||
| − | + | <center>[[File:P70-22_1_5-70-(15)-10282020.png]]</center> | |
| + | <!--<center>P70-22_1_5-70-(15)-10282020.png</center>--> | ||
| − | + | ====Weeks Example==== | |
| − | : | + | :3) '''Chart Properties '''form '''Time Axis '''tab’s '''Bottom '''sub-tab with the '''Tic Unit '''selected for '''Weeks''': |
| − | + | <center>[[File:P70-22_1_5-70-(16)-10282020.png]]</center> | |
| + | <!--<center>P70-22_1_5-70-(16)-10282020.png</center>--> | ||
| − | + | ===Custom Date Format Feature=== | |
| − | + | OnePager provides a self-contained and comprehensive list of '''Label formats''' for all of the '''Tic Unit '''options included with the product. There can be cases where the OnePager provided '''Label formats '''are insufficient for your needs. In such cases, OnePager provides the '''Custom Date Format '''feature that supports the define of your specific '''Label format''' and includes that '''format''' in the dropdown lists for most '''Tic unit options'''. | |
| − | + | For more information on the '''Custom Date Format '''feature, please see the article at: [[The Custom Date Format Feature for OnePager Pro for Version 7.0 | The Custom Date Format Feature for OnePager Pro]] <!--22.5.1-70--> | |
| − | <!-- | + | |
| − | + | ===Label Alignment Dropdown Options=== | |
| − | + | The '''Label alignment dropdown''' provides options for '''aligning''' the '''text''' within all '''Time Axis Level Cells''' in the '''Level '''selected. As mentioned above, a '''Tic''' is the vertical border outlining a '''Time Axis Cell''' and a '''Tic unit''' is the space between the '''two vertical borders''' that define a '''Time Axis Cell'''. | |
| − | + | ||
| − | + | You have four (4) options for '''aligning text''' within a '''Tic unit''' as shown below''':''' | |
| − | + | <center>[[File:P70-22_1_5-70-(17)-10282020.png]]</center> | |
| + | <!--<center>P70-22_1_5-70-(17)-10282020.png</center>--> | ||
| − | + | The default '''Label alignment''' found in OnePager Pro distributed '''Template Properties''' and '''Chart Properties '''forms is '''Center between tics'''. An example of a portion of a chart’s '''Time Axis''' with the '''Middle''' '''Time Axis Level '''using the '''Center on tics''' '''alignment''' option is shown below: | |
| − | + | <center>[[File:P70-22_1_5-70-(18)-10282020.png]]</center> | |
| + | <!--<center>P70-22_1_5-70-(18)-10282020.png</center>--> | ||
| − | + | It is recommended that these '''Label alignment options''' be used in such a way that the '''alignment''' with '''Time Axis Level Cells''' at a lower '''Level '''makes for a logical presentation. | |
| − | === | + | ===Label Font Usage=== |
| − | + | Clicking the '''Label font dropdown''' accesses the standard OnePager '''Font properties '''form as shown below. | |
| − | + | <center>[[File:P70-22_1_5-70-(7)-10282020.png]]</center> | |
| + | <!--<center>P70-22_1_5-70-(7)-10282020.png</center>--> | ||
| − | + | The '''edits''' made in the '''Font properties '''form apply to all the '''text '''in the '''Time Axis Level'''. | |
| − | + | ====Font==== | |
| − | + | Clicking the '''Font dropdown '''accesses the list of '''Font Types''' available on your computer and displays them as a dropdown''' '''menu. | |
| − | + | ====Color==== | |
| − | + | Clicking the '''Color dropdown''' accesses the standard OnePager '''Color Chooser''' form and allows you to '''edit '''the '''background color''' in the '''selected Time Axis Cell(s)'''. | |
| − | + | ====Size==== | |
| − | + | The '''Size '''dial allows you to select the '''pixel size''' for the '''text '''being '''edited'''. | |
| − | + | ||
| − | + | ====Bold, Italics, Underline==== | |
| − | + | The three (3) buttons below the '''Color dropdown''' marked '''B''', ''I'', and [[U]] are provided to enhance the selected '''text''' as '''Bold''', ''Italics'', and [[Underlined]] To '''Apply '''the '''edits''' made in the '''Font properties '''form click the '''OK''' button. | |
| − | + | ||
==Related Links== | ==Related Links== | ||
| − | [[The | + | [[Showing Different Time Units of Time for OnePager Pro for Version 7.0 | Showing Different Units of Time for OnePager Pro]] <!--22.1.1-70--> |
| + | |||
| + | [[Using Fiscal Years and Weeks for OnePager Pro for Version 7.0 | Using Fiscal Years and Weeks for OnePager Pro]] <!--22.2.1-70--> | ||
| + | |||
| + | [[The Custom Date Format Feature for OnePager Pro for Version 7.0 | The Custom Date Format Feature for OnePager Pro]] <!--22.5.1-70--> | ||
| + | |||
| + | [[Re-Ordering Time Axis Levels for OnePager Pro for Version 7.0 | Re-Ordering Time Axis Levels for OnePager Pro]] <!--22.3.5-70--> | ||
| − | [[ | + | [[The Floating Time Axis Feature for OnePager Pro for Version 7.0 | The Floating Time Axis Feature for OnePager Pro]] <!--22.3.9-70--> |
| − | [[ | + | [[Changing the Time Axis Borders for OnePager Pro for Version 7.0 | Changing the Time Axis Borders for OnePager Pro]] <!--22.1.7-70--> |
| − | (22.1. | + | (22.1.5-70) |
[[Category:Version 7.0]] | [[Category:Version 7.0]] | ||
[[Category:Editing the Chart]] | [[Category:Editing the Chart]] | ||
| − | |||
[[Category:Time Axis]] | [[Category:Time Axis]] | ||
| − | [[Category: | + | [[Category:Time Axis Tab]] |
| + | [[Category:Non-Linear Time Axis]] | ||
| + | [[Category:Floating Time Axis]] | ||
| + | [[Category:Fiscal Years]] | ||
| + | [[Category:Custom Date Format]] | ||
[[Category:Charts]] | [[Category:Charts]] | ||
[[Category:Templates]] | [[Category:Templates]] | ||
[[Category:Chart Properties Form]] | [[Category:Chart Properties Form]] | ||
| − | [[Category:OnePager | + | [[Category:OnePager Pro]] |
Revision as of 18:06, 15 January 2021
Contents
Overview
The Chart Properties form’s Time Axis tab has three (3) sub-tabs that provide controls for each Time Axis Level.
For more information on Showing Different Time Units, please see the article at: Showing Different Units of Time for OnePager Pro
The Chart Properties form Time Axis tab’s three Time Axis Level sub-tabs contain essentially the same controls and look like this:
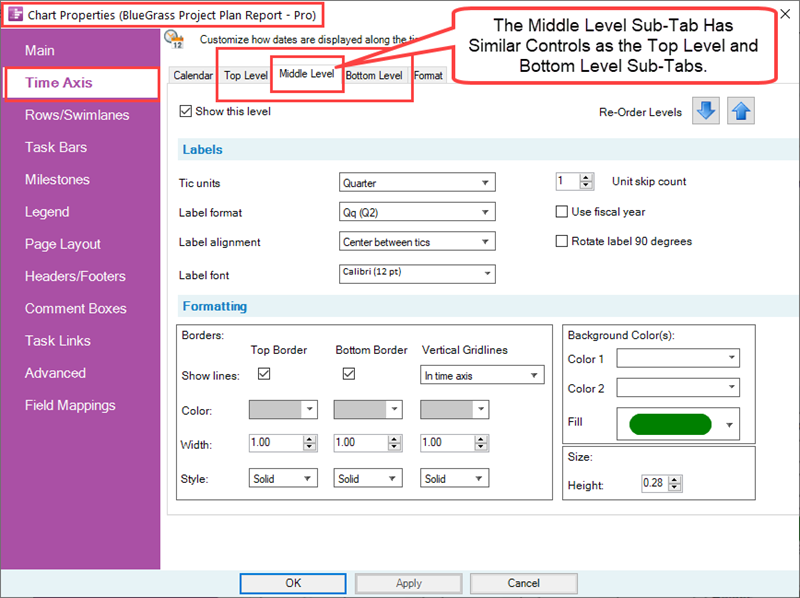
Within each of these sub-tabs (i.e., Top, Middle, and Bottom) there are six (6) control groups: (1) Show this level checkbox, (2) Re-Order Levels (3) Labels, (4) Formatting, (5) Background Color(s), and (6) Size. The controls provided in the Chart Properties form’s Time Axis tab and the three (3) sub-tabs considered here are the same as the corresponding sub-tabs in the Template Properties form’s Time Axis tab. For completeness, the Show this level checkbox that appears in the Top, Middle, and Bottom sub-tabs of the Template Properties and Chart Properties form’s Time Axis tab can be used to show or hide the corresponding Time Axis Level in the chart. At least one Time Axis Level must be shown.
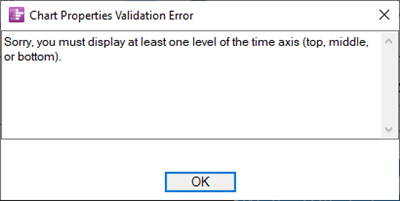
An attempt to hide all three Time Axis Levels accesses the message below:
The Re-Order Levels up and down arrows are provided so that you can exchange the location of Time Axis Levels with the up to three levels provided.
For more information on Re-Ordering Time Axis Levels, please see the article at: Re-Ordering Time Axis Levels for OnePager Pro
For more information on the Formatting control group, which supports formatting Time Axis Level and Cell borders, please see the article at: Changing the Time Axis Borders for OnePager Pro
The Size control group, found in the lower right corner of the tab, which controls changing the vertical height of the Time Axis Level is a dial control whose units are either in inches or centimeters depending on the type of Template Properties form being used to create the chart. Variations in Time Axis Level height can be useful for emphasizing the Time Axis Level, for providing vertical space for large Label fonts, or for providing the necessary vertical space for rotated Time Axis Level labels. Changes to the Size (Height:) control applies to all cells in the Time Axis Level. The purpose of this article is to describe the Label sub-group and how its controls can be used for editing of the chart through the use of the Chart Properties form and the Chart Editor.
Editing Time Axis Level Properties with the Chart Properties Form
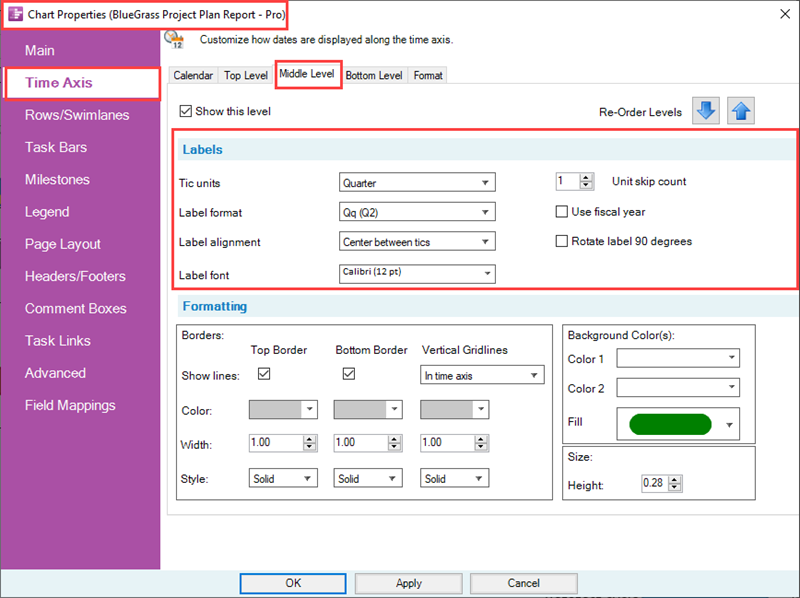
Within each sub-tab are controls for Time Axis Level Labels as in previous OnePager versions.
Tic Units
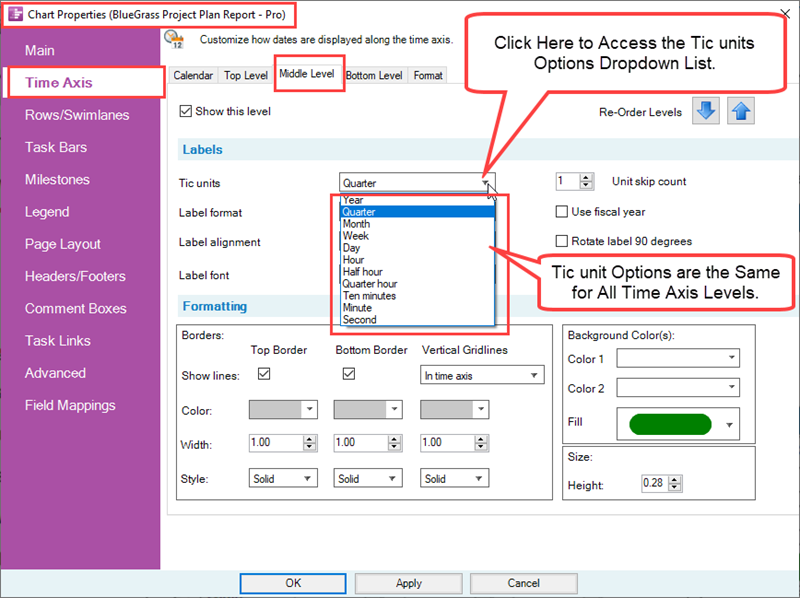
A Tic is the vertical border outlining a Time Axis Cell. A Tic unit is the space between the two vertical borders that define a Time Axis Cell. The Tic units dropdown for each Time Axis Level consist of the same options as shown below:
Label Format
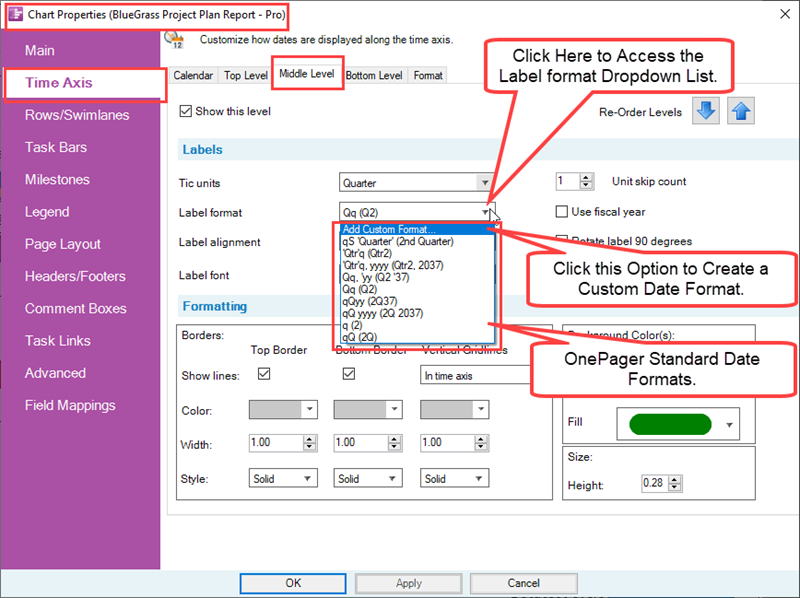
The Label format dropdown provides the OnePager list of all available Label formats specific to the Tic Unit. The Label format list is enhanced to give you the advanced capability to define your own Custom Date Format as shown in the illustration below.
- 1) Note the item in the list below called Add Custom Format….
- 2) Selecting the Add Custom Format… option takes you to the Custom Date Format feature.
For more information on the Custom Date Format feature, please see the article at: The Custom Date Format Feature for OnePager Pro
Label Alignment
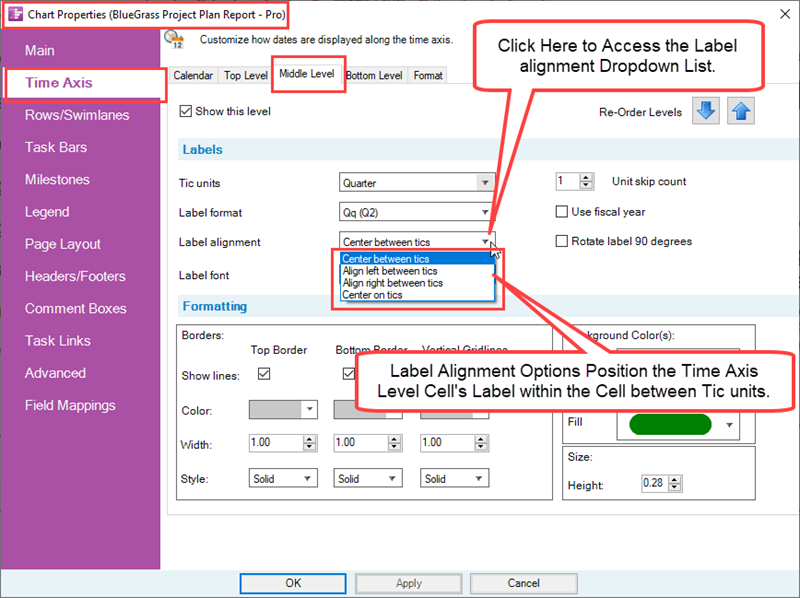
The Label alignment dropdown provides Label format text alignment options for each tic unit in the Time Axis Level Cells.
Label Font Properties
Clicking the Label font dropdown accesses the standard OnePager Font properties form as shown below:
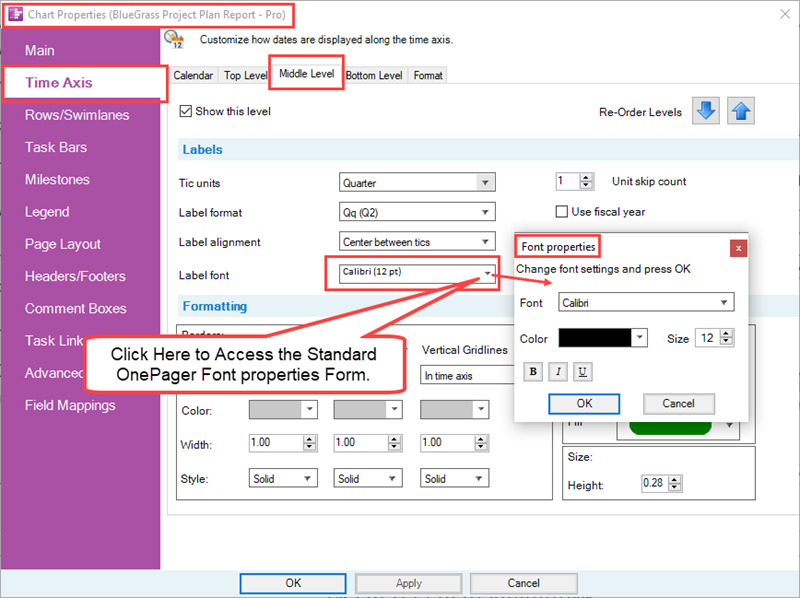
The Font properties form allows you to edit the way the text in the selected Time Axis Level text appears with regard to font type, color, size, and settings for Bold, Italics, and Underline. With OnePager you are able to maverick the Label font properties of each Time Axis Level Cell by using the time axis right-click context menu’s Format cell … command and Font properties form.
Unit Skip Count
The Unit skip count determines the number of time units that are skipped between Time Axis Level Labels. Normally the Unit skip count is set to 1 as shown below:

To illustrate an edit, if you set the Middle Time Axis Level’s Unit skip count to a higher value of 2, the Time Axis Middle Level looks like this:

In the above illustration the Middle Level Time Axis is no longer consistent with the Top or Bottom Level Time Axes with respect to Unit skip counts. To avoid confusion, it is recommended not showing the Bottom Level Time Axis as illustrated below:

As with other Time Axis Level and Cell properties, any edits made to a Time Axis Level or Cell property is made to the corresponding element of a Floating Time Axis as shown below:

For more information on the Floating Time Axis, please see the article at: The Floating Time Axis Feature for OnePager Pro
Use Fiscal Year Checkbox
The Use fiscal year checkbox, when checked ON, tells OnePager to apply Fiscal Year/Week dates as applicable. The controls for Fiscal Year/Week designations are found in the Chart Properties form Time Axis tab’s Calendar sub-tab in the Calendar Settings group as discussed above.
For more information on formulating Fiscal Year Time Axis Levels, please see the article at: Using Fiscal Years and Weeks for OnePager Pro
Rotate Label 90 Degrees Checkbox
The Rotate label 90 degrees checkbox found in the Top, Middle, and Bottom Levels sub-tabs of the Chart Properties form’s Time Axis tab allows you to represent the various Time Axis Level Cell’s text contents rotated 90 degrees clockwise as shown below:

Editing Time Axis Level Properties in the Chart Editor
Tic Units, Label Formats, and Label Alignments
The controls in the Chart Properties form’s Time Axis tab can be accessed directly by right-clicking on any Time Axis Cell to access the time axis right-click context menu and then clicking the Time-axis properties… command as shown below:

After clicking the Time-axis properties… command, the Chart Properties form’s Time Axis tab is accessed at the Level of the selected cell(s) so you can edit any Time Axis Level Label property. You also have the capability at this point to click to another Time Axis Level tab in the Chart Properties form and make edits to any of those Label group controls. These edits, when applied by clicking the Apply or OK button on the Chart Properties form, change any of the values you edited in the Label control group. It should be noted that changing the value of the Tic Units dropdown makes a corresponding change to the list of values available for the Label format dropdown.
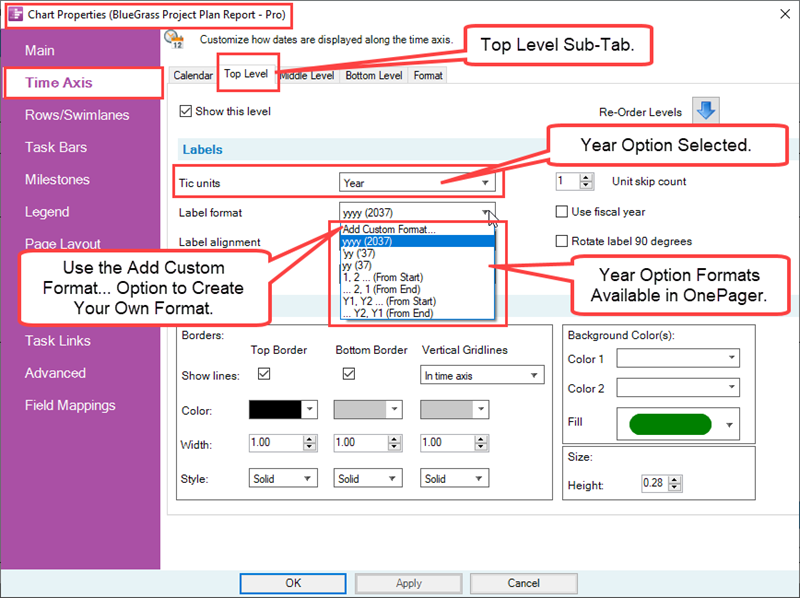
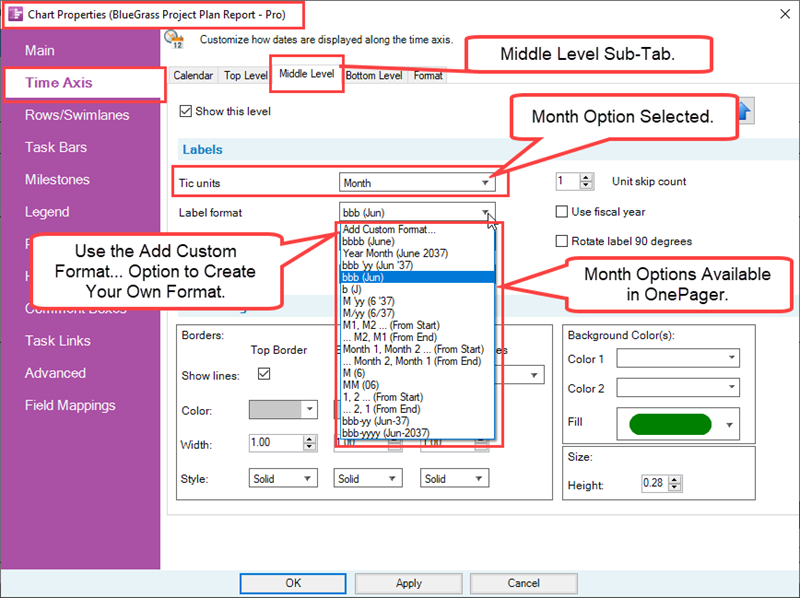
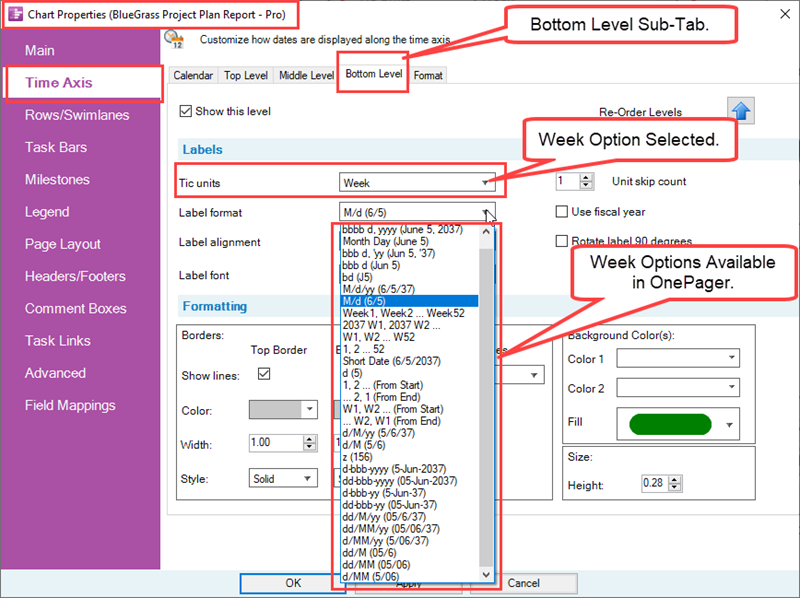
The following are three examples of available Label format for Years, Months, and Weeks:
Years Example
- 1) Chart Properties form Time Axis tab’s Top sub-tab with the Tic Unit selected for Years:
Months Example
- 2) Chart Properties form Time Axis tab’s Middle sub-tab with the Tic Unit selected for Months:
Weeks Example
- 3) Chart Properties form Time Axis tab’s Bottom sub-tab with the Tic Unit selected for Weeks:
Custom Date Format Feature
OnePager provides a self-contained and comprehensive list of Label formats for all of the Tic Unit options included with the product. There can be cases where the OnePager provided Label formats are insufficient for your needs. In such cases, OnePager provides the Custom Date Format feature that supports the define of your specific Label format and includes that format in the dropdown lists for most Tic unit options.
For more information on the Custom Date Format feature, please see the article at: The Custom Date Format Feature for OnePager Pro
Label Alignment Dropdown Options
The Label alignment dropdown provides options for aligning the text within all Time Axis Level Cells in the Level selected. As mentioned above, a Tic is the vertical border outlining a Time Axis Cell and a Tic unit is the space between the two vertical borders that define a Time Axis Cell.
You have four (4) options for aligning text within a Tic unit as shown below:
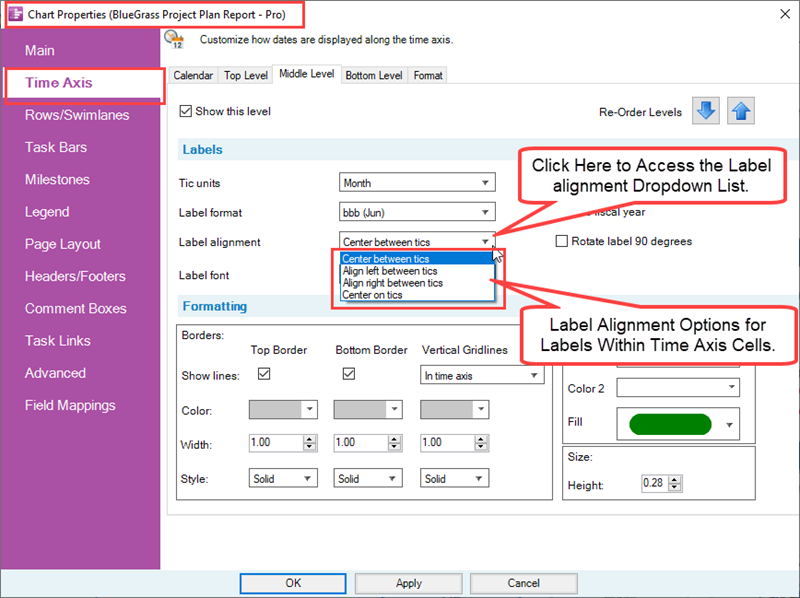
The default Label alignment found in OnePager Pro distributed Template Properties and Chart Properties forms is Center between tics. An example of a portion of a chart’s Time Axis with the Middle Time Axis Level using the Center on tics alignment option is shown below:

It is recommended that these Label alignment options be used in such a way that the alignment with Time Axis Level Cells at a lower Level makes for a logical presentation.
Label Font Usage
Clicking the Label font dropdown accesses the standard OnePager Font properties form as shown below.

The edits made in the Font properties form apply to all the text in the Time Axis Level.
Font
Clicking the Font dropdown accesses the list of Font Types available on your computer and displays them as a dropdown menu.
Color
Clicking the Color dropdown accesses the standard OnePager Color Chooser form and allows you to edit the background color in the selected Time Axis Cell(s).
Size
The Size dial allows you to select the pixel size for the text being edited.
Bold, Italics, Underline
The three (3) buttons below the Color dropdown marked B, I, and U are provided to enhance the selected text as Bold, Italics, and Underlined To Apply the edits made in the Font properties form click the OK button.
Related Links
Showing Different Units of Time for OnePager Pro
Using Fiscal Years and Weeks for OnePager Pro
The Custom Date Format Feature for OnePager Pro
Re-Ordering Time Axis Levels for OnePager Pro
The Floating Time Axis Feature for OnePager Pro
Changing the Time Axis Borders for OnePager Pro
(22.1.5-70)