Difference between revisions of "Testing Article1"
| Line 1: | Line 1: | ||
| − | ==About | + | ==About Creating a Count Down/Up Timer for OnePager Pro== |
| − | + | OnePager Pro provides you with an enhanced feature to express a '''count up or down timer''' in any '''Time Axis Level''' as illustrated below for the '''Bottom Time Axis Level '''in '''Months ''': | |
| − | :1) | + | <center>[[File:P70-22_2_5-70-(1)-10302020.png]]</center> |
| + | <!--<center>P70-22_2_5-70-(1)-10302020.png</center>--> | ||
| − | + | In the illustration above, the '''Months''' shown in the '''Bottom Time Axis Level''' are '''counted down''' from the 36th month in 2018 to the last month of the project in June 2021. You can '''reverse''' the '''month counter''' to show the number of '''months''' since the '''start''' of the project as shown below: | |
| − | : | + | <center>[[File:P70-22_2_5-70-(2)-10302020.png]]</center> |
| + | <!--<center>P70-22_2_5-70-(2)-10302020.png</center>--> | ||
| − | + | Further, you can establish a '''month''', for example, during the '''timespan''' of the project for both a '''count up''' and '''count down '''in months along the '''timeline''' as shown here: | |
| − | <center>[[File: | + | <center>[[File:P70-22_2_5-70-(3)-10302020.png]]</center> |
| − | <!--<center> | + | <!--<center>P70-22_2_5-70-(3)-10302020.png</center>--> |
| − | + | Finally, as with the '''count up/down''' settings from either the '''start '''or '''end '''of a project’s '''timespan''', the above order of the '''count''' can be '''reversed''' to a '''count down/up''' format starting at the same '''middle date''' as shown below: | |
| − | + | <center>[[File:P70-22_2_5-70-(4)-10302020.png]]</center> | |
| + | <!--<center>P70-22_2_5-70-(4)-10302020.png</center>--> | ||
| − | + | ==Enhanced Three Level Count Up and Down Feature== | |
| − | + | The controls for the '''Time Axis Levels '''are organized into a single tab of the '''Template Properties''' form and '''Chart Properties ''' form, the '''Time Axis''' tab. The OnePager Pro '''Time Axis Count up''' and''' Count down '''feature is a separate control group on the '''Calendar''' sub-tab of the '''Template Properties''' form and '''Chart Properties '''form’s '''Time Axis '''tab. All three '''Time Axis Levels''' can use '''Count up from''' or''' Count down from''' '''Label formats''' with the '''Count up from''' and '''Count down from dates''' centrally located on the '''Calendar '''sub-tab in the '''Calendar Settings''' control group as shown below. | |
| − | + | ||
| − | + | <center>[[File:P70-22_2_5-70-(5)-10302020.png]]</center> | |
| + | <!--<center>P70-22_2_5-70-(5)-10302020.png</center>--> | ||
| − | + | Each '''Time Axis Level''' sub-tab has appropriate '''Count up''' and '''Count down''' '''Label formats''', as shown in the '''Label format''' dropdown menu for the '''Top Level Time Axis''' shown below: | |
| − | + | <center>[[File:P70-22_2_5-70-(6)-10302020.png]]</center> | |
| + | <!--<center>P70-22_2_5-70-(6)-10302020.png</center>--> | ||
| − | + | When applied to the '''Top Level''' of a the three '''Time Axis Levels ''' in the chart, the chart looks like this: | |
| − | + | <center>[[File:P70-22_2_5-70-(7)-10302020.png]]</center> | |
| + | <!--<center>P70-22_2_5-70-(7)-10302020.png</center>--> | ||
| − | + | ==Creating the Count Down/Up Timers in Time Axis Levels== | |
| − | + | ||
| − | === | + | ===Basic Settings=== |
| − | + | Using the '''Month Time Axis Level Unit Label''', the following steps can be used to create a '''Count Down Timer''' for the '''Bottom Level Time Axis'''. For an existing chart, go to the '''Chart Properties''' form by clicking the '''Chart Properties''' button on the OnePager '''Home '''ribbon tool bar tab. Click the '''Time Axis''' tab of the '''Chart Properties''' form. Make sure that the '''Time Axis ''' in the chart shows all three '''Time Axis Levels''' by assuring that all three '''Time Axis Levels '''('''Top''', '''Middle''', and '''Bottom Levels''') have the '''Show this level''' checkbox checked '''ON''' as the example for the '''Bottom Time Axis Level '''below shows: | |
| − | <center>[[File: | + | <center>[[File:P70-22_2_5-70-(8)-10302020.png]]</center> |
| − | <!--<center> | + | <!--<center>P70-22_2_5-70-(8)-10302020.png</center>--> |
| − | == | + | ===Calendar Sub-Tab Settings=== |
| − | + | Next, click the '''Calendar '''sub-tab where the '''Count Up/Down''' control sub-group is located. Note that the '''Count up from '''and '''Count down from dates''' in the '''Chart Properties''' form's '''Time Axis''' tab are preset to the chart’s '''Start/Finish date boundaries ''' shown below in the OnePager '''View''' ribbon tool bar tab: | |
| − | + | <center>[[File:P70-22_2_5-70-(9)-10302020.png]]</center> | |
| + | <!--<center>P70-22_2_5-70-(9)-10302020.png</center>--> | ||
| − | ''' | + | At this step, no '''edits '''need to be made to the '''Count up from '''or '''Count down from dates''' in this sub-tab. |
| − | + | ===Label Format Settings for Count Up/Down - Examples=== | |
| − | + | ||
| − | + | To establish a '''Count Up Timer''' for the '''Bottom Time Axis Level''' which is set to the '''Month Tic unit''' in this example, click to the '''Bottom Level Time Axis '''sub-tab and select the '''Label format '''dropdown as shown here: | |
| − | : | + | <center>[[File:P70-22_2_5-70-(10)-10302020.png]]</center> |
| + | <!--<center>P70-22_2_5-70-(10)-10302020.png</center>--> | ||
| − | + | Each pair of '''Count Up/Down Label formats''' has a '''From Start '''and '''From End '''option to choose from. | |
| − | + | ====Count Up From Start==== | |
| − | + | Selecting the '''From Start''' option establishes the '''Count Up/Down Timer ''' at the '''one (1) '''at the '''date '''set in the '''Count up from '''window on the '''Calendar '''sub-tab as shown here where the '''M1, M2 … From Start''' option is selected: | |
| − | : | + | <center>[[File:P70-22_2_5-70-(11)-10302020.png]]</center> |
| + | <!--<center>P70-22_2_5-70-(11)-10302020.png</center>--> | ||
| − | === | + | ====Count Up From End==== |
| − | + | If the '''Label format''' changes to the '''From End''' '''format '''option, the '''Bottom Time Axis Level '''looks like this: | |
| − | <center>[[File: | + | <center>[[File:P70-22_2_5-70-(12)-10302020.png]]</center> |
| − | <!--<center> | + | <!--<center>P70-22_2_5-70-(12)-10302020.png</center>--> |
| − | === | + | ===Changing the Count Up/Down Control Settings - Examples=== |
| − | + | ====Counting From End==== | |
| − | + | Using the example chart and the settings in the '''Bottom Time Axis Level '''for the '''Label format '''as the '''from End''' option and then going to the '''Calendar '''sub-tab and changing the '''Count down from date '''from June 1, 2021 to June 1, 2020, the resulting chart looks like this: | |
| − | + | ||
| − | + | <center>[[File:P70-22_2_5-70-(13)-10302020.png]]</center> | |
| + | <!--<center>P70-22_2_5-70-(13)-10302020.png</center>--> | ||
| − | == | + | ====Counting From Start==== |
| − | + | Finally, as an example of further flexibility with this feature, if you change the '''Count up from date''' to the same '''date setting''' as the '''Count down from date''' from 8/1/2018 to 6/1/2020 as was done in the previous paragraph and change the '''Bottom Time Axis Level Label format '''from the '''From End''' to '''From Start''', the resulting chart changes the “sense” of the '''Bottom Time Axis Level Label Units '''as shown below: | |
| − | + | <center>[[File:P70-22_2_5-70-(14)-10302020.png]]</center> | |
| + | <!--<center>P70-22_2_5-70-(14)-10302020.png</center>--> | ||
| − | + | ===Notes=== | |
| − | + | The feature described above is also available when '''Fiscal Year Date Formats''' are used. Please keep in mind that all three '''Time Axis Levels '''can use the '''Count Up/Down''' feature in conjunction with the '''Label formats''' provided by OnePager Pro in the three '''Time Axis Level '''sub-tabs. | |
| − | + | The only exception is that OnePager Pro does not provide '''Label formats''' for the '''Count Up/Down '''feature for the '''Quarters Tic Unit Label'''. This can be overcome, if desired, by creating your own '''Custom Date Format''' for this '''Tic Unit Label'''. | |
| − | + | For more information on the '''Custom Date Format '''feature, please see the article at: [[The Custom Date Format Feature for OnePager Pro for Version 7.0 | The Custom Date Format Feature for OnePager Pro]] <!--22.5.1-70--> | |
| − | <!-- | + | |
| + | As a final note, the '''edits '''discussed in this article apply to '''Floating Time Axes''' if they are shown in the '''graph''' and the '''edits''' to the '''Time Axis Levels''' related to the '''Count Up/Down '''feature remain if the you '''switch Time Axes '''from one '''Level '''to another. | ||
==Related Links== | ==Related Links== | ||
| − | [[Labeling Time Axis Levels for OnePager | + | [[Showing Different Time Units of Time for OnePager Pro for Version 7.0 | Showing Different Units of Time for OnePager Pro]] <!--22.1.1-70--> |
| + | |||
| + | [[Labeling Time Axis Levels for OnePager Pro for Version 7.0 | Labeling Time Axis Levels for OnePager Pro]] <!--22.1.5-70--> | ||
| + | |||
| + | [[Changing the Chart’s Start/Finish Dates for OnePager Pro for Version 7.0 | Changing the Chart’s Start/Finish Dates for OnePager Pro]] <!--22.3.1-70--> | ||
| + | |||
| + | [[Re-Ordering Time Axis Levels for OnePager Pro for Version 7.0 | Switching Time Axis Levels for OnePager Pro]] <!--22.3.5-70--> | ||
| + | |||
| + | [[The Floating Time Axis Feature for OnePager Pro for Version 7.0 | The Floating Time Axis Feature for OnePager Pro]] <!--22.3.9-70--> | ||
| − | [[ | + | [[The Custom Date Format Feature for OnePager Pro for Version 7.0 | The Custom Date Format Feature for OnePager Pro]] <!--22.5.1-70--> |
| − | (22.2. | + | (22.2.5-70) |
[[Category:Version 7.0]] | [[Category:Version 7.0]] | ||
[[Category:Editing the Chart]] | [[Category:Editing the Chart]] | ||
| − | |||
[[Category:Time Axis]] | [[Category:Time Axis]] | ||
| − | [[Category: | + | [[Category:Floating Time Axis]] |
| − | [[Category: | + | [[Category:Count Up/Down]] |
| − | + | ||
[[Category:Ribbon]] | [[Category:Ribbon]] | ||
[[Category:Snapshots]] | [[Category:Snapshots]] | ||
| − | [[Category: | + | [[Category:charts]] |
[[Category:Templates]] | [[Category:Templates]] | ||
[[Category:Chart Properties Form]] | [[Category:Chart Properties Form]] | ||
| − | [[Category:OnePager | + | [[Category:OnePager Pro]] |
Revision as of 20:14, 15 January 2021
Contents
About Creating a Count Down/Up Timer for OnePager Pro
OnePager Pro provides you with an enhanced feature to express a count up or down timer in any Time Axis Level as illustrated below for the Bottom Time Axis Level in Months :

In the illustration above, the Months shown in the Bottom Time Axis Level are counted down from the 36th month in 2018 to the last month of the project in June 2021. You can reverse the month counter to show the number of months since the start of the project as shown below:

Further, you can establish a month, for example, during the timespan of the project for both a count up and count down in months along the timeline as shown here:

Finally, as with the count up/down settings from either the start or end of a project’s timespan, the above order of the count can be reversed to a count down/up format starting at the same middle date as shown below:

Enhanced Three Level Count Up and Down Feature
The controls for the Time Axis Levels are organized into a single tab of the Template Properties form and Chart Properties form, the Time Axis tab. The OnePager Pro Time Axis Count up and Count down feature is a separate control group on the Calendar sub-tab of the Template Properties form and Chart Properties form’s Time Axis tab. All three Time Axis Levels can use Count up from or Count down from Label formats with the Count up from and Count down from dates centrally located on the Calendar sub-tab in the Calendar Settings control group as shown below.
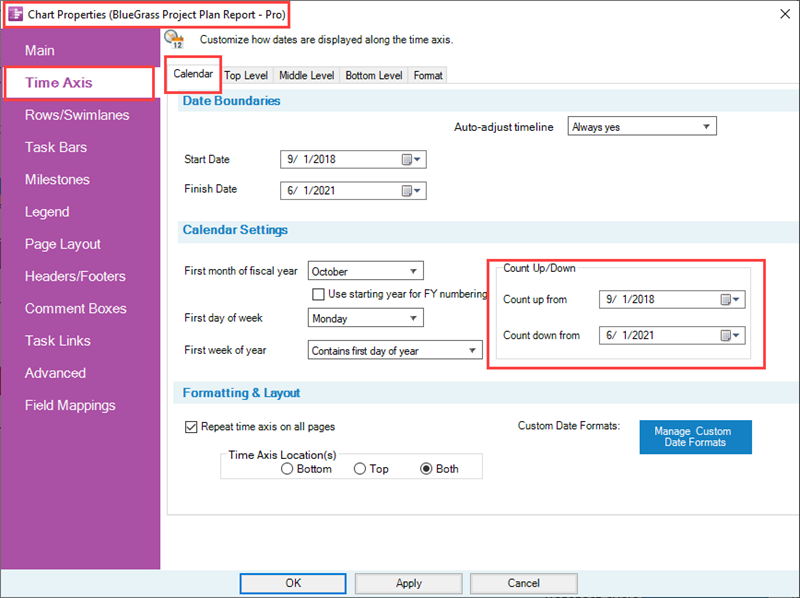
Each Time Axis Level sub-tab has appropriate Count up and Count down Label formats, as shown in the Label format dropdown menu for the Top Level Time Axis shown below:
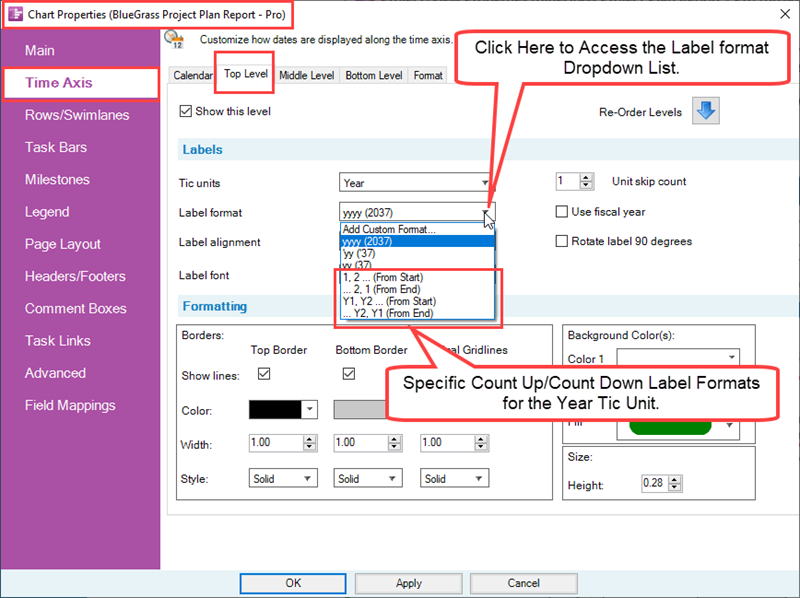
When applied to the Top Level of a the three Time Axis Levels in the chart, the chart looks like this:

Creating the Count Down/Up Timers in Time Axis Levels
Basic Settings
Using the Month Time Axis Level Unit Label, the following steps can be used to create a Count Down Timer for the Bottom Level Time Axis. For an existing chart, go to the Chart Properties form by clicking the Chart Properties button on the OnePager Home ribbon tool bar tab. Click the Time Axis tab of the Chart Properties form. Make sure that the Time Axis in the chart shows all three Time Axis Levels by assuring that all three Time Axis Levels (Top, Middle, and Bottom Levels) have the Show this level checkbox checked ON as the example for the Bottom Time Axis Level below shows:
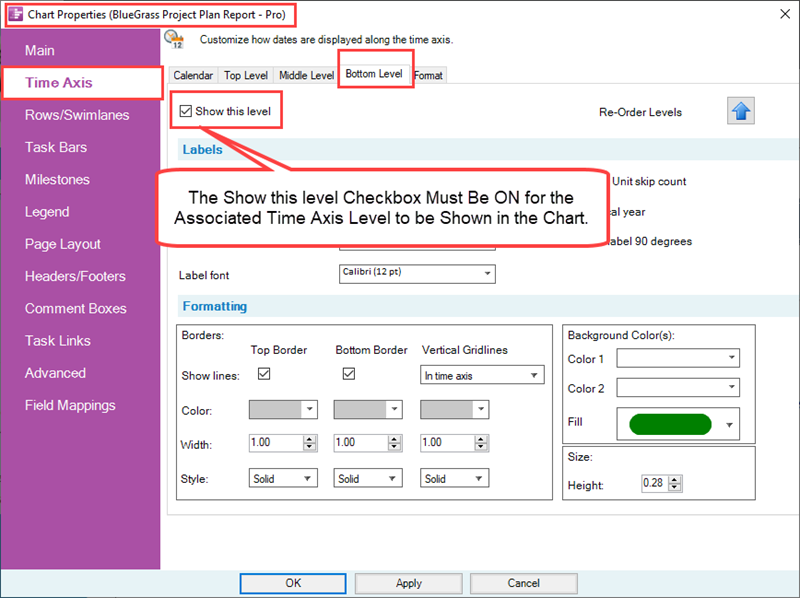
Calendar Sub-Tab Settings
Next, click the Calendar sub-tab where the Count Up/Down control sub-group is located. Note that the Count up from and Count down from dates in the Chart Properties form's Time Axis tab are preset to the chart’s Start/Finish date boundaries shown below in the OnePager View ribbon tool bar tab:
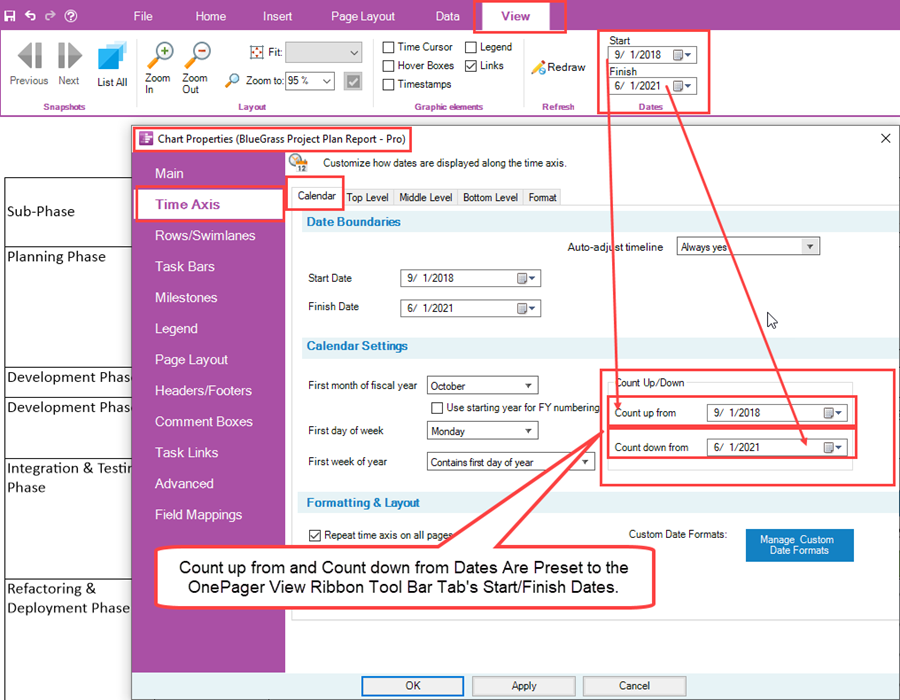
At this step, no edits need to be made to the Count up from or Count down from dates in this sub-tab.
Label Format Settings for Count Up/Down - Examples
To establish a Count Up Timer for the Bottom Time Axis Level which is set to the Month Tic unit in this example, click to the Bottom Level Time Axis sub-tab and select the Label format dropdown as shown here:
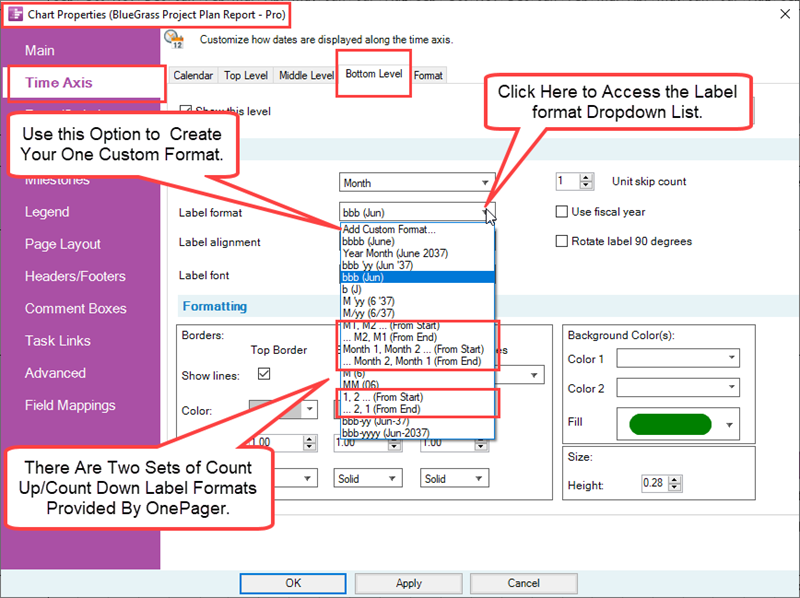
Each pair of Count Up/Down Label formats has a From Start and From End option to choose from.
Count Up From Start
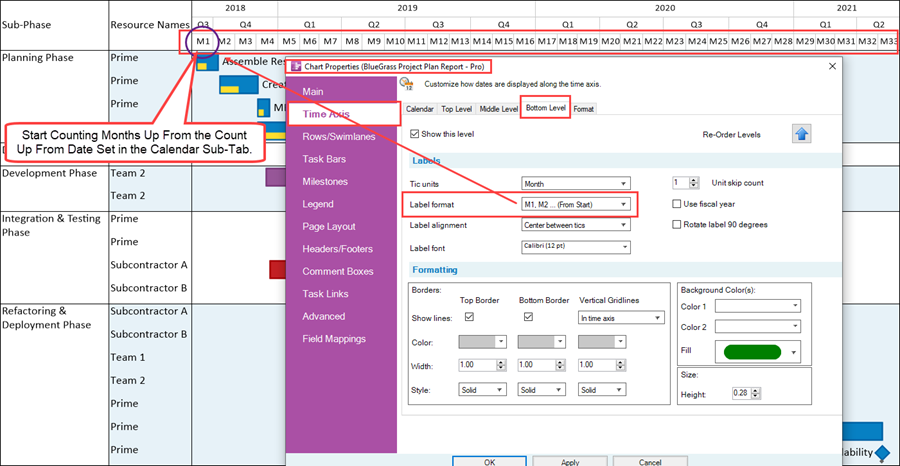
Selecting the From Start option establishes the Count Up/Down Timer at the one (1) at the date set in the Count up from window on the Calendar sub-tab as shown here where the M1, M2 … From Start option is selected:
Count Up From End
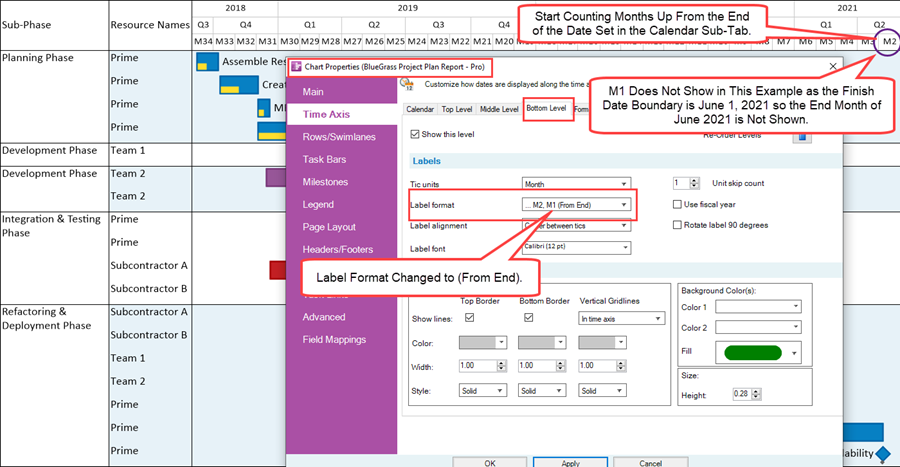
If the Label format changes to the From End format option, the Bottom Time Axis Level looks like this:
Changing the Count Up/Down Control Settings - Examples
Counting From End
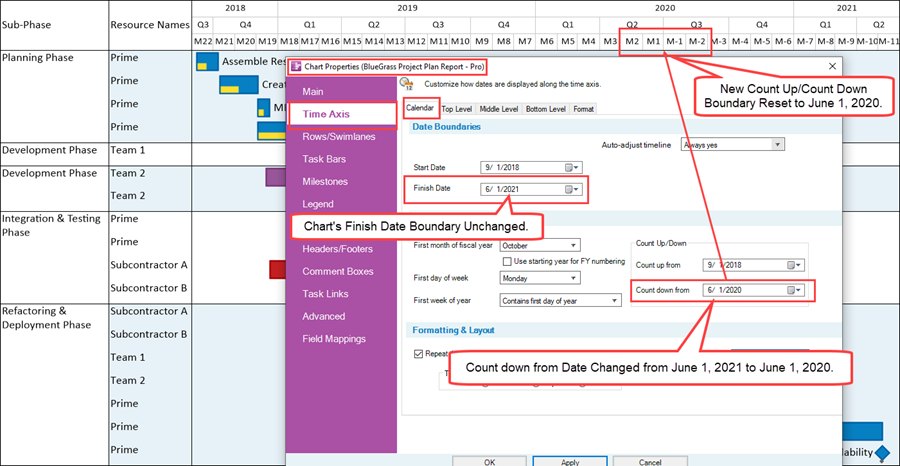
Using the example chart and the settings in the Bottom Time Axis Level for the Label format as the from End option and then going to the Calendar sub-tab and changing the Count down from date from June 1, 2021 to June 1, 2020, the resulting chart looks like this:
Counting From Start
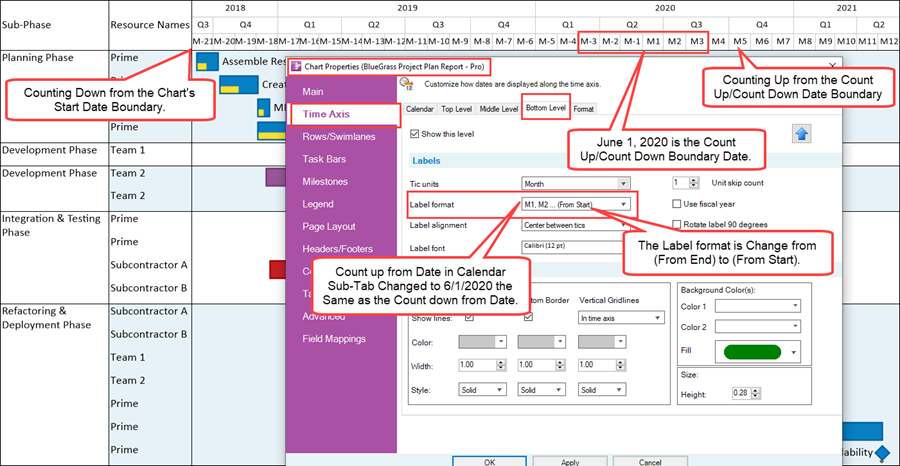
Finally, as an example of further flexibility with this feature, if you change the Count up from date to the same date setting as the Count down from date from 8/1/2018 to 6/1/2020 as was done in the previous paragraph and change the Bottom Time Axis Level Label format from the From End to From Start, the resulting chart changes the “sense” of the Bottom Time Axis Level Label Units as shown below:
Notes
The feature described above is also available when Fiscal Year Date Formats are used. Please keep in mind that all three Time Axis Levels can use the Count Up/Down feature in conjunction with the Label formats provided by OnePager Pro in the three Time Axis Level sub-tabs.
The only exception is that OnePager Pro does not provide Label formats for the Count Up/Down feature for the Quarters Tic Unit Label. This can be overcome, if desired, by creating your own Custom Date Format for this Tic Unit Label.
For more information on the Custom Date Format feature, please see the article at: The Custom Date Format Feature for OnePager Pro
As a final note, the edits discussed in this article apply to Floating Time Axes if they are shown in the graph and the edits to the Time Axis Levels related to the Count Up/Down feature remain if the you switch Time Axes from one Level to another.
Related Links
Showing Different Units of Time for OnePager Pro
Labeling Time Axis Levels for OnePager Pro
Changing the Chart’s Start/Finish Dates for OnePager Pro
Switching Time Axis Levels for OnePager Pro
The Floating Time Axis Feature for OnePager Pro
The Custom Date Format Feature for OnePager Pro
(22.2.5-70)