Difference between revisions of "Testing Article1"
(→Calendar Setting Control Group) |
|||
| Line 1: | Line 1: | ||
==Overview== | ==Overview== | ||
| − | This article covers | + | This article covers '''manual editing''' of the '''Time Axis''' and includes discussions of '''manual editing''' of '''Time Axis Level Cells''' from the '''Chart Editor ''' and '''manual editing''' of '''Floating Time Axis Cells'''. Because the '''Time Axis Level Cell’s context menu''' contains commands related to the '''Non-Linear Time Axis '''feature and accessing the '''Chart Properties''' form, these topics are covered in this article as well. There are references placed throughout this article to related topics and a list of '''related articles '''is provided end of this article. |
| − | + | Please be aware that some '''manual edits''' performed on '''Time Axis Level Cell(s)''' causes entries to be placed in '''The Grid''' located in the '''Chart Properties '''form '''Time Axis '''tab’s '''Format '''sub-tab. | |
| − | The | + | The organization of this article follows the process of '''Time Axis Level Cell editing '''from the selection of the '''Time Axis Level Cell''' through the various methods available to '''edit Time Axis Cell '''properties in the '''Chart Editor'''. |
| − | + | Please use the '''hyperlinks '''in the '''Contents''' box at the top of this article to go directly to specific topics. | |
| − | == | + | ==Selecting Time Axis Level Cells in the Chart Editor== |
| − | + | '''Time Axis Level Cells''' can be '''selected''' with either a '''left-click''' which highlights the '''Cell''' or a '''right-click''' which provides access to the '''Time Axis Level Cell context menu'''. Multiple '''Cells '''can be selected in the same '''Time Axis Level''' using either the '''CTL+Left-Click''' to select non-contiguous '''Cells''' or '''Cells '''in different '''Time Axis Levels''' or the '''SHIFT+Left-Click''' to select contiguous '''Cells '''in the same '''Time Axis Level'''. '''Time Axis Level Cell(s)''' are '''selected''' to: (1) '''edit''' their '''show/hide''' status, (2) '''edit '''their '''width '''in the '''Time Axis Level manually''', (3) '''edit '''certain '''Time Axis Level Cell '''properties, or (4) access the '''Chart Properties '''form '''Time Axis '''tab’s '''Level '''sub-tab to make more global '''edits'''. | |
| − | + | ===Selecting Time Axis Level Cells with the Left-Click=== | |
| − | + | ||
| − | + | Using the mouse '''left-click '''on any single '''Time Axis Level Cell''' highlights the '''Cell '''with the '''handlebars '''as shown below: | |
| − | + | <center>[[File:P70-22_4_3-70-(1)-11102020.png]]</center> | |
| + | <!--<center>P70-22_4_3-70-(1)-11102020.png</center>--> | ||
| − | + | Once an individual '''Time Axis Level Cell '''is '''selected''' with the '''left-click '''you can either '''stretch''' or '''compress''' it from the left or from the right '''handlebar'''. '''Selected Time Axis Level Cells '''cannot be moved up or down from the '''Time Axis Level '''in which they reside. | |
| − | + | ||
| − | + | However, '''Time Axis Levels '''can be '''re-ordered''' as described in the article at: [[Re-Ordering Time Axis Levels for OnePager Pro for Version 7.0 | Switching Time Axis Levels for OnePager Pro]] <!--22.3.5-70--> | |
| − | + | The use of the '''handlebars''' is illustrated below showing the intermediate step after the mouse is placed on the right '''handlebar''' and '''dragged '''to the right side of the Q2 '''Middle Time Axis Level Cell''': | |
| − | + | ||
| − | + | <center>[[File:P70-22_4_3-70-(2)-11102020.png]]</center> | |
| + | <!--<center>P70-22_4_3-70-(2)-11102020.png</center>--> | ||
| − | + | When the mouse button is released the '''Time Axis Levels '''look like this: | |
| − | <center>[[File: | + | <center>[[File:P70-22_4_3-70-(3)-11102020.png]]</center> |
| − | <!--<center> | + | <!--<center>P70-22_4_3-70-(3)-11102020.png</center>--> |
| − | + | Above, the Q1 '''Middle Time Axis Level Cell '''is '''stretched''' to approximately double its original '''width'''. Since the '''stretched''' '''Cell''' happens to be in the '''Middle Time Axis Level''', the '''Cells showing''' below it in the '''Bottom Time Axis Level''' are '''stretched''' as well to maintain the related proportionality. In a similar fashion, the 2019 '''Top Level Time Axis Cell '''is '''stretched''' proportionally but the Q2, Q3, and Q4 '''Middle Time Axis Level Cells''' remain unchanged as does the remainder of the unaffected '''Time Axis Level Cells.''' | |
| − | === | + | ===Selecting Time Axis Level Cells with the CTL+Left-Click=== |
| − | + | You can use your mouse to select '''Time Axis Level Cells '''in different '''Time Axis Levels''' by using the '''CTL+Left-Click method '''as shown here: | |
| − | <center>[[File: | + | <center>[[File:P70-22_3_3-70-(25)-11022020.png]]</center> |
| − | <!--<center> | + | <!--<center>P70-22_3_3-70-(25)-11022020.png</center>--> |
| − | + | Above, there are five (5) '''Time Axis Level Cells''' selected in the order shown. Although there are five (5) '''Time Axis Level Cells '''selected above, you can only '''stretch '''or '''compress '''selected '''Cell '''using the '''Drag and Drop method '''in '''one Time Axis Level only '''as shown below: | |
| − | + | <center>[[File:P70-22_3_3-70-(26)-11022020.png]]</center> | |
| + | <!--<center>P70-22_3_3-70-(26)-11022020.png</center>--> | ||
| − | + | If you now use the mouse to '''stretch '''the 2019 Q2 '''Middle Time Axis Level Cell''', OnePager Pro '''de-selects''' all selected '''Time Axis Level Cells''' highlighted in other '''Time Axis Levels''' such that only the '''Middle Time Axis Level Cells''' that are candidates for '''stretching''' remain selected as shown here: | |
| − | <center>[[File: | + | <center>[[File:P70-22_3_3-70-(27)-11022020.png]]</center> |
| − | <!--<center> | + | <!--<center>P70-22_3_3-70-(27)-11022020.png</center>--> |
| − | + | On the other hand, if you start to '''stretch '''the '''Bottom Level''' '''Time Axis Cells''', OnePager Pro '''de-selects''' the '''Middle Level Time Axis Cells''' before performing the desired '''stretch''' as shown below: | |
| − | + | <center>[[File:P70-22_3_3-70-(28)-11022020.png]]</center> | |
| + | <!--<center>P70-22_3_3-70-(28)-11022020.png</center>--> | ||
| − | === | + | ===Selecting Time Axis Level Cells with the SHIFT+Left-Click=== |
| − | + | You can also '''select''' a sequential set of '''Time Axis Cells''' in the same '''Level '''by using the '''SHIFT+Left-Click''' keys as shown below: | |
| − | + | <center>[[File:P70-22_3_3-70-(29)-11022020.png]]</center> | |
| + | <!--<center>P70-22_3_3-70-(29)-11022020.png</center>--> | ||
| − | + | Once the '''Time Axis Level Cells''' are '''selected''', anyone of them can be used to '''stretch '''or '''compress '''the set as shown here: | |
| − | + | ||
| − | + | ||
| − | + | ||
| − | + | ||
| − | + | ||
| − | + | ||
| − | + | <center>[[File:P70-22_3_3-70-(30)-11022020.png]]</center> | |
| + | <!--<center>P70-22_3_3-70-(30)-11022020.png</center>--> | ||
| − | The ''' | + | The general rule is that you cannot '''stretch '''multiple '''Time Axis Level Cells''' that are '''selected''' in '''multiple Time Axis Levels'''. |
| − | + | ===General Rules for Using CTL+Left-Click and SHIFT+Left-Click on Time Axis Level Cells=== | |
| − | + | ||
| − | + | Using a '''combination''' of the '''CTL+Left-Click''' and the '''SHIFT+Left-Click''' is restricted. | |
| − | + | The rules provided below are used by OnePager to coordinate the '''selection''' of '''Time Axis Level Cells'''. | |
| − | + | ||
| − | + | You can use the '''CTL+Left-Click''' to select any '''Time Axis Level Cell '''in any '''Level'''. However, attempting to '''stretch '''a single '''Time Axis Level Cell''' when '''Cells '''are selected in two or more '''Levels''' results in only the selected '''Cell '''being '''stretched'''. The selected '''Time Axis Level Cells''' in other '''Levels''' are '''de-selected'''. | |
| − | You | + | You can use the '''SHIFT+Left-Click''' to select a series of '''Time Axis Level Cells''' that are all in the same '''Level'''. This results in a contiguous series of '''Time Axis Level Cells '''being '''selected''' all of which can be '''edited''' as one or '''stretched '''or '''compressed''' together. When you have a contiguous series of '''Time Axis Level Cells selected''' you can '''right-click''' on any one of them to access the '''context menu'''. |
| − | + | You can use the '''CTL+Left-Click '''in multiple '''Time Axis Levels '''and then any attempts to utilize the '''SHIFT+Left-Click''' only works if the contiguous '''Time Axis Level Cells '''being selected are in '''one''' '''Time Axis Level'''. Attempting to use the '''SHIFT+Left-Click''' across two or more '''Levels''' is not honored. For example, suppose you use the '''CTL+Left-Click '''to select several '''Cells''' each in the '''Bottom Level Time Axis''' and the '''Middle Level Time Axis''' all the while holding the '''CTL '''key down. This results in the two '''Levels''' being '''selected'''. | |
| − | + | ||
| − | + | Attempting to use the '''SHIFT+Left-Click '''in either the '''Bottom Level''' or the '''Middle Level Time Axes''' results in contiguous '''Cells''' being '''selected'''. If, however, after multiple '''Time Axis Level Cells''' are '''selected''' in the '''Bottom''' and '''Middle''' '''Time Axis Levels''', attempting to use the '''SHIFT+Left-Click '''in the '''Top Level Time Axis''' is '''not honored''' although the previously selected '''Cells''' remain '''selected'''. | |
| − | + | ===Selecting Time Axis Level Cells with the Right-Click=== | |
| − | + | ||
| − | + | If you use the mouse '''right-click''' on a '''Time Axis Level Cell''', the action accesses the '''time axis''' right-click '''context menu''' shown below: | |
| − | + | <center>[[File:P70-22_3_3-70-(33)-11022020.png]]</center> | |
| + | <!--<center>P70-22_3_3-70-(33)-11022020.png</center>--> | ||
| − | + | The '''context menu '''above has five (5) commands of which four (4) are always '''enabled'''. The '''Unstretch all cells''' command is '''enabled''' when at least one (1) '''Time Axis Level Cell''' is '''stretched''' or '''compressed'''. | |
| − | The | + | The sections that follow cover the five (5) '''context menu '''commands and associated topics. |
| − | + | ==Manually Hiding/Showing Individual Time Axis Level Cells== | |
| − | + | ||
| − | The ''' | + | The '''hiding/showing of individual Time Axis Level Cells''' feature is useful in schedule presentation situations where you want to '''hide''' portions of the chart that are not relevant to the schedule issues you want to present. '''Time Axis Level Cells''' as well as '''Floating Time Axis Level Cells''' can be '''Hidden''' by manually '''selecting''' one or more '''Cells '''with '''left-clicks''' and then '''right-clicking''' on a '''selected''' '''Cell(s)''' to access the '''time axis''' right-click '''context menu''' shown below: |
| − | + | <center>[[File:P70-22_1_1-70-(6)-10262020.png]]</center> | |
| + | <!--<center>P70-22_1_1-70-(6)-10262020.png</center>--> | ||
| − | + | Clicking the '''Hide cell''' command in the above '''context menu''' makes the three '''selected Bottom Time Axis Level Cells''' disappear from the chart along with portions of the task bars/milestone symbols occupying the '''timespan''' being '''hidden'''. The result of clicking the '''Hide cell '''command looks like this: | |
| − | <center>[[File: | + | <center>[[File:P70-22_1_1-70-(7)-10262020.png]]</center> |
| − | <!--<center> | + | <!--<center>P70-22_1_1-70-(7)-10262020.png</center>--> |
| − | === | + | ===Using The Grid with Hidden Time Axis Level Cells=== |
| − | + | As a record of this action, entries are placed in '''The Grid''' as shown below: | |
| − | + | <center>[[File:P70-22_4_3-70-(4)-11102020.png]]</center> | |
| + | <!--<center>P70-22_4_3-70-(4)-11102020.png</center>--> | ||
| − | + | '''The Grid''' above keeps a record of '''Hidden Time Axis Level Cells''' and is '''enabled''' in the sense that you can restore visibility of '''Hidden Time Axis Level Cells''' by checking one or more of the '''Show '''column''' '''checkboxes. Turing '''OFF''' the rules, so to speak, by unchecking the '''ON '''column''' '''checkbox to '''OFF''' has the same effect; that is, the '''Hidden Time Axis Level Cell''' is then '''shown'''. The '''Zoom% '''is established at the time the chart is created at 100% for all '''Time Axis Level Cells'''. If a '''Timespan '''is entered into '''The Grid''', the entry’s '''Zoom%''' is set initially to 100%. Thereafter, the '''Zoom%''' is calculated based upon the original '''Width''' of the '''Time Axis Level Cell''' regardless if the '''Width '''of a '''Cell''' is '''edited''' by the '''drag and drop method''', or '''edited''' in '''The Grid’s Zoom% '''column. '''Editing''' the '''Zoom%''' value for an entry in '''The Grid''' has an effect only after the '''Hidden Time Axis Level Cell’s Show/Hide status''' is '''edited''' to '''Show''' by the checking of the '''Show '''column''' '''checkbox for that entry. If you enter a '''Zoom% '''value of zero (0) or a negative value, OnePager Pro resets '''Zoom% '''value for the '''Cell''' to 2.0%. Likewise you cannot create a '''Zoom% '''greater than '''1,000%.''' | |
| − | + | As can be seen in the above '''The Grid''', the columns that have their entries '''disabled''' cannot be '''edited'''. The '''Priority '''column in '''The Grid''' only applies to '''Timespan '''entries. It is used to keep track of the order that '''Timespans''' are manually '''stretched '''or '''compressed '''in the chart. The '''Priority '''column helps OnePager perform the '''Unstretch all cells''' command in the proper order. The '''Add''',''' Delete''', and''' Copy Timespan '''controls are available for '''creating''' and '''editing''' '''Timespans '''in '''The Grid'''. Since '''The Grid''' is also used to '''create''', '''edit''', and '''track''' '''Curtains''', the commands beneath '''The Grid’s window''' change to reflect the entry selected. The dates used in '''The Grid''' to define the '''timespan''' include not only the date for '''From/To Dates''' but the '''time of day''' as well. | |
| − | + | ||
| − | + | If you just specify '''dates''', OnePager assumes that the '''From Date''' starts at midnight on that day and the '''To Date''' ends before midnight on that day. To completely specify the '''timespan '''for a '''Time Axis Level Cell''' to be '''hidden''' it is important to make sure that the '''timespan''' is complete. As an example, to '''hide '''the month of January 2019 the '''From Date '''should be 1/1/2019 and the '''To Date '''should be 2/1/2019 as shown here: | |
| − | + | <center>[[File:P70-22_4_3-70-(5)-11102020.png]]</center> | |
| − | <center>[[File: | + | <!--<center>P70-22_4_3-70-(5)-11102020.png</center>--> |
| − | <!--<center> | + | |
| − | + | ===Restoring Hidden Time Axis Level Cells=== | |
| − | + | ||
| − | + | ||
| − | + | When '''Time Axis Level Cells''' are '''Hidden''' on any '''Time Axis Level''', they can be '''restored''' to visibility in several ways. First, you can go to the OnePager '''Home''' ribbon tool bar tab in the '''Editing '''group and click on the '''Show/Hide '''dropdown and click the '''Show All Time Axis Cells''' command as shown below: | |
| − | + | <center>[[File:P70-22_3_3-70-(5)-11022020.png]]</center> | |
| + | <!--<center>P70-22_3_3-70-(5)-11022020.png</center>--> | ||
| − | + | Exercising the above action also clears ('''removes''') all '''Timespan''' entries in '''The Grid'''. Second, you can also use '''The Grid''' to '''restore''' some or all '''Hidden Time Axis Level Cells''' to visibility by checking the desired entry’s '''Show '''column''' '''checkbox as shown here: | |
| − | + | <center>[[File:P70-22_3_3-70-(6)-11022020.png]]</center> | |
| + | <!--<center>P70-22_3_3-70-(6)-11022020.png</center>--> | ||
| − | + | Using '''The Grid''' method above '''restores''' visibility to the '''Hidden Time Axis Level Cells''' and retains the entries in '''The Grid''' which can be useful for future '''edits'''. Finally, unchecking the '''ON '''checkbox to '''OFF''' in '''The''' '''Grid '''turns '''OFF''' the entry rule thereby '''restoring''' the selected '''Timespans ''' to visibility while retaining the entry in '''The Grid '''as shown below: | |
| − | + | ||
| − | + | <center>[[File:P70-22_3_3-70-(7)-11022020.png]]</center> | |
| + | <!--<center>P70-22_3_3-70-(7)-11022020.png</center>--> | ||
| − | + | If there are '''hidden Time Axis Level Cells''' in a '''Hidden Time Axis Level''' ('''Show this level''' checkbox in the '''Chart Properties '''form '''Time Axis '''tab’s various '''Level '''sub-tabs was unchecked or '''OFF'''), clicking the '''Show All Time Axis Cells''' in the OnePager '''Home''' ribbon tool bar tab's '''Editing''' group’s '''Show/Hide''' dropdown does '''NOT restore hidden Time Axis Level '''to the '''show status'''. In other words, to '''restore hidden Time Axis Level Cells''', the '''Time Axis Level '''containing the '''hidden Time Axis Level Cells '''must be shown in the chart. However, after the '''Show All Time Axis Cells''' command is executed, and barring any further '''hiding '''of '''Time Axis Level Cells''', when the '''hidden Time Axis Level''' is again '''shown''' all previously '''hidden Cells''' are visible. | |
| − | + | For more information on '''hiding/showing Time Axis Level Cells''', please see the article at: [[Showing and Hiding Time Axis Levels and Cells for OnePager Pro for Version 7.0 | Showing and Hiding Time Axis Levels and Cells for OnePager Pro]] <!--22.3.3-70--> | |
| − | <!-- | + | |
| − | + | ==Formatting Individual Time Axis Level Cells== | |
| − | + | '''Time Axis Level Cells''' as well as '''Floating Time Axis Level Cells''' can be '''Formatted''' by manually '''selecting''' one or more '''Cells '''by '''right-clicking''' on the selected '''Cell(s)''' to access the '''time axis''' right-click '''context menu''' shown below: | |
| − | + | <center>[[File:P70-22_4_3-70-(8)-11022020.png]]</center> | |
| + | <!--<center>P70-22_4_3-70-(8)-11022020.png</center>--> | ||
| − | + | Clicking the '''Format cell …''' command accesses the '''Time Axis Cell Properties''' form shown below where you can '''edit''' some of the most important '''properties '''of the selected '''Cell(s)''': | |
| − | + | ||
| − | + | <center>[[File:P70-22_4_3-70-(9)-11022020.png]]</center> | |
| + | <!--<center>P70-22_4_3-70-(9)-11022020.png</center>--> | ||
| − | + | Making any '''edits''' to the '''selected Time Axis Level Cells''' using the '''Time Axis Cell Properties''' form '''edits''' only these '''selected Cells'''. After the '''edits''' are made, the '''selected Cells''' are considered '''mavericks'''. Attempting to set the '''Zoom%''' in the '''Time Axis Cell Properties''' form to zero (0) or a negative '''Zoom% '''value is not accepted by OnePager. Instead, OnePager sets the '''Zoom% '''value for entries values less than or equal to zero to a '''Zoom% '''value of 2.0 percent. Re-selecting any '''maverick Time Axis Level Cell''' using the procedure above and clicking the '''Use default properties''' button in the '''Time Axis Cell Properties '''form '''restores''' the selected '''Cells''' to the '''global''' '''properties''' established in the '''Chart Properties '''form. | |
| − | + | ===Creating Timespans Using the Time Axis Cell Properties Form - An Example=== | |
| − | + | ||
| − | + | An individual or group of '''Time Axis Level Cells''' can also be '''manually''' '''edited''' by right-clicking on the '''Cell '''or '''Cells''' and clicking the '''Format cell… '''command from the '''time axis''' right-click '''context menu''' as shown below: | |
| − | + | <center>[[File:P70-22_4_3-70-(10)-11022020.png]]</center> | |
| + | <!--<center>P70-22_4_3-70-(10)-11022020.png</center>--> | ||
| − | + | Clicking the '''Format cell…''' button accesses the '''Time Axis Cell Properties '''form: | |
| − | + | ||
| − | + | <center>[[File:P70-22_4_3-70-(11)-11022020.png]]</center> | |
| + | <!--<center>P70-22_4_3-70-(11)-11022020.png</center>--> | ||
| − | + | In this form you can modify the '''selected Cell''' or '''Cells background color''' and '''Font properties'''. With respect to making '''edits''' to the '''Cell width''' property in the above form, the '''Zoom% '''window is only '''enabled''' if, '''selected multiple Cells''' are all in the '''same Time Axis Level'''. If multiple '''Cells '''are '''selected''' in different '''Time Axis Levels''', the '''Zoom% '''control is '''disabled'''. You cannot set the '''Zoom% '''value window to zero (0) or less; attempting this causes OnePager to reset the '''Zoom% '''value in the '''Time Axis Cell Properties''' form’s '''Zoom% '''window to a '''Zoom% '''value of 2.0 percent. You cannot set the '''Zoom% '''value greater than 1,000%; doing so causes OnePager to reset the value back to 1,000%. | |
| − | + | ||
| − | + | If multiple '''Cells '''are in different '''Time Axis Levels''' you can modify all '''selected Cells''' with respect to '''Background color''' and '''Font properties'''. The '''Cell width window''' in the form is for informational purposes only. When you make '''edits''' with the '''Zoom% '''control window, the '''Cell width window '''is updated to reflect the '''width '''of the '''Cell '''in the linear measure you’ve selected based on your in either '''English''' or '''Metric units''' depending on the type of '''Template Properties''' form you are using (e.g., inches or centimeters). Additionally, since the '''Fill Pattern''' is a '''property''' of the '''Time Axis Level''', it cannot be '''edited''' individually for a single '''Time Axis Level Cell'''. | |
| − | + | '''Editing''' the '''Fill Pattern''' must be done at the '''Chart Properties''' form level. Making any of the '''edits''' described above to an individual '''Cell '''or '''Cells''' makes them all '''mavericks'''. You can '''reset the default properties''' of a modified '''Cell '''or '''Cells '''by clicking the '''Use default properties''' button in the '''Time Axis Cell Properties '''form. This action resets the selected '''Cell’s properties''' back to those currently set in the '''Chart Properties '''form. | |
| − | + | ==Unstretch All Cells after Creating Non-Linear Timespans== | |
| − | + | In the examples above, '''Non-Linear Timespans''' are '''created'''. If it is unpractical to use the '''UNDO''' feature in OnePager to return to true '''Linear Timespan''', where all '''Cells''' in a '''Time Axis Level '''are the same '''width''', the '''Unstretch all cell '''command in the '''Time Axis''' right-click '''context menu''' shown below can be used. | |
| − | + | <center>[[File:P70-22_4_3-70-(12)-11022020.png]]</center> | |
| + | <!--<center>P70-22_4_3-70-(12)-11022020.png</center>--> | ||
| − | + | To '''Unstretch all cells''', right-click on any '''Time Axis Level Cell''' and click the '''Unstretch all cells '''command as shown above. | |
| − | + | ||
| − | === | + | ===Caution When Unstretching All Cells=== |
| − | + | The '''Unstretch all cells''' command, when clicked, operates on the entire '''Time Axis''' at all '''Levels'''. This is necessary because often, if not always, '''stretching '''a selected '''Cell''' at one '''Level''' causes '''Cells''' above and below to '''stretch '''as well. Accordingly, when you select '''Unstretch all cells''' command, all '''Time Axis Level Cells''' become uniform in '''width''' in their own '''Time Axis Level'''. Clicking the '''Unstretch all cells''' returns the previously '''stretched''' or '''compressed''' '''Time Axis Level Cells''' to their original '''width '''and restores the '''Document’s width''' to its original '''size'''. This procedure includes for all '''Time Axis Levels''' starting with the '''Top level''', then the '''Middle level''', and finally the '''Bottom level'''. | |
| − | + | After the '''Unstretch all cells '''command is used, the '''Time Axis '''for our example looks like this: | |
| − | + | ||
| − | + | <center>[[File:P70-22_4_3-70-(13)-11022020.png]]</center> | |
| + | <!--<center>P70-22_4_3-70-(13)-11022020.png</center>--> | ||
| − | + | ===Unstretching All Cells and the Floating Time Axis=== | |
| − | + | If the chart contains one or more '''Floating Time Axes''', they are '''unstretched '''to match the corresponding '''Cells''' of each '''Time Axis Level'''. | |
| − | + | For more information on the '''Non-Linear Time Axis '''feature, please see the article at: [[The Non-Linear Time Axis Feature for OnePager Pro for Version 7.0 | The Non-Linear Time Axis Feature for OnePager Pro]] <!--22.3.7-70--> | |
| − | + | For more information on the '''Floating Time Axis''' feature, please see the article at: [[The Floating Time Axis Feature for OnePager Pro for Version 7.0 | The Floating Time Axis Feature for OnePager Pro]] <!--22.3.9-70--> | |
| − | + | ==Accessing the Chart Properties Form from a Time Axis Level Cell== | |
| − | + | Clicking the '''Time-axis properties… '''command in the '''Time Axis context menu '''accesses the '''Chart Properties''' form at the '''Time Axis '''tab and the sub-tab for the '''Time Axis Level '''you '''selected'''. '''Selecting''' a '''Time Axis Level Cell''' from the '''Bottom Level''' and right-clicking the '''Cell '''accesses the '''context menu '''where you can then click the '''Time-axis properties… '''command: | |
| − | + | <center>[[File:P70-22_4_3-70-(14)-11022020.png]]</center> | |
| + | <!--<center>P70-22_4_3-70-(14)-11022020.png</center>--> | ||
| − | + | Clicking the '''Time-axis properties… '''command accesses the '''Chart Properties''' form’s '''Time Axis '''tab for the '''Bottom Level''' as shown below: | |
| − | + | <center>[[File:P70-22_4_3-70-(15)-11022020.png]]</center> | |
| + | <!--<center>P70-22_4_3-70-(15)-11022020.png</center>--> | ||
| − | + | By using the '''Chart Properties '''form in this way you are able to '''edit''' the '''global properties''' of all '''Time Axis Level Cells '''in the '''Time Axis Level '''selected. You can also use the sub-tabs in the form above to go to other '''Time Axis Levels''', to the '''Calendar '''sub-tab or the '''Format '''sub-tab. When multiple '''Time Axis Level Cells '''are '''selected''' in different '''Time Axis Levels''' with the left-click action and a single '''Time Axis Level Cell''' is right-clicked and the '''Time-axis properties… '''command is clicked, the '''Chart Properties''' form '''Time Axis '''tab’s '''Level '''sub-tab is accessed only for the '''Time Axis Level Cell '''for which the '''Time-axis properties… '''command was applied. All other '''Time Axis Level Cells''' that were previously selected are '''de-selected'''. | |
| − | + | ||
| − | + | For more information on using the '''Chart Properties '''form '''Time Axis '''tab, please see the article at: [[Editing Time Axes with the Chart Properties Form for OnePager Pro for Version 7.0 | Editing Time Axes with the Chart Properties Form for OnePager Pro]] <!--22.4.1-70--> | |
| − | + | ==Creating And Editing Curtains with the Time Axis Context Menu’s Insert Curtain Command== | |
| − | + | It can be advantageous from time to time to insert a '''Curtain''' into the chart that has exactly the same '''Start/End Date boundaries''' as a particular '''Time Axis Level Cell '''or '''Cells'''. For example, it can be necessary to highlight a particular Quarter as important in a schedule conversation. '''Time Axis Level Cell '''related '''Curtains''' can be added to the chart using a right-click on the '''time axis''' right-click '''context menu '''and its '''Insert curtain '''command. To insert a '''Curtain '''with '''Time Axis Level Cell boundaries''', first '''select''' the '''Cell '''or '''Cells''' to access the '''Time Axis context menu''' as shown below: | |
| − | + | <center>[[File:P70-22_4_3-70-(16)-11022020.png]]</center> | |
| + | <!--<center>P70-22_4_3-70-(16)-11022020.png</center>--> | ||
| − | + | When you click the '''Insert curtain''' command a basic '''Curtain '''is '''inserted''' into the chart with '''Start/End Date boundaries''' the same as those for the selected '''Time Axis Level Cell''' as shown here: | |
| − | + | <center>[[File:P70-22_4_3-70-(17)-11022020.png]]</center> | |
| + | <!--<center>P70-22_4_3-70-(17)-11022020.png</center>--> | ||
| − | + | The '''Insert curtain '''command only creates a single '''Curtain'''. If multiple '''Time Axis Level Cells '''are '''selected''', either in one '''Time Axis Level''' or multiple '''Levels''', the '''Insert curtain''' command is '''disabled'''. An '''Inserted Curtain''' can be '''edited''' by right-clicking on it to access the '''curtain''' right-click '''context menu '''as shown below: | |
| − | + | <center>[[File:P70-22_4_3-70-(18)-11022020.png]]</center> | |
| + | <!--<center>P70-22_4_3-70-(18)-11022020.png</center>--> | ||
| − | + | The commands in the above '''context menu''' operate in the same ways as '''context menu '''commands for all other '''Curtains'''. | |
| − | + | For more information on the '''creation and management of curtains''', please see the article at: [[Creating and Managing Curtains for Version 7.0 | Creating and Managing Curtains]] <!--16.0.1-70--> | |
| − | + | When a''' Curtain '''is created using the '''Insert curtain '''command, a '''Curtain entry''' is added into '''The Grid'''. '''The Grid''' showing the '''Inserted Curtain '''is shown below: | |
| − | + | <center>[[File:P70-22_4_3-70-(19)-11022020.png]]</center> | |
| + | <!--<center>P70-22_4_3-70-(19)-11022020.png</center>--> | ||
| − | To | + | To '''edit''' an '''Inserted Curtain''', you can access the '''Curtain Properties '''form in one of two ways. First, using the above illustration as a guide, you can click the '''Properties''' button in '''The Grid entry '''for the '''Inserted Curtain''' to access the '''Curtain Properties '''form as shown below: |
| − | <center>[[File: | + | <center>[[File:P70-22_4_3-70-(20)-11022020.png]]</center> |
| − | <!--<center> | + | <!--<center>P70-22_4_3-70-(20)-11022020.png</center>--> |
| − | + | The other method for accessing the '''Curtain Properties''' form is to right-click on the '''Inserted Curtain''' itself to access the '''context menu '''and click the '''Properties … '''command as shown below: | |
| − | <center>[[File: | + | <center>[[File:P70-22_4_3-70-(21)-11022020.png]]</center> |
| − | <!--<center> | + | <!--<center>P70-22_4_3-70-(21)-11022020.png</center>--> |
| − | ''' | + | For more information on '''Time Axis Curtains''', please see the article at: [[Creating, Editing, and Managing Time Axis Daily Curtains for OnePager Pro for Version 7.0 | Creating, Editing, and Managing Time Axis Daily Curtains for OnePager Pro]] <!--22.5.5-70--> |
| − | + | ==Manual Editing of Floating Time Axis Level Cells== | |
| − | + | The '''Floating Time Axis ''' cells can be '''edited''' on an individual basis. Since this article covers '''manual editing '''of '''Time Axis Levels '''and '''Time Axis Level Cells''' some mention here is required with respect to '''Floating Time Axes.''' | |
| − | + | For more information on the '''Floating Time Axis '''feature, please see the article at: [[The Floating Time Axis Feature for OnePager Pro for Version 7.0 | The Floating Time Axis Feature for OnePager Pro]] <!--22.3.9-70--> | |
| − | + | ===Selecting Floating Time Axis Level Cells=== | |
| − | + | ||
| − | + | '''Selecting Floating Time Axis Level Cells''' is accomplished in the same way as '''selecting Time Axis Level Cells'''. '''Floating Time Axis Level Cells''' can be '''selected''' individually with a single left-click, '''selected''' in a sequence using the '''CTL+Left-Click''' method, or '''selected''' in a contiguous set using the '''SHIFT+Left-Click'''. | |
| − | + | The rules for using the '''CTL+Left-Click''' and the '''SHIFT+Left-Click''' that apply to using these methods together to '''select Time Axis Level Cells''' applies to using these methods for selecting '''Floating Time Axis Level Cells'''. | |
| − | + | ||
| − | + | Whenever you '''select''' a '''Floating Time Axis Level Cell''' the corresponding '''Time Axis Level Cell '''is '''NOT ''' selected or vice versa. You can '''select Cells''' in both '''Floating Time Axis Levels''' and '''Time Axis Levels''' using the various '''selection''' methods previously described above. The rules for '''selecting multiple Floating Time Axis Level Cells '''with the various '''selection''' methods apply. Once '''Cells''' in the '''Floating Time Axis Levels''' and '''Time Axis Levels '''are '''selected''' you can then '''edit''' and '''stretch '''or '''compress '''them as required. Whatever '''editing''', '''stretching''' or '''compressing''' is done to the '''selected Cells''' by either '''editing''' in the '''Time Axis Levels''' or the '''Floating Time Axis Levels''' is done such that these displayed '''Levels '''remain consistent in the chart. | |
| − | + | ===Editing Floating Time Axis Cells=== | |
| − | + | ||
| − | + | Selecting any '''Floating Time Axis Level Cell''' allows you generally to only use the '''time axis''' right-click '''context menu''' to '''edit''' that specific '''Floating Time Axis Level Cell'''. The '''context menu '''accessed when you right-click a '''Floating Time Axis Level Cell''' is shown below with the difference highlighted between it and the '''context menu''' for a '''Time Axis Level Cell'''. | |
| − | + | <center>[[File:P70-22_4_3-70-(22)-11022020.png]]</center> | |
| + | <!--<center>P70-22_4_3-70-(22)-11022020.png</center>--> | ||
| − | + | The top three commands in the '''context menu''' above provide the same '''editing''' actions for '''Floating Time Axis Level Cells''' as they do for '''Time Axis Level Cells''' found outside the '''graph '''('''Top''' or '''Bottom''' of the '''graph''' or both). Because the top three commands shown in the '''context menu '''above can change the appearance of the '''Floating Time Axis Level''', it is necessary for these commands to also change the appearance of the corresponding '''Time Axis Level''' to maintain consistency within the chart and the '''graph'''. Accordingly, most '''edits''' made to a '''Floating Time Axis Level Cell''' are also made to the corresponding '''Time Axis Level Cell'''. | |
| − | + | The exception is in '''editing''' the '''height '''of a '''Floating Time Axis Level'''. '''Editing''' the '''height''' of a '''Floating Time Axis Level''' does '''not''' change the '''height''' of the corresponding '''Time Axis Level''' and vice versa. With respect to the '''Unstretch all cells''' command, the command is '''enabled''' only if one or more '''Cells''' in a '''Time Axis or Floating Time Axis Level''' is '''stretched''' or '''compressed'''. Otherwise, the command is '''disabled'''. | |
| − | + | If the '''enabled Unstretch all cells''' command is exercised on a '''Floating Time Axis Level Cell''', all '''Time Axis '''and''' Floating Time Axis Level Cells''' are '''unstretched'''. In the '''context menu''' above, the '''Time-axis properties…''' command accesses the '''Chart Properties '''form '''Time Axis '''tab’s '''Top''', '''Middle''', or '''Bottom Level''' sub-tab when this command is clicked depending on which '''Level '''is selected in the '''Floating Time Axis'''. Most '''edits''' made in the '''Chart Properties '''form can be applied '''globally''' to both the '''Time Axis''' '''Level '''and any '''Floating Time Axis Level '''if the '''edit''' applies to '''Cells'''. | |
| − | + | If the '''edit''' made in the '''Chart Properties '''form '''Time Axis '''tab’s '''Level''' sub-tabs '''changes''' a '''Level''' related '''property''', such as the '''height property''', that '''change''' is only made in the '''Time Axis Level''' and '''NOT '''to the '''Floating Time Axis Level'''. For the '''Floating Time Axis''', the '''Insert curtain''' command is not '''enabled'''. The '''Hide floating time axis level '''command when clicked '''hides''' the '''Floating Time Axis Level''' and displays an empty '''Row '''in the chart. As an empty '''Row''', it takes on the '''properties''' and characteristics of any other empty '''Row'''. | |
| − | + | A discussion of how to restore a '''Hidden Floating Time Axis Level''' is discussed below. Making '''formatting edits''' to '''Floating Time Axis Level Cells''' '''mavericks''' both the '''Floating Time Axis Level Cell '''and the '''Time Axis Level Cell '''as well. | |
| − | + | For example you can '''edit''' the '''background color''' for a specific '''Floating Time Axis Level Cell''' as is set up to be done below: | |
| − | <center>[[File: | + | <center>[[File:P70-22_4_3-70-(23)-11022020.png]]</center> |
| − | <!--<center> | + | <!--<center>P70-22_4_3-70-(23)-11022020.png</center>--> |
| − | + | Clicking the '''Format cell…''' command accesses the '''Time Axis Cell Properties '''form where you can make '''edits''' to the '''Floating Time Axis Level Cell’s background color''' as shown below using the OnePager standard '''Color Chooser''' form: | |
| − | + | <center>[[File:P70-22_4_3-70-(24)-11022020.png]]</center> | |
| + | <!--<center>P70-22_4_3-70-(24)-11022020.png</center>--> | ||
| − | + | Making the above '''edit''' to the '''background color '''in the '''Floating Time Axis Level Cell '''also changes the '''background color '''for the corresponding '''Time Axis Level Cell''' as shown below: | |
| − | + | <center>[[File:P70-22_4_3-70-(25)-11022020.png]]</center> | |
| + | <!--<center>P70-22_4_3-70-(25)-11022020.png</center>--> | ||
| − | + | In a similar way, if you '''edit''' a property of a '''Time Axis Level Cell''' when there is a corresponding '''Floating Time Axis''' in the chart, the corresponding '''Floating Time Axis Level Cell''' takes on the '''edits''' made to the '''Time Axis Level Cell'''. | |
| − | ==== | + | ====Hiding Floating Time Axis Levels==== |
| − | + | The bottom command in the '''time axis''' right-click '''context menu '''for a '''Floating Time Axis Level Cell '''is the '''Hide floating time axis level''' command. Clicking this command immediately '''hides '''the '''Floating Time Axis Level''' regardless of what '''Cell''' in the '''Floating Time Axis '''was '''selected'''. However, this command '''hides''' only the content of the '''Floating Time Axis Level''' but leaves the '''Row '''visible where the selected '''Floating Time Axis Level '''resided as shown below: | |
| − | <center>[[File: | + | <center>[[File:P70-22_4_3-70-(26)-11022020.png]]</center> |
| − | <!--<center> | + | <!--<center>P70-22_4_3-70-(26)-11022020.png</center>--> |
| − | + | This behavior is a bit different from that of '''hiding rows'''. Normally '''Rows''' in the chart are automatically '''hidden''' from view in the '''graph''' at the end of the '''hide rows '''operation. With '''Floating Time Axis Levels''', '''hiding''' the '''Level '''converts the area of the '''graph''' to a normal '''Row''' in the chart that appears as empty space. The '''Row '''remaining after the '''Hide floating time axis level '''command is completed''' '''retains all the properties of a normal''' Row'''. It can have '''text columns''' entries and all their '''properties''' remain '''editable'''. This approach is thought to provide you with greater flexibility when making further '''edits''' to the chart containing '''Floating Time Axis Levels'''. These normal '''Rows''' can be '''edited''' like any other '''Row''' in the chart. | |
| − | + | When '''Floating Time Axis Levels''' are '''hidden''', as shown above, the empty '''Row''' that replaces the '''hidden Floating Time Axis Level''' can be '''removed''' from the '''graph''' by using the '''Hide rows''' button on the OnePager '''Home''' ribbon tool bar tab as shown here: | |
| − | + | <center>[[File:P70-22_4_3-70-(27)-11022020.png]]</center> | |
| + | <!--<center>P70-22_4_3-70-(27)-11022020.png</center>--> | ||
| − | + | Performing the '''Hide row''' operation using the '''Row hiding choices '''form '''hides '''the previously '''hidden Floating Time Axis Level '''in the '''graph''' as shown here: | |
| − | + | ||
| − | + | <center>[[File:P70-22_4_3-70-(28)-11022020.png]]</center> | |
| + | <!--<center>P70-22_4_3-70-(28)-11022020.png</center>--> | ||
| − | + | An alternative approach to '''hiding''' any''' Floating Time Axis Level''' is to select the '''Row’s Text Column Label '''area with a right-click and click the '''Hide row '''command in the '''row''' right-click '''context menu''' as shown below: | |
| − | <center>[[File: | + | <center>[[File:P70-22_4_3-70-(29)-11022020.png]]</center> |
| − | <!--<center> | + | <!--<center>P70-22_4_3-70-(29)-11022020.png</center>--> |
| − | + | When you do this, the chart again looks like this: | |
| − | + | <center>[[File:P70-22_4_3-70-(28)-11022020.png]]</center> | |
| + | <!--<center>P70-22_4_3-70-(28)-11022020.png</center>--> | ||
| − | + | At this point if you want to make the previously '''Hidden Floating Time Axis Level '''visible again, our recommendation is to '''reinsert''' the '''Floating Time Axis Level''' using the '''empty space''' right-click '''context menu '''to perform this action. | |
| − | + | ||
| − | + | For more information on '''Creating Floating Time Axis Levels''', please see this section in the article at: [[The Floating Time Axis Feature for OnePager Pro for Version 7.0#Creating Floating Time Axis Levels | The Floating Time Axis Feature for OnePager Pro - Creating Floating Time Axis Levels]] <!--22.3.9-70--> | |
| − | + | ===Using the Chart Properties Form’s Time Axis Tab to Globally Edit Floating Time Axis Levels=== | |
| − | + | Clicking the '''Time Axis Properties '''command in the '''time axis''' right-click '''context menu '''shown below accesses the '''Chart Properties Time Axis '''tab for the at the '''Level''' corresponding to the '''Floating Time Axis Level Cell''' that you right-clicked: | |
| − | + | <center>[[File:P70-22_4_3-70-(30)-11022020.png]]</center> | |
| + | <!--<center>P70-22_4_3-70-(30)-11022020.png</center>--> | ||
| − | + | From the '''Chart Properties '''form''' Time Axis '''tab’s '''Top Level''' sub-tab you can make most chart global '''edits''' to both the '''Floating Time Axis’ Top Level''' and the '''Time Axis’ Top''' '''Level '''as shown below: | |
| − | + | <center>[[File:P70-22_4_3-70-(31)-11022020.png]]</center> | |
| + | <!--<center>P70-22_4_3-70-(31)-11022020.png</center>--> | ||
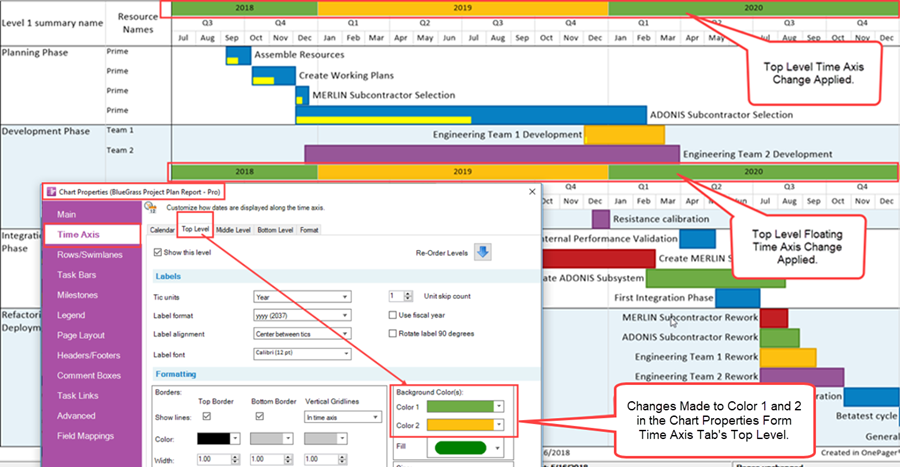
| − | + | For example, if you make '''edits''' in the '''Background Colors '''sub-control group as shown below, you get these results: | |
| − | + | ||
| − | + | <center>[[File:P70-22_4_3-70-(32)-11022020.png]]</center> | |
| + | <!--<center>P70-22_4_3-70-(32)-11022020.png</center>--> | ||
| − | + | As mentioned earlier you cannot use the '''global edit''' for the '''level height''' in the '''Chart Properties '''form’s '''Level '''tabs to '''edit''' the '''height''' of a '''Floating Time Axis Level'''. | |
| − | + | ||
| − | + | ===Floating Time Axes and the OnePager Template=== | |
| − | + | There are '''No''' corresponding '''Floating Time Axis Level''' or '''Cell''' controls in the OnePager Pro '''Template Properties''' form. Accordingly, '''Floating Time Axis''' '''Level '''representations are within the individual chart although some '''Floating Time Axis Cell properties''' can be '''edited globally''' along with their '''Time Axis Levels''' and '''Cells''' in the '''Chart Properties '''form. Individual '''Floating Time Axis Levels''' and '''Cells''' can always be '''manually edited'''. | |
| − | + | ||
| − | + | ||
| − | + | ||
| − | + | ||
| − | + | ||
| − | + | ||
| − | + | ||
| − | + | ||
| − | + | ||
| − | + | ||
| − | + | ||
| − | + | ||
| − | + | ||
| − | + | ||
| − | + | ||
| − | + | ||
| − | + | ||
| − | + | ||
| − | + | ||
| − | + | ||
| − | + | ||
| − | + | ||
| − | + | ||
| − | + | ||
| − | ''' | + | |
| − | + | ||
| − | + | ||
| − | + | ||
| − | + | ||
| − | + | ||
| − | + | ||
| − | + | ||
| − | + | ||
| − | + | ||
| − | + | ||
| − | + | ||
| − | + | ||
| − | + | ||
| − | + | ||
| − | + | ||
| − | + | ||
| − | + | ||
| − | + | ||
| − | + | ||
| − | + | ||
| − | + | ||
| − | + | ||
| − | + | ||
| − | + | ||
| − | + | ||
| − | + | ||
| − | + | ||
| − | + | ||
| − | + | ||
| − | + | ||
| − | + | ||
| − | + | ||
| − | + | ||
| − | + | ||
| − | + | ||
| − | + | ||
| − | + | ||
| − | + | ||
| − | + | ||
| − | + | ||
| − | + | ||
| − | + | ||
| − | + | ||
| − | + | ||
| − | + | ||
| − | + | ||
| − | + | ||
| − | + | ||
| − | + | ||
| − | + | ||
| − | + | ||
| − | + | ||
| − | + | ||
| − | + | ||
| − | + | ||
| − | + | ||
| − | + | ||
| − | + | ||
| − | + | ||
| − | + | ||
| − | + | ||
| − | + | ||
| − | + | ||
| − | + | ||
| − | + | ||
| − | + | ||
| − | + | ||
==Related Links== | ==Related Links== | ||
| − | + | [[Changing the Time Axis Borders for OnePager Pro for Version 7.0 | Changing the Time Axis Borders for OnePager Pro]] <!--22.1.7-70--> | |
| − | + | ||
| − | + | ||
| − | + | ||
| − | + | ||
| − | + | ||
| − | + | ||
| − | + | ||
| − | + | ||
| − | + | ||
| − | + | ||
| − | + | ||
| − | + | ||
| − | + | ||
| − | + | ||
| − | + | ||
| − | + | ||
| − | + | ||
| − | + | ||
| − | + | ||
| − | + | ||
| − | + | ||
| − | [[Changing the Time Axis Borders for OnePager | + | |
| − | + | ||
| − | + | ||
| − | [[Managing | + | [[Creating and Managing Curtains for Version 7.0 | Creating and Managing Curtains]] <!--16.0.1-70--> |
| − | [[The Floating Time Axis Feature for OnePager | + | [[The Floating Time Axis Feature for OnePager Pro for Version 7.0 | The Floating Time Axis Feature for OnePager Pro]] <!--22.3.9-70--> |
| − | [[ | + | [[Showing and Hiding Time Axis Levels and Cells for OnePager Pro for Version 7.0 | Showing and Hiding Time Axis Levels and Cells for OnePager Pro]] <!--22.3.3-70--> |
| − | [[The Non-Linear Time Axis Feature for OnePager | + | [[The Non-Linear Time Axis Feature for OnePager Pro for Version 7.0 | The Non-Linear Time Axis Feature for OnePager Pro]] <!--22.3.7-70--> |
| − | [[ | + | [[Editing Time Axes with the Chart Properties Form for OnePager Pro for Version 7.0 | Editing Time Axes with the Chart Properties Form for OnePager Pro]] <!--22.4.1-70--> |
| − | [[ | + | [[Creating, Editing, and Managing Time Axis Daily Curtains for OnePager Pro for Version 7.0 | Creating, Editing, and Managing Time Axis Daily Curtains for OnePager Pro]] <!--22.5.5-70--> |
| − | (22.4. | + | (22.4.3-70) |
[[Category:Version 7.0]] | [[Category:Version 7.0]] | ||
| − | [[Category:OnePager | + | [[Category:OnePager Pro]] |
[[Category:Editing the Chart]] | [[Category:Editing the Chart]] | ||
[[Category:Charts]] | [[Category:Charts]] | ||
[[Category:Time Axis]] | [[Category:Time Axis]] | ||
[[Category:Time Axis Tab]] | [[Category:Time Axis Tab]] | ||
| − | |||
| − | |||
[[Category:Floating Time Axis]] | [[Category:Floating Time Axis]] | ||
[[Category:Non-Linear Time Axis]] | [[Category:Non-Linear Time Axis]] | ||
[[Category:Color Palettes]] | [[Category:Color Palettes]] | ||
[[Category:Curtains]] | [[Category:Curtains]] | ||
| − | |||
| − | |||
| − | |||
| − | |||
| − | |||
[[Category:Ribbon]] | [[Category:Ribbon]] | ||
| − | |||
[[Category:Task/Milestone]] | [[Category:Task/Milestone]] | ||
[[Category:Template]] | [[Category:Template]] | ||
[[Category:Chart Properties]] | [[Category:Chart Properties]] | ||
Revision as of 15:17, 19 January 2021
Contents
- 1 Overview
- 2 Selecting Time Axis Level Cells in the Chart Editor
- 2.1 Selecting Time Axis Level Cells with the Left-Click
- 2.2 Selecting Time Axis Level Cells with the CTL+Left-Click
- 2.3 Selecting Time Axis Level Cells with the SHIFT+Left-Click
- 2.4 General Rules for Using CTL+Left-Click and SHIFT+Left-Click on Time Axis Level Cells
- 2.5 Selecting Time Axis Level Cells with the Right-Click
- 3 Manually Hiding/Showing Individual Time Axis Level Cells
- 4 Formatting Individual Time Axis Level Cells
- 5 Unstretch All Cells after Creating Non-Linear Timespans
- 6 Accessing the Chart Properties Form from a Time Axis Level Cell
- 7 Creating And Editing Curtains with the Time Axis Context Menu’s Insert Curtain Command
- 8 Manual Editing of Floating Time Axis Level Cells
- 9 Related Links
Overview
This article covers manual editing of the Time Axis and includes discussions of manual editing of Time Axis Level Cells from the Chart Editor and manual editing of Floating Time Axis Cells. Because the Time Axis Level Cell’s context menu contains commands related to the Non-Linear Time Axis feature and accessing the Chart Properties form, these topics are covered in this article as well. There are references placed throughout this article to related topics and a list of related articles is provided end of this article.
Please be aware that some manual edits performed on Time Axis Level Cell(s) causes entries to be placed in The Grid located in the Chart Properties form Time Axis tab’s Format sub-tab.
The organization of this article follows the process of Time Axis Level Cell editing from the selection of the Time Axis Level Cell through the various methods available to edit Time Axis Cell properties in the Chart Editor.
Please use the hyperlinks in the Contents box at the top of this article to go directly to specific topics.
Selecting Time Axis Level Cells in the Chart Editor
Time Axis Level Cells can be selected with either a left-click which highlights the Cell or a right-click which provides access to the Time Axis Level Cell context menu. Multiple Cells can be selected in the same Time Axis Level using either the CTL+Left-Click to select non-contiguous Cells or Cells in different Time Axis Levels or the SHIFT+Left-Click to select contiguous Cells in the same Time Axis Level. Time Axis Level Cell(s) are selected to: (1) edit their show/hide status, (2) edit their width in the Time Axis Level manually, (3) edit certain Time Axis Level Cell properties, or (4) access the Chart Properties form Time Axis tab’s Level sub-tab to make more global edits.
Selecting Time Axis Level Cells with the Left-Click
Using the mouse left-click on any single Time Axis Level Cell highlights the Cell with the handlebars as shown below:

Once an individual Time Axis Level Cell is selected with the left-click you can either stretch or compress it from the left or from the right handlebar. Selected Time Axis Level Cells cannot be moved up or down from the Time Axis Level in which they reside.
However, Time Axis Levels can be re-ordered as described in the article at: Switching Time Axis Levels for OnePager Pro
The use of the handlebars is illustrated below showing the intermediate step after the mouse is placed on the right handlebar and dragged to the right side of the Q2 Middle Time Axis Level Cell:

When the mouse button is released the Time Axis Levels look like this:

Above, the Q1 Middle Time Axis Level Cell is stretched to approximately double its original width. Since the stretched Cell happens to be in the Middle Time Axis Level, the Cells showing below it in the Bottom Time Axis Level are stretched as well to maintain the related proportionality. In a similar fashion, the 2019 Top Level Time Axis Cell is stretched proportionally but the Q2, Q3, and Q4 Middle Time Axis Level Cells remain unchanged as does the remainder of the unaffected Time Axis Level Cells.
Selecting Time Axis Level Cells with the CTL+Left-Click
You can use your mouse to select Time Axis Level Cells in different Time Axis Levels by using the CTL+Left-Click method as shown here:

Above, there are five (5) Time Axis Level Cells selected in the order shown. Although there are five (5) Time Axis Level Cells selected above, you can only stretch or compress selected Cell using the Drag and Drop method in one Time Axis Level only as shown below:

If you now use the mouse to stretch the 2019 Q2 Middle Time Axis Level Cell, OnePager Pro de-selects all selected Time Axis Level Cells highlighted in other Time Axis Levels such that only the Middle Time Axis Level Cells that are candidates for stretching remain selected as shown here:

On the other hand, if you start to stretch the Bottom Level Time Axis Cells, OnePager Pro de-selects the Middle Level Time Axis Cells before performing the desired stretch as shown below:

Selecting Time Axis Level Cells with the SHIFT+Left-Click
You can also select a sequential set of Time Axis Cells in the same Level by using the SHIFT+Left-Click keys as shown below:

Once the Time Axis Level Cells are selected, anyone of them can be used to stretch or compress the set as shown here:

The general rule is that you cannot stretch multiple Time Axis Level Cells that are selected in multiple Time Axis Levels.
General Rules for Using CTL+Left-Click and SHIFT+Left-Click on Time Axis Level Cells
Using a combination of the CTL+Left-Click and the SHIFT+Left-Click is restricted.
The rules provided below are used by OnePager to coordinate the selection of Time Axis Level Cells.
You can use the CTL+Left-Click to select any Time Axis Level Cell in any Level. However, attempting to stretch a single Time Axis Level Cell when Cells are selected in two or more Levels results in only the selected Cell being stretched. The selected Time Axis Level Cells in other Levels are de-selected.
You can use the SHIFT+Left-Click to select a series of Time Axis Level Cells that are all in the same Level. This results in a contiguous series of Time Axis Level Cells being selected all of which can be edited as one or stretched or compressed together. When you have a contiguous series of Time Axis Level Cells selected you can right-click on any one of them to access the context menu.
You can use the CTL+Left-Click in multiple Time Axis Levels and then any attempts to utilize the SHIFT+Left-Click only works if the contiguous Time Axis Level Cells being selected are in one Time Axis Level. Attempting to use the SHIFT+Left-Click across two or more Levels is not honored. For example, suppose you use the CTL+Left-Click to select several Cells each in the Bottom Level Time Axis and the Middle Level Time Axis all the while holding the CTL key down. This results in the two Levels being selected.
Attempting to use the SHIFT+Left-Click in either the Bottom Level or the Middle Level Time Axes results in contiguous Cells being selected. If, however, after multiple Time Axis Level Cells are selected in the Bottom and Middle Time Axis Levels, attempting to use the SHIFT+Left-Click in the Top Level Time Axis is not honored although the previously selected Cells remain selected.
Selecting Time Axis Level Cells with the Right-Click
If you use the mouse right-click on a Time Axis Level Cell, the action accesses the time axis right-click context menu shown below:

The context menu above has five (5) commands of which four (4) are always enabled. The Unstretch all cells command is enabled when at least one (1) Time Axis Level Cell is stretched or compressed.
The sections that follow cover the five (5) context menu commands and associated topics.
Manually Hiding/Showing Individual Time Axis Level Cells
The hiding/showing of individual Time Axis Level Cells feature is useful in schedule presentation situations where you want to hide portions of the chart that are not relevant to the schedule issues you want to present. Time Axis Level Cells as well as Floating Time Axis Level Cells can be Hidden by manually selecting one or more Cells with left-clicks and then right-clicking on a selected Cell(s) to access the time axis right-click context menu shown below:

Clicking the Hide cell command in the above context menu makes the three selected Bottom Time Axis Level Cells disappear from the chart along with portions of the task bars/milestone symbols occupying the timespan being hidden. The result of clicking the Hide cell command looks like this:

Using The Grid with Hidden Time Axis Level Cells
As a record of this action, entries are placed in The Grid as shown below:
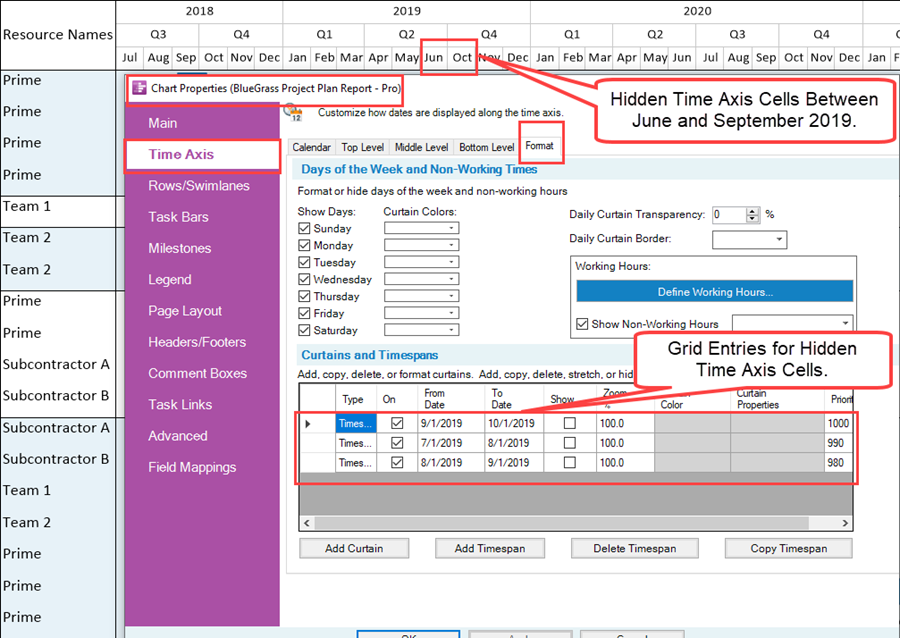
The Grid above keeps a record of Hidden Time Axis Level Cells and is enabled in the sense that you can restore visibility of Hidden Time Axis Level Cells by checking one or more of the Show column checkboxes. Turing OFF the rules, so to speak, by unchecking the ON column checkbox to OFF has the same effect; that is, the Hidden Time Axis Level Cell is then shown. The Zoom% is established at the time the chart is created at 100% for all Time Axis Level Cells. If a Timespan is entered into The Grid, the entry’s Zoom% is set initially to 100%. Thereafter, the Zoom% is calculated based upon the original Width of the Time Axis Level Cell regardless if the Width of a Cell is edited by the drag and drop method, or edited in The Grid’s Zoom% column. Editing the Zoom% value for an entry in The Grid has an effect only after the Hidden Time Axis Level Cell’s Show/Hide status is edited to Show by the checking of the Show column checkbox for that entry. If you enter a Zoom% value of zero (0) or a negative value, OnePager Pro resets Zoom% value for the Cell to 2.0%. Likewise you cannot create a Zoom% greater than 1,000%.
As can be seen in the above The Grid, the columns that have their entries disabled cannot be edited. The Priority column in The Grid only applies to Timespan entries. It is used to keep track of the order that Timespans are manually stretched or compressed in the chart. The Priority column helps OnePager perform the Unstretch all cells command in the proper order. The Add, Delete, and Copy Timespan controls are available for creating and editing Timespans in The Grid. Since The Grid is also used to create, edit, and track Curtains, the commands beneath The Grid’s window change to reflect the entry selected. The dates used in The Grid to define the timespan include not only the date for From/To Dates but the time of day as well.
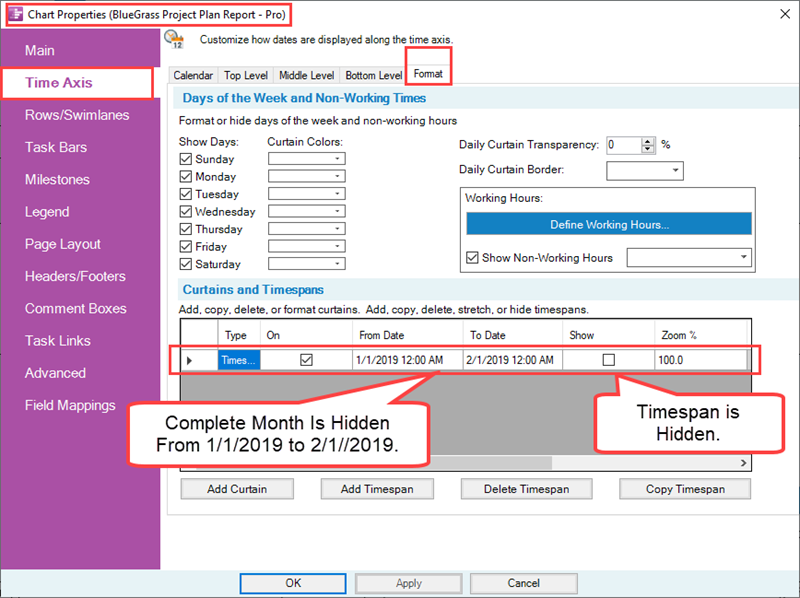
If you just specify dates, OnePager assumes that the From Date starts at midnight on that day and the To Date ends before midnight on that day. To completely specify the timespan for a Time Axis Level Cell to be hidden it is important to make sure that the timespan is complete. As an example, to hide the month of January 2019 the From Date should be 1/1/2019 and the To Date should be 2/1/2019 as shown here:
Restoring Hidden Time Axis Level Cells
When Time Axis Level Cells are Hidden on any Time Axis Level, they can be restored to visibility in several ways. First, you can go to the OnePager Home ribbon tool bar tab in the Editing group and click on the Show/Hide dropdown and click the Show All Time Axis Cells command as shown below:
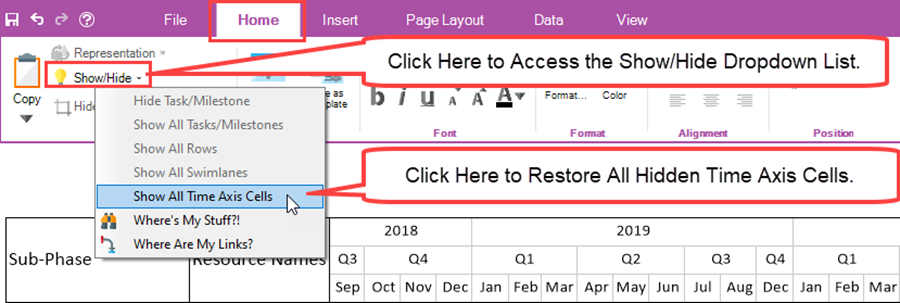
Exercising the above action also clears (removes) all Timespan entries in The Grid. Second, you can also use The Grid to restore some or all Hidden Time Axis Level Cells to visibility by checking the desired entry’s Show column checkbox as shown here:
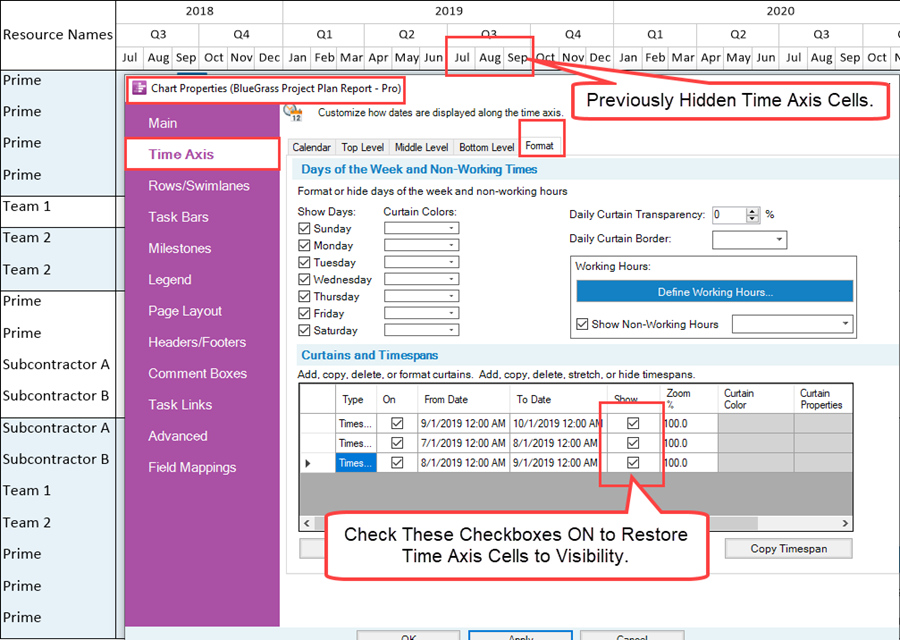
Using The Grid method above restores visibility to the Hidden Time Axis Level Cells and retains the entries in The Grid which can be useful for future edits. Finally, unchecking the ON checkbox to OFF in The Grid turns OFF the entry rule thereby restoring the selected Timespans to visibility while retaining the entry in The Grid as shown below:
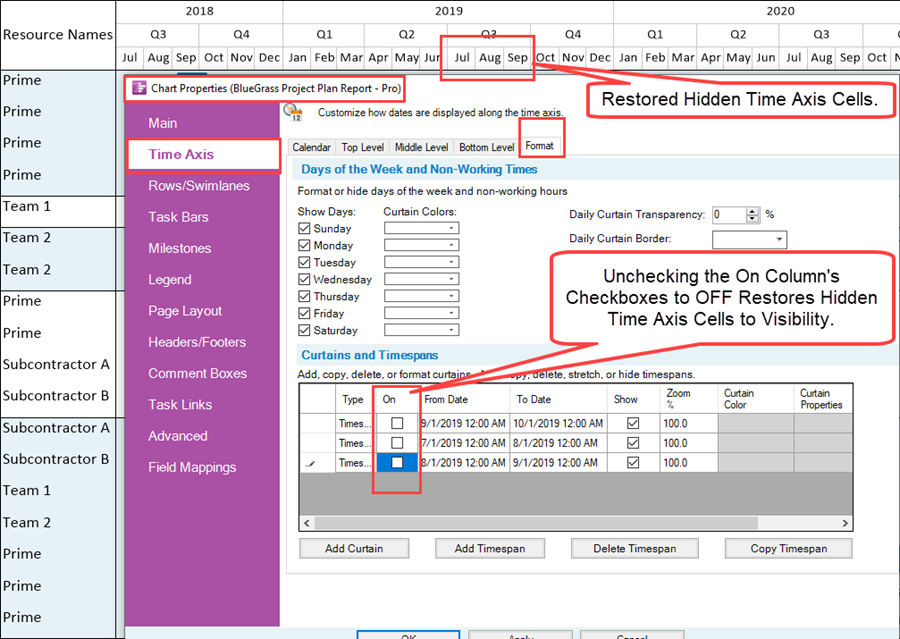
If there are hidden Time Axis Level Cells in a Hidden Time Axis Level (Show this level checkbox in the Chart Properties form Time Axis tab’s various Level sub-tabs was unchecked or OFF), clicking the Show All Time Axis Cells in the OnePager Home ribbon tool bar tab's Editing group’s Show/Hide dropdown does NOT restore hidden Time Axis Level to the show status. In other words, to restore hidden Time Axis Level Cells, the Time Axis Level containing the hidden Time Axis Level Cells must be shown in the chart. However, after the Show All Time Axis Cells command is executed, and barring any further hiding of Time Axis Level Cells, when the hidden Time Axis Level is again shown all previously hidden Cells are visible.
For more information on hiding/showing Time Axis Level Cells, please see the article at: Showing and Hiding Time Axis Levels and Cells for OnePager Pro
Formatting Individual Time Axis Level Cells
Time Axis Level Cells as well as Floating Time Axis Level Cells can be Formatted by manually selecting one or more Cells by right-clicking on the selected Cell(s) to access the time axis right-click context menu shown below:

Clicking the Format cell … command accesses the Time Axis Cell Properties form shown below where you can edit some of the most important properties of the selected Cell(s):

Making any edits to the selected Time Axis Level Cells using the Time Axis Cell Properties form edits only these selected Cells. After the edits are made, the selected Cells are considered mavericks. Attempting to set the Zoom% in the Time Axis Cell Properties form to zero (0) or a negative Zoom% value is not accepted by OnePager. Instead, OnePager sets the Zoom% value for entries values less than or equal to zero to a Zoom% value of 2.0 percent. Re-selecting any maverick Time Axis Level Cell using the procedure above and clicking the Use default properties button in the Time Axis Cell Properties form restores the selected Cells to the global properties established in the Chart Properties form.
Creating Timespans Using the Time Axis Cell Properties Form - An Example
An individual or group of Time Axis Level Cells can also be manually edited by right-clicking on the Cell or Cells and clicking the Format cell… command from the time axis right-click context menu as shown below:

Clicking the Format cell… button accesses the Time Axis Cell Properties form:
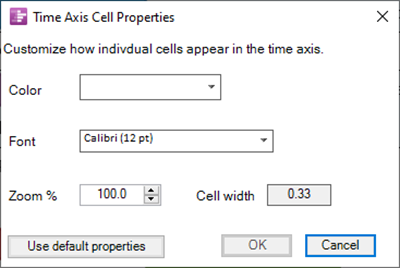
In this form you can modify the selected Cell or Cells background color and Font properties. With respect to making edits to the Cell width property in the above form, the Zoom% window is only enabled if, selected multiple Cells are all in the same Time Axis Level. If multiple Cells are selected in different Time Axis Levels, the Zoom% control is disabled. You cannot set the Zoom% value window to zero (0) or less; attempting this causes OnePager to reset the Zoom% value in the Time Axis Cell Properties form’s Zoom% window to a Zoom% value of 2.0 percent. You cannot set the Zoom% value greater than 1,000%; doing so causes OnePager to reset the value back to 1,000%.
If multiple Cells are in different Time Axis Levels you can modify all selected Cells with respect to Background color and Font properties. The Cell width window in the form is for informational purposes only. When you make edits with the Zoom% control window, the Cell width window is updated to reflect the width of the Cell in the linear measure you’ve selected based on your in either English or Metric units depending on the type of Template Properties form you are using (e.g., inches or centimeters). Additionally, since the Fill Pattern is a property of the Time Axis Level, it cannot be edited individually for a single Time Axis Level Cell.
Editing the Fill Pattern must be done at the Chart Properties form level. Making any of the edits described above to an individual Cell or Cells makes them all mavericks. You can reset the default properties of a modified Cell or Cells by clicking the Use default properties button in the Time Axis Cell Properties form. This action resets the selected Cell’s properties back to those currently set in the Chart Properties form.
Unstretch All Cells after Creating Non-Linear Timespans
In the examples above, Non-Linear Timespans are created. If it is unpractical to use the UNDO feature in OnePager to return to true Linear Timespan, where all Cells in a Time Axis Level are the same width, the Unstretch all cell command in the Time Axis right-click context menu shown below can be used.

To Unstretch all cells, right-click on any Time Axis Level Cell and click the Unstretch all cells command as shown above.
Caution When Unstretching All Cells
The Unstretch all cells command, when clicked, operates on the entire Time Axis at all Levels. This is necessary because often, if not always, stretching a selected Cell at one Level causes Cells above and below to stretch as well. Accordingly, when you select Unstretch all cells command, all Time Axis Level Cells become uniform in width in their own Time Axis Level. Clicking the Unstretch all cells returns the previously stretched or compressed Time Axis Level Cells to their original width and restores the Document’s width to its original size. This procedure includes for all Time Axis Levels starting with the Top level, then the Middle level, and finally the Bottom level.
After the Unstretch all cells command is used, the Time Axis for our example looks like this:

Unstretching All Cells and the Floating Time Axis
If the chart contains one or more Floating Time Axes, they are unstretched to match the corresponding Cells of each Time Axis Level.
For more information on the Non-Linear Time Axis feature, please see the article at: The Non-Linear Time Axis Feature for OnePager Pro
For more information on the Floating Time Axis feature, please see the article at: The Floating Time Axis Feature for OnePager Pro
Accessing the Chart Properties Form from a Time Axis Level Cell
Clicking the Time-axis properties… command in the Time Axis context menu accesses the Chart Properties form at the Time Axis tab and the sub-tab for the Time Axis Level you selected. Selecting a Time Axis Level Cell from the Bottom Level and right-clicking the Cell accesses the context menu where you can then click the Time-axis properties… command:

Clicking the Time-axis properties… command accesses the Chart Properties form’s Time Axis tab for the Bottom Level as shown below:
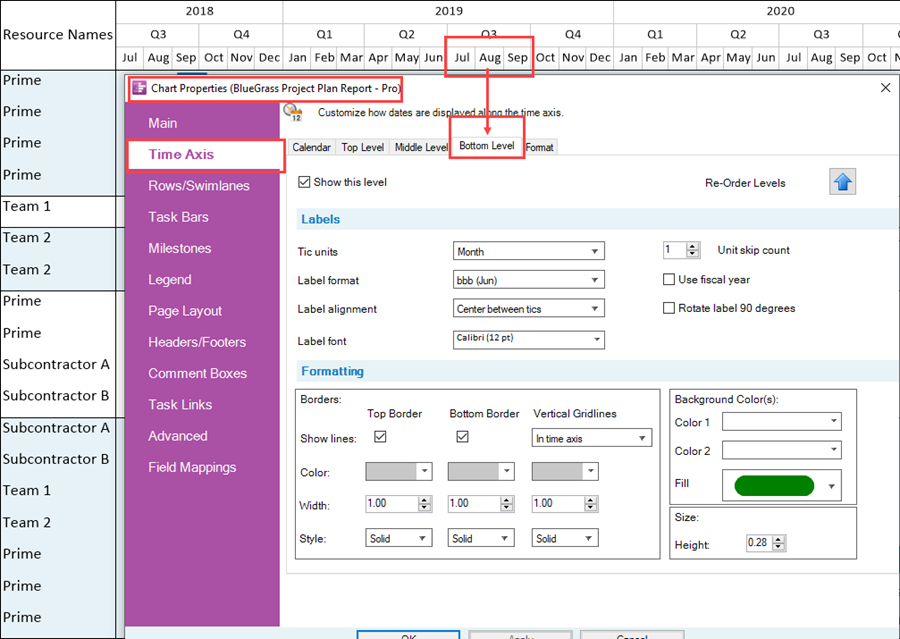
By using the Chart Properties form in this way you are able to edit the global properties of all Time Axis Level Cells in the Time Axis Level selected. You can also use the sub-tabs in the form above to go to other Time Axis Levels, to the Calendar sub-tab or the Format sub-tab. When multiple Time Axis Level Cells are selected in different Time Axis Levels with the left-click action and a single Time Axis Level Cell is right-clicked and the Time-axis properties… command is clicked, the Chart Properties form Time Axis tab’s Level sub-tab is accessed only for the Time Axis Level Cell for which the Time-axis properties… command was applied. All other Time Axis Level Cells that were previously selected are de-selected.
For more information on using the Chart Properties form Time Axis tab, please see the article at: Editing Time Axes with the Chart Properties Form for OnePager Pro
Creating And Editing Curtains with the Time Axis Context Menu’s Insert Curtain Command
It can be advantageous from time to time to insert a Curtain into the chart that has exactly the same Start/End Date boundaries as a particular Time Axis Level Cell or Cells. For example, it can be necessary to highlight a particular Quarter as important in a schedule conversation. Time Axis Level Cell related Curtains can be added to the chart using a right-click on the time axis right-click context menu and its Insert curtain command. To insert a Curtain with Time Axis Level Cell boundaries, first select the Cell or Cells to access the Time Axis context menu as shown below:

When you click the Insert curtain command a basic Curtain is inserted into the chart with Start/End Date boundaries the same as those for the selected Time Axis Level Cell as shown here:

The Insert curtain command only creates a single Curtain. If multiple Time Axis Level Cells are selected, either in one Time Axis Level or multiple Levels, the Insert curtain command is disabled. An Inserted Curtain can be edited by right-clicking on it to access the curtain right-click context menu as shown below:

The commands in the above context menu operate in the same ways as context menu commands for all other Curtains.
For more information on the creation and management of curtains, please see the article at: Creating and Managing Curtains
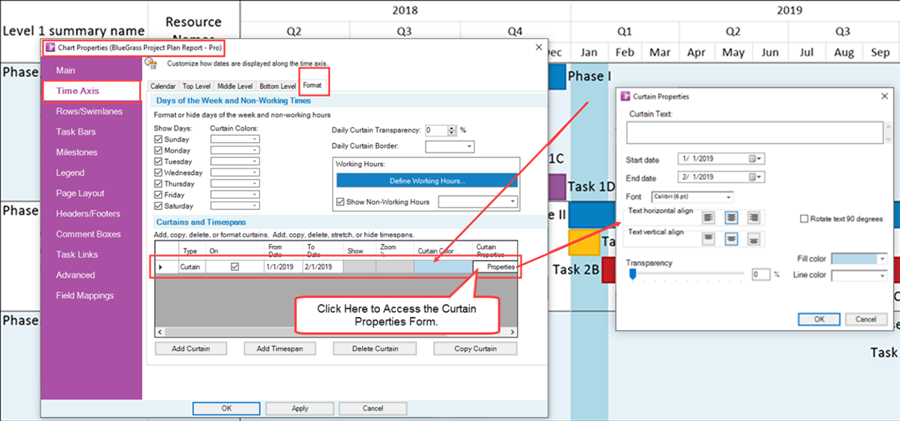
When a Curtain is created using the Insert curtain command, a Curtain entry is added into The Grid. The Grid showing the Inserted Curtain is shown below:
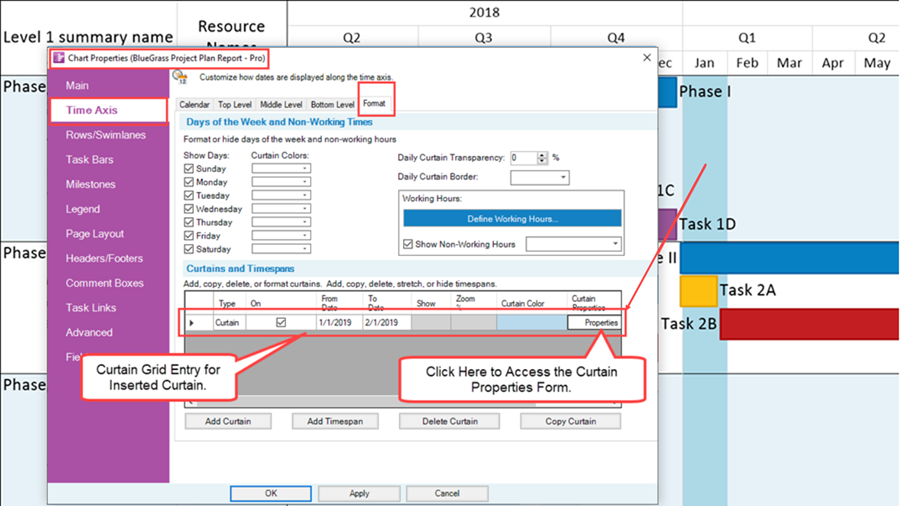
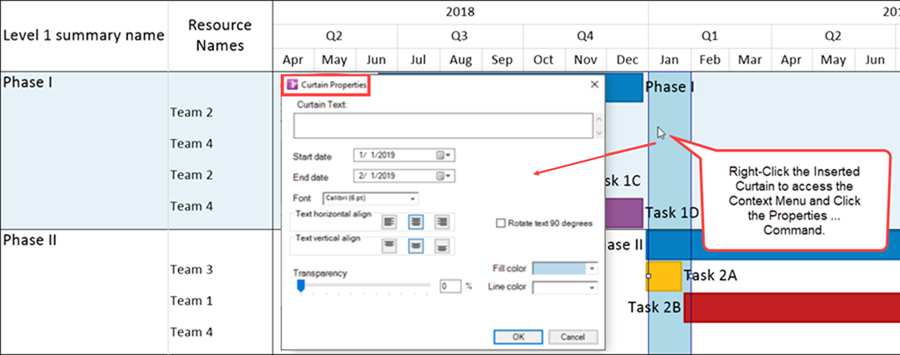
To edit an Inserted Curtain, you can access the Curtain Properties form in one of two ways. First, using the above illustration as a guide, you can click the Properties button in The Grid entry for the Inserted Curtain to access the Curtain Properties form as shown below:
The other method for accessing the Curtain Properties form is to right-click on the Inserted Curtain itself to access the context menu and click the Properties … command as shown below:
For more information on Time Axis Curtains, please see the article at: Creating, Editing, and Managing Time Axis Daily Curtains for OnePager Pro
Manual Editing of Floating Time Axis Level Cells
The Floating Time Axis cells can be edited on an individual basis. Since this article covers manual editing of Time Axis Levels and Time Axis Level Cells some mention here is required with respect to Floating Time Axes.
For more information on the Floating Time Axis feature, please see the article at: The Floating Time Axis Feature for OnePager Pro
Selecting Floating Time Axis Level Cells
Selecting Floating Time Axis Level Cells is accomplished in the same way as selecting Time Axis Level Cells. Floating Time Axis Level Cells can be selected individually with a single left-click, selected in a sequence using the CTL+Left-Click method, or selected in a contiguous set using the SHIFT+Left-Click.
The rules for using the CTL+Left-Click and the SHIFT+Left-Click that apply to using these methods together to select Time Axis Level Cells applies to using these methods for selecting Floating Time Axis Level Cells.
Whenever you select a Floating Time Axis Level Cell the corresponding Time Axis Level Cell is NOT selected or vice versa. You can select Cells in both Floating Time Axis Levels and Time Axis Levels using the various selection methods previously described above. The rules for selecting multiple Floating Time Axis Level Cells with the various selection methods apply. Once Cells in the Floating Time Axis Levels and Time Axis Levels are selected you can then edit and stretch or compress them as required. Whatever editing, stretching or compressing is done to the selected Cells by either editing in the Time Axis Levels or the Floating Time Axis Levels is done such that these displayed Levels remain consistent in the chart.
Editing Floating Time Axis Cells
Selecting any Floating Time Axis Level Cell allows you generally to only use the time axis right-click context menu to edit that specific Floating Time Axis Level Cell. The context menu accessed when you right-click a Floating Time Axis Level Cell is shown below with the difference highlighted between it and the context menu for a Time Axis Level Cell.
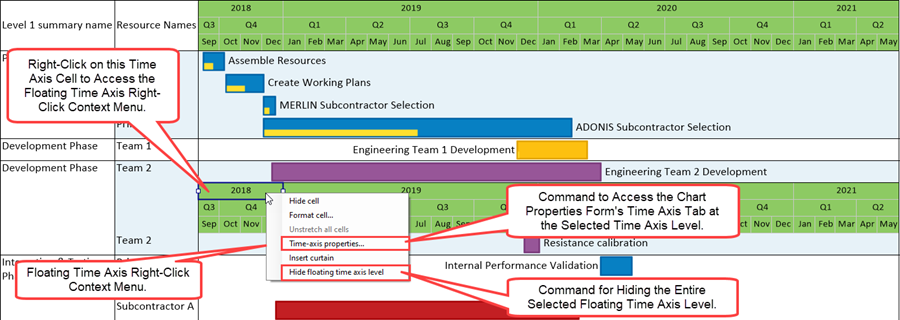
The top three commands in the context menu above provide the same editing actions for Floating Time Axis Level Cells as they do for Time Axis Level Cells found outside the graph (Top or Bottom of the graph or both). Because the top three commands shown in the context menu above can change the appearance of the Floating Time Axis Level, it is necessary for these commands to also change the appearance of the corresponding Time Axis Level to maintain consistency within the chart and the graph. Accordingly, most edits made to a Floating Time Axis Level Cell are also made to the corresponding Time Axis Level Cell.
The exception is in editing the height of a Floating Time Axis Level. Editing the height of a Floating Time Axis Level does not change the height of the corresponding Time Axis Level and vice versa. With respect to the Unstretch all cells command, the command is enabled only if one or more Cells in a Time Axis or Floating Time Axis Level is stretched or compressed. Otherwise, the command is disabled.
If the enabled Unstretch all cells command is exercised on a Floating Time Axis Level Cell, all Time Axis and Floating Time Axis Level Cells are unstretched. In the context menu above, the Time-axis properties… command accesses the Chart Properties form Time Axis tab’s Top, Middle, or Bottom Level sub-tab when this command is clicked depending on which Level is selected in the Floating Time Axis. Most edits made in the Chart Properties form can be applied globally to both the Time Axis Level and any Floating Time Axis Level if the edit applies to Cells.
If the edit made in the Chart Properties form Time Axis tab’s Level sub-tabs changes a Level related property, such as the height property, that change is only made in the Time Axis Level and NOT to the Floating Time Axis Level. For the Floating Time Axis, the Insert curtain command is not enabled. The Hide floating time axis level command when clicked hides the Floating Time Axis Level and displays an empty Row in the chart. As an empty Row, it takes on the properties and characteristics of any other empty Row.
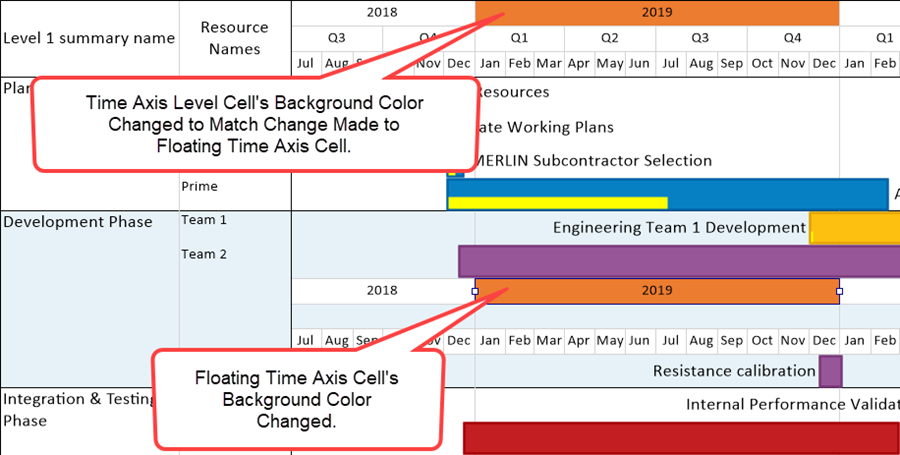
A discussion of how to restore a Hidden Floating Time Axis Level is discussed below. Making formatting edits to Floating Time Axis Level Cells mavericks both the Floating Time Axis Level Cell and the Time Axis Level Cell as well.
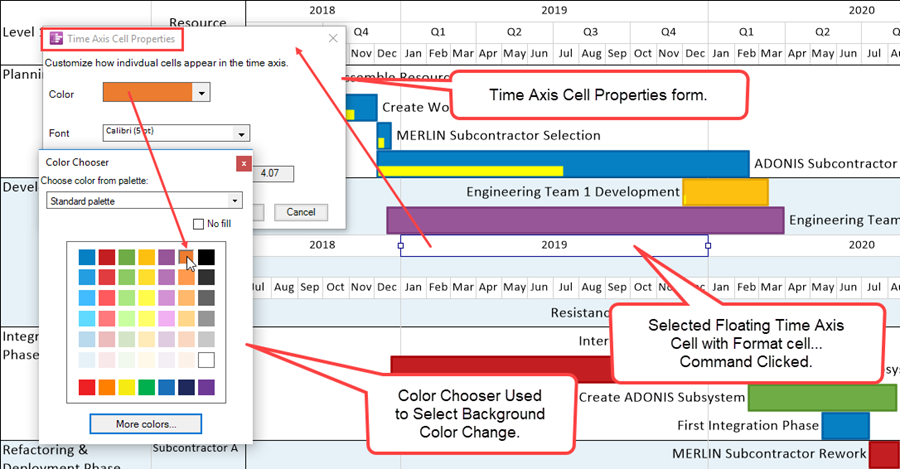
For example you can edit the background color for a specific Floating Time Axis Level Cell as is set up to be done below:
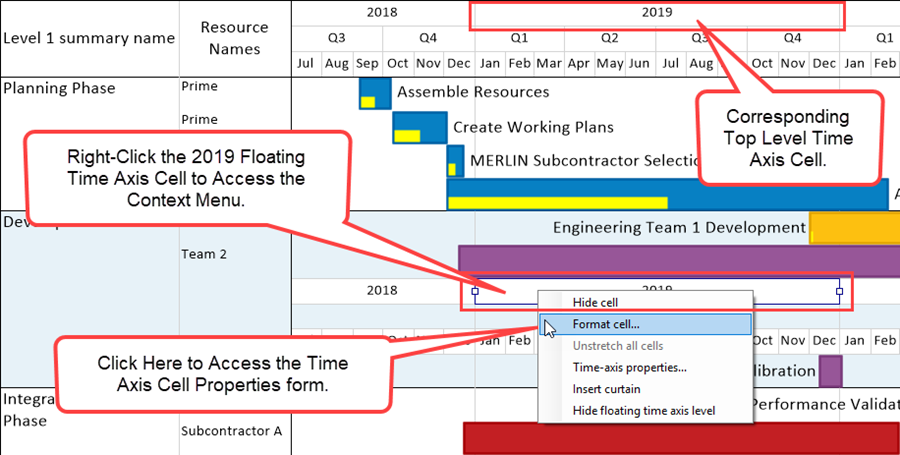
Clicking the Format cell… command accesses the Time Axis Cell Properties form where you can make edits to the Floating Time Axis Level Cell’s background color as shown below using the OnePager standard Color Chooser form:
Making the above edit to the background color in the Floating Time Axis Level Cell also changes the background color for the corresponding Time Axis Level Cell as shown below:
In a similar way, if you edit a property of a Time Axis Level Cell when there is a corresponding Floating Time Axis in the chart, the corresponding Floating Time Axis Level Cell takes on the edits made to the Time Axis Level Cell.
Hiding Floating Time Axis Levels
The bottom command in the time axis right-click context menu for a Floating Time Axis Level Cell is the Hide floating time axis level command. Clicking this command immediately hides the Floating Time Axis Level regardless of what Cell in the Floating Time Axis was selected. However, this command hides only the content of the Floating Time Axis Level but leaves the Row visible where the selected Floating Time Axis Level resided as shown below:
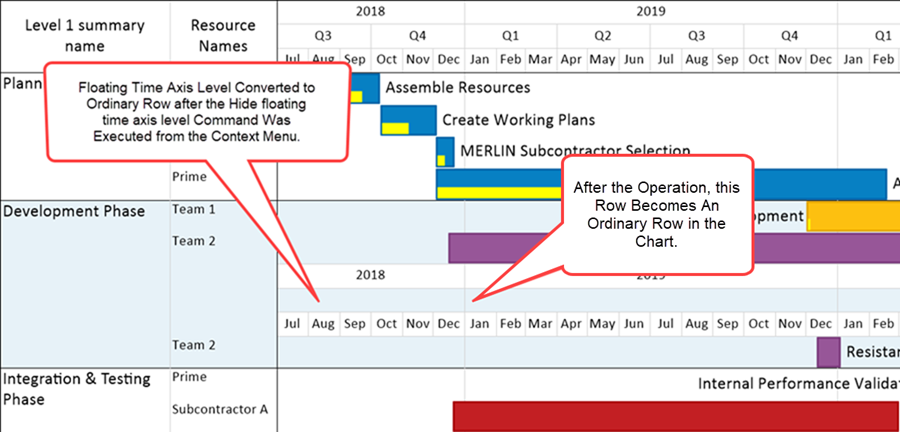
This behavior is a bit different from that of hiding rows. Normally Rows in the chart are automatically hidden from view in the graph at the end of the hide rows operation. With Floating Time Axis Levels, hiding the Level converts the area of the graph to a normal Row in the chart that appears as empty space. The Row remaining after the Hide floating time axis level command is completed retains all the properties of a normal Row. It can have text columns entries and all their properties remain editable. This approach is thought to provide you with greater flexibility when making further edits to the chart containing Floating Time Axis Levels. These normal Rows can be edited like any other Row in the chart.
When Floating Time Axis Levels are hidden, as shown above, the empty Row that replaces the hidden Floating Time Axis Level can be removed from the graph by using the Hide rows button on the OnePager Home ribbon tool bar tab as shown here:
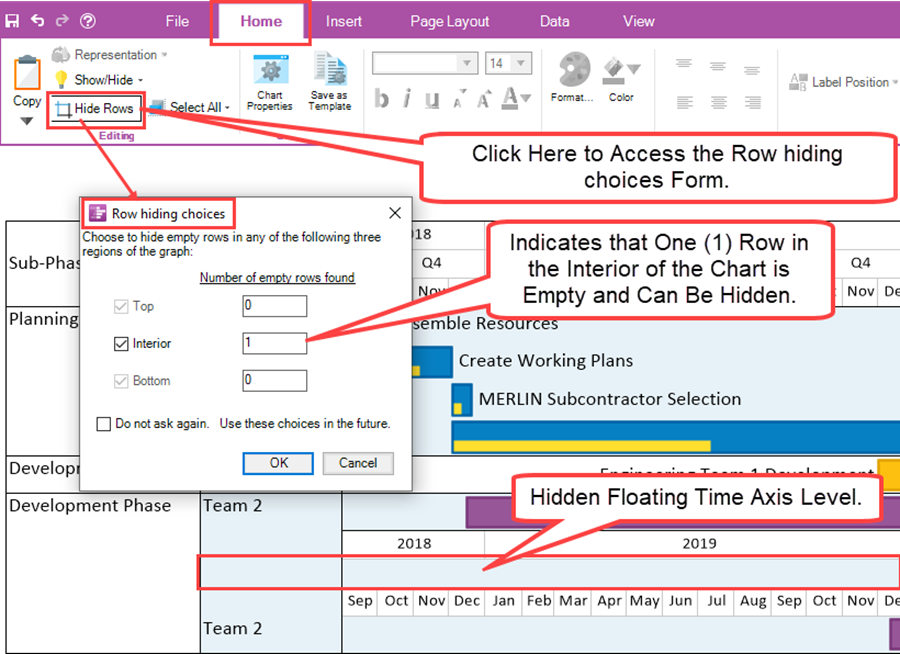
Performing the Hide row operation using the Row hiding choices form hides the previously hidden Floating Time Axis Level in the graph as shown here:
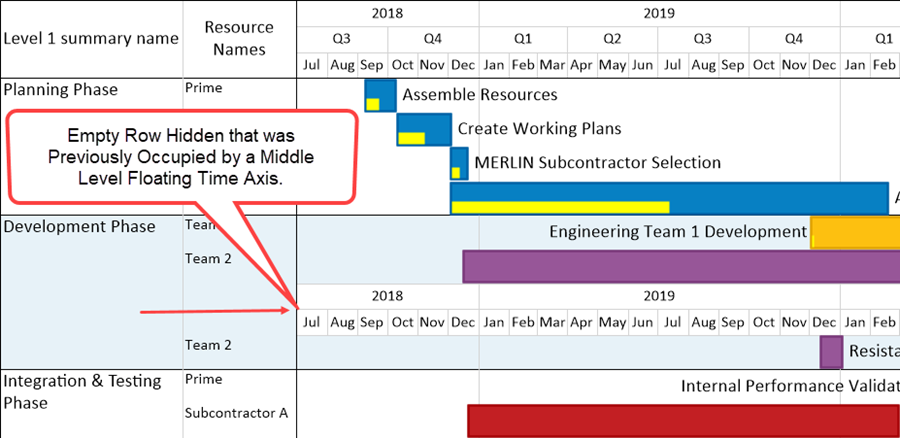
An alternative approach to hiding any Floating Time Axis Level is to select the Row’s Text Column Label area with a right-click and click the Hide row command in the row right-click context menu as shown below:
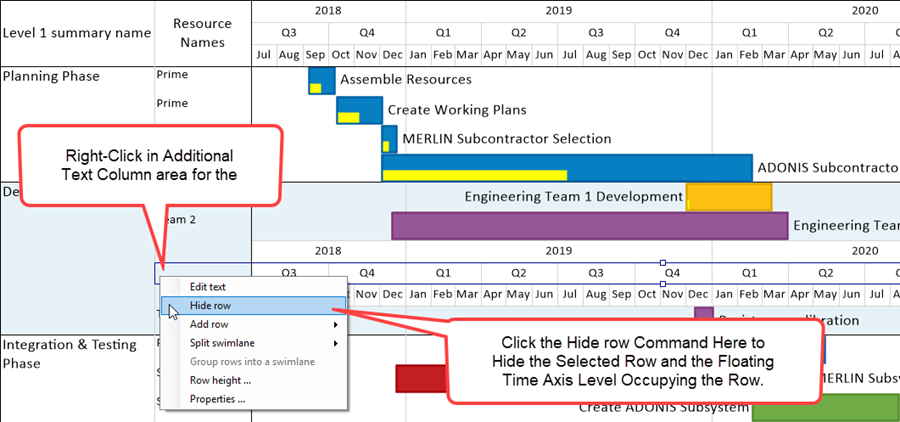
When you do this, the chart again looks like this:

At this point if you want to make the previously Hidden Floating Time Axis Level visible again, our recommendation is to reinsert the Floating Time Axis Level using the empty space right-click context menu to perform this action.
For more information on Creating Floating Time Axis Levels, please see this section in the article at: The Floating Time Axis Feature for OnePager Pro - Creating Floating Time Axis Levels
Using the Chart Properties Form’s Time Axis Tab to Globally Edit Floating Time Axis Levels
Clicking the Time Axis Properties command in the time axis right-click context menu shown below accesses the Chart Properties Time Axis tab for the at the Level corresponding to the Floating Time Axis Level Cell that you right-clicked:
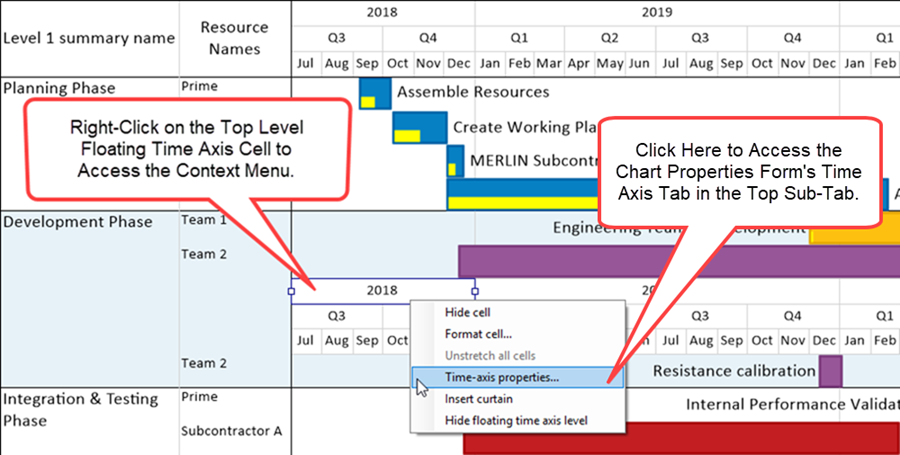
From the Chart Properties form Time Axis tab’s Top Level sub-tab you can make most chart global edits to both the Floating Time Axis’ Top Level and the Time Axis’ Top Level as shown below:
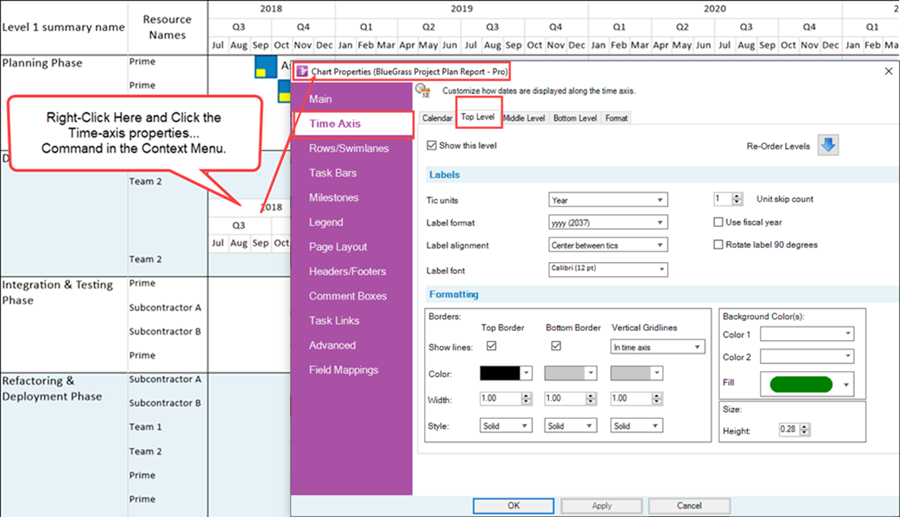
For example, if you make edits in the Background Colors sub-control group as shown below, you get these results:
As mentioned earlier you cannot use the global edit for the level height in the Chart Properties form’s Level tabs to edit the height of a Floating Time Axis Level.
Floating Time Axes and the OnePager Template
There are No corresponding Floating Time Axis Level or Cell controls in the OnePager Pro Template Properties form. Accordingly, Floating Time Axis Level representations are within the individual chart although some Floating Time Axis Cell properties can be edited globally along with their Time Axis Levels and Cells in the Chart Properties form. Individual Floating Time Axis Levels and Cells can always be manually edited.
Related Links
Changing the Time Axis Borders for OnePager Pro
Creating and Managing Curtains
The Floating Time Axis Feature for OnePager Pro
Showing and Hiding Time Axis Levels and Cells for OnePager Pro
The Non-Linear Time Axis Feature for OnePager Pro
Editing Time Axes with the Chart Properties Form for OnePager Pro
Creating, Editing, and Managing Time Axis Daily Curtains for OnePager Pro
(22.4.3-70)