Difference between revisions of "The Custom Date Format Feature for OnePager Express for Version 7.0"
(→Custom Date Format Syntax) |
|||
| Line 4: | Line 4: | ||
<center>[[File:X70-22_5_2-70-(11)-11242020.png]]</center> | <center>[[File:X70-22_5_2-70-(11)-11242020.png]]</center> | ||
| − | <center> | + | <!--<center>X70-22_5_2-70-(11)-11242020.png</center>--> |
Access to the feature is provided through the '''Chart Properties''' form '''Time Axis '''tab’s '''Calendar '''sub-tab in the '''Formatting & Layout''' control group as shown below: | Access to the feature is provided through the '''Chart Properties''' form '''Time Axis '''tab’s '''Calendar '''sub-tab in the '''Formatting & Layout''' control group as shown below: | ||
<center>[[File:X70-22_5_2-70-(1)-11242020.png]]</center> | <center>[[File:X70-22_5_2-70-(1)-11242020.png]]</center> | ||
| − | <center> | + | <!--<center>X70-22_5_2-70-(1)-11242020.png</center>--> |
Clicking the '''Manage Custom Date Formats''' button accesses the '''Add Custom-Date Format''' form at the beginning of the '''creation''' or '''editing''' process as shown above. '''Custom Date Formats''' are also supported in the OnePager '''Template Properties '''form at the '''Time Axis '''tab’s '''Calendar '''sub-tab shown here: | Clicking the '''Manage Custom Date Formats''' button accesses the '''Add Custom-Date Format''' form at the beginning of the '''creation''' or '''editing''' process as shown above. '''Custom Date Formats''' are also supported in the OnePager '''Template Properties '''form at the '''Time Axis '''tab’s '''Calendar '''sub-tab shown here: | ||
<center>[[File:X70-22_5_2-70-(2)-11242020.png]]</center> | <center>[[File:X70-22_5_2-70-(2)-11242020.png]]</center> | ||
| − | <center> | + | <!--<center>X70-22_5_2-70-(2)-11242020.png</center>--> |
The intent of this article is to provide the information essential for you to '''create''', '''edit''', and '''manage''' your own '''date formats'''. | The intent of this article is to provide the information essential for you to '''create''', '''edit''', and '''manage''' your own '''date formats'''. | ||
| Line 27: | Line 27: | ||
<center>[[File:X70-22_4_2-70-(3)-11232020.png]]</center> | <center>[[File:X70-22_4_2-70-(3)-11232020.png]]</center> | ||
| − | <center> | + | <!--<center>X70-22_4_2-70-(3)-11232020.png</center>--> |
When this button is clicked, the '''Add Custom-Date Format''' form is accessed as shown below: | When this button is clicked, the '''Add Custom-Date Format''' form is accessed as shown below: | ||
<center>[[File:X70-22_4_2-70-(4)-11232020.png]]</center> | <center>[[File:X70-22_4_2-70-(4)-11232020.png]]</center> | ||
| − | <center> | + | <!--<center>X70-22_4_2-70-(4)-11232020.png</center>--> |
This form allows you to '''add Custom Date Formats''' by typing in the desired '''format''' in the '''Date Format''' window shown in the form above. | This form allows you to '''add Custom Date Formats''' by typing in the desired '''format''' in the '''Date Format''' window shown in the form above. | ||
| Line 39: | Line 39: | ||
<center>[[File:X70-22_5_2-70-(3)-11242020.png]]</center> | <center>[[File:X70-22_5_2-70-(3)-11242020.png]]</center> | ||
| − | <center> | + | <!--<center>X70-22_5_2-70-(3)-11242020.png</center>--> |
| − | In the form above, there is a link to the OnePager website where all the '''syntax information''' needed to '''create''' your own '''Custom Date Formats''' can be found: [[https://www.onepager.com/support/faq.php?id=123 Format Help]] | + | In the form above, there is a link to the OnePager website where all the '''syntax information''' needed to '''create''' your own '''Custom Date Formats''' can be found: [[https://www.onepager.com/support/faq.php?id=123 Format Help]] |
When you click the '''Add Format '''button, OnePager accesses the '''Manage Custom Date Formats '''form that includes your new '''Custom Date Format '''in the '''Date Format List '''as shown here: | When you click the '''Add Format '''button, OnePager accesses the '''Manage Custom Date Formats '''form that includes your new '''Custom Date Format '''in the '''Date Format List '''as shown here: | ||
<center>[[File:X70-22_5_2-70-(4)-11242020.png]]</center> | <center>[[File:X70-22_5_2-70-(4)-11242020.png]]</center> | ||
| − | <center> | + | <!--<center>X70-22_5_2-70-(4)-11242020.png</center>--> |
The form above is multi-purpose in that it provides a '''Sample''' of the selected '''Custom Date Format''' in the '''Date Format''' window, provides a list of '''Custom Date Formats '''that can be selected for further '''editing''' or '''deleting''', and tells you where the applicable '''time unit''' the '''Custom Date Format '''is going to be applied in the '''Applies to time unit(s): '''window. Additionally, there is another convenient link to the OnePager website page providing instructions on the '''syntax instructions '''for '''Custom Date Formats''': [[https://www.onepager.com/support/faq.php?id=123 Format Help]] | The form above is multi-purpose in that it provides a '''Sample''' of the selected '''Custom Date Format''' in the '''Date Format''' window, provides a list of '''Custom Date Formats '''that can be selected for further '''editing''' or '''deleting''', and tells you where the applicable '''time unit''' the '''Custom Date Format '''is going to be applied in the '''Applies to time unit(s): '''window. Additionally, there is another convenient link to the OnePager website page providing instructions on the '''syntax instructions '''for '''Custom Date Formats''': [[https://www.onepager.com/support/faq.php?id=123 Format Help]] | ||
| Line 51: | Line 51: | ||
From the above form you can choose to '''create''' another '''Custom Date Format '''by clicking the '''Add Format '''button or '''delete''' the selected '''Custom Date Format''' in the list by clicking the '''Delete Format '''button. When you are finished, click the '''OK '''button to return to the '''Chart Properties''' form '''Time Axis '''tab’s '''Calendar '''sub-tab. '''Creating''' your own '''Custom Date Formats''' can be useful when you want the '''text''' displayed in various '''Time Axis '''and '''Floating Time Axis Levels''' for specific meaning beyond what OnePager provides. | From the above form you can choose to '''create''' another '''Custom Date Format '''by clicking the '''Add Format '''button or '''delete''' the selected '''Custom Date Format''' in the list by clicking the '''Delete Format '''button. When you are finished, click the '''OK '''button to return to the '''Chart Properties''' form '''Time Axis '''tab’s '''Calendar '''sub-tab. '''Creating''' your own '''Custom Date Formats''' can be useful when you want the '''text''' displayed in various '''Time Axis '''and '''Floating Time Axis Levels''' for specific meaning beyond what OnePager provides. | ||
| − | For more information on the '''Chart Properties '''form, please see the article at: [[Time Axis Tab for Version 7.0 (OnePager Express) | Time Axis Tab for OnePager Express]] | + | For more information on the '''Chart Properties '''form, please see the article at: [[Time Axis Tab for Version 7.0 (OnePager Express) | Time Axis Tab for OnePager Express]] <!--21.17.2-70--> |
===Using the Template Properties Form to Create and Edit Custom Date Formats=== | ===Using the Template Properties Form to Create and Edit Custom Date Formats=== | ||
| Line 57: | Line 57: | ||
The '''Template '''form '''Time Axis '''tab’s '''Calendar '''sub-tab is identical to the corresponding sub-tab in the '''Chart Properties '''form. The processes for '''creating''', '''editing''', and '''managing''' '''Custom Date Formats''' in the '''Template '''form are identical to the processes used in the '''Chart Properties '''form. '''Custom Date Formats created''' in the '''Chart Properties''' form can be made into '''Template '''forms by '''saving''' the '''Chart Properties''' form as a '''Template '''form. | The '''Template '''form '''Time Axis '''tab’s '''Calendar '''sub-tab is identical to the corresponding sub-tab in the '''Chart Properties '''form. The processes for '''creating''', '''editing''', and '''managing''' '''Custom Date Formats''' in the '''Template '''form are identical to the processes used in the '''Chart Properties '''form. '''Custom Date Formats created''' in the '''Chart Properties''' form can be made into '''Template '''forms by '''saving''' the '''Chart Properties''' form as a '''Template '''form. | ||
| − | For more information on '''Making a Template Properties Form from a Chart''', please see this section in the article at: [[Managing the Current Template for Version 7.0#Making a Template Properties Form from a Chart | Managing the Current Template - Making a Template Properties Form from a Chart]] | + | For more information on '''Making a Template Properties Form from a Chart''', please see this section in the article at: [[Managing the Current Template for Version 7.0#Making a Template Properties Form from a Chart | Managing the Current Template - Making a Template Properties Form from a Chart]] <!--24.6.1-70--> |
'''Custom Date Formats created''' in a '''Template Properties '''form can be '''edited''' in the '''Template Properties '''form, '''saved''', and used in the creation of future charts. '''Custom Date Formats created''' in a '''Chart Properties''' form can also be '''edited''' in the '''Chart Properties '''form and '''saved''' for future use in subsequent snapshots. However, '''edits''' made in the '''Chart Properties '''form to '''Custom Date Formats''' do not change the '''Custom Date Formats '''residing in the basic '''Template '''form used to create the initial chart. | '''Custom Date Formats created''' in a '''Template Properties '''form can be '''edited''' in the '''Template Properties '''form, '''saved''', and used in the creation of future charts. '''Custom Date Formats created''' in a '''Chart Properties''' form can also be '''edited''' in the '''Chart Properties '''form and '''saved''' for future use in subsequent snapshots. However, '''edits''' made in the '''Chart Properties '''form to '''Custom Date Formats''' do not change the '''Custom Date Formats '''residing in the basic '''Template '''form used to create the initial chart. | ||
| − | For more information on the '''Template Properties '''form's '''Time Axis''' tab, please see this section in the article at [[Template Only Features for Version 7.0 (OnePager Express)#Template Properties Form's Time Axis Tab | Template Only Features-OnePager Express – Template Properties Form's Time Axis Tab]] | + | For more information on the '''Template Properties '''form's '''Time Axis''' tab, please see this section in the article at [[Template Only Features for Version 7.0 (OnePager Express)#Template Properties Form's Time Axis Tab | Template Only Features-OnePager Express – Template Properties Form's Time Axis Tab]] <!--24.2.1-70--> |
===Using the Label Format Dropdown to Create Custom Date Formats=== | ===Using the Label Format Dropdown to Create Custom Date Formats=== | ||
| Line 68: | Line 68: | ||
<center>[[File:X70-22_1_6-70-(5)-11132020.png]]</center> | <center>[[File:X70-22_1_6-70-(5)-11132020.png]]</center> | ||
| − | <center> | + | <!--<center>X70-22_1_6-70-(5)-11132020.png</center>--> |
Clicking the '''Add Custom Format…''' selection in the dropdown accesses the '''Add Custom-Date Format '''form referenced above. With the '''Add Custom-Date Format '''form accessed you can '''create''' a new '''Custom Date Format''' that becomes immediately available when the '''Add Format '''button on the '''Add Custom-Date Format '''form is clicked. After the '''Custom Date Format '''is entered into the '''Add Custom-Date Format '''form it is immediately available in all '''Label format '''dropdown menus. | Clicking the '''Add Custom Format…''' selection in the dropdown accesses the '''Add Custom-Date Format '''form referenced above. With the '''Add Custom-Date Format '''form accessed you can '''create''' a new '''Custom Date Format''' that becomes immediately available when the '''Add Format '''button on the '''Add Custom-Date Format '''form is clicked. After the '''Custom Date Format '''is entered into the '''Add Custom-Date Format '''form it is immediately available in all '''Label format '''dropdown menus. | ||
| − | For more information on '''Labeling Time Axis Levels''', please see the article at: [[Labeling Time Axis Levels for OnePager Express for Version 7.0 | Labeling Time Axis Levels for OnePager Express]] | + | For more information on '''Labeling Time Axis Levels''', please see the article at: [[Labeling Time Axis Levels for OnePager Express for Version 7.0 | Labeling Time Axis Levels for OnePager Express]] <!--22.1.6-70--> |
==Creating and Managing Custom Date Formats== | ==Creating and Managing Custom Date Formats== | ||
| Line 79: | Line 79: | ||
<center>[[File:X70-22_4_2-70-(3)-11232020.png]]</center> | <center>[[File:X70-22_4_2-70-(3)-11232020.png]]</center> | ||
| − | <center> | + | <!--<center>X70-22_4_2-70-(3)-11232020.png</center>--> |
Clicking the button shown above accesses the '''Add Custom-Date Format''' form where you can construct your '''Custom Date Format''' by typing it in the window indicated below. | Clicking the button shown above accesses the '''Add Custom-Date Format''' form where you can construct your '''Custom Date Format''' by typing it in the window indicated below. | ||
<center>[[File:X70-22_5_2-70-(5)-11242020.png]]</center> | <center>[[File:X70-22_5_2-70-(5)-11242020.png]]</center> | ||
| − | <center> | + | <!--<center>X70-22_5_2-70-(5)-11242020.png</center>--> |
The above form displays a sample of your '''Custom Date Format''' after you’ve '''created''' it and clicked the '''See the format''' button shown above. | The above form displays a sample of your '''Custom Date Format''' after you’ve '''created''' it and clicked the '''See the format''' button shown above. | ||
| Line 93: | Line 93: | ||
<center>[[File:X70-22_5_2-70-(6)-11242020.png]]</center> | <center>[[File:X70-22_5_2-70-(6)-11242020.png]]</center> | ||
| − | <center> | + | <!--<center>X70-22_5_2-70-(6)-11242020.png</center>--> |
An example helps illustrate the process. Suppose you want to '''create''' a '''Custom Date Format''' that displays the year followed by the text '''“Calendar Year”'''. | An example helps illustrate the process. Suppose you want to '''create''' a '''Custom Date Format''' that displays the year followed by the text '''“Calendar Year”'''. | ||
| Line 102: | Line 102: | ||
<center>[[File:X70-22_5_2-70-(6A)-11242020.png]]</center> | <center>[[File:X70-22_5_2-70-(6A)-11242020.png]]</center> | ||
| − | <center> | + | <!--<center>X70-22_5_2-70-(6A)-11242020.png</center>--> |
The '''Custom Date Format '''consists of a '''“code”''' for the type of '''date format''' and can be followed by '''text''' enclosed in either single or double quotes. The example above shows a four digit code for years expressed as '''yyyy'''. | The '''Custom Date Format '''consists of a '''“code”''' for the type of '''date format''' and can be followed by '''text''' enclosed in either single or double quotes. The example above shows a four digit code for years expressed as '''yyyy'''. | ||
| Line 110: | Line 110: | ||
<center>[[File:X70-22_5_2-70-(7)-11242020.png]]</center> | <center>[[File:X70-22_5_2-70-(7)-11242020.png]]</center> | ||
| − | <center> | + | <!--<center>X70-22_5_2-70-(7)-11242020.png</center>--> |
The process is completed at this point by clicking the '''OK '''button on the '''Manage Custom Date Formats''' form or you can go back to the '''Add Custom-Date Format''' form by clicking the '''Add Format '''button to '''create''' another '''Custom Date Format'''. You have the option in the '''Manage Custom Date Formats''' form to '''edit''' any '''Custom Date Format''' listed by selecting it and '''editing''' it in the '''Date Format''' window. You can also '''delete''' any selected '''Custom Date Format''' from the list by selecting it and click the '''Delete Format''' button. When you’ve finished and either clicked the '''Apply''' or '''OK '''button on the '''Chart Properties '''form, OnePager adds your '''Custom Date Format''', in this case a '''Year''', to the list of '''Date formats''' already predefined by OnePager. | The process is completed at this point by clicking the '''OK '''button on the '''Manage Custom Date Formats''' form or you can go back to the '''Add Custom-Date Format''' form by clicking the '''Add Format '''button to '''create''' another '''Custom Date Format'''. You have the option in the '''Manage Custom Date Formats''' form to '''edit''' any '''Custom Date Format''' listed by selecting it and '''editing''' it in the '''Date Format''' window. You can also '''delete''' any selected '''Custom Date Format''' from the list by selecting it and click the '''Delete Format''' button. When you’ve finished and either clicked the '''Apply''' or '''OK '''button on the '''Chart Properties '''form, OnePager adds your '''Custom Date Format''', in this case a '''Year''', to the list of '''Date formats''' already predefined by OnePager. | ||
| Line 117: | Line 117: | ||
<center>[[File:X70-22_5_2-70-(8)-11242020.png]]</center> | <center>[[File:X70-22_5_2-70-(8)-11242020.png]]</center> | ||
| − | <center> | + | <!--<center>X70-22_5_2-70-(8)-11242020.png</center>--> |
When you click '''Apply''' or '''OK '''in the '''Chart Properties '''form, the '''Top Level Time Axis''' looks like this: | When you click '''Apply''' or '''OK '''in the '''Chart Properties '''form, the '''Top Level Time Axis''' looks like this: | ||
<center>[[File:X70-22_5_2-70-(9)-11242020.png]]</center> | <center>[[File:X70-22_5_2-70-(9)-11242020.png]]</center> | ||
| − | <center> | + | <!--<center>X70-22_5_2-70-(9)-11242020.png</center>--> |
You can also access the '''Add Custom-Date Format '''from the first entry in the '''Label format '''dropdown as shown below: | You can also access the '''Add Custom-Date Format '''from the first entry in the '''Label format '''dropdown as shown below: | ||
<center>[[File:X70-22_5_2-70-(10)-11242020.png]]</center> | <center>[[File:X70-22_5_2-70-(10)-11242020.png]]</center> | ||
| − | <center> | + | <!--<center>X70-22_5_2-70-(10)-11242020.png</center>--> |
'''Custom Date Formats''' added in the '''Chart Properties''' form are retained as long as the charts associated with the '''Chart Properties '''are available. The '''Custom Date Format''' can be used in any snapshot associated with the chart and the '''Chart Properties''' form. The '''Custom Date Format''' available in such a chart can be '''edited''' through the '''Chart Properties''', as shown earlier, and used, as modified, in all snapshots. '''Custom Date Formats''' added to a '''Template''' form are available for all charts created with that '''Template''' form. '''Custom Date Formats''' included in a '''Chart Properties''' form are retained in a '''Template Properties '''form '''created''' from that '''Chart Properties''' form as explained above. | '''Custom Date Formats''' added in the '''Chart Properties''' form are retained as long as the charts associated with the '''Chart Properties '''are available. The '''Custom Date Format''' can be used in any snapshot associated with the chart and the '''Chart Properties''' form. The '''Custom Date Format''' available in such a chart can be '''edited''' through the '''Chart Properties''', as shown earlier, and used, as modified, in all snapshots. '''Custom Date Formats''' added to a '''Template''' form are available for all charts created with that '''Template''' form. '''Custom Date Formats''' included in a '''Chart Properties''' form are retained in a '''Template Properties '''form '''created''' from that '''Chart Properties''' form as explained above. | ||
| Line 135: | Line 135: | ||
As shown in the examples above the '''syntax''' for a '''Custom Date Format''' is a combination of '''English letters '''as codes with options for you to add '''text''' enclosed in either '''single or double quotes'''. There are also some '''special characters '''such as '''single and double colons''', '''single and double forward slashes''', '''hyphens''', and '''commas''' used as separators. The '''timespans '''available range from '''seconds''' on up to '''years '''with intermediate periods such as '''days''', '''weeks''', '''months''', and '''quarters'''. | As shown in the examples above the '''syntax''' for a '''Custom Date Format''' is a combination of '''English letters '''as codes with options for you to add '''text''' enclosed in either '''single or double quotes'''. There are also some '''special characters '''such as '''single and double colons''', '''single and double forward slashes''', '''hyphens''', and '''commas''' used as separators. The '''timespans '''available range from '''seconds''' on up to '''years '''with intermediate periods such as '''days''', '''weeks''', '''months''', and '''quarters'''. | ||
| − | Please use this link for a full list of all available '''codes''' and '''special characters''' available for defining '''Custom Date Formats''': [[https://www.onepager.com/support/faq.php?id=123 Format Help]] | + | Please use this link for a full list of all available '''codes''' and '''special characters''' available for defining '''Custom Date Formats''': [[https://www.onepager.com/support/faq.php?id=123 Format Help]] |
==Related Links== | ==Related Links== | ||
| − | [[Labeling Time Axis Levels for OnePager Express for Version 7.0 | Labeling Time Axis Levels for OnePager Express]] 22.1.6-70 | + | [[Labeling Time Axis Levels for OnePager Express for Version 7.0 | Labeling Time Axis Levels for OnePager Express]] <!--22.1.6-70--> |
| − | [[Editing Time Axes with the Chart Properties Form for OnePager Express for Version 7.0 | Editing Time Axes with the Chart Properties Form for OnePager Express]] 22.4.2-70 | + | [[Editing Time Axes with the Chart Properties Form for OnePager Express for Version 7.0 | Editing Time Axes with the Chart Properties Form for OnePager Express]] <!--22.4.2-70--> |
| − | [[Template Only Features for Version 7.0 (OnePager Express) | Template Only Features-OnePager Express]] 24.2.1-70 | + | [[Template Only Features for Version 7.0 (OnePager Express) | Template Only Features-OnePager Express]] <!--24.2.1-70--> |
| − | [[Managing the Current Template for Version 7.0 | Managing the Current Template]] 24.6.1-70 | + | [[Managing the Current Template for Version 7.0 | Managing the Current Template]] <!--24.6.1-70--> |
| − | [[Time Axis Tab for Version 7.0 (OnePager Express) | Time Axis Tab for OnePager Express]] 21.17.2-70 | + | [[Time Axis Tab for Version 7.0 (OnePager Express) | Time Axis Tab for OnePager Express]] <!--21.17.2-70--> |
'''Help Page for Adding Custom Date Formats:''' [[https://www.onepager.com/support/faq.php?id=123 Format Help]] | '''Help Page for Adding Custom Date Formats:''' [[https://www.onepager.com/support/faq.php?id=123 Format Help]] | ||
Latest revision as of 15:51, 19 January 2021
Contents
Overview
The Custom Date Format is a feature in OnePager Express that provides the capability to create your own date formats for use in the Time Axis, Floating Time Axis, and other places where OnePager supports various date formats. As an example, the Top Level Time Axis shown below has a user created Custom Date Format where the Year is augmented with “Calendar Year” as an added text:

Access to the feature is provided through the Chart Properties form Time Axis tab’s Calendar sub-tab in the Formatting & Layout control group as shown below:
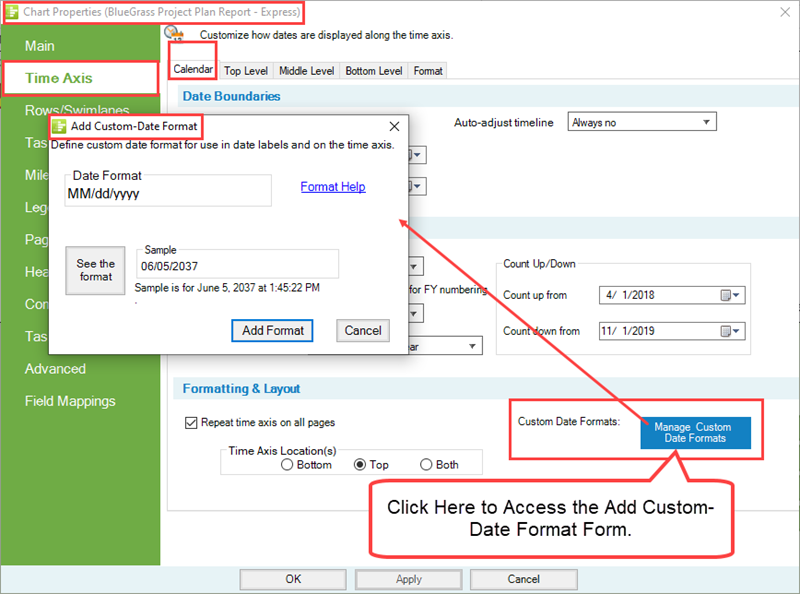
Clicking the Manage Custom Date Formats button accesses the Add Custom-Date Format form at the beginning of the creation or editing process as shown above. Custom Date Formats are also supported in the OnePager Template Properties form at the Time Axis tab’s Calendar sub-tab shown here:
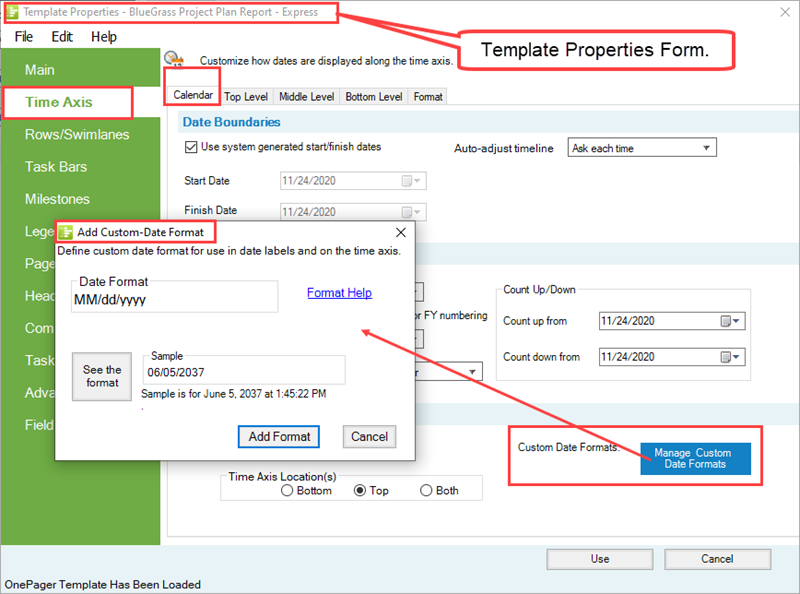
The intent of this article is to provide the information essential for you to create, edit, and manage your own date formats.
Accessing the Custom Date Format Feature
The Custom Date Format feature is accessible from the Chart Properties and Template forms. Creating a Custom Date Format in the Template Properties form allows you to create Custom Date Format and use it in any chart created using that specific Template. Creating a Custom Date Format in the Chart Properties form allows you to create Custom Date Format and use it in charts created with that specific Chart Properties form and in an follow on snapshots that might be created subsequently. Chart Properties forms containing Custom Date Formats can be saved as Template Properties forms for future use and to standardize Date Formats throughout an organization.
Using the Chart Properties Form to Create and Edit Custom Date Formats
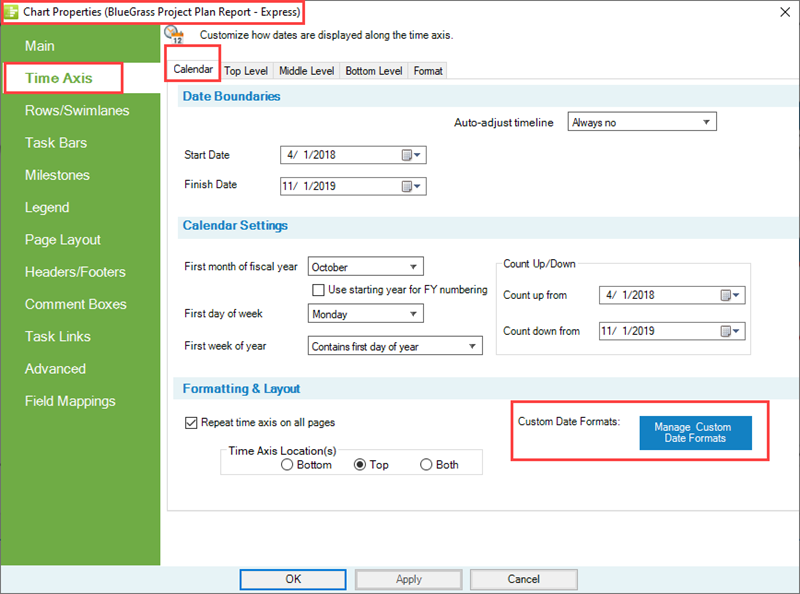
You can access controls for the new feature for creating and editing Custom Date Formats by accessing the Chart Properties form Time Axis tab’s Calendar sub-tab in the Formatting & Layout control group by clicking the Manage Custom Date Formats button as shown here:
When this button is clicked, the Add Custom-Date Format form is accessed as shown below:
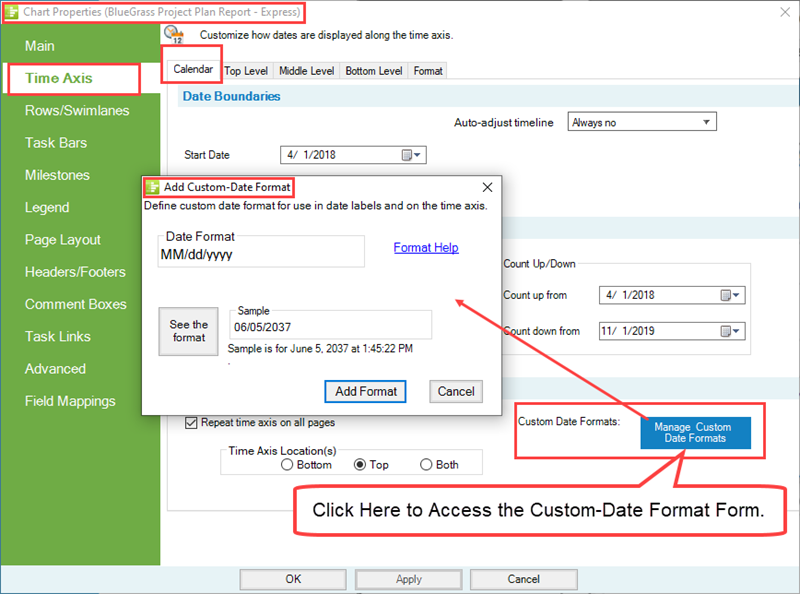
This form allows you to add Custom Date Formats by typing in the desired format in the Date Format window shown in the form above.
After typing in the new Date Format into the window provided and clicking the Add Format button as shown here the software provides an example of the Custom Date Format in the Sample window after you click the See the format button:
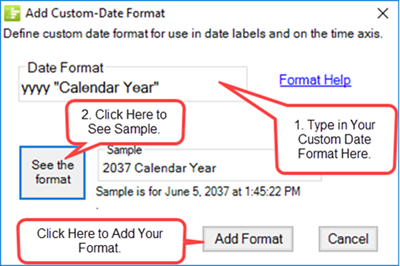
In the form above, there is a link to the OnePager website where all the syntax information needed to create your own Custom Date Formats can be found: [Format Help]
When you click the Add Format button, OnePager accesses the Manage Custom Date Formats form that includes your new Custom Date Format in the Date Format List as shown here:
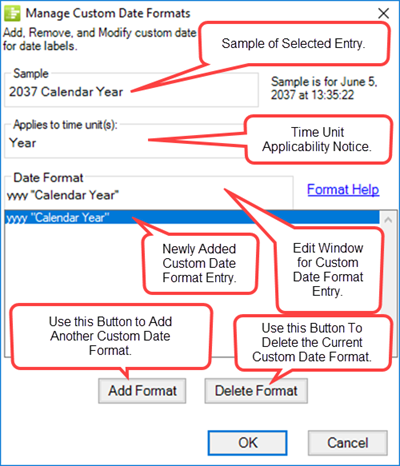
The form above is multi-purpose in that it provides a Sample of the selected Custom Date Format in the Date Format window, provides a list of Custom Date Formats that can be selected for further editing or deleting, and tells you where the applicable time unit the Custom Date Format is going to be applied in the Applies to time unit(s): window. Additionally, there is another convenient link to the OnePager website page providing instructions on the syntax instructions for Custom Date Formats: [Format Help]
From the above form you can choose to create another Custom Date Format by clicking the Add Format button or delete the selected Custom Date Format in the list by clicking the Delete Format button. When you are finished, click the OK button to return to the Chart Properties form Time Axis tab’s Calendar sub-tab. Creating your own Custom Date Formats can be useful when you want the text displayed in various Time Axis and Floating Time Axis Levels for specific meaning beyond what OnePager provides.
For more information on the Chart Properties form, please see the article at: Time Axis Tab for OnePager Express
Using the Template Properties Form to Create and Edit Custom Date Formats
The Template form Time Axis tab’s Calendar sub-tab is identical to the corresponding sub-tab in the Chart Properties form. The processes for creating, editing, and managing Custom Date Formats in the Template form are identical to the processes used in the Chart Properties form. Custom Date Formats created in the Chart Properties form can be made into Template forms by saving the Chart Properties form as a Template form.
For more information on Making a Template Properties Form from a Chart, please see this section in the article at: Managing the Current Template - Making a Template Properties Form from a Chart
Custom Date Formats created in a Template Properties form can be edited in the Template Properties form, saved, and used in the creation of future charts. Custom Date Formats created in a Chart Properties form can also be edited in the Chart Properties form and saved for future use in subsequent snapshots. However, edits made in the Chart Properties form to Custom Date Formats do not change the Custom Date Formats residing in the basic Template form used to create the initial chart.
For more information on the Template Properties form's Time Axis tab, please see this section in the article at Template Only Features-OnePager Express – Template Properties Form's Time Axis Tab
Using the Label Format Dropdown to Create Custom Date Formats
Custom Date Formats can also be created using the Label format dropdown found in each of the three (3) Chart Properties form Time Axis tab Level sub-tabs (Top Level, Middle Level, or Bottom Level) shown below:
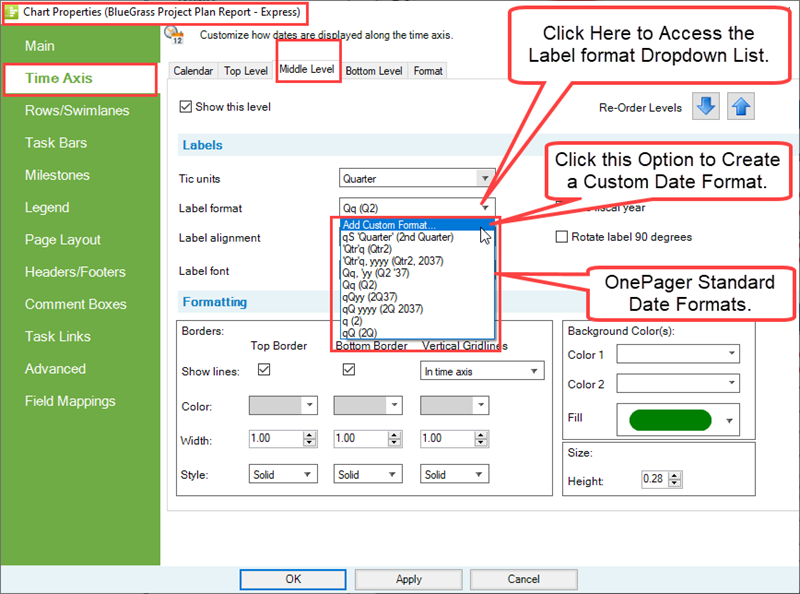
Clicking the Add Custom Format… selection in the dropdown accesses the Add Custom-Date Format form referenced above. With the Add Custom-Date Format form accessed you can create a new Custom Date Format that becomes immediately available when the Add Format button on the Add Custom-Date Format form is clicked. After the Custom Date Format is entered into the Add Custom-Date Format form it is immediately available in all Label format dropdown menus.
For more information on Labeling Time Axis Levels, please see the article at: Labeling Time Axis Levels for OnePager Express
Creating and Managing Custom Date Formats
In previous versions, OnePager date formats were the only formats available. While the date formats provided mirror those provided for similar features in other applications, you were limited to a finite set. OnePager provides the capability to create your own Custom Date Formats from the Year down to the Second with some miscellaneous options also provided. You can create and manage your own Custom Date Formats by first clicking the Manage Custom Date Formats button on the Template Properties or Chart Properties form’s Time Axis tab at the Calendar sub-tab as shown here:

Clicking the button shown above accesses the Add Custom-Date Format form where you can construct your Custom Date Format by typing it in the window indicated below.
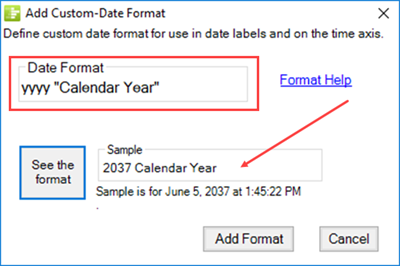
The above form displays a sample of your Custom Date Format after you’ve created it and clicked the See the format button shown above.
A Hyperlink is provided in the form as Format Help [Format Help] that takes you to the OnePager website page where all the syntax information and examples for creating a Custom Date Format are provided.
When you’ve finished creating your Custom Date Format, click the Add Format button and your Custom Date Format is displayed in the Manage Custom Date Formats form which is accessed and shown below. If more than one Custom Date Format is created, this form displays them all and makes them available for future editing.
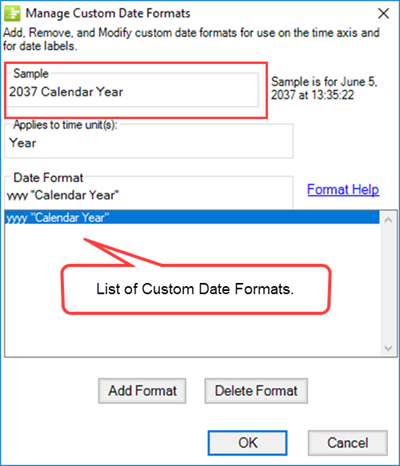
An example helps illustrate the process. Suppose you want to create a Custom Date Format that displays the year followed by the text “Calendar Year”.
Custom Date Format - An Example
Access the Add Custom-Date Format form as described above and type your desired Custom Date Format into the Date Format window as shown below:
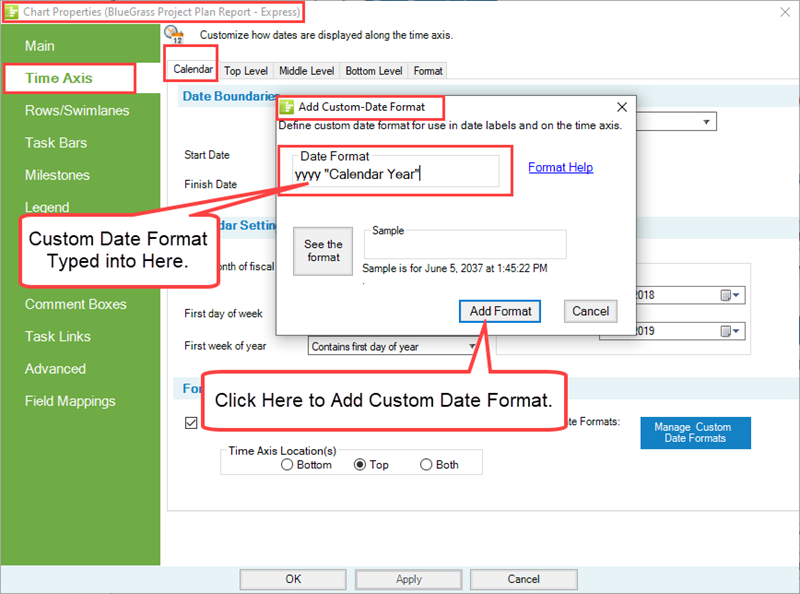
The Custom Date Format consists of a “code” for the type of date format and can be followed by text enclosed in either single or double quotes. The example above shows a four digit code for years expressed as yyyy. This is followed by the double quote enclosed text – Calendar Year. Text and date codes can be interchanged. Codes for the various date formats supported are fairly intuitive. For instance the code for day is a d.
When you finish adding your Custom Date Format, click the Add Format button on the Add Custom-Date Format form which accesses the Manage Custom Date Format form with your Custom Date Format added as shown here:
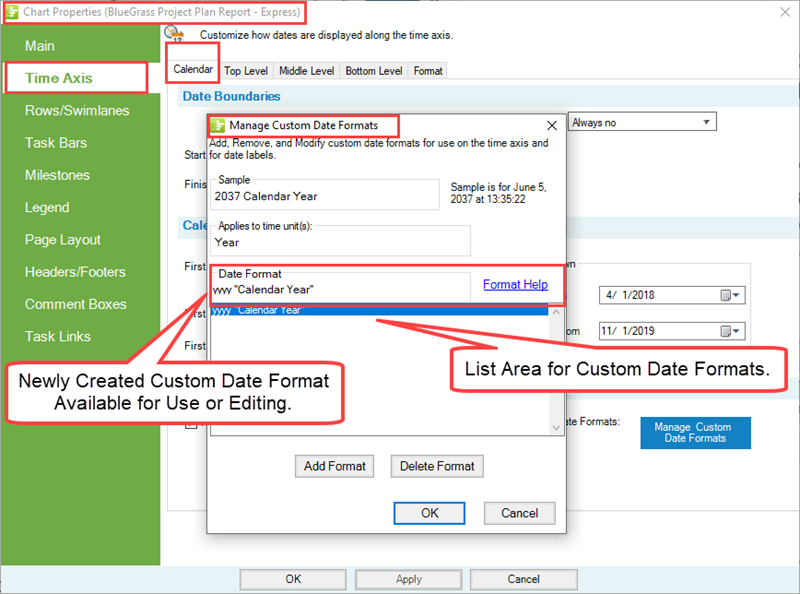
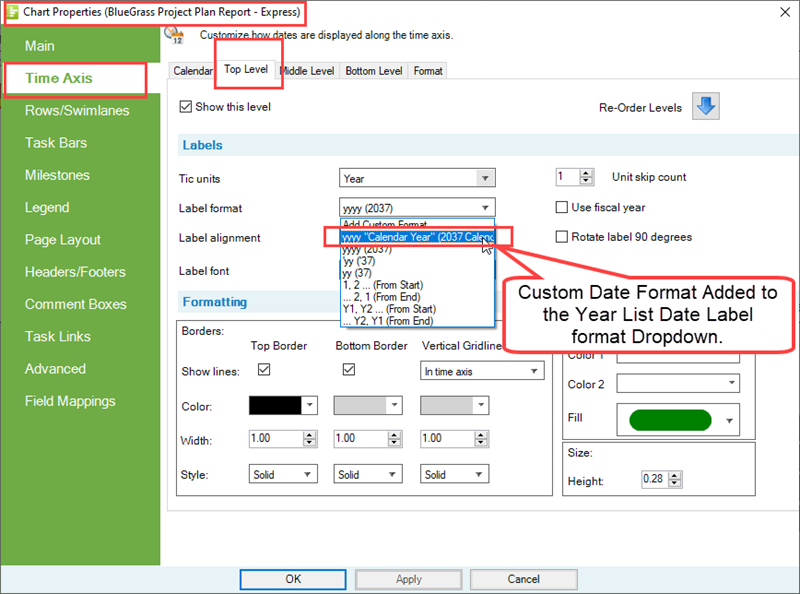
The process is completed at this point by clicking the OK button on the Manage Custom Date Formats form or you can go back to the Add Custom-Date Format form by clicking the Add Format button to create another Custom Date Format. You have the option in the Manage Custom Date Formats form to edit any Custom Date Format listed by selecting it and editing it in the Date Format window. You can also delete any selected Custom Date Format from the list by selecting it and click the Delete Format button. When you’ve finished and either clicked the Apply or OK button on the Chart Properties form, OnePager adds your Custom Date Format, in this case a Year, to the list of Date formats already predefined by OnePager.
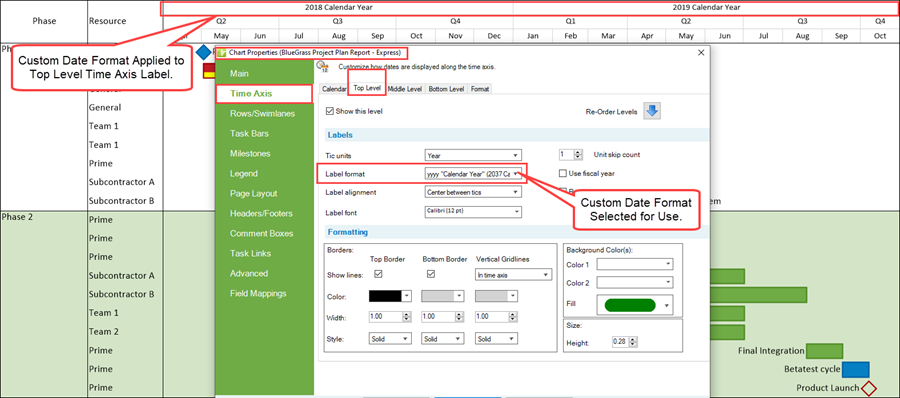
The added Custom Date Format can be seen in the dropdown list example shown below:
When you click Apply or OK in the Chart Properties form, the Top Level Time Axis looks like this:
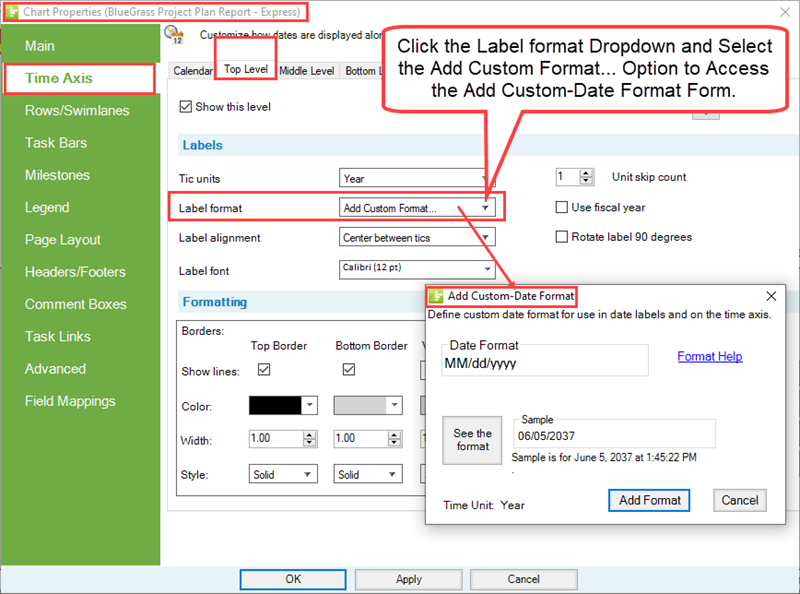
You can also access the Add Custom-Date Format from the first entry in the Label format dropdown as shown below:
Custom Date Formats added in the Chart Properties form are retained as long as the charts associated with the Chart Properties are available. The Custom Date Format can be used in any snapshot associated with the chart and the Chart Properties form. The Custom Date Format available in such a chart can be edited through the Chart Properties, as shown earlier, and used, as modified, in all snapshots. Custom Date Formats added to a Template form are available for all charts created with that Template form. Custom Date Formats included in a Chart Properties form are retained in a Template Properties form created from that Chart Properties form as explained above.
Custom Date Format Syntax
As shown in the examples above the syntax for a Custom Date Format is a combination of English letters as codes with options for you to add text enclosed in either single or double quotes. There are also some special characters such as single and double colons, single and double forward slashes, hyphens, and commas used as separators. The timespans available range from seconds on up to years with intermediate periods such as days, weeks, months, and quarters.
Please use this link for a full list of all available codes and special characters available for defining Custom Date Formats: [Format Help]
Related Links
Labeling Time Axis Levels for OnePager Express
Editing Time Axes with the Chart Properties Form for OnePager Express
Template Only Features-OnePager Express
Time Axis Tab for OnePager Express
Help Page for Adding Custom Date Formats: [Format Help]
(22.5.2-70)