Adding a Snapshot - OnePager Pro
During the course of a project, work is accomplished, new tasks start, completed tasks are finished, and, from time to time, dates are adjusted. These occurrences are usually picked up as part of a regular reporting process for the project. When updated, the Microsoft Project plan becomes an important source for reporting updated schedule information.
OnePager uses the updated Microsoft Project plan to ADD snapshots to help manage the project.
The scenario for accomplishing this periodic process is shown below:
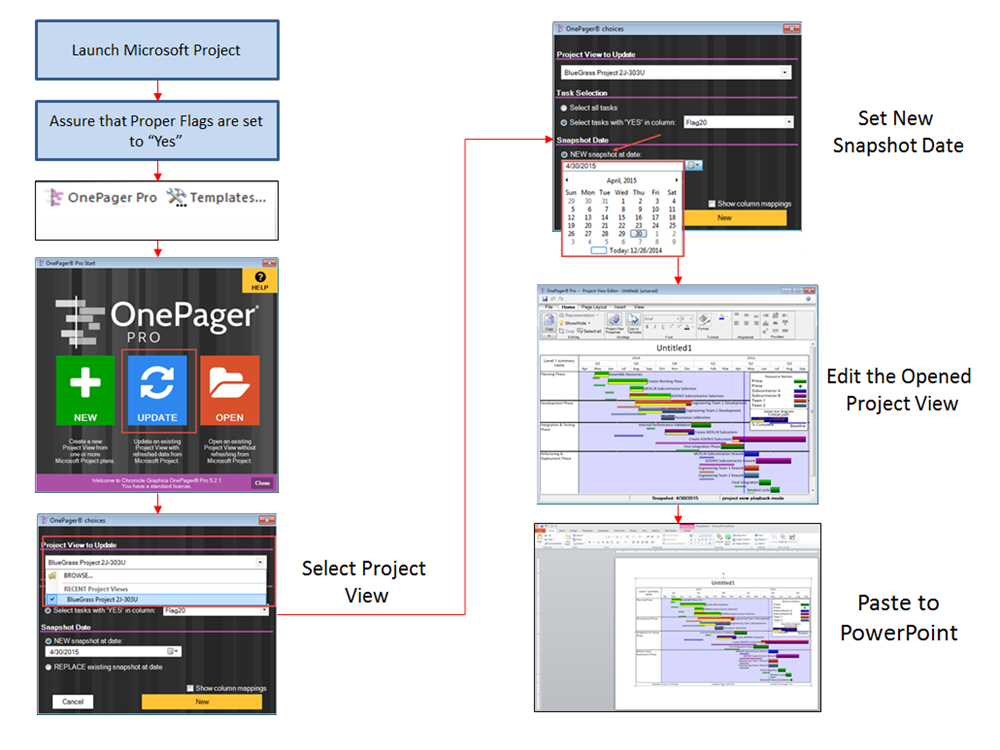
1) Launch Microsoft Project and bring up a Microsoft Project plan containing updated information.
2) Launch OnePager and select the “UPDATE” button on the “OnePager Pro Start” form as shown below:
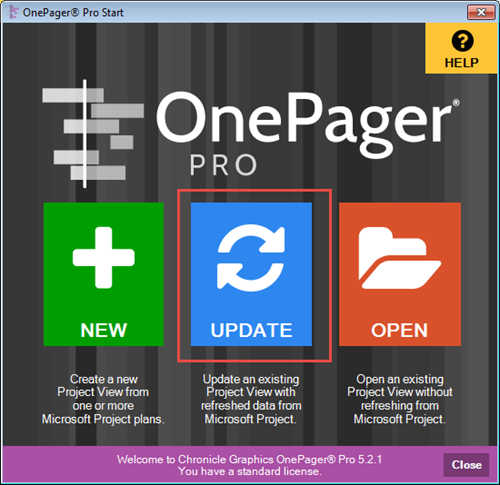
- a) Clicking the “UPDATE” button will bring up the “OnePager choices” form where you can select the project view for this update operation as shown below:
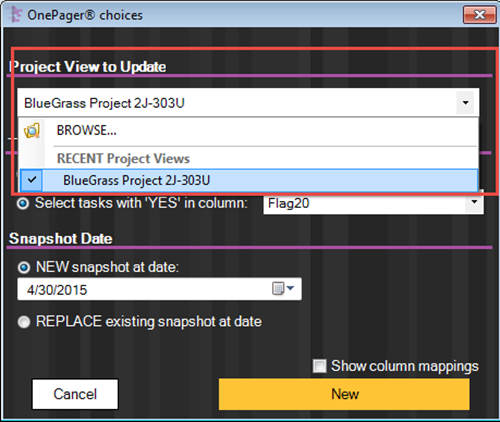
- b) Select the “NEW snapshot at date:” radio button and use the calendar drop-down list to select the date for this snapshot as shown here:
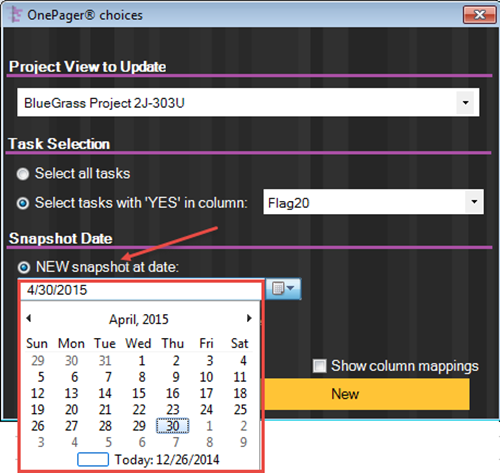
- c) Then, click “Next>” or “New” depending on whether the “Show column mapping” box is checked. OnePager will import the data from the Microsoft Project plan under the control of the Flag/Number field and produce a new snapshot in the project view at the date selected.
3) Once the updated project view is open, you may edit, save, and copy the project view to a PowerPoint slide or elsewhere as described previously.
4) When you save the project view, the newly-created snapshot is stored in the project view’s TAM file along with all its other snapshots. A project view may contain as many snapshots as you like.
5) As an alternative, some project update methodologies use updated file names for a series of Microsoft Project plans. For example, you may name a project “Project-A-5-1-2015” to represent the project status on 5/1/2015. In the next month, you will update this Microsoft Project plan with changes occurring during May 2015 and save the Microsoft Project plan with a file name of “Project-A-6-1-2015.”
6) To create a snapshot for the project view named “Project-A” simply launch Microsoft Project and load “Project-A-6-1-2015.” Launch OnePager from Microsoft Project and select the “UPDATE” button on the “OnePager Pro Start” form that appears.
- a) This brings up the “OnePager choice” form in “UPDATE” mode. Use the drop-down window in the “Project View to Update” group to select project view “Project-A.”
- b) Then select the “NEW snapshot at date:” radio button. Use the drop-down calendar list to set the date for the snapshot and proceed to create the snapshot.
- c) OnePager will create the new snapshot for the selected date and store it in the “Project-A” project view.
7) Some care needs to be taken to make sure that the update uses the correct flag setting. The project view is designed to remember which flag setting it is using, so the updates will be consistent unless you accidentally change the flag setting. When there are multiple Flag/Number fields in a Microsoft Project plan from which OnePager imports data, it’s a good idea to glance at the flag setting before hitting the large “New” button.
(7.7)