Difference between revisions of "Managing the Current Template for OnePager Live"
m (Text replacement - ".png]]" to ".png|link=]]") |
|||
| Line 30: | Line 30: | ||
3) Click the '''File''' button on the '''Template Properties''' form's tool bar and click the '''Open…''' command. The result is shown below: | 3) Click the '''File''' button on the '''Template Properties''' form's tool bar and click the '''Open…''' command. The result is shown below: | ||
| − | <center>[[File:P60-24_6_1-60-(1)-02242017.png]]</center> | + | <center>[[File:P60-24_6_1-60-(1)-02242017.png|link=]]</center> |
<!--<center>P60-24_6_1-60-(1)-02242017.png</center>--> | <!--<center>P60-24_6_1-60-(1)-02242017.png</center>--> | ||
| Line 37: | Line 37: | ||
5) To see your available '''Templates''', click the '''BROWSE…''' option to reveal the Microsoft Windows Explorer window showing your available '''Templates''' in their folder: | 5) To see your available '''Templates''', click the '''BROWSE…''' option to reveal the Microsoft Windows Explorer window showing your available '''Templates''' in their folder: | ||
| − | <center>[[File:P52-24_6-(2)-06052015.png]]</center> | + | <center>[[File:P52-24_6-(2)-06052015.png|link=]]</center> |
6) Select the '''Template''' you need and then click the '''Open''' button. This will establish the selected '''Template''' as the '''current Template'''. Any new project views created from this point on will use this selected '''Template'''. | 6) Select the '''Template''' you need and then click the '''Open''' button. This will establish the selected '''Template''' as the '''current Template'''. Any new project views created from this point on will use this selected '''Template'''. | ||
| Line 45: | Line 45: | ||
7) As discussed in the sub-section above, after you have located the desired '''Template''' and have the '''Template''' form displayed on the screen, just click the '''Use''' button to close the form. | 7) As discussed in the sub-section above, after you have located the desired '''Template''' and have the '''Template''' form displayed on the screen, just click the '''Use''' button to close the form. | ||
| − | <center>[[File:P60-24_6_1-60-(3)-02242017.png]]</center> | + | <center>[[File:P60-24_6_1-60-(3)-02242017.png|link=]]</center> |
<!--<center>P60-24_6_1-60-(3)-02242017.png</center>--> | <!--<center>P60-24_6_1-60-(3)-02242017.png</center>--> | ||
8) Or, if you have edited the '''Template''' or created a new '''Template,''' click the '''Save and use''' button. | 8) Or, if you have edited the '''Template''' or created a new '''Template,''' click the '''Save and use''' button. | ||
| − | <center>[[File:P60-24_6_1-60-(4)-02242017.png]]</center> | + | <center>[[File:P60-24_6_1-60-(4)-02242017.png|link=]]</center> |
<!--<center>P60-24_6_1-60-(4)-02242017.png</center>--> | <!--<center>P60-24_6_1-60-(4)-02242017.png</center>--> | ||
| Line 59: | Line 59: | ||
:a) To create a new '''Template''', launch the '''Template Properties''' form with the '''Template…''' button on the Microsoft Project or Excel tool bar. When the '''Template Properties''' form appears, select the '''File''' command and the click '''New…''' option as shown here: | :a) To create a new '''Template''', launch the '''Template Properties''' form with the '''Template…''' button on the Microsoft Project or Excel tool bar. When the '''Template Properties''' form appears, select the '''File''' command and the click '''New…''' option as shown here: | ||
| − | <center>[[File:P60-24_6_1-60-(5)-02242017.png]]</center> | + | <center>[[File:P60-24_6_1-60-(5)-02242017.png|link=]]</center> |
<!--<center>P60-24_6_1-60-(5)-02242017.png</center>--> | <!--<center>P60-24_6_1-60-(5)-02242017.png</center>--> | ||
| Line 68: | Line 68: | ||
:d) To do this, again, click the '''File''' button on the '''Template Properties''' form's tool bar and then click either the '''Save''' or the '''Save As…''' options as shown below: | :d) To do this, again, click the '''File''' button on the '''Template Properties''' form's tool bar and then click either the '''Save''' or the '''Save As…''' options as shown below: | ||
| − | <center>[[File:P60-24_6_1-60-(6)-02242017.png]]</center> | + | <center>[[File:P60-24_6_1-60-(6)-02242017.png|link=]]</center> |
<!--<center>P60-24_6_1-60-(6)-02242017.png</center>--> | <!--<center>P60-24_6_1-60-(6)-02242017.png</center>--> | ||
| Line 77: | Line 77: | ||
:g) To save the new or modified '''Template''' with your own file name, click the '''Save As…''' option in the '''File''' dropdown. The Microsoft Windows '''Save''' form will appear and you can choose the file name and save the '''template''' as shown below: | :g) To save the new or modified '''Template''' with your own file name, click the '''Save As…''' option in the '''File''' dropdown. The Microsoft Windows '''Save''' form will appear and you can choose the file name and save the '''template''' as shown below: | ||
| − | <center>[[File:P52-24_6-(7)-06052015.png]]</center> | + | <center>[[File:P52-24_6-(7)-06052015.png|link=]]</center> |
==Making a Template from a Project View== | ==Making a Template from a Project View== | ||
| Line 85: | Line 85: | ||
:a) Open the project view of interest and click the '''Copy to Template''' button on the '''Home''' tab as shown below: | :a) Open the project view of interest and click the '''Copy to Template''' button on the '''Home''' tab as shown below: | ||
| − | <center>[[File:P60-24_6_1-60-(6A)-02242017.png]]</center> | + | <center>[[File:P60-24_6_1-60-(6A)-02242017.png|link=]]</center> |
<!--<center>P60-24_6_1-60-(6A)-02242017.png</center>--> | <!--<center>P60-24_6_1-60-(6A)-02242017.png</center>--> | ||
:b) Clicking the '''Copy to Template''' button will bring up Microsoft Windows Explorer and the folder location where '''Templates''' are stored as shown below: | :b) Clicking the '''Copy to Template''' button will bring up Microsoft Windows Explorer and the folder location where '''Templates''' are stored as shown below: | ||
| − | <center>[[File:P52-24_6-(9)-06052015.png]]</center> | + | <center>[[File:P52-24_6-(9)-06052015.png|link=]]</center> |
:c) You can change the folder location for the new '''Template''' and change the file name as desired. Click the '''Save''' button when editing is completed. | :c) You can change the folder location for the new '''Template''' and change the file name as desired. Click the '''Save''' button when editing is completed. | ||
| Line 108: | Line 108: | ||
:d) When you’ve changed the name to the desire '''Template''' file, click anywhere or close the Microsoft Windows Explorer window. | :d) When you’ve changed the name to the desire '''Template''' file, click anywhere or close the Microsoft Windows Explorer window. | ||
| − | <center>[[File:P52-24_6-(10)-06052015.png]]</center> | + | <center>[[File:P52-24_6-(10)-06052015.png|link=]]</center> |
==Deleting a Template== | ==Deleting a Template== | ||
| Line 118: | Line 118: | ||
:b) Then, select the '''Delete''' command in the dropdown and the file will be deleted as shown below: | :b) Then, select the '''Delete''' command in the dropdown and the file will be deleted as shown below: | ||
| − | <center>[[File:P52-24_6-(11)-06052015.png]]</center> | + | <center>[[File:P52-24_6-(11)-06052015.png|link=]]</center> |
==Find Included Images in Templates== | ==Find Included Images in Templates== | ||
| Line 124: | Line 124: | ||
14) For management of images associated with a '''Template''', click the '''Template Properties''' tool bar’s '''Edit''' button and the following menu is shown: | 14) For management of images associated with a '''Template''', click the '''Template Properties''' tool bar’s '''Edit''' button and the following menu is shown: | ||
| − | <center>[[File:P60-24_6_1-60-(12)-02242017.png]]</center> | + | <center>[[File:P60-24_6_1-60-(12)-02242017.png|link=]]</center> |
<!--<center>P60-24_6_1-60-(12)-02242017.png</center>--> | <!--<center>P60-24_6_1-60-(12)-02242017.png</center>--> | ||
| Line 131: | Line 131: | ||
16) If there are no images associated with the '''Template,''' an information message appears as shown below: | 16) If there are no images associated with the '''Template,''' an information message appears as shown below: | ||
| − | <center>[[File:P52-24_6-(13)-06052015.png]]</center> | + | <center>[[File:P52-24_6-(13)-06052015.png|link=]]</center> |
17) For more information on managing images in '''Templates''' please see the article in this series: [[Background Images for Version 6.0 (Portal) | Background Images (Portal)]] 20.0.1-60 | 17) For more information on managing images in '''Templates''' please see the article in this series: [[Background Images for Version 6.0 (Portal) | Background Images (Portal)]] 20.0.1-60 | ||
| Line 147: | Line 147: | ||
:d) To do this click the '''Templates…''' button which brings up the '''Template Properties''' form and go to the '''Edit''' button and click the '''Images…''' command as shown here: | :d) To do this click the '''Templates…''' button which brings up the '''Template Properties''' form and go to the '''Edit''' button and click the '''Images…''' command as shown here: | ||
| − | <center>[[File:P60-24_6_1-60-(12)-02242017.png]]</center> | + | <center>[[File:P60-24_6_1-60-(12)-02242017.png|link=]]</center> |
<!--<center>P60-24_6_1-60-(12)-02242017.png</center>--> | <!--<center>P60-24_6_1-60-(12)-02242017.png</center>--> | ||
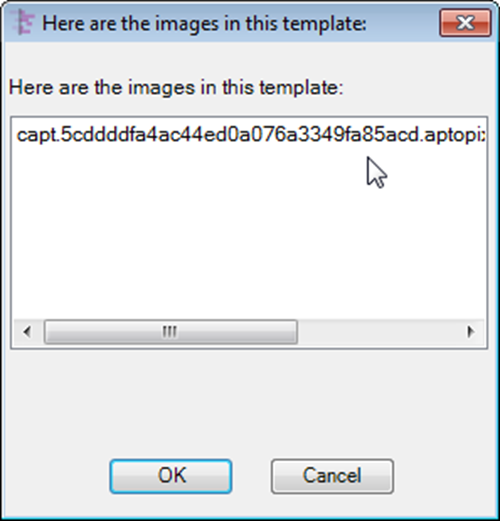
:e) When you click '''Images...''' command, you will see a report of which images are in your '''Template''': | :e) When you click '''Images...''' command, you will see a report of which images are in your '''Template''': | ||
| − | <center>[[File:P52-24_6-(15)-06052015.png]]</center> | + | <center>[[File:P52-24_6-(15)-06052015.png|link=]]</center> |
19) You can view these images at any time using the '''Template''' to make a new project view. | 19) You can view these images at any time using the '''Template''' to make a new project view. | ||
Latest revision as of 13:25, 11 June 2024
Contents
- 1 About Managing the Current Template
- 2 Finding Available Templates and Changing the Current Template
- 3 Using the Selected Template
- 4 Creating a New Template and Saving the Template for Later Use
- 5 Making a Template from a Project View
- 6 Renaming a Template
- 7 Deleting a Template
- 8 Find Included Images in Templates
- 9 Including Logos in a Template
- 10 Related Links
About Managing the Current Template
24.6.1-OPL2 7/12/2017
Since OnePager is distributed with several Templates to choose from, you need to know how to:
- Find the available Templates,
- Use a selected Template,
- Create a new Template and save the Template created or changed in your Template folder,
- Make a Template from a project view,
- Rename a Template file,
- Delete an unneeded Template,
- Find included images in Templates,
- And include logos in Templates.
We’ll discuss on each of these topics in this article.
Finding Available Templates and Changing the Current Template
OnePager is distributed with a fairly comprehensive set of Templates.
By default, the out of the box Template is the Single Project Gantt View – Detailed template. Templates are stored in separate folders.
In addition, OnePager separates the Templates into those that use English units (inches), those that use Metric units (centimeters), and Legacy Templates (created prior to the version 5.0 release).
1) To locate your available Templates, launch the Template Properties form by clicking the Templates… button on the Microsoft Project or Excel tool bar.
2) Alternatively, when using the OnePager Desktop application, launch the application and go to the File tab on the ribbon and locate the Template button on the Options tab. Clicking the Template button will bring up the Template Propertiesform as shown below.
3) Click the File button on the Template Properties form's tool bar and click the Open… command. The result is shown below:
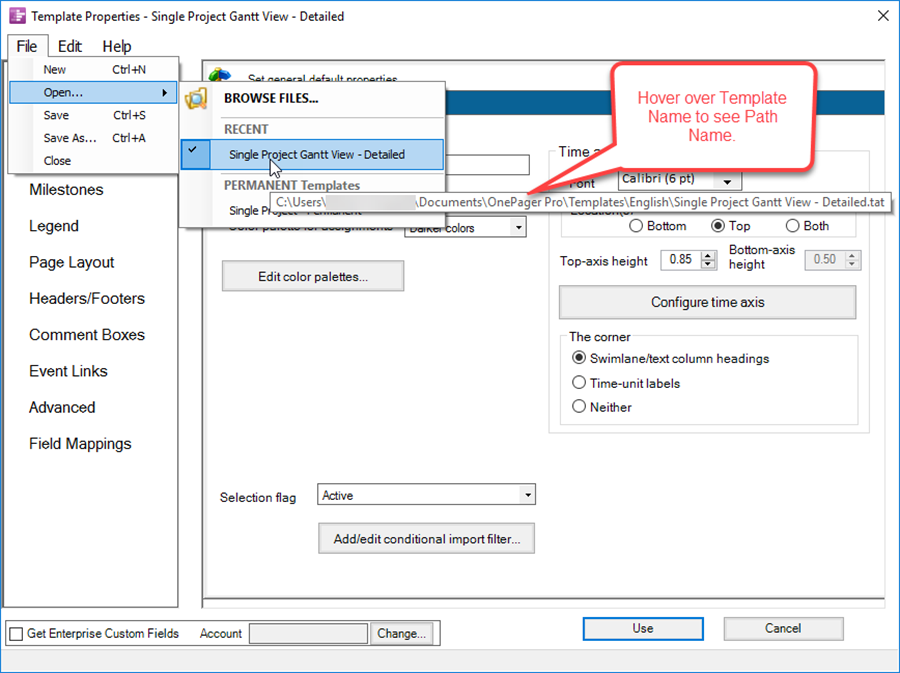
4) Hovering over a RECENT Template project view file name will reveal the path name to the associated Template being used by that project view file name.
5) To see your available Templates, click the BROWSE… option to reveal the Microsoft Windows Explorer window showing your available Templates in their folder:
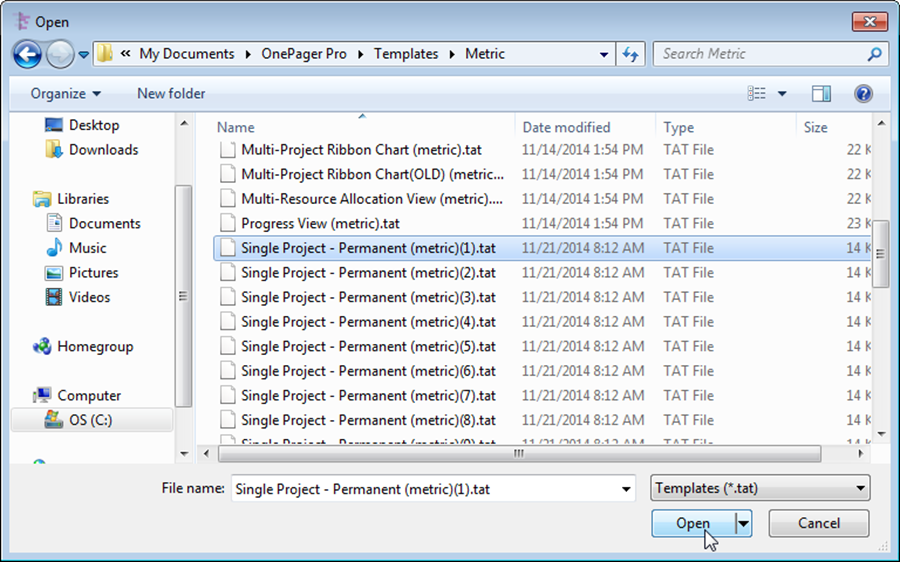
6) Select the Template you need and then click the Open button. This will establish the selected Template as the current Template. Any new project views created from this point on will use this selected Template.
Using the Selected Template
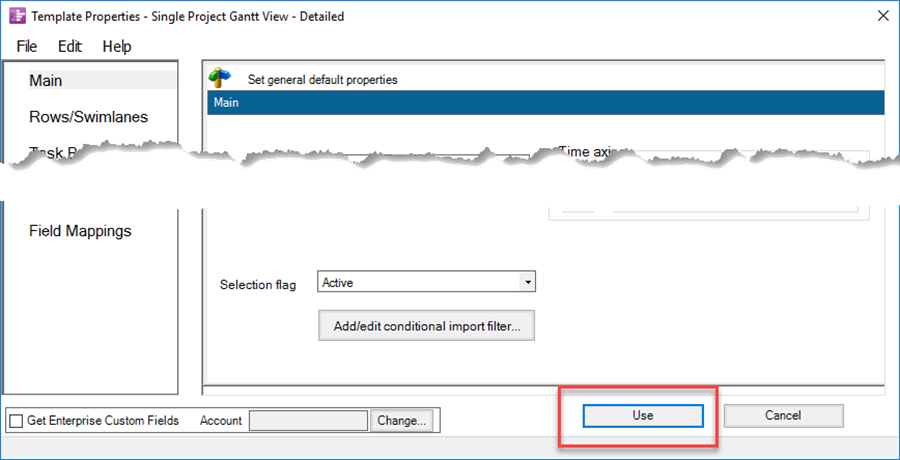
7) As discussed in the sub-section above, after you have located the desired Template and have the Template form displayed on the screen, just click the Use button to close the form.
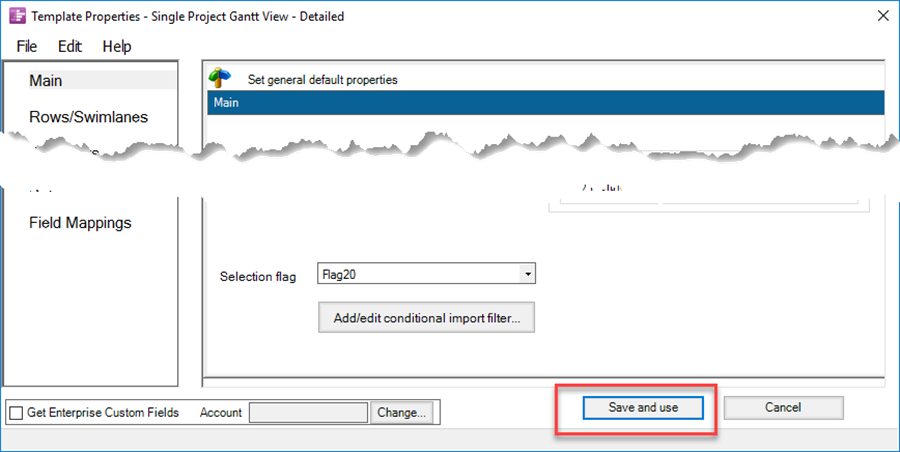
8) Or, if you have edited the Template or created a new Template, click the Save and use button.
Creating a New Template and Saving the Template for Later Use
9) You can create a new Template so that you can make the project view settings you need to support your presentations or to establish as standard in your organization. Follow the steps described below:
- a) To create a new Template, launch the Template Properties form with the Template… button on the Microsoft Project or Excel tool bar. When the Template Properties form appears, select the File command and the click New… option as shown here:
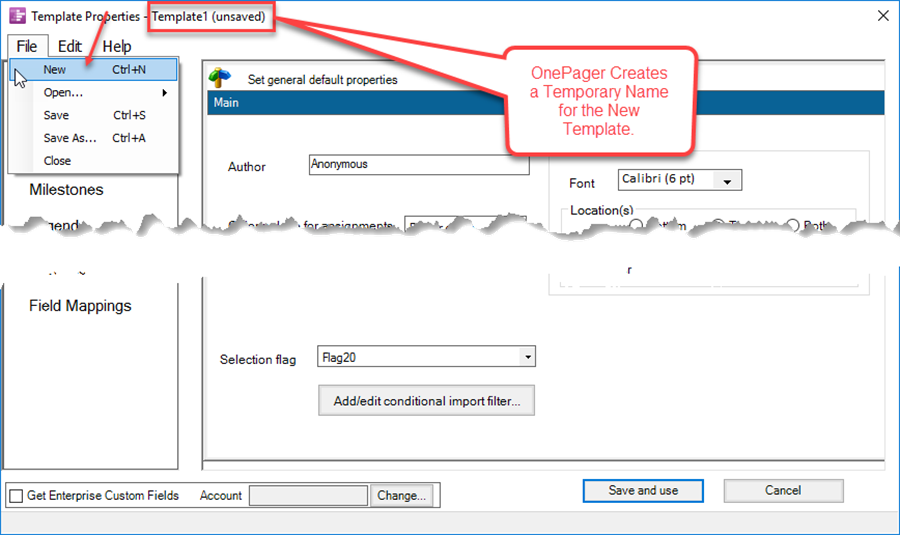
- b) As shown above, clicking the New... command in the File dropdown will cause OnePager to create a temporary Template name and show that the Template is (unsaved). At this point go ahead and make your changes to the settings on one or more of the Template's tabs.
- c) When you are finished with your changes, you need to save your new Template and give it a file name appropriate to the project or organization.
- d) To do this, again, click the File button on the Template Properties form's tool bar and then click either the Save or the Save As… options as shown below:
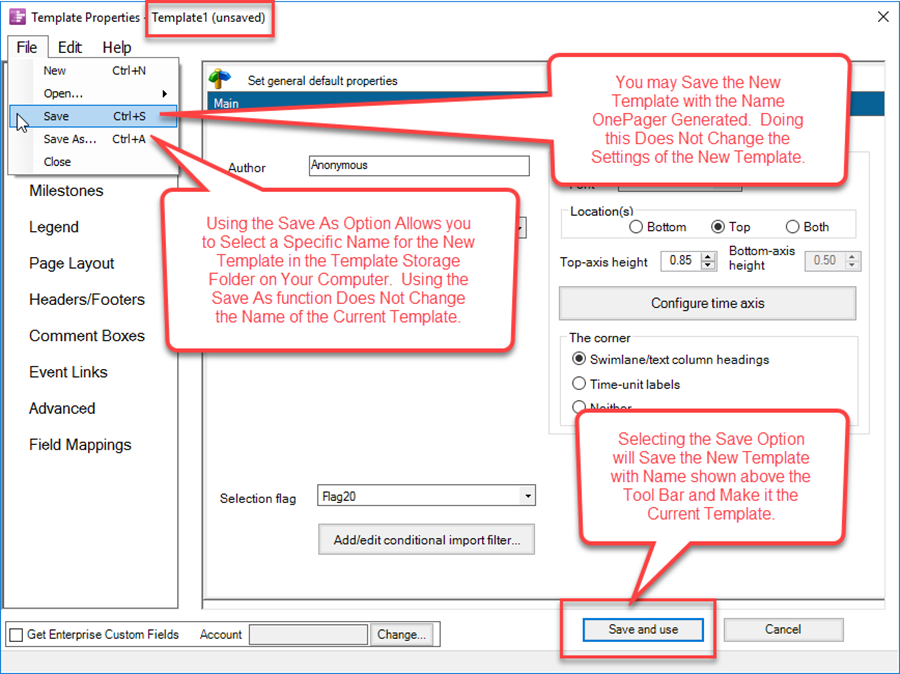
- e) You can save the Template you’ve just created or modified either with the OnePager generated name or with a name of your choosing.
- f) You can also save the Template just created or changed with the OnePager generated name and make it the Current Template by clicking the Save and use button at the bottom of the Template Properties form.
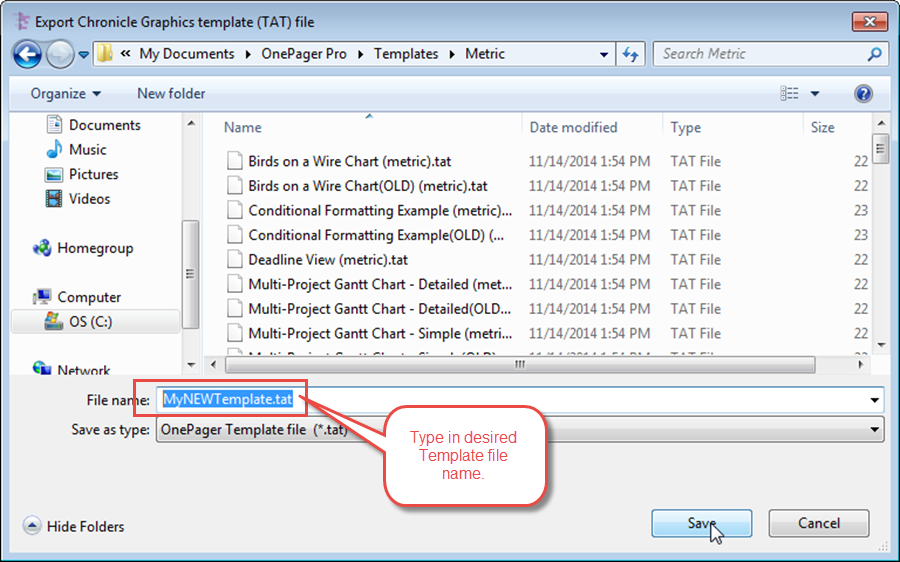
- g) To save the new or modified Template with your own file name, click the Save As… option in the File dropdown. The Microsoft Windows Save form will appear and you can choose the file name and save the template as shown below:
Making a Template from a Project View
10) Once you create an effective project view, you might like to use those same settings to make a new project view for a different set of data from different Microsoft Project or Excel source plans. Or you can let some other person emulate the project view’s look and feel as a new standard. To accomplish this follow the steps below:
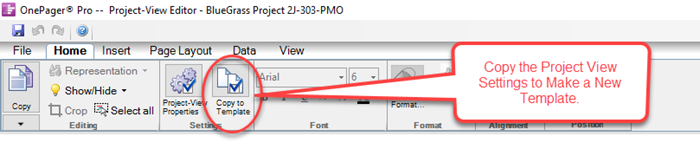
- a) Open the project view of interest and click the Copy to Template button on the Home tab as shown below:
- b) Clicking the Copy to Template button will bring up Microsoft Windows Explorer and the folder location where Templates are stored as shown below:

- c) You can change the folder location for the new Template and change the file name as desired. Click the Save button when editing is completed.
11) You can now use this new Template to repeat the look and feel of the project view you copied to a Template with different data from other Microsoft Project or Excel source plans. You can also share this Template with other OnePager users by sending them the Template files (.TAT extension) in an email, or by copying your Template files to a shared location.
Renaming a Template
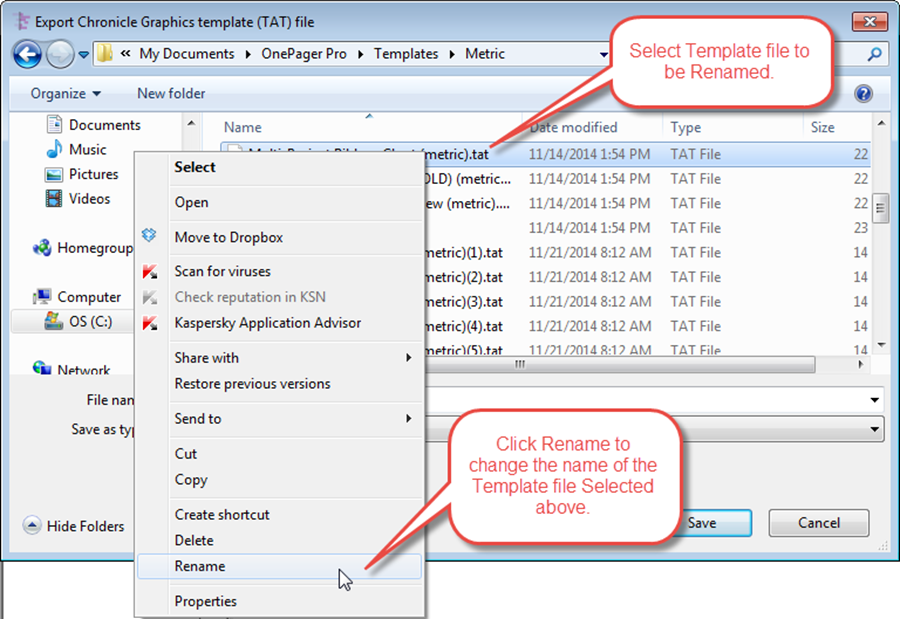
12) You can rename a Template file in the same way that you rename any file supported by Microsoft Windows. Please follow the steps below:
- a) Use Microsoft Windows Explorer to go to the location where your Template files are stored as shown below.
- b) Select the file that you want to change and right-click to reveal the dropdown menu as shown below.
- c) Click the Rename command which will highlight the selected Template file and allow you to make the name change in place.
- d) When you’ve changed the name to the desire Template file, click anywhere or close the Microsoft Windows Explorer window.
Deleting a Template
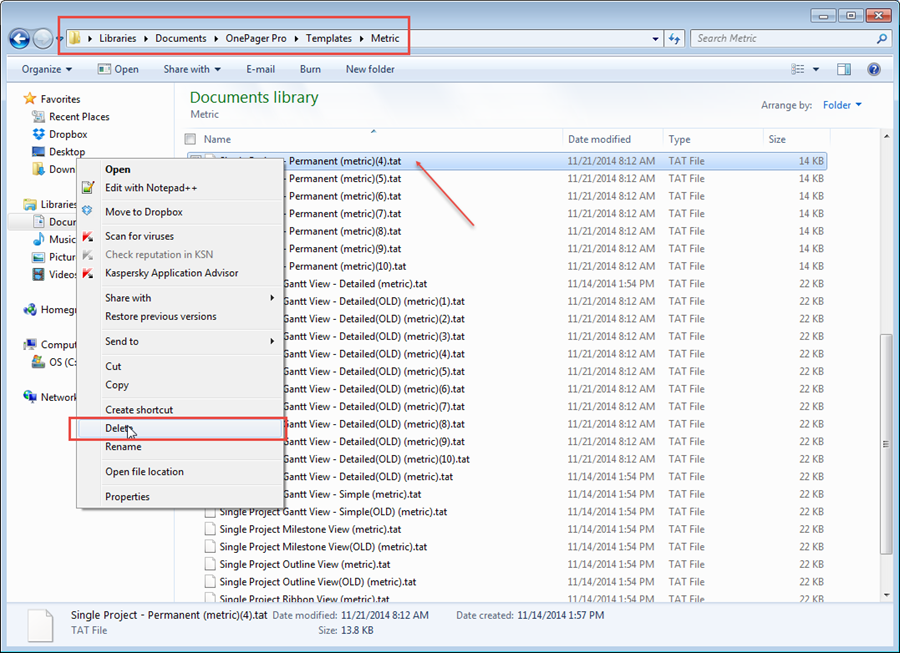
13) Deleting a Template file can be done in the same way that any other Microsoft Windows file is deleted.
a) Locate the Template file to be deleted in your file system and select the file to be deleted with a right-click.
- b) Then, select the Delete command in the dropdown and the file will be deleted as shown below:
Find Included Images in Templates
14) For management of images associated with a Template, click the Template Properties tool bar’s Edit button and the following menu is shown:
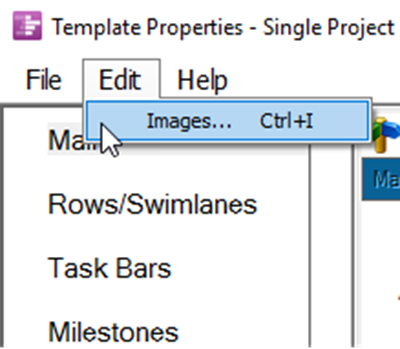
15) Clicking the Images... command gives you a list of images that are included in the current Template.
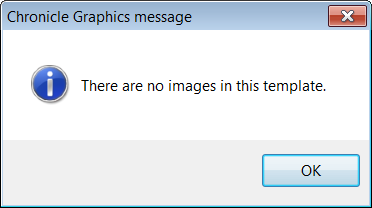
16) If there are no images associated with the Template, an information message appears as shown below:
17) For more information on managing images in Templates please see the article in this series: Background Images (Portal) 20.0.1-60
Including Logos in a Template
18) You may want to put standard images such as company logos into a Template so that you and others can build graphs that have standard company elements in them. To do this, follow the steps below:
- a) Put the logo and other images into a project view as described in this article: Inserting Background Images 20.1.1-60.
- b) Then turn that project view into a Template as described in the previous section.
- c) You can verify that the images are indeed part of the Template by examining its image content.
- d) To do this click the Templates… button which brings up the Template Properties form and go to the Edit button and click the Images… command as shown here:
- e) When you click Images... command, you will see a report of which images are in your Template:
19) You can view these images at any time using the Template to make a new project view.
20) To delete an image from the Template, select an image to be deleted from the images listed in the Here are the images in this template form shown above with the mouse (left-click) and press your keyboard’s Delete Key. This will permanently delete the image from the Template.
21) UNDO will not retrieve the image after the keyboard’s Delete Key is pressed.
Related Links
(24.6.1-OPL2)