Difference between revisions of "Adding a Row or Swimlane for OnePager Live"
From OnePager Documentation
(→Add Row Example) |
(→Add Swimlane Example) |
||
| Line 25: | Line 25: | ||
==Add Swimlane Example== | ==Add Swimlane Example== | ||
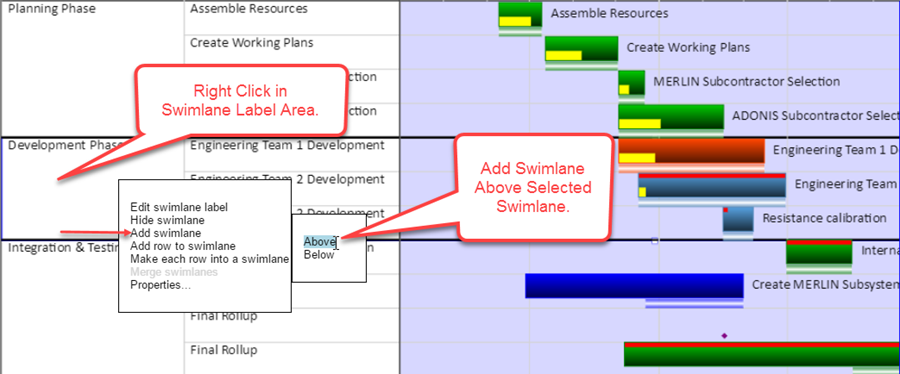
| − | 3) Right click in the | + | 3) Right click in the swimlane's label area where you want to add an additional swimlane. This action brings up the context menu shown below: |
| − | <center>[[File: | + | <center>[[File:LE-12_16_1-OPL-(2)-06202016.png]]</center> |
| − | 4 | + | 4) The '''Add Above''' and '''Add Below''' commands have the same effects as described above. |
| − | + | ||
| − | + | ||
(12.16.1-OPL) | (12.16.1-OPL) | ||
Revision as of 22:24, 20 June 2016
Overview
12.16.1-OPL Not Edited Beyond this Point.
OnePager enables you to manually add blank rows or swimlanes to the project view.
To add rows or swimlanes follow the steps below:
1) Right click the row or swimlane label.
Add Row Example
2) The following context menu will appear:

Add Above
- a) When the Add above command is selected, a blank row (or swimlane) will be added above the selected position.
Add Below
- b) When the Add below command is selected, a blank row (or swimlane) will be added below the selected position.
Add Swimlane Example
3) Right click in the swimlane's label area where you want to add an additional swimlane. This action brings up the context menu shown below:

4) The Add Above and Add Below commands have the same effects as described above.
(12.16.1-OPL)