Conditional Formatting Overview (OnePager Pro)
As an example of conditional formatting, suppose that you have tasks that you want to show as green if the value in “Text30” from your Microsoft Project plan contains the text “Low Risk”. Further, you want tasks to show as yellow if “Text30” for that task contains the text “Medium Risk” and you want the task to show as red if “Text30” contains the text “High Risk”. Above all, you want this to be represented in a series of snapshots automatically as YOU change the value of the Task’s “Text30” field in the Microsoft Project plan only. OnePager gives you the capability to define these rules and apply them consistently from snapshot to snapshot as the plan data changes. Additionally, you can subsequently change the rules as needed. Finally, you have the ability to copy a rule or rules to make rule definition an easier process.
Keeping it simple, let’s create a Microsoft Project plan with Tasks AA, BB, and CC each with a Start and Finish date, each with a flag field for OnePager import control, and a Text30 column for representing the risk assessment. That Microsoft Project plan might look like this:

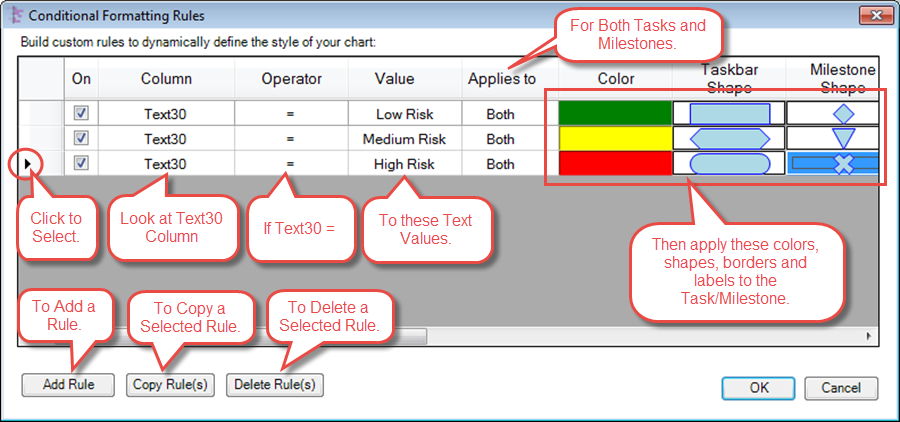
To set up the desired output and performance from OnePager, we need to enter our conditions for these tasks into the “Conditional Formatting Rules” engine. Access to the “Conditional Formatting Rules” engine prior to creation of a project view is through the “Task Bars” or “Milestones” tab of the “Template Properties” form.
When the “Conditional Formatting Rules” form is filled in as we’ve described it will look like this:

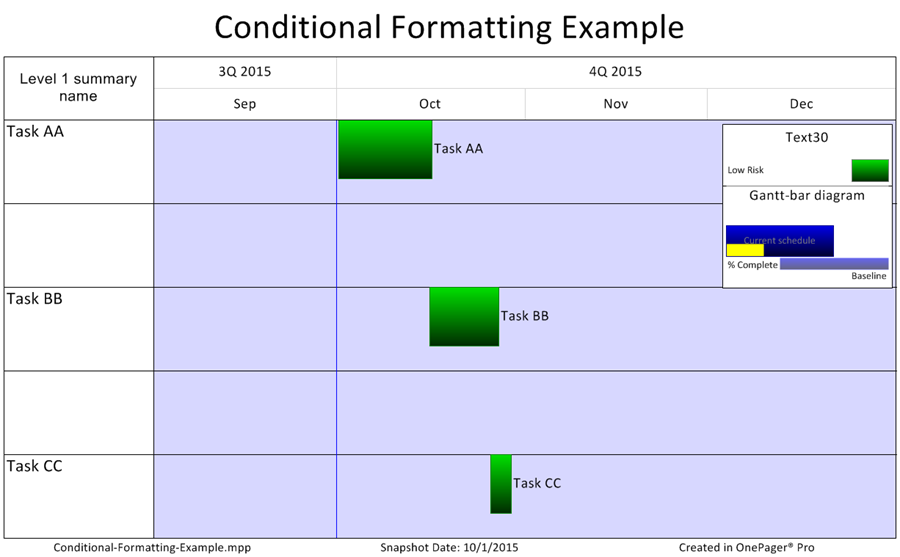
If we now create the project view, it will look like this for the first snapshot on 10/1/2015:

Since Tasks AA, BB, and CC have each of their “Text30” data cells set to “Low Risk” all tasks first snapshot are colored Green.
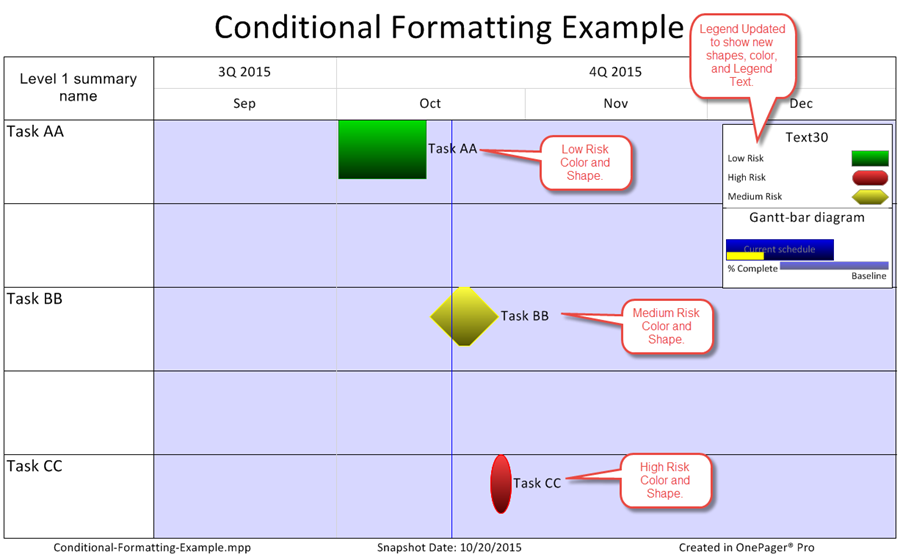
Now suppose we update our Microsoft Project plan on 10/20/2015 to show Task AA remaining “Low Risk” but Task BB now becoming “Medium Risk” so we update “Text30” accordingly. Further, let’s assume that now Task CC is now in a “High Risk” condition so we update its “Text30 accordingly. The Microsoft Project plan would look like this for the status on 10/20/2015:

With this updated Microsoft Project plan dated 10/20/2015 we can take a second snapshot that will look like this:

The update to the OnePager project view snapshot for 10/20/2015 was done automatically for you after you established the Conditional Formatting rules for this project. You only requirement was to maintain the appropriate “Risk Assessment” values in your Microsoft Project plan.
The above example illustrates the power of Conditional Formatting. Now let’s look at some of the details. However, before starting, it should be pointed out that Conditional Formatting is done on a “Global” basis. As with other global editing that is supported by OnePager, changes to Conditional Formatting rules are will have an impact on the project view and all snapshots previously created as well as snapshots created in the future. Accordingly, caution should be exercised should you want to preserve historical snapshots in their original form before changes are made to the Conditional Formatting rules.
(11.1)