Creating Project Views from Server Resident Project Plans - OnePager Pro for Version 5.3
Contents
- 1 Creating Project Views from Server Resident Project Plans - OnePager Pro for Version 5.3 (P53-8_5_1-01182015)
- 1.1 About Using Server Resident Project Plans
- 1.2 Getting Started
- 1.3 Logging-in to Your Project Server Account
- 1.4 Selecting a Project or Projects from Your Project Server Account
- 1.5 Using the Automatically Connect Button
- 1.6 Connecting to your Project Server Account Files
- 1.7 Creating the Project View
- 1.8 Updating the Project View from Project Server
- 1.9 Sharing Project Views Created from the Cloud
- 1.10 Related Links
Creating Project Views from Server Resident Project Plans - OnePager Pro for Version 5.3 (P53-8_5_1-01182015)
About Using Server Resident Project Plans
OnePager Pro Version 5.3 provides expanded cloud access capabilities by supporting access to Microsoft Project Server, Project Online, and SharePoint accounts.
OnePager Pro can connect to cloud-resident databases so that project views and snapshots can be created directly from these sources.
Additionally, OnePager Pro supports access to multiple accounts, searches of online databases for specific Gantt chart source files, and online security protocols. With this access, you are able to easily pull Microsoft Project source files down from the cloud and use the OnePager Pro desktop application to create project views.
See Pull Operation Feature for more information.
Getting Started
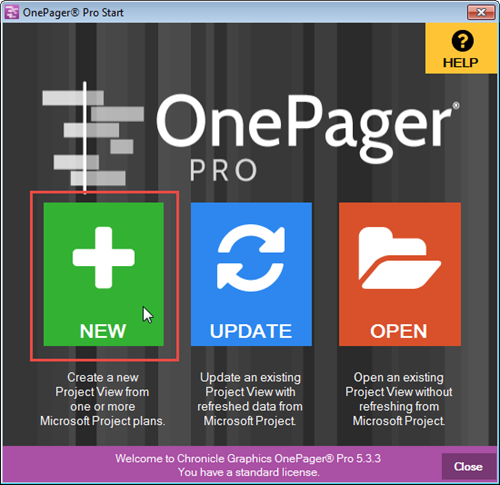
1) Launch OnePager Pro’s desktop application from the desktop icon. Then, click the “NEW” button on the “OnePager Pro Start” form as shown below:
2) When the “OnePager choices” form appears, click the “Select” button which reveals a drop down menu. Then, click the ‘BROWSE Project Server…” option as shown below:

Logging-in to Your Project Server Account
1) The previous action will bring up the “Account Information for Data Source” form, shown below, which you use to connect to your Microsoft Project Server projects.
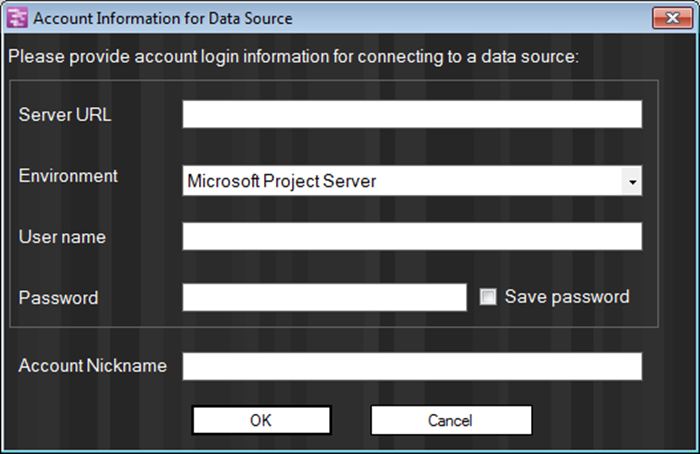
The function of the four (4) fill-in fields and the check box are mostly self-explanatory. Once the fields are filled in, click the “OK” button to go to the next form where you can click the “Connect” button.
2) Environment: This field is prepopulated with “Microsoft Project Server”. In the future additional choices will be available such as “Project Online”. For login actions to get to Enterprise Custom Fields both choices are available along with “I’m not sure”. See the article at link: Using Enterprise Custom Fields from Microsoft Project for Version 5.3 (OnePager Pro) 24.3.1.
3) Save Password: A few comments are in order related to the “Save Password” check box.
- a) When this check box is CHECKED, OnePager will encrypt and remember the password you provide in the form. Essentially, checking this check box gives OnePager permission to store your credentials.
- b) The information will be used to automatically connect to the same Microsoft Project Server account in the future if the “Automatically connect” check box in the “Choose what to import” form, discussed below, is CHECKED.
- c) Since multiple Project Server accounts can be established, the “Save password” check box applies individually to each.
- d) If the “Save Password” check box is NOT CHECKED, you may need to fill in the password form each time you want to access your Microsoft Project Server accounts.
e) If you have previously used logged into a Project Server account via Microsoft Project Professional and have given Windows permission to remember your credentials, OnePager may not even need to know your user name and password. It can login using the Windows credentials stored on your computer. For more information go to Control Panel\User Accounts and Family Safety\Credential Manager.
Selecting a Project or Projects from Your Project Server Account
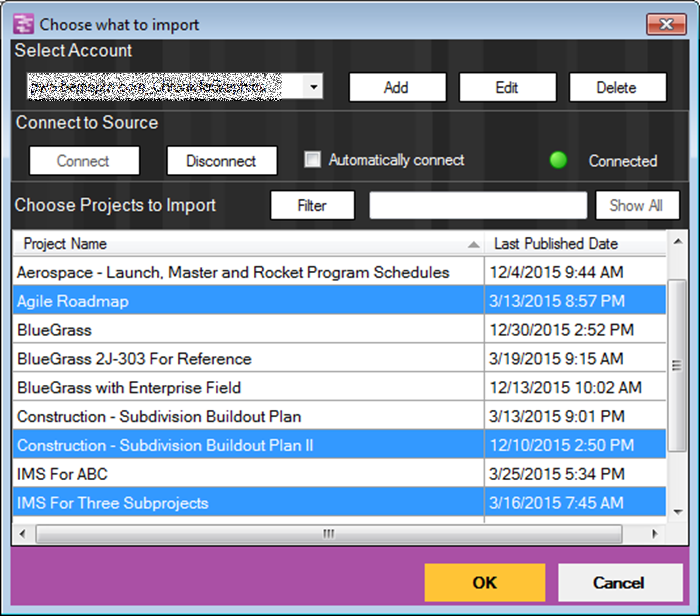
1) Clicking the “OK” button on the form above will bring up the “Choose what to import” form shown below:
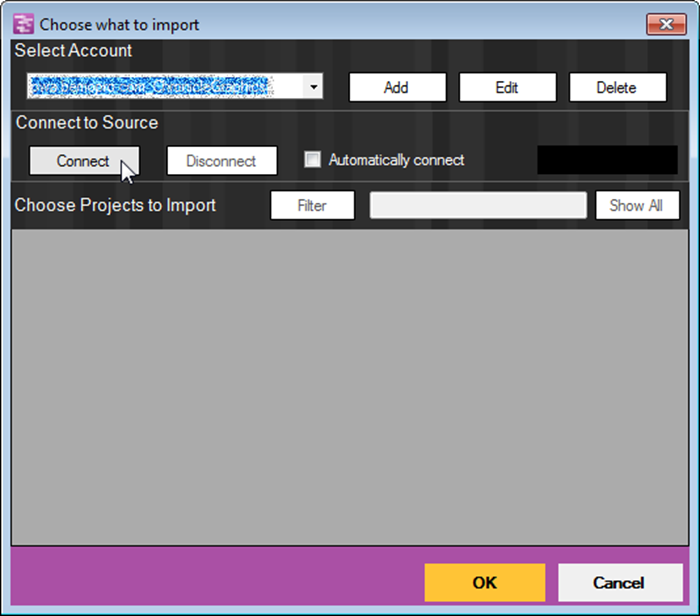
2) The form above allows you to establish a single or multiple Project Server account or accounts, perform edits on the account log-in information, and delete accounts. The form lets you establish and terminate the connections to the selected account. Finally, once connected, the form provides a scrollable space to display the files in the account and a filtering mechanism to assist in searches.
Using the Automatically Connect Button
If you plan to ultimately select several files to create a multi-project graph, we recommend that you check the “Automatically connect” check box before clicking on the “Connect” button as described below. As a warning, be advised that once the “Automatically connect” check box is checked, this check box must be unchecked in order to disconnect from your Project Server account with the “Disconnect” button.
Checking the “Automatically connect” check box will automatically login to the selected account every time you open the form.
Connecting to your Project Server Account Files
1) When you click the “Connect” button in the “Connect to Source” group, the form will display the file information available at the site and will look something like the following:
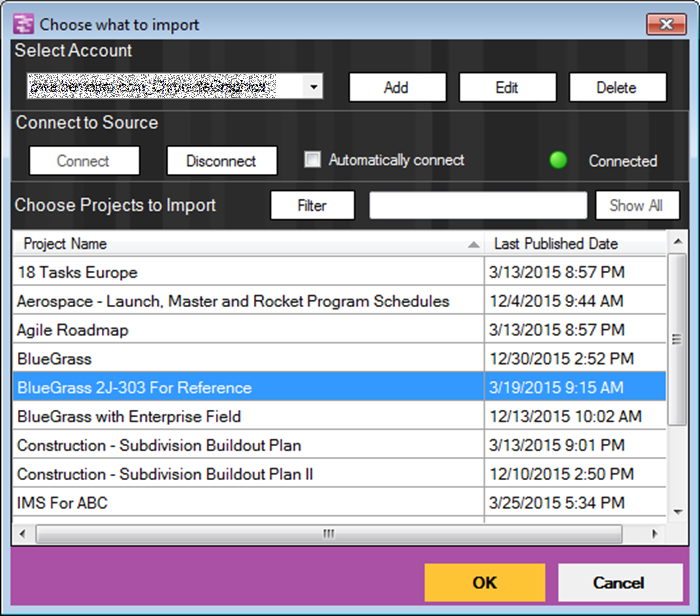
2) There are three groups of controls in the “Choose what to import” form:
a) Select Account: The left-most field contains the URL for the Project Server account and has a drop down arrow so that, if you have several accounts available you may select between them.
- i) Clicking the “Add” button will again bring up the “Account Information for Data Source” form allowing you to enter another set of URL, User name, and Password for another account.
- ii) Clicking the “Edit” button will bring up the “Account Information for Data Source” form containing the information for the URL displayed in the window at the left. With this form available you can edit the data within and save it when you click the “OK” button.
- iii) Clicking the “Delete” button will delete the account information for the account URL displayed in the window to the left.
- b) Connect to Source: The “Connect” and “Disconnect” buttons allow you to make the connection to your data or break the connection.
- i) When the “Connect” button is clicked, OnePager will display a message providing you with the status of the connect operation. When the connection is made a green dot will appear to the right saying “Connected”. If the attempt to connect fails, a red dot with the tag of “Not Connected” will appear. Additionally, one of the following error messages will appear in red in the “Connect to Source” group of the form:
| Message | Meaning |
|---|---|
|
"Need login account" |
Cannot login because user has not created a login account. Press the Add button to create an account. If the Add button is not showing, press the Change button first. |
|
"Unable to connect" |
OnePager could not connect to the server using the specified account, and the login environment was already set to its most flexible value of “I’m not sure” |
|
"Unable to connect. Edit login Environment to “I'm not sure” |
OnePager could not connect to the server using the specified account, but the login environment was set to a specific value such as Project Server or Project Online. Trying again with “I’m not sure” will attempt the login both ways. |
- ii) Clicking the “Disconnect” button will immediately disconnect Microsoft Project Server and OnePager Pro from the account. The form will not close and a red dot with the tag “Disconnected” will appear.
- iii) If you do not click the “Disconnect” button before exiting OnePager Pro desktop, the connection will be terminated when Microsoft Project is closed. As mentioned above in the Save Password section, OnePager Pro will remember your login information in encrypted form if the “Save Password” check box is CHECKED for the account.
- iv) Checking the “Automatically connect” check box will tell OnePager Pro to keep the connection to the URL displayed in the “Select Account” window active until the check box is unchecked and the “Disconnect” button is clicked.
- c) Choose Projects to Import: This group on the form displays the list of files available for import from the designated Microsoft Project Server account. You have some options available when searching the files you would like to import:
- i) Scroll-Down the List: Scroll down the list until you find the project or projects that you want to import. Select the file or files desired by mouse clicking on them and when ready to import, click the “OK” button at the bottom of the form.
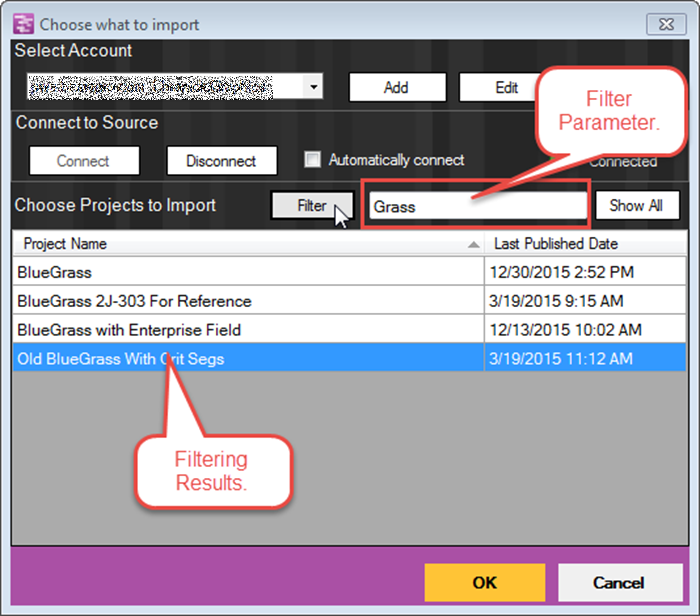
- ii) Use the Filter: You can filter through the files by placing filter text in the window to the immediate right of the “Filter” button. When the “Filter” button is clicked, OnePager will display those files that meet the filter criteria as shown here: You can then select the desired file or files as described above.
- iii) Show All: Clicking the “Show All” button will display all the files available to OnePager for selection. Use the scroll bar at the right to search down the file names.
Creating the Project View
1) Upon completing the file selection process, click the “OK” button at the bottom of the “Choose what to import” form and the “OnePager choices” form will be updated to show the files selected as shown below:
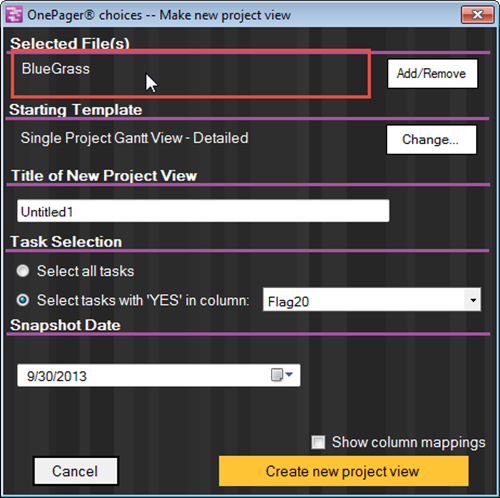
2) As with any set of projects you may examine and manipulate them by clicking on the “Add/Remove” button shown above which will bring up the “Data source selection” form shown at the right below. Clicking the “Add” button on the “Data source selection” form will, in turn, bring up the “Choose what to import form” shown at the left below, thereby populating the “Data source selection” form:

3) Once you make the necessary entries and confirmed the settings in the “OnePager choices” form you can proceed to create your project view through the normal process.
Updating the Project View from Project Server
Updating project views that were created from cloud sources is explained below.
The OnePager Pro Version 5.3 desktop application supports pull updates from Microsoft Project Server source files. The application does NOT support pull updates when the sources are from Microsoft Project Online or SharePoint. In these cases, you need to initiate an update using the OnePager Add-in inside Microsoft Project.
Updates to Project Views from Microsoft Project Server Projects
1) You may perform any update from Microsoft Project Server sources using either the pull or push operations available for OnePager Pro Version 5.3. Please use the following links for further information:
2) When using the reference links above, please keep in mind that when performing a pull operation to update project views, the sequence is to:
- a) First, launch OnePager Pro’s desktop application and click the “OPEN” button on the “OnePager Pro Start” form.
- b) This action provides you the opportunity to select the project view (.TAM) file either by “BROWSING Files…” or choosing a “RECENT” file from the drop down list.
- c) Once you’ve selected the file, OnePager Pro will know where to source packet is located, retrieve it, and use it to update the selected project view (add or replace snapshot).
3) The above sequence is a slight deviation to the sequence specified in the articles at the links above.
Sharing Project Views Created from the Cloud
1) OnePager Pro is able to updates project views from cloud sources because it has access to the credentials for the data sources. These credentials are stored locally in the OnePager Pro database or in the Windows Credential vault on your computer.
2) Sharing project views created in the cloud is, therefore, a bit more involved because the recipient needs access to the same cloud data sources (i.e., Microsoft Project Server account).
- a) Your internal procedures for giving various team members cloud-access credentials should govern these considerations.
- b) More information is available on sharing project views at these links:
3) At the present time, whenever you upgrade your version of OnePager Pro on your local computer, the OnePager Pro database is purged of all data associated with Microsoft Project Server, Project Online, and SharePoint credentials.
Related Links
Using Enterprise Custom Fields from Microsoft Project for Version 5.3 (OnePager Pro) 24.3.1-53
Creating a NEW Project View via Pull Operation - OnePager Pro for Version 5.3 7.13.1-53
Pull Operation Feature 7.16.1-53
(8.5.1-53)