Difference between revisions of "Creating Project Views from Server Resident Project Plans for OnePager Pro Add-in for Version 6.0"
(→Using OnePager Pro Add-in to Access Cloud Resident Source Plans to Create a NEW Project View) |
(→Using Microsoft Project Professional with Cloud Resident Source Plans to UPDATE a Project View) |
||
| (18 intermediate revisions by the same user not shown) | |||
| Line 1: | Line 1: | ||
==Overview== | ==Overview== | ||
| − | The OnePager Pro ('''OPP''') '''Add-in''' operates the same in all modes (i.e., '''NEW, UPDATE, and OP''') when '''source plans''' are accessed from Microsoft Project Server | + | The OnePager Pro ('''OPP''') '''Add-in''' operates the same in all modes (i.e., '''NEW, UPDATE, and OP''') when '''source plans''' are accessed from Microsoft Project Server or Project Online accounts as when '''source plan''' data are resident on your computer. |
| − | When you intend to use Microsoft Project '''source plans''' that are resident in the '''cloud''' along with '''OPP Add-in''', we recommend that you access your '''source plans''' using Microsoft Project Professional rather than through '''OPP Add-in'''. By so doing, '''OPP Add-in''' supports your project view creation and opening needs as if your '''source plans''' are | + | When you intend to use Microsoft Project '''source plans''' that are resident in the '''cloud''' along with '''OPP Add-in''', we recommend that you access your '''source plans''' using Microsoft Project Professional rather than through '''OPP Add-in'''. By so doing, '''OPP Add-in''' supports your project view creation and opening needs as if your '''source plans''' are computer resident. |
| − | However, when you intend to use '''OPP Add-in''' in the '''UPDATE''' mode with '''source plans''' accessed from the '''cloud''' through Microsoft Project Professional, there is an additional step in the '''UPDATE''' process that needs to be performed. | + | However, when you intend to use '''OPP Add-in''' in the '''UPDATE''' mode with '''source plans''' accessed from the '''cloud''' through Microsoft Project Professional, there is an additional step in the '''UPDATE''' process that needs to be performed. |
| − | ==General | + | ==General Cautions== |
| − | 1) | + | 1) '''OPP Add-in''' supports accessing '''cloud''' resident '''source plans''' without the assistance of Microsoft Project Professional. Additionally, '''OPP Add-in''' can create, update, and open multi-project project views from '''source packages''' consisting of more than one Microsoft Project '''source plan'''. See the article at: [[Creating Various Multi-Project Views with OnePager Pro and Express for Version 6.0 (Portal) | Creating Various Multi-Project Views with OnePager Pro and Express (Portal)]] <!--8.0.1-60-->. |
| − | 2) However, due to technical differences between Microsoft Project '''source plans''' resident on your computer and those that are '''cloud''' resident (i.e., Microsoft Project Server | + | 2) However, due to technical differences between Microsoft Project '''source plans''' resident on your computer and those that are '''cloud''' resident (i.e., Microsoft Project Server or Project Online), it is '''NOT''' possible to '''mix source plans''' from different '''media''' (i.e., your computer and the '''cloud'''). |
3) As a protection, '''OPP Add-in''' prohibit, to the extent possible, the combination of '''source plans''' from differing '''media''' from being incorporated into a single '''source package''' for the purpose of creating a '''NEW''' project view or for '''UPDATING''' an existing project view. | 3) As a protection, '''OPP Add-in''' prohibit, to the extent possible, the combination of '''source plans''' from differing '''media''' from being incorporated into a single '''source package''' for the purpose of creating a '''NEW''' project view or for '''UPDATING''' an existing project view. | ||
| − | 4) Please keep | + | 4) As an additional precaution, please be mindful of the setting of the '''Server method''' in the '''Template''' and '''PVP''' form's '''Advanced''' tabs. This setting is critical to inform '''OPP Add-in''' of which application is responsible for '''cloud''' resident '''source plan''' access. |
| + | |||
| + | 5) Please keep these '''cautions''' in mind when constructing '''source packages''' for '''OPP Add-in'''. | ||
==About Using Server Resident Project Source Plans and OnePager Pro Add-in== | ==About Using Server Resident Project Source Plans and OnePager Pro Add-in== | ||
| − | 1) Our recommendation is to use Microsoft Project Professional to connect, access, and verify your access to your Microsoft Project Server | + | 1) Our recommendation is to use Microsoft Project Professional to connect, access, and verify your access to your Microsoft Project Server or Project Online account when you intend to use '''OPP Add-in''' to create a '''NEW''' project view, '''UPDATE''' an existing project, or '''OPEN''' an existing project view. |
| − | 2) As mentioned in the portal article at [[ | + | 2) As mentioned in the portal article at [[Using OnePager Pro with Server Resident Project Plans for Version 6.0 (Portal) | Using OnePager Pro with Server Resident Project Plans (Portal)]] <!--8.5.1-60 Renamed-->, '''OPP Add-in''' operates in the '''NEW''' and '''OPEN''' mode the same for '''source plans''' accessed from the '''cloud''' as when '''source plans''' are resident on your computer. |
3) It is only in the '''UPDATE''' mode that '''OPP Add-in''' requires that you perform one extra step in the normal '''UPDATE''' mode process. This extra step is discussed in the sub-section below: | 3) It is only in the '''UPDATE''' mode that '''OPP Add-in''' requires that you perform one extra step in the normal '''UPDATE''' mode process. This extra step is discussed in the sub-section below: | ||
| Line 35: | Line 37: | ||
3) The high level steps are as follows: | 3) The high level steps are as follows: | ||
| − | :a) Make sure to close any and all instances of OnePager Pro that might be running outside of Microsoft Project (i.e., OnePager Pro '''Desktop'''). | + | :a) Make sure to close any and all instances of '''OnePager Pro''' that might be running outside of Microsoft Project (i.e., OnePager Pro '''Desktop'''). |
:b) Launch Microsoft Project Professional from your desktop. | :b) Launch Microsoft Project Professional from your desktop. | ||
| − | :c) Use Microsoft Project Professional to access your Microsoft Project Server | + | :c) Use Microsoft Project Professional to access your Microsoft Project Server or Project Online account. |
:d) Open the required Microsoft Project Server '''source plan''' from your desktop Microsoft Project Professional application. | :d) Open the required Microsoft Project Server '''source plan''' from your desktop Microsoft Project Professional application. | ||
| Line 45: | Line 47: | ||
:e) Next, go to the Microsoft Project Professional '''Add-ins''' tab on the tool bar and click the '''OnePager''' icon. | :e) Next, go to the Microsoft Project Professional '''Add-ins''' tab on the tool bar and click the '''OnePager''' icon. | ||
| − | :f) Once the '''OnePager Pro Start''' form appears click the '''OPEN''' button. '''Do Not Attempt to Do An UPDATE At This Point.''' | + | :f) Once the '''OnePager Pro Start''' form appears, click the '''OPEN''' button. '''Do Not Attempt to Do An UPDATE At This Point.''' |
| − | :g) Now, go to the '''OPP Home''' tab and click the Project-View Properties ('''PVP''') button | + | :g) Now, go to the '''OPP Home''' tab and click the Project-View Properties ('''PVP''') button. Then click on the '''Advanced''' tab in the left margin of the '''PVP''' form as shown below: |
<center>[[File:P60-8_5_1_1-60-(1)-04032017.png]]</center> | <center>[[File:P60-8_5_1_1-60-(1)-04032017.png]]</center> | ||
<center>P60-8_5_1_1-60-(1)-04032017.png</center> | <center>P60-8_5_1_1-60-(1)-04032017.png</center> | ||
| − | :h) Change the '''Server Method''' setting in the '''PVP''' form’s '''Advanced''' tab to the '''Use MS Project Professional''' setting. This tells '''OPP Add-in''' to let Microsoft Project Professional load your '''source plan'''. Finally, click '''Apply''' and '''OK''' button as shown below: | + | :h) Change the '''Server Method''' setting in the '''PVP''' form’s '''Advanced''' tab to the '''Use MS Project Professional''' setting. This tells '''OPP Add-in''' to let Microsoft Project Professional load your '''source plan'''. Finally, click '''Apply''' to make the change and keep the '''PVP''' form open or click the '''OK''' button to make the change and close the '''PVP''' form as shown below: |
<center>[[File:P60-8_5_1_1-60-(2)-04032017.png]]</center> | <center>[[File:P60-8_5_1_1-60-(2)-04032017.png]]</center> | ||
| Line 71: | Line 73: | ||
3) The steps are as follows: | 3) The steps are as follows: | ||
| − | :a) Make sure to close any and all instances of OnePager Pro that might be running outside of Microsoft Project (i.e., OnePager Pro '''Desktop'''). | + | :a) Make sure to close any and all instances of '''OnePager Pro''' that might be running outside of Microsoft Project (i.e., OnePager Pro '''Desktop'''). |
:b) Launch Microsoft Project Professional from your desktop. | :b) Launch Microsoft Project Professional from your desktop. | ||
| Line 84: | Line 86: | ||
:e) If the change is made click the '''Save and use''' to close the '''Template''' form. | :e) If the change is made click the '''Save and use''' to close the '''Template''' form. | ||
| − | :f) Now, you can use Microsoft Project Professional to access your Microsoft Project Server | + | :f) Now, you can use Microsoft Project Professional to access your Microsoft Project Server or Project Online account. |
:g) Open the required Microsoft Project Server '''source plan''' from your desktop Microsoft Project Professional application. | :g) Open the required Microsoft Project Server '''source plan''' from your desktop Microsoft Project Professional application. | ||
| Line 92: | Line 94: | ||
:i) Once the '''OnePager Pro Start''' form appears click the '''NEW''' button. | :i) Once the '''OnePager Pro Start''' form appears click the '''NEW''' button. | ||
| − | :j) From this point on the process for creating a '''NEW''' project view follows the standard workflow. | + | :j) From this point on, the process for creating a '''NEW''' project view follows the standard workflow. |
==Using OnePager Pro Add-in to Access Cloud Resident Source Plans== | ==Using OnePager Pro Add-in to Access Cloud Resident Source Plans== | ||
| Line 98: | Line 100: | ||
===Using OnePager Pro Add-in to Access Cloud Resident Source Plans to Create a NEW Project View=== | ===Using OnePager Pro Add-in to Access Cloud Resident Source Plans to Create a NEW Project View=== | ||
| − | 1) As we mentioned in the | + | 1) As we mentioned in the sub-section above ([[Creating Project Views from Server Resident Project Plans for OnePager Pro Add-in for Version 6.0#About Using Server Resident Project Source Plans and OnePager Pro Add-in | About Using Server Resident Project Source Plans and OnePager Pro Add-in]]), we recommended that you use Microsoft Project Professional to connect, access, and validate your access to your '''cloud''' resident '''source plans'''. |
| − | 2) You can still use '''OnePager Pro Add-in''' for this purpose but the access procedure requires that you first launch Microsoft Project Professional and load '''some source plan''' before launching '''OPP Add-in'''. This is required because '''OPP Add-in''' if launched from Microsoft Project Professional where there is a '''blank source plan''' brings up the '''OnePager Start''' form with the '''NEW and UPDATE''' buttons | + | 2) You can still use '''OnePager Pro Add-in''' for this purpose but the access procedure requires that you first launch Microsoft Project Professional and load '''some source plan''' before launching '''OPP Add-in'''. This is required because '''OPP Add-in''' if launched from Microsoft Project Professional where there is a '''blank source plan''' brings up the '''OnePager Start''' form with the '''NEW and UPDATE''' buttons are disabled as shown below: |
<center>[[File:P60-8_5_1_1-60-(4)-04062017.png]]</center> | <center>[[File:P60-8_5_1_1-60-(4)-04062017.png]]</center> | ||
| Line 124: | Line 126: | ||
<center>P60-8_5_1_1-60-(5)-04062017.png</center> | <center>P60-8_5_1_1-60-(5)-04062017.png</center> | ||
| − | + | 3) Next, access your '''cloud source plan''' using '''OPP Add-in''' by clicking the '''Add/Remove''' on the '''OPC''' form. Click the '''Add/Remove''' button to display the '''Data source selection''' form shown below: | |
<center>[[File:P60-8_5_1_1-60-(6)-04062017.png]]</center> | <center>[[File:P60-8_5_1_1-60-(6)-04062017.png]]</center> | ||
<center>P60-8_5_1_1-60-(6)-04062017.png</center> | <center>P60-8_5_1_1-60-(6)-04062017.png</center> | ||
| − | + | 4) The next step is to '''remove''' this temporary '''source plan''' and go through the procedure to connect to your '''cloud''' resident '''source plans'''. | |
| − | : | + | :a) To '''remove''' the temporary ''' source plan''', select it with a click in its row of the '''Data source selection''' form and then click the '''Remove''' button. The '''Data source selection''' form will then look like this: |
<center>[[File:P60-8_5_1_1-60-(7)-04062017.png]]</center> | <center>[[File:P60-8_5_1_1-60-(7)-04062017.png]]</center> | ||
<center>P60-8_5_1_1-60-(7)-04062017.png</center> | <center>P60-8_5_1_1-60-(7)-04062017.png</center> | ||
| − | : | + | :b) Next, click the '''Add''' button in the '''Data source selection''' form which will bring up the options as follows: |
<center>[[File:P60-8_5_1_1-60-(8)-04062017.png]]</center> | <center>[[File:P60-8_5_1_1-60-(8)-04062017.png]]</center> | ||
<center>P60-8_5_1_1-60-(8)-04062017.png</center> | <center>P60-8_5_1_1-60-(8)-04062017.png</center> | ||
| − | : | + | :c) Making the selection above will bring up the '''Choose what to import''' form as shown below: |
<center>[[File:P60-8_5_1_1-60-(9)-04062017.png]]</center> | <center>[[File:P60-8_5_1_1-60-(9)-04062017.png]]</center> | ||
<center>P60-8_5_1_1-60-(9)-04062017.png</center> | <center>P60-8_5_1_1-60-(9)-04062017.png</center> | ||
| − | : | + | :d) Next, click the '''Connect''' button in the '''Choose what to import''' form, select the '''source plan''' from the list that appears and then click '''OK''' as shown here: |
<center>[[File:P60-8_5_1_1-60-(10AA)-04062017.png]]</center> | <center>[[File:P60-8_5_1_1-60-(10AA)-04062017.png]]</center> | ||
<center>P60-8_5_1_1-60-(10AA)-04062017.png</center> | <center>P60-8_5_1_1-60-(10AA)-04062017.png</center> | ||
| − | : | + | :e) Clicking the '''OK''' button in the above step will update the '''Data source selection''' form to display your '''cloud''' resident '''source plan''' as shown below: |
<center>[[File:P60-8_5_1_1-60-(11AA)-04062017.png]]</center> | <center>[[File:P60-8_5_1_1-60-(11AA)-04062017.png]]</center> | ||
<center>P60-8_5_1_1-60-(11AA)-04062017.png</center> | <center>P60-8_5_1_1-60-(11AA)-04062017.png</center> | ||
| − | + | 4) Finally, click ''OK'' on the '''Data source selection''' form and '''OPP Add-in''' will update the top of the '''OPC''' form to reflect the new '''cloud''' resident '''source plan''' selected. The '''OPC''' form now looks like this after the project view name and the '''flag''' selections are made: | |
<center>[[File:P60-8_5_1_1-60-(12AA)-04062017.png]]</center> | <center>[[File:P60-8_5_1_1-60-(12AA)-04062017.png]]</center> | ||
<center>P60-8_5_1_1-60-(12AA)-04062017.png</center> | <center>P60-8_5_1_1-60-(12AA)-04062017.png</center> | ||
| − | + | 5) By clicking the '''Create new project view''' button in the '''OPC''' form above '''OPP Add-in''' will '''pull''' in the '''cloud''' resident '''source plan''' and create the desired project view that will look like this: | |
<center>[[File:P60-8_5_1_1-60-(13AA)-04062017.png]]</center> | <center>[[File:P60-8_5_1_1-60-(13AA)-04062017.png]]</center> | ||
<center>P60-8_5_1_1-60-(13AA)-04062017.png</center> | <center>P60-8_5_1_1-60-(13AA)-04062017.png</center> | ||
| − | ==Using OnePager Pro Add-in to Access Cloud Resident Source Plans to UPDATE a Project View== | + | 6) The new project view may be edited, saved, or shared as required. |
| + | |||
| + | ===Using OnePager Pro Add-in to Access Cloud Resident Source Plans to UPDATE a Project View=== | ||
| + | |||
| + | You can use '''OnePager Pro Add-in''' to access your '''cloud''' resident '''source plans''' for the purpose of performing an '''UPDATE''' on an existing project view. | ||
| + | |||
| + | 1) Assuming that the '''source plan''' you wish to use for your '''UPDATE''' is '''cloud''' resident and you wish to use '''OPP Add-in''' to access this '''cloud''' resident '''source plan''' you need to establish '''OPP Add-in''' in the '''UPDATE''' mode as follows: | ||
| + | |||
| + | :a) Launch Microsoft Project Professional and load a '''temporary source plan''' from your local computer. | ||
| + | |||
| + | :b) Follow the steps outlined in the section immediately above to assure that your '''Template''' is set up to have '''OPP Add-in''' perform the access of the '''cloud''' resident '''source plan''' by assuring that the '''Template''' has the '''Server method''' setting set to '''Connect directly to server'''. | ||
| + | |||
| + | 2) After closing the '''Template''' form, click the '''OnePager''' button on the Microsoft Project Professional tool bar to launch '''OPP Add-in'''. | ||
| + | |||
| + | 3) When the '''OnePager Start''' form appears, click the '''UPDATE''' button and select the project view to undergo the '''UPDATE''' as shown below: | ||
| + | |||
| + | <center>[[File:P60-8_5_1_1-60-(14)-04062017.png]]</center> | ||
| + | <center>P60-8_5_1_1-60-(14)-04062017.png</center> | ||
| + | |||
| + | :a) Doing this will bring up the '''OPC''' form showing the selected project view at the top of the form as shown here: | ||
| + | |||
| + | <center>[[File:P60-8_5_1_1-60-(15)-04062017.png]]</center> | ||
| + | <center>P60-8_5_1_1-60-(15)-04062017.png</center> | ||
| + | |||
| + | :b) Since the project view is associated with a '''source plan''' and '''OPP Add-in''' knows the '''path name''' to access that ''' source plan''', '''OPP Add-in''' will retrieve the ''' source plan''' from your '''cloud''' resident location when you click the '''New''' button at the bottom of the '''OPC''' form. | ||
| + | |||
| + | :c) Assuming that the '''source plan''' at this '''cloud''' location was updated with current information, in this case up to 10/1/2015, '''OPP Add-in''' will create a new snapshot with this date as shown below: | ||
| + | |||
| + | <center>[[File:P60-8_5_1_1-60-(16)-04062017.png]]</center> | ||
| + | <center>P60-8_5_1_1-60-(16)-04062017.png</center> | ||
| + | |||
| + | 4) The updated project view may be edited, saved, or shared as required. | ||
==Troubleshooting== | ==Troubleshooting== | ||
| Line 178: | Line 211: | ||
==Related Links== | ==Related Links== | ||
| − | [[Using Enterprise Custom Fields from Microsoft Project for OnePager Pro for Version 6.0 | Using Enterprise Custom Fields from Microsoft Project for OnePager Pro]] 24.3.1-60 | + | [[Using Enterprise Custom Fields from Microsoft Project for OnePager Pro for Version 6.0 | Using Enterprise Custom Fields from Microsoft Project for OnePager Pro]] <!--24.3.1-60--> |
[[Creating a NEW Project View - OnePager Pro Add-in for Version 6.0 | Creating a NEW Project View - OnePager Pro Add-in]] | [[Creating a NEW Project View - OnePager Pro Add-in for Version 6.0 | Creating a NEW Project View - OnePager Pro Add-in]] | ||
Latest revision as of 17:22, 26 May 2017
Contents
Overview
The OnePager Pro (OPP) Add-in operates the same in all modes (i.e., NEW, UPDATE, and OP) when source plans are accessed from Microsoft Project Server or Project Online accounts as when source plan data are resident on your computer.
When you intend to use Microsoft Project source plans that are resident in the cloud along with OPP Add-in, we recommend that you access your source plans using Microsoft Project Professional rather than through OPP Add-in. By so doing, OPP Add-in supports your project view creation and opening needs as if your source plans are computer resident.
However, when you intend to use OPP Add-in in the UPDATE mode with source plans accessed from the cloud through Microsoft Project Professional, there is an additional step in the UPDATE process that needs to be performed.
General Cautions
1) OPP Add-in supports accessing cloud resident source plans without the assistance of Microsoft Project Professional. Additionally, OPP Add-in can create, update, and open multi-project project views from source packages consisting of more than one Microsoft Project source plan. See the article at: Creating Various Multi-Project Views with OnePager Pro and Express (Portal) .
2) However, due to technical differences between Microsoft Project source plans resident on your computer and those that are cloud resident (i.e., Microsoft Project Server or Project Online), it is NOT possible to mix source plans from different media (i.e., your computer and the cloud).
3) As a protection, OPP Add-in prohibit, to the extent possible, the combination of source plans from differing media from being incorporated into a single source package for the purpose of creating a NEW project view or for UPDATING an existing project view.
4) As an additional precaution, please be mindful of the setting of the Server method in the Template and PVP form's Advanced tabs. This setting is critical to inform OPP Add-in of which application is responsible for cloud resident source plan access.
5) Please keep these cautions in mind when constructing source packages for OPP Add-in.
About Using Server Resident Project Source Plans and OnePager Pro Add-in
1) Our recommendation is to use Microsoft Project Professional to connect, access, and verify your access to your Microsoft Project Server or Project Online account when you intend to use OPP Add-in to create a NEW project view, UPDATE an existing project, or OPEN an existing project view.
2) As mentioned in the portal article at Using OnePager Pro with Server Resident Project Plans (Portal) , OPP Add-in operates in the NEW and OPEN mode the same for source plans accessed from the cloud as when source plans are resident on your computer.
3) It is only in the UPDATE mode that OPP Add-in requires that you perform one extra step in the normal UPDATE mode process. This extra step is discussed in the sub-section below:
Using Microsoft Project Professional to Access Cloud Resident Source Plans
Using Microsoft Project Professional with Cloud Resident Source Plans to UPDATE a Project View
1) We assume for this sub-section that you are experienced with accessing your Microsoft Project Professional source plans from the cloud.
2) Accordingly, we assume that the steps involved are documented elsewhere and includes any access security procedures needed to access your source plans residing in the cloud.
3) The high level steps are as follows:
- a) Make sure to close any and all instances of OnePager Pro that might be running outside of Microsoft Project (i.e., OnePager Pro Desktop).
- b) Launch Microsoft Project Professional from your desktop.
- c) Use Microsoft Project Professional to access your Microsoft Project Server or Project Online account.
- d) Open the required Microsoft Project Server source plan from your desktop Microsoft Project Professional application.
- e) Next, go to the Microsoft Project Professional Add-ins tab on the tool bar and click the OnePager icon.
- f) Once the OnePager Pro Start form appears, click the OPEN button. Do Not Attempt to Do An UPDATE At This Point.
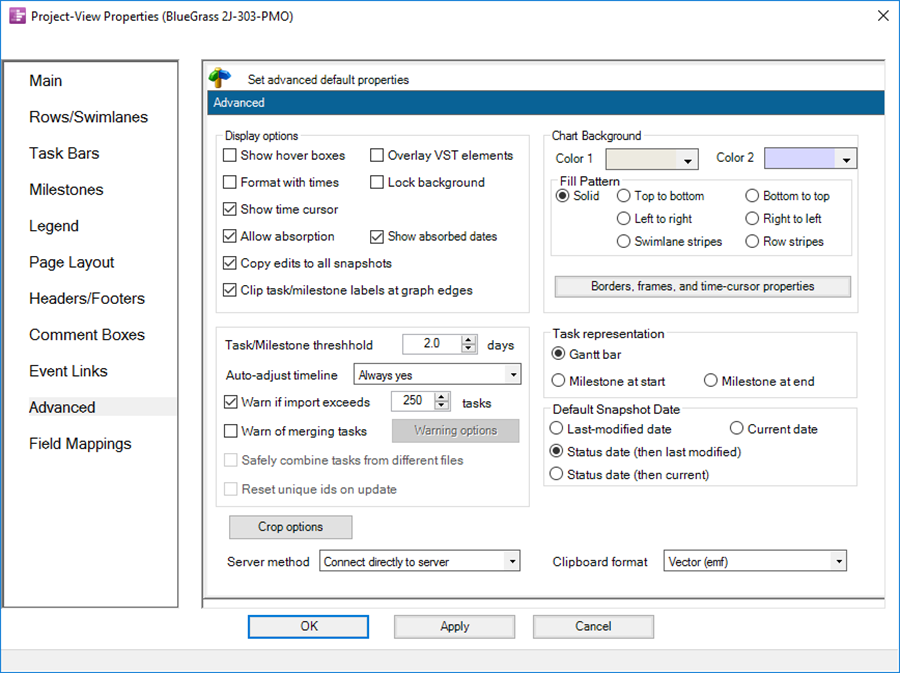
- g) Now, go to the OPP Home tab and click the Project-View Properties (PVP) button. Then click on the Advanced tab in the left margin of the PVP form as shown below:
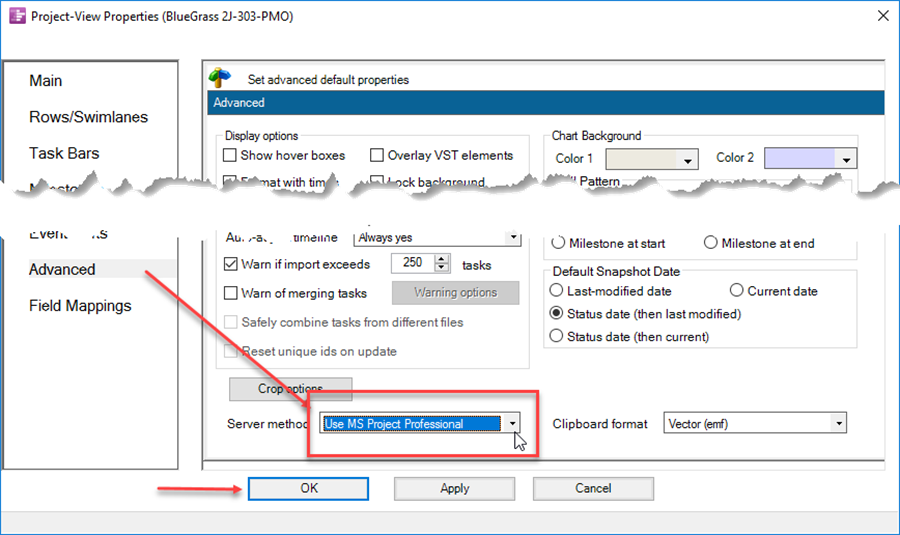
- h) Change the Server Method setting in the PVP form’s Advanced tab to the Use MS Project Professional setting. This tells OPP Add-in to let Microsoft Project Professional load your source plan. Finally, click Apply to make the change and keep the PVP form open or click the OK button to make the change and close the PVP form as shown below:
- i) When the PVP form closes, go to the Data tab on the OPP Add-in ribbon and proceed with the UPDATE process as you would normally.
- j) See the article at this link for more details on the Pull Update Operation: Using the OnePager "Data" Tab's "Selected file(s)" Button
- k) This completed the UPDATE mode process using OPP Add-in with a cloud resident source plan.
Using Microsoft Project Professional with Cloud Resident Source Plans to Create a NEW Project View
1) We assume for this sub-section that you are experienced with accessing your Microsoft Project Professional source plans from the cloud.
2) Accordingly, we assume that the steps involved are documented elsewhere and includes any access security procedures needed to access your source plans residing in the cloud.
3) The steps are as follows:
- a) Make sure to close any and all instances of OnePager Pro that might be running outside of Microsoft Project (i.e., OnePager Pro Desktop).
- b) Launch Microsoft Project Professional from your desktop.
- c) Go to the Microsoft Project Professional Add-ins tab on the tool bar and click the Templates icon. This brings up the current Template.
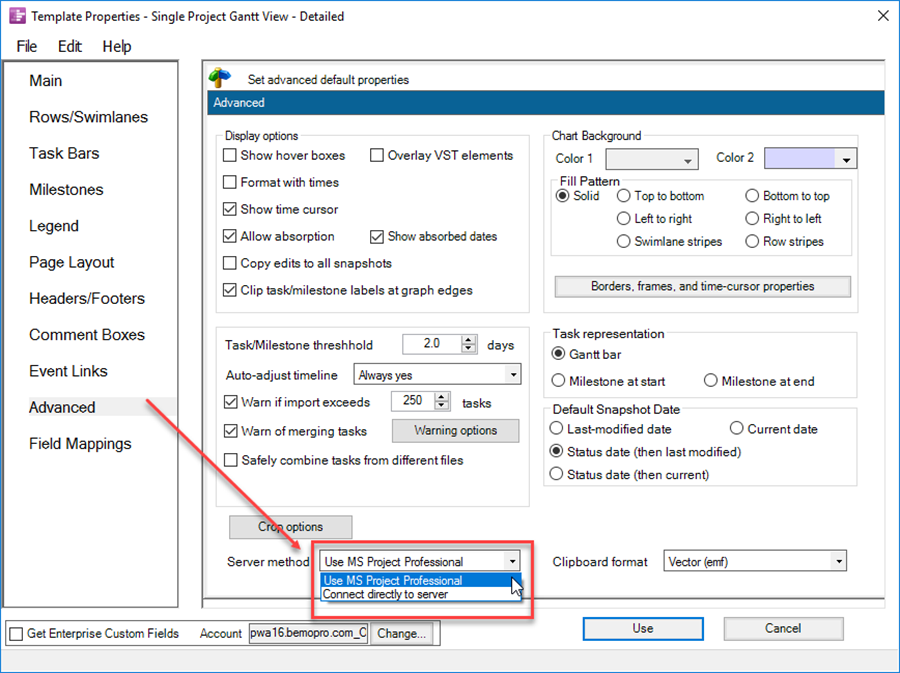
- d) Next, go to the Template form's Advanced tab and check to make sure that the Server method window is displaying the Use MS Project Professional. If not, change this setting to Use MS Project Professional as shown below:
- e) If the change is made click the Save and use to close the Template form.
- f) Now, you can use Microsoft Project Professional to access your Microsoft Project Server or Project Online account.
- g) Open the required Microsoft Project Server source plan from your desktop Microsoft Project Professional application.
- h) Next, go to the Microsoft Project Professional Add-ins tab on the tool bar and click the OnePager icon.
- i) Once the OnePager Pro Start form appears click the NEW button.
- j) From this point on, the process for creating a NEW project view follows the standard workflow.
Using OnePager Pro Add-in to Access Cloud Resident Source Plans
Using OnePager Pro Add-in to Access Cloud Resident Source Plans to Create a NEW Project View
1) As we mentioned in the sub-section above ( About Using Server Resident Project Source Plans and OnePager Pro Add-in), we recommended that you use Microsoft Project Professional to connect, access, and validate your access to your cloud resident source plans.
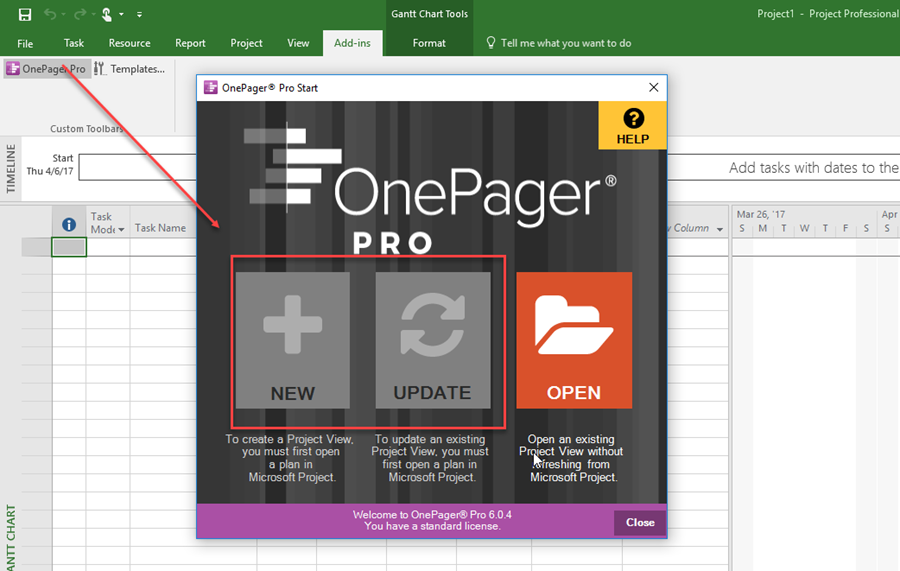
2) You can still use OnePager Pro Add-in for this purpose but the access procedure requires that you first launch Microsoft Project Professional and load some source plan before launching OPP Add-in. This is required because OPP Add-in if launched from Microsoft Project Professional where there is a blank source plan brings up the OnePager Start form with the NEW and UPDATE buttons are disabled as shown below:
3) To avoid this, we recommend that you simply launch Microsoft Project Professional with any source plan resident on your computer for convenience.
4) Doing this allows you to use the OnePager Start form's NEW button to access your cloud resident source plans as follows:
- a) After launching Microsoft Project Professional with some source plan from your local computer, click the Template... button on the Microsoft Project Professional tool bar's Add-ins tab.
- i) This brings up the OPP Add-in current Template previously shown in a sub-section above.
- ii) What you need to do is verify or change the Server method in the Advanced tab of the current Template so that the option selected is Connect directly to server as shown below:
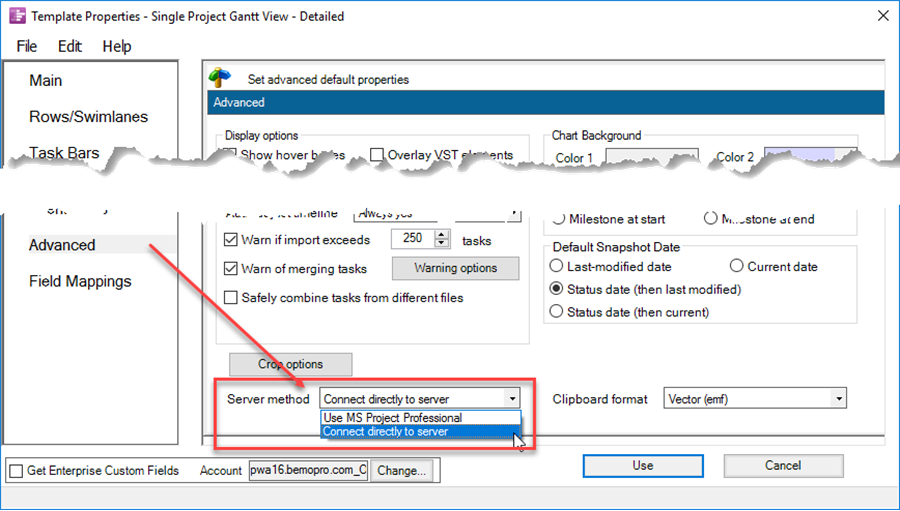
- iii) When this setting is selected, click the Save and use button at the bottom of the Template form.
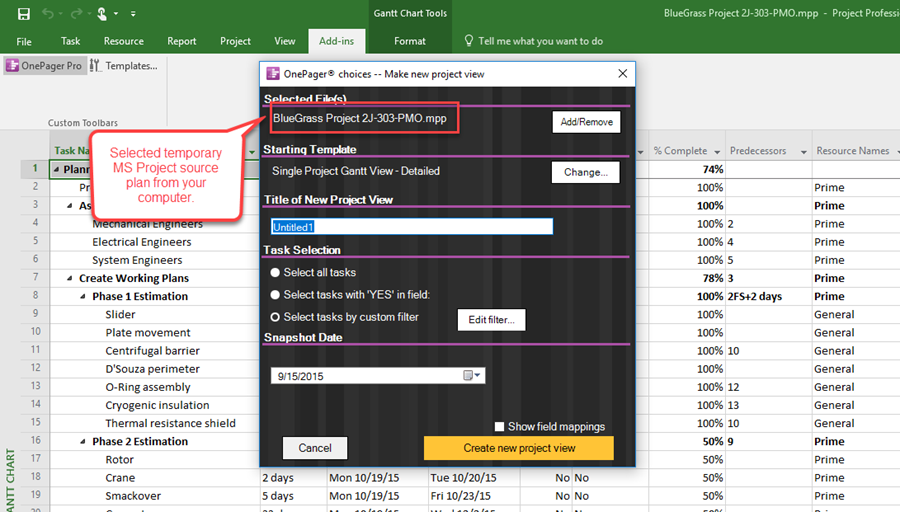
- b) After closing the current Template form, click the OnePager icon on the Microsoft Project Professional tool bar, and click the NEW button on the OnePager Start form. You will be presented with the OnePager choices (OPC) form as shown here:
3) Next, access your cloud source plan using OPP Add-in by clicking the Add/Remove on the OPC form. Click the Add/Remove button to display the Data source selection form shown below:
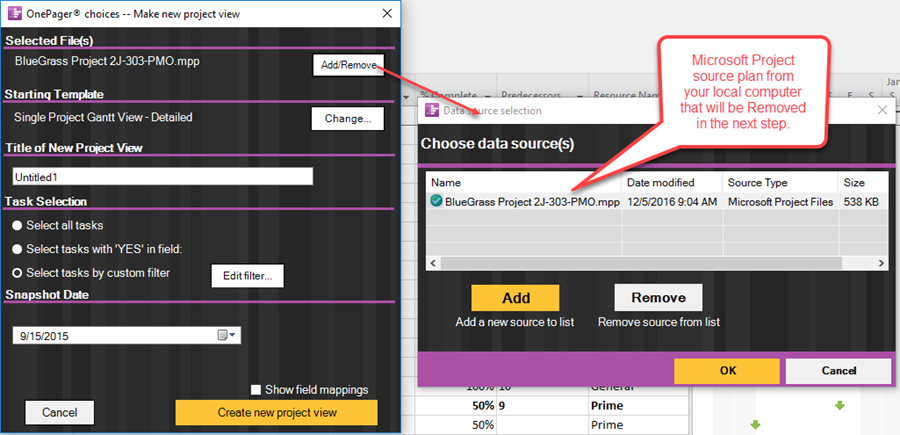
4) The next step is to remove this temporary source plan and go through the procedure to connect to your cloud resident source plans.
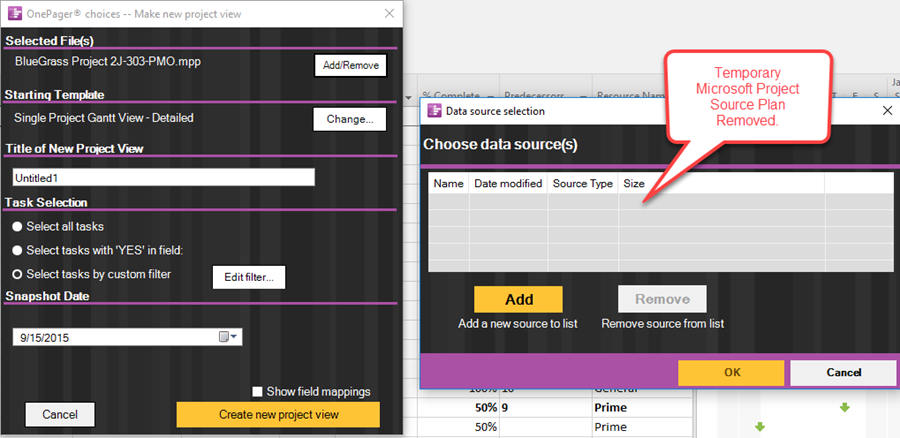
- a) To remove the temporary source plan, select it with a click in its row of the Data source selection form and then click the Remove button. The Data source selection form will then look like this:
- b) Next, click the Add button in the Data source selection form which will bring up the options as follows:
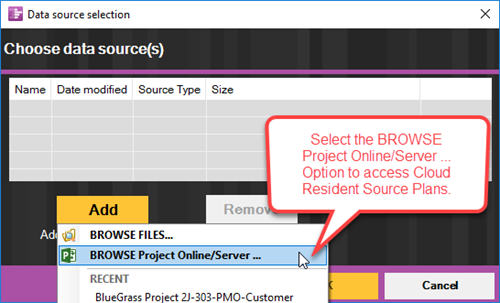
- c) Making the selection above will bring up the Choose what to import form as shown below:

- d) Next, click the Connect button in the Choose what to import form, select the source plan from the list that appears and then click OK as shown here:
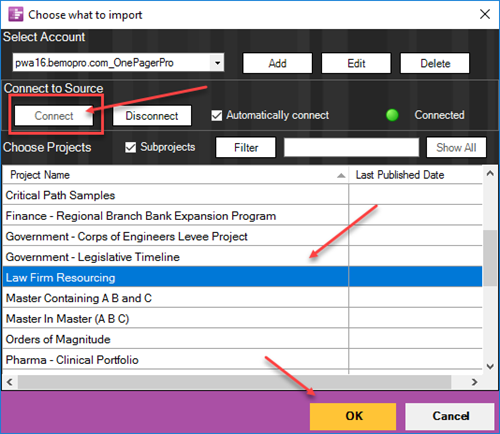
- e) Clicking the OK button in the above step will update the Data source selection form to display your cloud resident source plan as shown below:
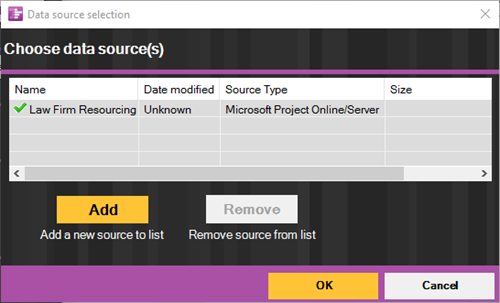
4) Finally, click OK on the Data source selection form and OPP Add-in will update the top of the OPC form to reflect the new cloud resident source plan selected. The OPC form now looks like this after the project view name and the flag selections are made:
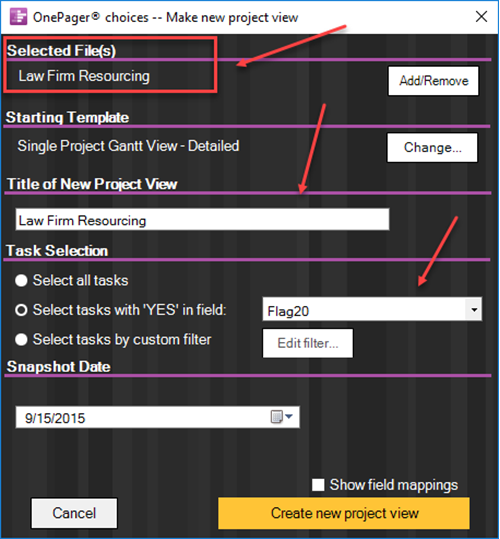
5) By clicking the Create new project view button in the OPC form above OPP Add-in will pull in the cloud resident source plan and create the desired project view that will look like this:
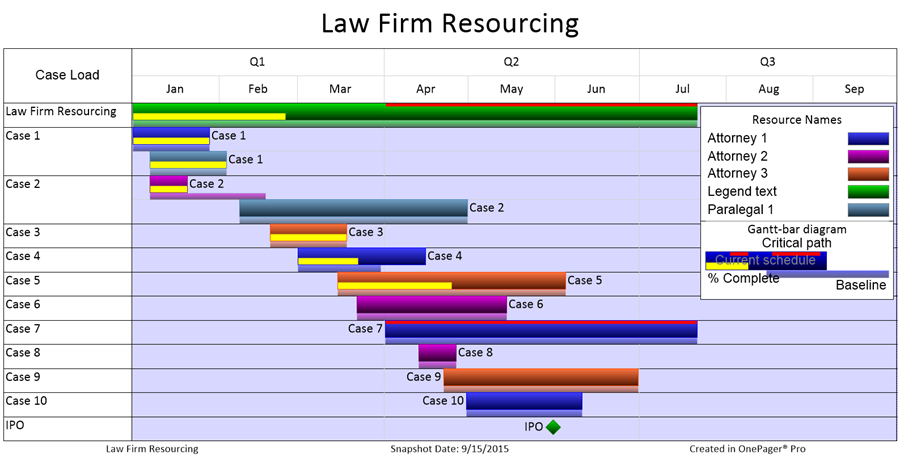
6) The new project view may be edited, saved, or shared as required.
Using OnePager Pro Add-in to Access Cloud Resident Source Plans to UPDATE a Project View
You can use OnePager Pro Add-in to access your cloud resident source plans for the purpose of performing an UPDATE on an existing project view.
1) Assuming that the source plan you wish to use for your UPDATE is cloud resident and you wish to use OPP Add-in to access this cloud resident source plan you need to establish OPP Add-in in the UPDATE mode as follows:
- a) Launch Microsoft Project Professional and load a temporary source plan from your local computer.
- b) Follow the steps outlined in the section immediately above to assure that your Template is set up to have OPP Add-in perform the access of the cloud resident source plan by assuring that the Template has the Server method setting set to Connect directly to server.
2) After closing the Template form, click the OnePager button on the Microsoft Project Professional tool bar to launch OPP Add-in.
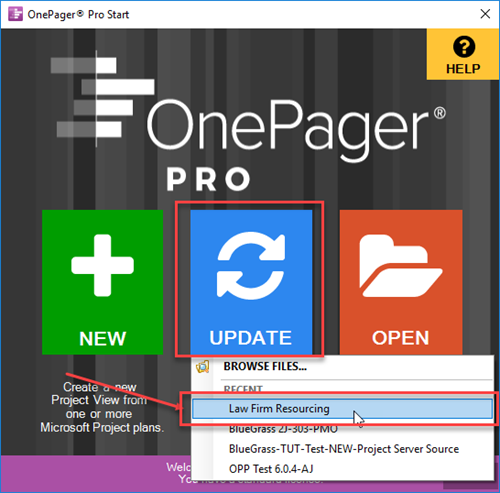
3) When the OnePager Start form appears, click the UPDATE button and select the project view to undergo the UPDATE as shown below:
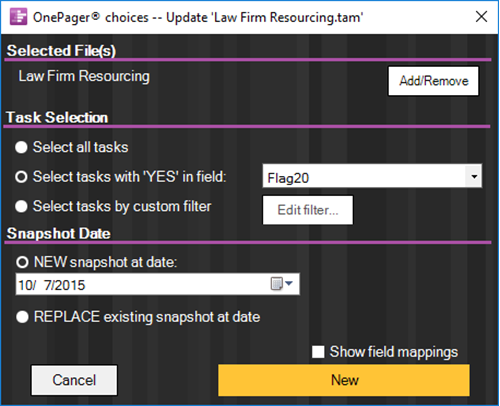
- a) Doing this will bring up the OPC form showing the selected project view at the top of the form as shown here:
- b) Since the project view is associated with a source plan and OPP Add-in knows the path name to access that source plan, OPP Add-in will retrieve the source plan from your cloud resident location when you click the New button at the bottom of the OPC form.
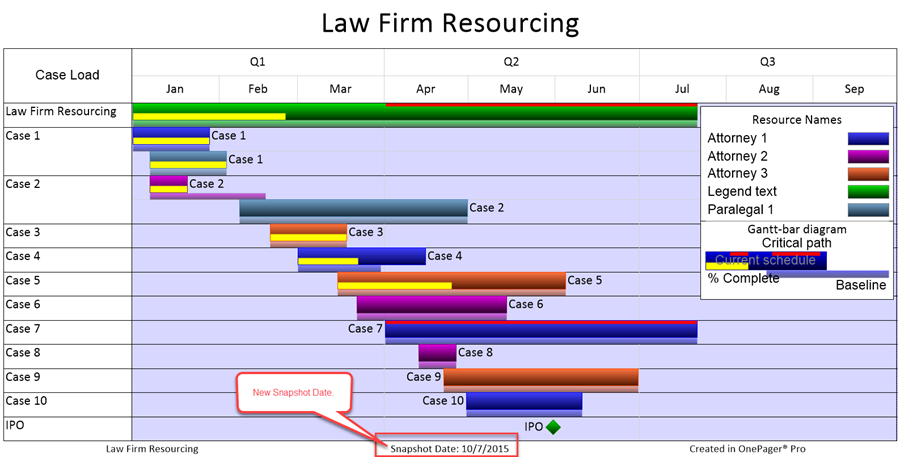
- c) Assuming that the source plan at this cloud location was updated with current information, in this case up to 10/1/2015, OPP Add-in will create a new snapshot with this date as shown below:
4) The updated project view may be edited, saved, or shared as required.
Troubleshooting
Please refer to these two Frequently Asked Questions if you are having problems:
Updating OnePager with a Project Online/Project Server 2016 plan
Can't Connect to Project Online/Project Server 2016 to Update a OnePager Report
Related Links
Using Enterprise Custom Fields from Microsoft Project for OnePager Pro
Creating a NEW Project View - OnePager Pro Add-in
Creating Another New Project View - OnePager Pro Add-in
Opening an EXISTING Project View - OnePager Pro Add-in
ADDING a Snapshot via Push Update - OnePager Pro Add-in
REPLACING a Snapshot via Push Update - OnePager Pro Add-in
(8.5.1.1-60)