Creating and Managing Comment Boxes for Version 7.0
Contents
- 1 About Creating and Managing Comment Boxes
- 2 Creating Comment Boxes Using the Task/Milestone Right-Click Context Menu
- 3 Creating A Comment Box Using the Comment Box Button
- 4 Creating A Comment Box From a Task/Milestone Text Label
- 5 Editing Comment Boxes
- 6 Notes
- 7 Deleting Comment Boxes
- 8 Ordering Comment Boxes
- 9 Adding Another Comment Box
- 10 Putting Selected Comment Boxes in All Snapshots
- 11 Making Comment Boxes Invisible Except for the Text
- 12 Additional Comment Box Content Options
- 13 Related Links
About Creating and Managing Comment Boxes
1) Comment boxes are a way to attach additional text to a task or milestone shape that do not otherwise exist in your Microsoft Project or Microsoft Excel source plan.
2) They are a great way to call attention to critical information to support schedule conversations.
Default Comment Box Settings
3) The default settings for Comment box parameters are provided in the distributed OnePager Pro and Express Template form's Comment Box tab as shown below for OnePager Pro:
4) When the Template form is used to create a chart, these settings are established in the chart's Chart Properties form at its Comment Box tab where the settings and controls are the same.
Editing Comment Box Global Settings in the Chart
5) You can use the Chart Properties form's Comment Box tab to globally edit these settings that apply to all Comment boxes that are subsequently created in the chart.
6) For more information on globally editing Comment Box settings in the Chart Properties form, please see the article at: Comment Boxes. 21.11.1-70
7) Additionally, you can create, edit, and delete Comment boxes manually in the chart by:
- a) Using the context menu associated with right-clicking on a task or milestone shape.
- b) Creating a Comment box on a selected task/milestone shape or shapes by using the Comment Box button on the Insert tool bar on the OnePager ribbon.
Creating Comment Boxes Using the Task/Milestone Right-Click Context Menu
1) To create a Comment box for any selected task/milestone, right-clicking the task/milestone and select the Comments… command from the context menu as shown below:
2) This action accesses the Create or edit comment box form shown here:
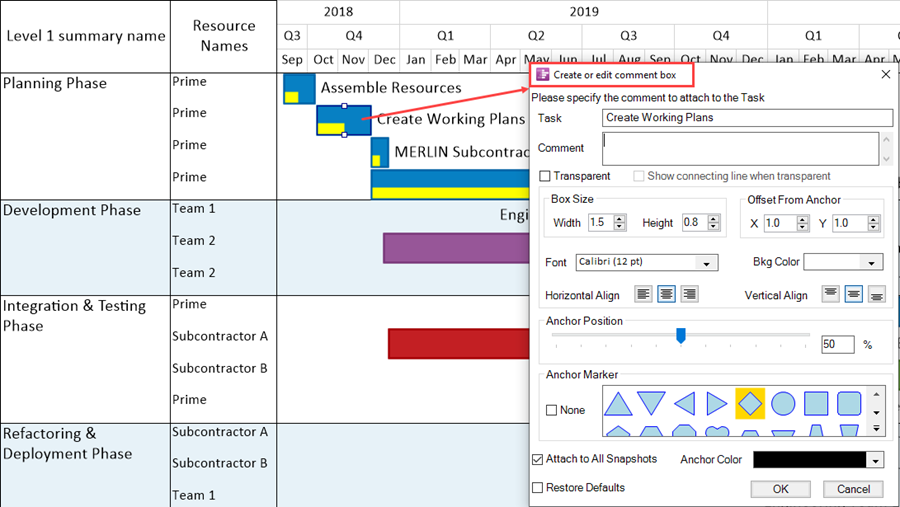
Create or Edit Comment Box Form's Controls
3) Use the form illustration above as reference for the following control functions.
4) Comment. The text you enter that appears in the Comment box.
5) Box Size. The size of the Comment box in inches or centimeters.
6) Offset from Anchor. The displacement of the Comment box from the anchor position on the task/milestone shape. Normally to move a Comment box drag the box to a new position, but you can also set the position with these controls.
7) Anchor Position. A slider bar control that sets the horizontal location along the selected task/milestone shape at which the Comment box is anchored. It is a percentage of the task/milestone’s time duration.
8) Font. The dropdown provides access to the Font properties form with its controls for changing the font type, color, and size of the text in the Comment box are accessed. Additionally, you have control over the text with respect to Bold, Italics, and Underline.
9) Horizontal Align. These three buttons allow you to horizontally position the Comment box text string inside the Comment box. OnePager automatically assures that that the text string remains within the Comment box.
10) Vertical Align. These three buttons allow you to vertically position the Comment box text string inside the Comment box. OnePager automatically assures that that the text string remains within the Comment box.
11) Bkg Color (Background Color). This control uses the standard Color Chooser to select the color for the background within the Comment box.
12) Anchor Shapes. The control lets you select from symbols available the anchors shape for the Comment box to the task/milestone. The anchor shapes are the same shapes available for milestone shapes.
13) None Checkbox. Checking the None checkbox On tells OnePager that there should be no anchor shape used at the junction of the Comment box connecting line and the task/milestone shape.
14) Anchor Color. The control lets you select the color of the anchor shape on the task/milestone.
15) Attach Comment to All Snapshots. If this checkbox checked On, the Comment box appears in all snapshots. Later on, you can delete the Comment box from any snapshot you choose.
16) Restore Defaults. Checking this checkbox On restores the default properties of the Comment box to the settings in the Chart Properties form.
Applying Comment Box Editing Actions
17) After making your option selections in the Create or edit comment box form, click OK to apply your edits to the Comment box on the selected task/milestone.
18) When the OK button on the Create or edit comment box form is clicked, the edits are applied only to the Comment box or boxes associated with the selected task shapes.
19) As a result of individually selecting and editing Comment boxes for individual task/milestone shapes, these Comment boxes are treated as mavericks since their properties likely differ from those properties set in the Chart Properties or Template forms.
20) Recall that the Restore Defaults button in the Create or edit comment box form can be checked On to revert the mavericked properties of any selected Comment box back to the default properties.
Creating A Comment Box Using the Comment Box Button
1) As an alternative way of adding a Comment box for a task/milestone, select the desired task/milestone and then click the Comment Box button in the Insert tab of the ribbon as shown below:
2) Clicking the Comment Box button accesses the Create or edit comment box form where you can make your setting selections as discussed above in the previous section.
3) When all settings are made, click OK and the Comment box is displayed with the selected task/milestone.
4) Shown below is an illustration of a Comment box created using the Comment Box button on the OnePager Insert tab:
5) The sample Comment box shown above consists of a rectangle, inserted text string, and a connecting line to an 'anchor point on the selected task shape.
6) These components of a Comment box can be edited as discussed in the following sections.
Creating A Comment Box From a Task/Milestone Text Label
1) With some charts there are conditions where task/milestone text labels may overlap with other text labels or other task/milestone shapes in the chart.
2) You can manually place a task/milestone shape's name text label into a Comment box and subsequently move and/or resize the Comment box to avoid these situations.
Example
3) Using the portion of a OnePager Pro chart below there are a couple of task/milestone text labels that are difficult to read:

4) One approach to resolving this conflict is to place the the task name text label of Engineering Team 1 Development into a Comment box.
5) To do this, left-click the task name text label itself which selects the text label as shown below:

6) The action of selecting the task name text label also enables the Label Position dropdown list on the OnePager ribbon's Home tab as shown here:
7) After selecting the In comment box command from the dropdown list, the result looks like this:

Alternative Method
8) Placing a task name text label into a Comment box can also be accomplished by right-clicking the task/milestone shape to access its context menu, then clicking the Format... command in the dropdown, and finally accessing the Task Label tab of the accessed Change Task/Milestone Properties form shown below:
9) Upon completion of these steps, the selected task name text label is placed in a Comment box and the chart is modified to look like this:

10) As described below, once the Comment boxes are created you have the capability to move them in the chart, resize the boxes, and edit the text string within the Comment boxes.
11) For more general information on the management of task name text labels, please see the series of articles at: Manual Editing Task/Milestone Shapes and Text Labels (Portal). 9.0.1-70
Editing Comment Boxes
Moving Comment Boxes
1) After creating a comment box, you can moved it another position in the document area by using your mouse to left-click on the Comment box and while holding down the left-click button, drag the Comment box to a new position as is shown below:
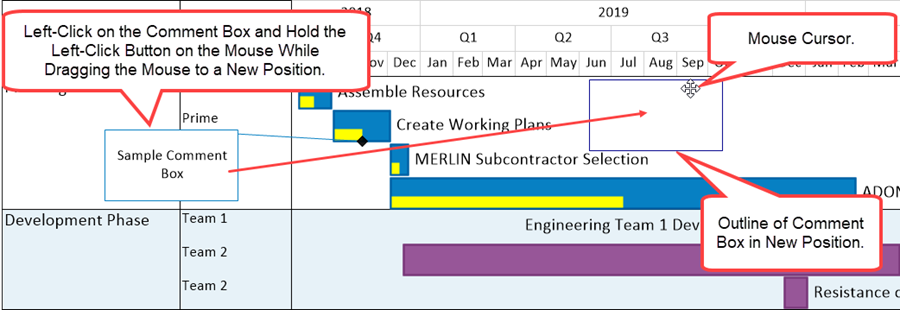
2) When the mouse left-click button is released, the Comment box remains in the new position with the Comment box selected as shown here:

Resizing Comment Boxes
1) To resize a Comment box, the box must first be selected with a left click.
2) Selecting a comment box, results in the comment box being highlighted and surrounded by eight grab boxes as shown below:

3) To resize a Comment box, select the Comment box to display the highlight and eight (8) grab boxes and place the mouse cursor on one of the grab boxes as shown below:

- a) In the chart above the lower right grab box is selected as indicated by the double-arrow cursor shape.
- b) When the mouse is moved with the left-click button depressed, a rectangle shows the proposed Comment box's new position as the cursor is dragged. This intermediate step is shown below:

4) When the left mouse button is released, the Comment box is resized and redrawn as shown below:

5) If you make the selected Comment box smaller in size, OnePager adjusts the Font size to attempt to keep the text string within the Comment box.
Using the Comment Boxes Context Menu
6) Right-clicking on a Comment box or boxes accesses the Comment box context menu shown below:

7) There are five (5) commands shown in the context menu above, four (4) of which are covered in this article at the links shown below:
| Deleting Comment Boxes 13.0.1-70 |
| Ordering Comment Boxes 13.0.1-70 |
| Adding Another Comment Box 13.0.1-70 |
| Putting Selected Comment Boxes in All Snapshots 13.0.1-70 |
Properties... Command
8) Selecting the Properties… command accesses the Create or edit comment box form where the controls are described at this link: Create or Edit Comment Box Form's Controls 13.0.1-70
Using the OnePager Home Tab's Font, Format, and Alignment Control Groups
6) As an alternative, you can use several of the controls on the Home tab to change the properties of text within Comment boxes which are shown here:
Editing Comment Box Text Fonts
7) There are eight (8) controls in the Font control group shown above which are standard in most applications involving text editing.
8) These controls include:
- a) Font Style implemented on the ribbon as a dropdown list that includes the font styles installed on your computer.
- b) Font Size also a dropdown list of possible sizes from 1 to 48.
- c) Bold button which is a toggle setting the selected text string as Bold text.
- d) Italics button which is also a toggle setting the selected text string as Italic text.
- e) Underline button which operates as a toggle setting the selected text string as Underline.
- f) Increase font size button which steps the selected text string's font size up one with every click.
- g) Decrease font size button which steps the selected text string's font size down one with every click.
- h) Text Color button which, when clicked, accesses the standard Color Chooser form.
Editing Comment Box Text Formats
9) In the Format control group shown above only the Text Color button is enabled when a Comment box is selected.
10) The Format... button shown above as a color palette icon is disabled as Comment boxes are not supported by the Change Task/Milestone Properties form.
Editing Comment Box Text Alignments
11) There are two sets of three alignment buttons in the Alignment control group shown above related to the text strings in Comment boxes.
12) The top three alignment buttons align the selected text string in a Comment box vertically within the space enclosed by the Comment box.
13) The bottom three alignment buttons align the selected text string in a Comment box horizontally within the space enclosed by the Comment box.
14) When the size of the Comment box changes either in a horizontal or vertical direction, the vertical and horizontal text string alignments are maintained.
15) OnePager automatically increases or decreases the number of lines of the text string within the Comment box to prevent the text string from overlapping a Comment box boundary.
Managing Other Comment Box Properties
16) The Create or edit comment box form's controls are described above in this article at this link: Create or Edit Comment Box Form's Controls 13.0.1-70
17) The descriptions above are self-explanatory, however, some explanation of several controls need expansion.
Background Color Management
18) There are options regarding the background color for a Comment box.
19) When a Comment box is created for an individual task/milestone name text string, the Create or edit comment box form can be accessed, and the Bkg Color window in this form allows you to edit the background color for that individual Comment box:
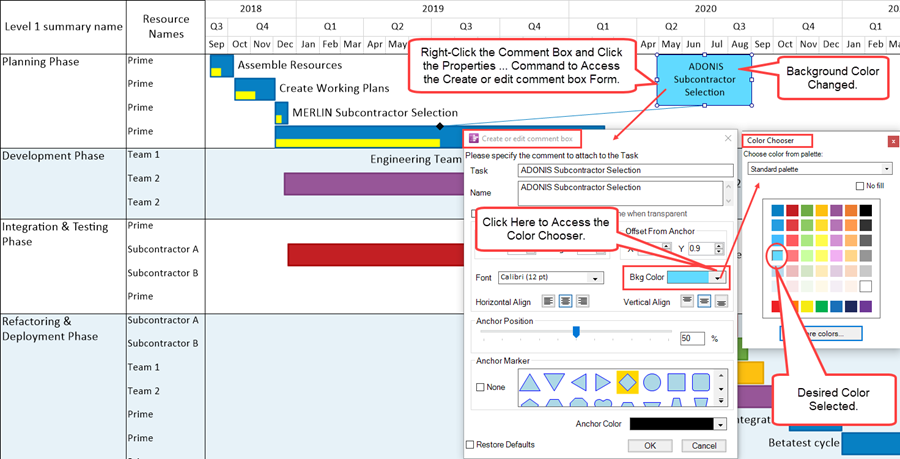
- a) As shown above, you can edit the Comment box’s background color by right-clicking on the Comment box to access the context menu and then select the Properties… command to access the Create or edit comment box form.
- b) When you next, click the Bkg Color control the standard Color Chooser is accessed.
- c) Any background color can be selected from the Color Chooser form, however, keep in mind the color selected for the Comment box's text string in order to avoid hiding the text string within the selected color.
Using the No fill Feature
20) You can turn On the No Fill feature by selecting the No fill checkbox after clicking the Bkg Color control shown below:
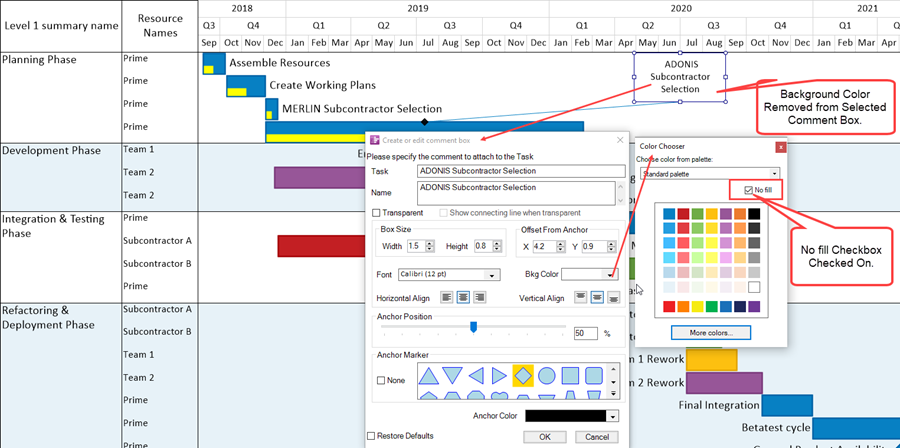
21) Clicking the OK button updates the Bkg Color of the Comment box in the chart.
22) To demonstrate the effect of No fill for the Comment box in the illustration above, moving the Comment box to another position in the chart where there is a chart swimlane background color, the Comment box appears like this:

Transparency Controls
23) The Transparent checkbox in the Create or edit comment box form allows you to change the appearance of the entire Comment box into a free standing text string with or without the Comment box's connecting line.
24) To show an example of this, the illustration below has a typical Comment box with a background color and a connecting line:

25) If we access the Create or edit comment box form as before and check the Transparent checkbox On two things happen:
- a) First, the other Color controls in the form are disabled and
- b) The adjoining Show connecting line when transparent checkbox is enabled.
- c) The Create or edit comment box form looks like this:
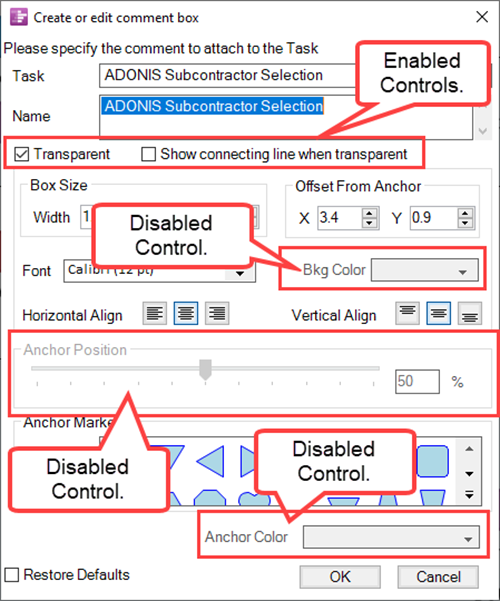
26) Checking the Transparent checkbox On and then clicking the OK button at the bottom of the form alters the selected Comment box to look like this:

27) If you check the Show connecting line when transparent checkbox On, the results are shown below:

28) Although the Comment box shown above is Transparent it can still be selected, moved, and resized as necessary.
29) Additionally, its text string is fully editable.
30) If the Show connecting line when transparent checkbox is On the connecting line responds to any Comment box move or resizing action.
Anchor Position Controls
31) You can control the position of the Comment box anchor on it task shape using the slider bar accessed in the Create or edit comment box form as shown below:
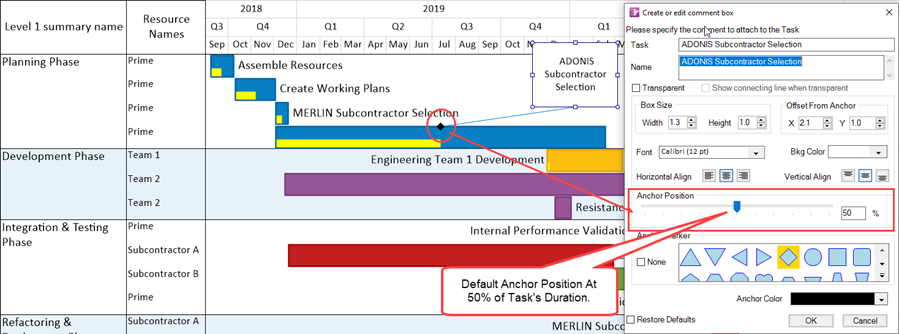
32) Sliding the Anchor Position slider bar left or right changes the anchor position and the position of the Comment box and connecting line as illustrated here with a change of Anchor Position to near the 75% position:

Anchor Shapes
Notes
1) You can eliminate the border, connecting line, and anchor for a comment box by checking the Transparent checkbox shown above in the Create or edit comment box form.
2) Unchecking the No Fill checkbox is a three step process as described in this article: Changing Individual Task/Milestone Properties (Color, Shapes, Labels, etc.) 9.2.1-70
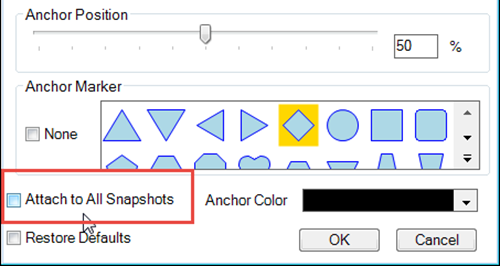
3) The checkbox called Attach to All Snapshots on the Create or edit comment box form appears on the form during the creation of the comment box. The Attach to All Snapshots checkbox is absent from the form when the form is accessed to edit a comment box.
Deleting Comment Boxes
1) To delete a comment box, follow the steps shown below:
2) Right-click on the selected comment box and choose Delete from the context menu. You have two (2) option to delete the comment box:
- (1) from the current snapshot only, or
- (2) from all snapshots.
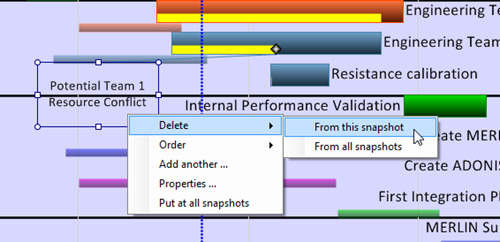
3) Generally, it is more common to delete a comment box from all snapshots, unless you want it to reappear in a different snapshot later on.
Ordering Comment Boxes
1) Comment boxes, when created, are automatically displayed in front of all other graphics.
2) If you want to avoid covering up tasks/milestones or labels, you can use the Order command to adjust the display of comment boxes on the Z-Axis as described in the steps below:
- a) Right-click on the selected comment box and then click on the Order command as shown below:
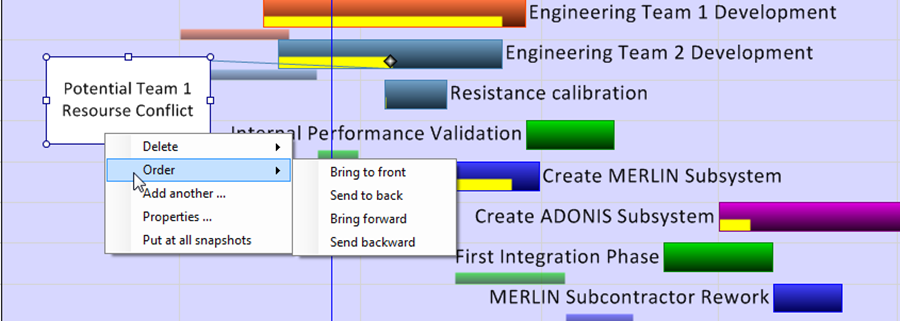
- b) Mouse over the Order command to access the four sub-commands as shown above. These are explained in detail in the The Chart Legend (Portal) 15.0.1-70 group of articles.
3) As shown above, the comment box appears to be hiding the baseline element of the task.
4) If you want that baseline element to appear on top of the comment box, click the Send to back sub-command and the chart looks like this:

Adding Another Comment Box
1) You can have more than one comment box attached to a selected task/milestone.
2) To accomplish this, use the Add another… sub-command as described in the steps below:
- a) Right-click on any comment box attached to the task/milestone that requires an additional comment box.
- b) Then click the Add another… sub-command in the context menu.
2) These actions access the Create or edit comment box form where you can specify the new comment box’s text label and other properties.
3) When you click the OK button, the added comment box is displayed on the selected task/milestone as shown here as an example:

Putting Selected Comment Boxes in All Snapshots
1) The default setting for created comment boxes is to put the comment box in all snapshots.
- a) Sometimes a comment box is only appropriate for a selected snapshot and should not appear in all snapshots.
- b) When this is the desired result, you should uncheck the Attach to All Snapshots checkbox in the Create or edit comment box form when the comment box is first created.
2) The comment box created in this manner has all its other properties set to the default values.
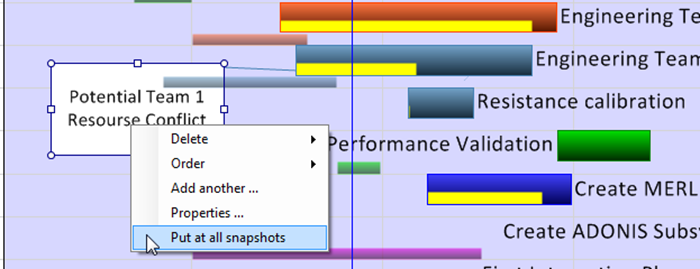
3) Should you subsequently decide that this comment box should be included in all snapshots, right-click on the comment box and click the Put at all snapshots sub-command in the context menu as shown below:
Making Comment Boxes Invisible Except for the Text
1) Sometimes it is convenient to put some text at some arbitrary position near a task or milestone but not have it surrounded by a box border and connected by an anchor line.
2) In the example below, we push the task name into a comment box and then make the comment box itself invisible.
3) We start with this:

- a) Right-click the task/milestone, select Format… command, and then go to the Task Label tab of the Change Task/Milestone Properties form shown below:
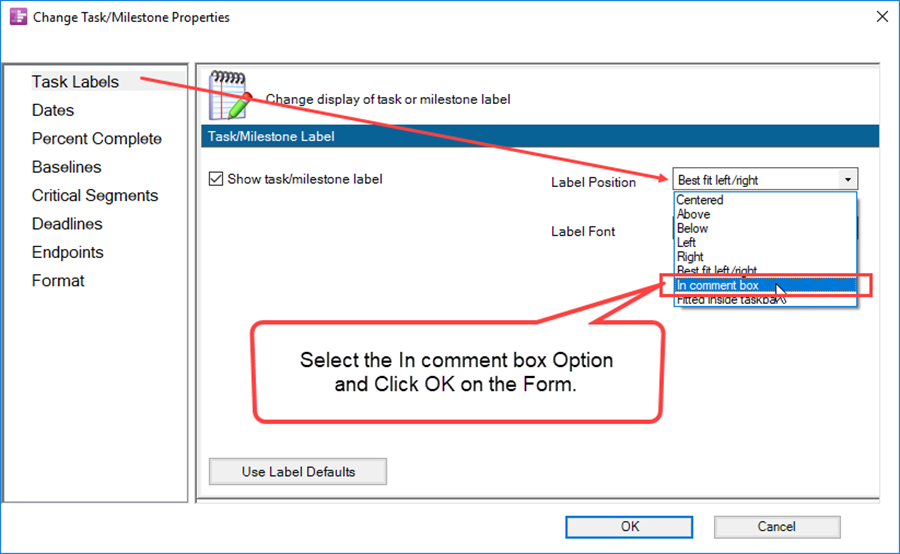
- b) Change the Label Position window to the in comment box option.
- c) Start and finish dates, if displayed with the task label, are not brought into the comment box.
- d) This pushes the task name into a comment box as shown below:

- e) To make the comment box and anchor line disappear, right-click on the comment box and click the Properties… command in the context menu to access the Create or edit comment box form:
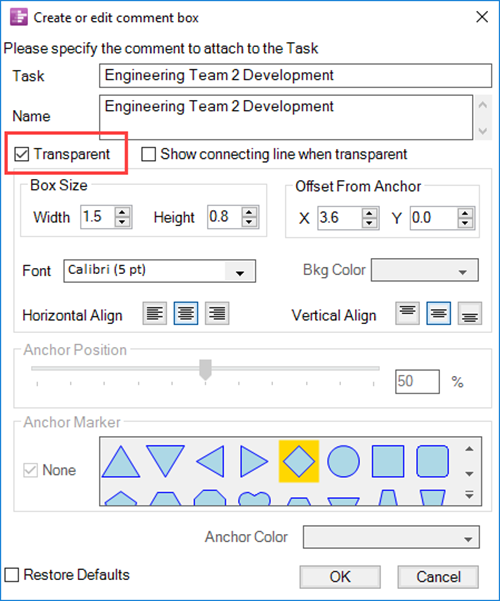
- f) The last step is to check the Transparent checkbox, which makes the comment box look like this:

4) Above, the comment box’s border and connector are both transparent.
5) You also have the option to make to connecting line visible even if the comment box border is transparent by checking the Show connecting line when transparent checkbox ON.
6) When this is done, the chart with the transparent border on the comment box looks like this:

Additional Comment Box Content Options
1) OnePager allows you to display a task bar or milestone’s label in a comment box connected to the task bar or milestone symbol.
- a) This has always been the case.
- b) OnePager can display task bar start and finish dates, the milestone date, and task bar and milestone percent complete (%Complete) information in a comment box.
2) Whenever, either through the Template Properties or the Chart Properties form, you elect to display start date, finish date, and/or percent complete text for task/milestones, you can cause this information to be displayed in a task/milestone comment box.
3) This is shown below where all tasks/milestones are displaying label text, start dates, finish dates, and percent complete values in one task was selected to display this information in a comment box.

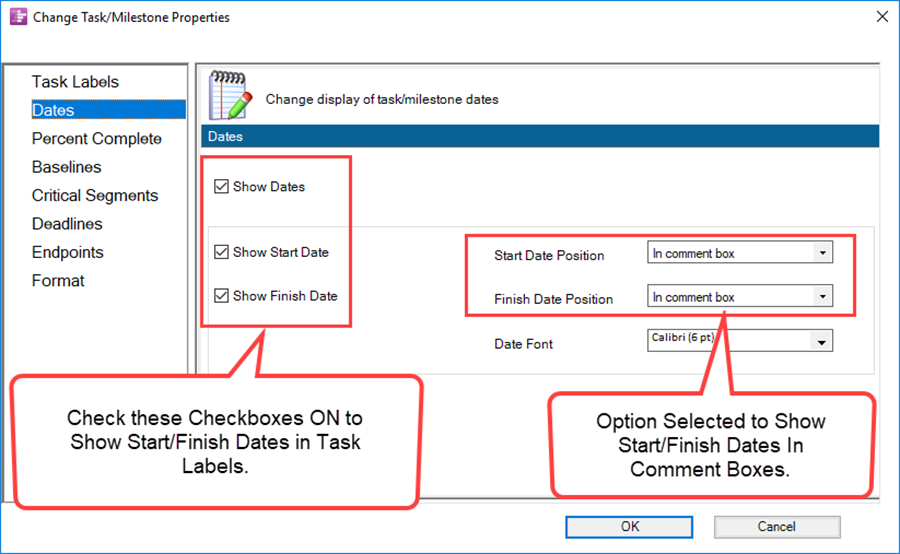
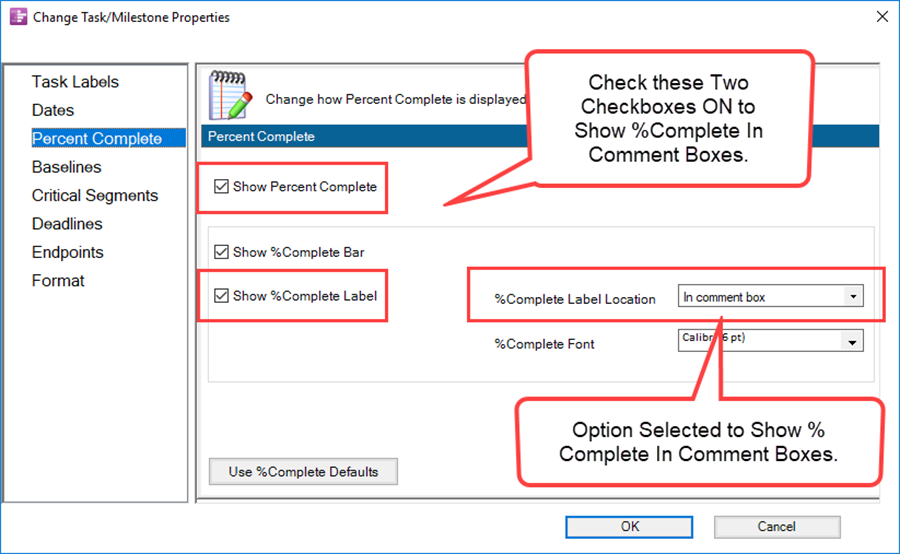
4) Controls for the outcome illustrated above are found by right-clicking on the selected task, selecting the Format… command in the context menu, and then using Change Task/Milestone Properties form’s Dates tab and Percent Complete tab's controls to achieve the desired combination of information to display.
5) The settings for the Dates tab and the Percent Complete tab of the Change Task/Milestone Properties forms are shown below:
Related Links
Manual Editing Task/Milestone Shapes and Text Labels (Portal) 9.0.1-70
Editing with the Chart Properties form (Portal) 21.0.1-70
Comment Boxes 21.11.1-70
Managing Templates (Portal) 24.0.1-70
(13.0.1-70)