Difference between revisions of "Creating and Managing Free Boxes"
m (Text replacement - ".png]]" to ".png|link=]]") |
|||
| Line 7: | Line 7: | ||
Add a free box by going to the “Insert” tab on the OnePager ribbon and selecting the “Free Box” button as shown below: | Add a free box by going to the “Insert” tab on the OnePager ribbon and selecting the “Free Box” button as shown below: | ||
| − | <center>[[File:P52-14_-(1)-06042015.png]]</center> | + | <center>[[File:P52-14_-(1)-06042015.png|link=]]</center> |
<center></center> | <center></center> | ||
| Line 13: | Line 13: | ||
1) Then move the mouse cursor to the location on the graph where you want to place an free floating box and click once to place it on the screen: | 1) Then move the mouse cursor to the location on the graph where you want to place an free floating box and click once to place it on the screen: | ||
| − | <center>[[File:P52-14_-(2)-06042015.png]]</center> | + | <center>[[File:P52-14_-(2)-06042015.png|link=]]</center> |
<center></center> | <center></center> | ||
| Line 19: | Line 19: | ||
2) To create a larger box size when adding it to the graph, click the “Free Box” command on ribbon as before, then move the mouse cursor to the where you want the upper-left corner of the box to be, finally hold down the left mouse button ,and drag the mouse cursor to define the box you want to place on the screen: | 2) To create a larger box size when adding it to the graph, click the “Free Box” command on ribbon as before, then move the mouse cursor to the where you want the upper-left corner of the box to be, finally hold down the left mouse button ,and drag the mouse cursor to define the box you want to place on the screen: | ||
| − | <center>[[File:P52-14_-(3)-06042015.png]]</center> | + | <center>[[File:P52-14_-(3)-06042015.png|link=]]</center> |
<center></center> | <center></center> | ||
| Line 25: | Line 25: | ||
3) Then release the left mouse button to complete the definition of the box: | 3) Then release the left mouse button to complete the definition of the box: | ||
| − | <center>[[File:P52-14_-(4)-06042015.png]]</center> | + | <center>[[File:P52-14_-(4)-06042015.png|link=]]</center> |
<center></center> | <center></center> | ||
| Line 35: | Line 35: | ||
1) Once a free floating box is on the screen, you can move it around, delete it, or edit its properties, just as you do for a comment box. To access these functions, select the box with the mouse and right-click to bring up the context menu shown below: | 1) Once a free floating box is on the screen, you can move it around, delete it, or edit its properties, just as you do for a comment box. To access these functions, select the box with the mouse and right-click to bring up the context menu shown below: | ||
| − | <center>[[File:P52-14_-(5)-06042015.png]]</center> | + | <center>[[File:P52-14_-(5)-06042015.png|link=]]</center> |
==Deleting a Free Box== | ==Deleting a Free Box== | ||
| Line 41: | Line 41: | ||
:a) You can delete the box from the current snapshot or from all snapshots or from just the current snapshot you are working in as shown with the two options below: | :a) You can delete the box from the current snapshot or from all snapshots or from just the current snapshot you are working in as shown with the two options below: | ||
| − | <center>[[File:P52-14_-(6)-06042015.png]]</center> | + | <center>[[File:P52-14_-(6)-06042015.png|link=]]</center> |
==Ordering a Free Box on the Screen== | ==Ordering a Free Box on the Screen== | ||
| Line 47: | Line 47: | ||
:b) You can bring the box to the front of the project view or send it to back of the project view by using the “Order” command. | :b) You can bring the box to the front of the project view or send it to back of the project view by using the “Order” command. | ||
| − | <center>[[File:P52-14_-(7)-06042015.png]]</center> | + | <center>[[File:P52-14_-(7)-06042015.png|link=]]</center> |
==Copying a Free Box== | ==Copying a Free Box== | ||
| Line 53: | Line 53: | ||
:c) You can make a copy of an existing box. Just click on the “Make a copy” sub-command and OnePager will duplicate the selected free box as shown below: | :c) You can make a copy of an existing box. Just click on the “Make a copy” sub-command and OnePager will duplicate the selected free box as shown below: | ||
| − | <center>[[File:P52-14_-(8)-06042015.png]]</center> | + | <center>[[File:P52-14_-(8)-06042015.png|link=]]</center> |
:d) You can make sure that the free box appears at all snapshots by clicking the “Put at all snapshots” sub-command. For more details on the “Put at all snasphots” sub-command consult the “Comment Box” and “Legend” sections of this document. | :d) You can make sure that the free box appears at all snapshots by clicking the “Put at all snapshots” sub-command. For more details on the “Put at all snasphots” sub-command consult the “Comment Box” and “Legend” sections of this document. | ||
| Line 61: | Line 61: | ||
:e) To change all other properties of the box, press the “Properties …” selection, in the context menu which brings up the following form: | :e) To change all other properties of the box, press the “Properties …” selection, in the context menu which brings up the following form: | ||
| − | <center>[[File:P52-14_-(9)-06042015.png]]</center> | + | <center>[[File:P52-14_-(9)-06042015.png|link=]]</center> |
:f) On this form, you can type as much text as you want and place it on as many lines as you want. You can change the box’s font properties, its text alignment, its dimensions, its fill color and its line color as shown below: | :f) On this form, you can type as much text as you want and place it on as many lines as you want. You can change the box’s font properties, its text alignment, its dimensions, its fill color and its line color as shown below: | ||
| − | <center>[[File:P52-14_-(10)-06042015.png]]</center> | + | <center>[[File:P52-14_-(10)-06042015.png|link=]]</center> |
1) The “No Fill option” on the Free Box’s background color is also available. To access this feature bring up the “Shape Properties” form and do the following: | 1) The “No Fill option” on the Free Box’s background color is also available. To access this feature bring up the “Shape Properties” form and do the following: | ||
| Line 71: | Line 71: | ||
:a) Go to the “Fill color” control and click the drop down button to reveal the “Color Chooser” form as shown below: | :a) Go to the “Fill color” control and click the drop down button to reveal the “Color Chooser” form as shown below: | ||
| − | <center>[[File:P52-14_-(11)-06042015.png]]</center> | + | <center>[[File:P52-14_-(11)-06042015.png|link=]]</center> |
<center></center> | <center></center> | ||
| Line 79: | Line 79: | ||
:c) Then, click “OK” and the selected Free Box will look like this: | :c) Then, click “OK” and the selected Free Box will look like this: | ||
| − | <center>[[File:P52-14_-(12)-06042015.png]]</center> | + | <center>[[File:P52-14_-(12)-06042015.png|link=]]</center> |
<center></center> | <center></center> | ||
| Line 87: | Line 87: | ||
:d) You may eliminate the border for a “Free Box” by checking the “No Fill” check box in the “Color Chooser” drop down selected from the “Line Color” window shown above in the “Shape Properties” form shown above. When this is done, the Free Box will look like this: | :d) You may eliminate the border for a “Free Box” by checking the “No Fill” check box in the “Color Chooser” drop down selected from the “Line Color” window shown above in the “Shape Properties” form shown above. When this is done, the Free Box will look like this: | ||
| − | <center>[[File:P52-14_-(13)-06042015.png]]</center> | + | <center>[[File:P52-14_-(13)-06042015.png|link=]]</center> |
<center></center> | <center></center> | ||
| Line 101: | Line 101: | ||
1) To move an existing free floating box select it and drag it to the desired position as shown below: | 1) To move an existing free floating box select it and drag it to the desired position as shown below: | ||
| − | <center>[[File:P52-14_-(14)-06042015.png]]</center> | + | <center>[[File:P52-14_-(14)-06042015.png|link=]]</center> |
2) Release the left-click mouse button and the free floating box will be repositioned as shown below: | 2) Release the left-click mouse button and the free floating box will be repositioned as shown below: | ||
| − | <center>[[File:P52-14_-(15)-06042015.png]]</center> | + | <center>[[File:P52-14_-(15)-06042015.png|link=]]</center> |
<center></center> | <center></center> | ||
| Line 111: | Line 111: | ||
3) To resize a free floating box, left-click to select it and position the cursor on one of the eight (8) grab boxes or circles shown above. Drag the mouse so that the free floating box is resized to the desired dimensions as shown below: | 3) To resize a free floating box, left-click to select it and position the cursor on one of the eight (8) grab boxes or circles shown above. Drag the mouse so that the free floating box is resized to the desired dimensions as shown below: | ||
| − | <center>[[File:P52-14_-(16)-06042015.png]]</center> | + | <center>[[File:P52-14_-(16)-06042015.png|link=]]</center> |
<center></center> | <center></center> | ||
| Line 117: | Line 117: | ||
4) When the desired dimensions are achieved, release the mouse button and the free floating box will be resized as shown below: | 4) When the desired dimensions are achieved, release the mouse button and the free floating box will be resized as shown below: | ||
| − | <center>[[File:P52-14_-(17)-06042015.png]]</center> | + | <center>[[File:P52-14_-(17)-06042015.png|link=]]</center> |
(14.0) | (14.0) | ||
Latest revision as of 07:26, 8 May 2024
Contents
About Free Boxes
Free boxes are similar to comment boxes, except that they are not attached to a task or milestone. Free boxes are similar to text boxes in PowerPoint.
Adding a Free Box
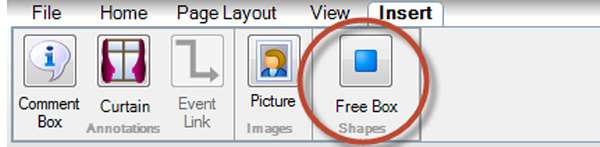
Add a free box by going to the “Insert” tab on the OnePager ribbon and selecting the “Free Box” button as shown below:
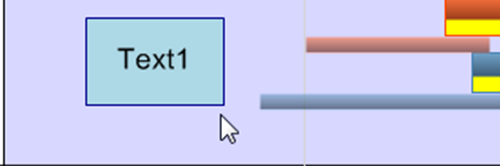
1) Then move the mouse cursor to the location on the graph where you want to place an free floating box and click once to place it on the screen:
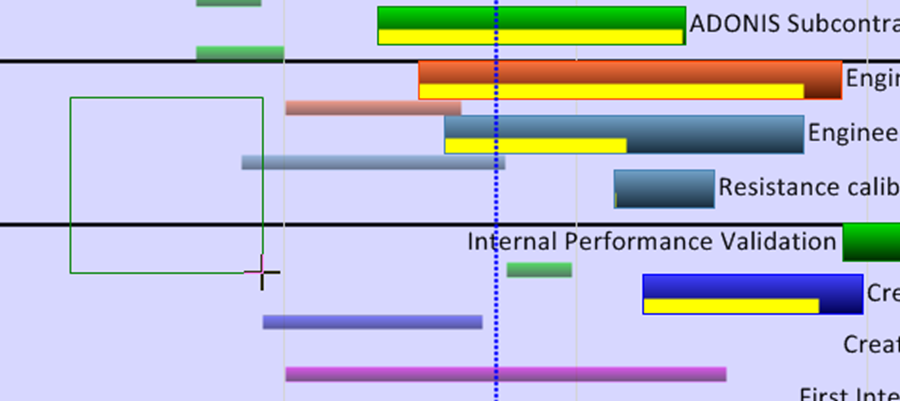
2) To create a larger box size when adding it to the graph, click the “Free Box” command on ribbon as before, then move the mouse cursor to the where you want the upper-left corner of the box to be, finally hold down the left mouse button ,and drag the mouse cursor to define the box you want to place on the screen:
3) Then release the left mouse button to complete the definition of the box:

Editing Free Boxes
To edit free box, follow the steps below:
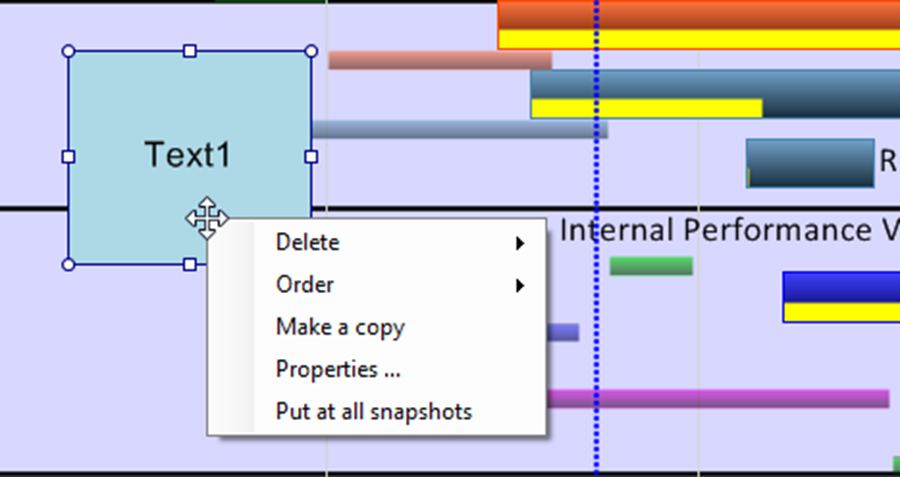
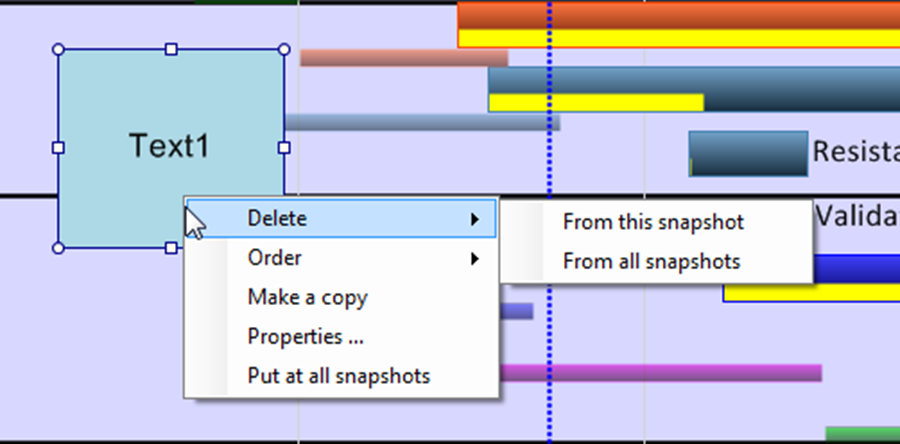
1) Once a free floating box is on the screen, you can move it around, delete it, or edit its properties, just as you do for a comment box. To access these functions, select the box with the mouse and right-click to bring up the context menu shown below:
Deleting a Free Box
- a) You can delete the box from the current snapshot or from all snapshots or from just the current snapshot you are working in as shown with the two options below:
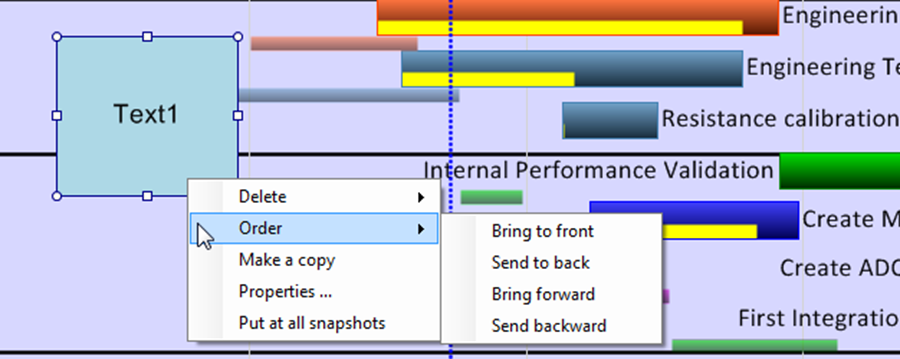
Ordering a Free Box on the Screen
- b) You can bring the box to the front of the project view or send it to back of the project view by using the “Order” command.
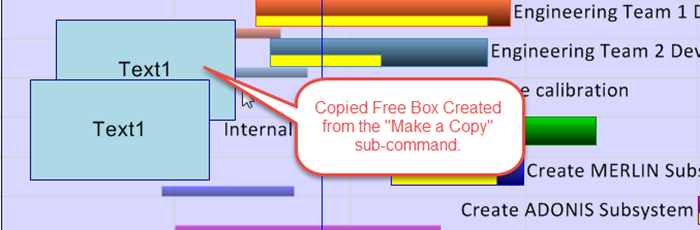
Copying a Free Box
- c) You can make a copy of an existing box. Just click on the “Make a copy” sub-command and OnePager will duplicate the selected free box as shown below:
- d) You can make sure that the free box appears at all snapshots by clicking the “Put at all snapshots” sub-command. For more details on the “Put at all snasphots” sub-command consult the “Comment Box” and “Legend” sections of this document.
Changing the Properties of a Free Box
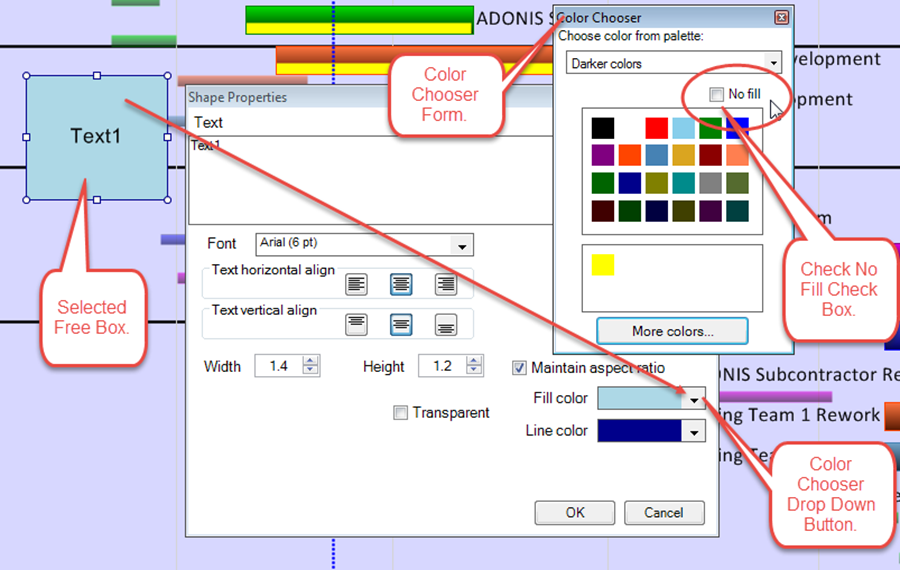
- e) To change all other properties of the box, press the “Properties …” selection, in the context menu which brings up the following form:
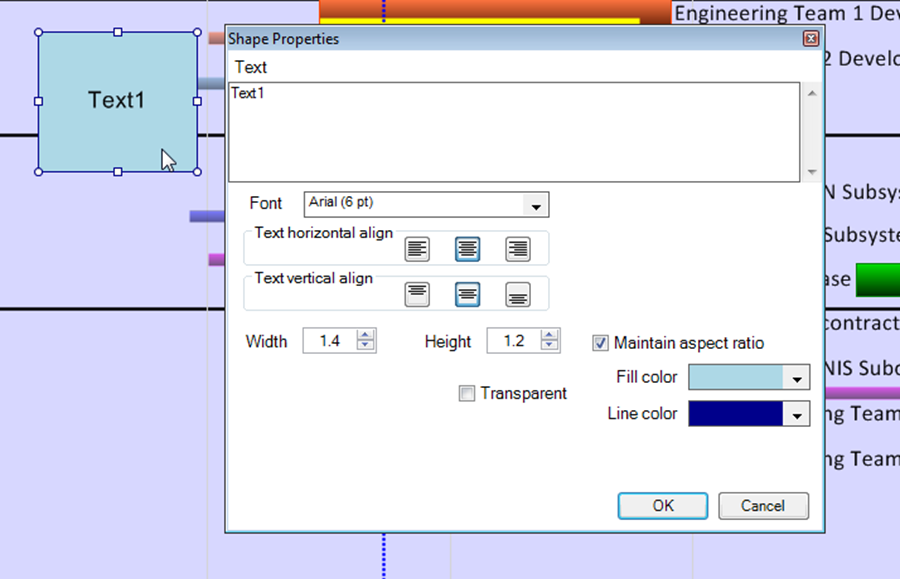
- f) On this form, you can type as much text as you want and place it on as many lines as you want. You can change the box’s font properties, its text alignment, its dimensions, its fill color and its line color as shown below:
1) The “No Fill option” on the Free Box’s background color is also available. To access this feature bring up the “Shape Properties” form and do the following:
- a) Go to the “Fill color” control and click the drop down button to reveal the “Color Chooser” form as shown below:
- b) Check the “No Fill” check box which will cause the “Color Chooser” form to close.
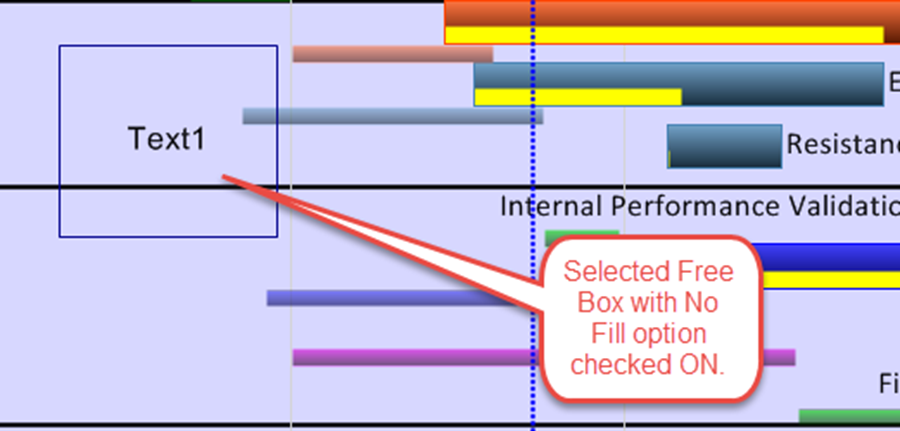
- c) Then, click “OK” and the selected Free Box will look like this:
A Note
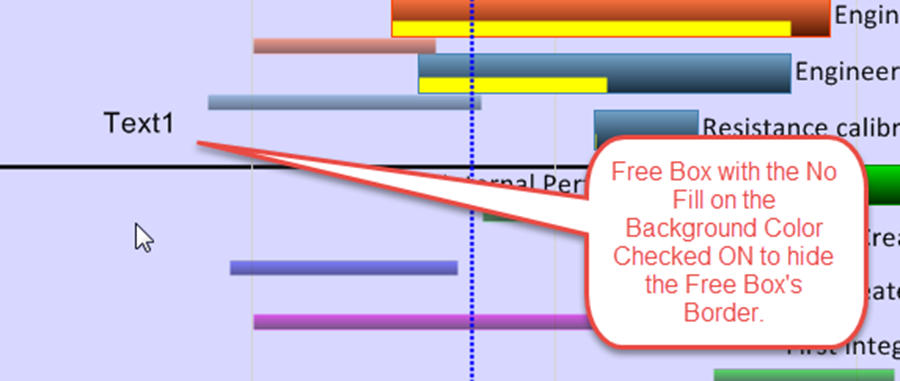
- d) You may eliminate the border for a “Free Box” by checking the “No Fill” check box in the “Color Chooser” drop down selected from the “Line Color” window shown above in the “Shape Properties” form shown above. When this is done, the Free Box will look like this:
A Further Note
- e) Unchecking the “No Fill’ check box is a three step process described above in the “Changing Individual Task/Milestone Colors” group of this document.
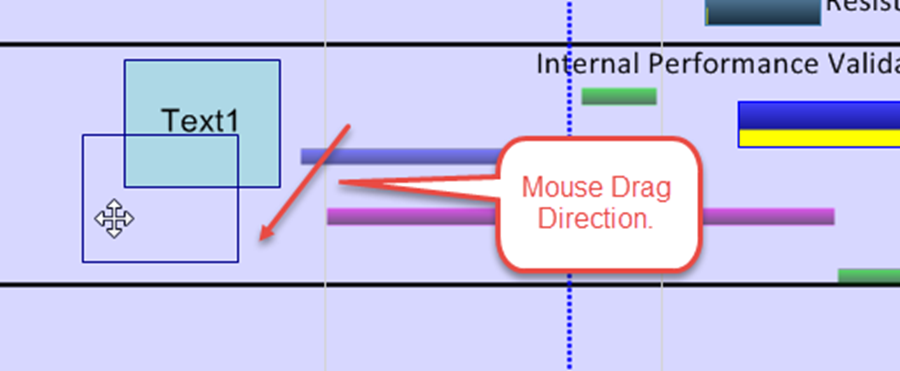
Moving and Resizing Free Boxes
Free floating boxes can be easily moved to different positions, once created, and may be resized.
1) To move an existing free floating box select it and drag it to the desired position as shown below:
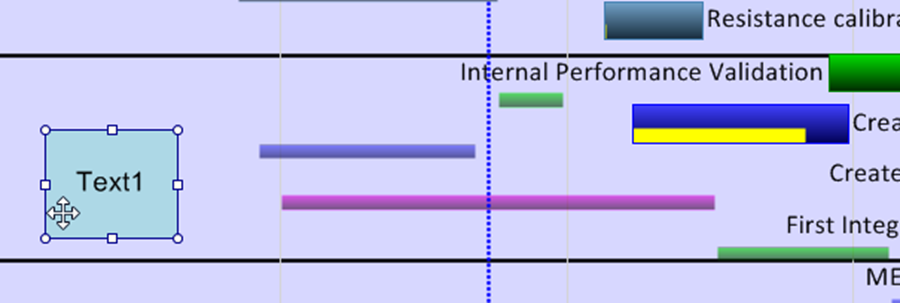
2) Release the left-click mouse button and the free floating box will be repositioned as shown below:
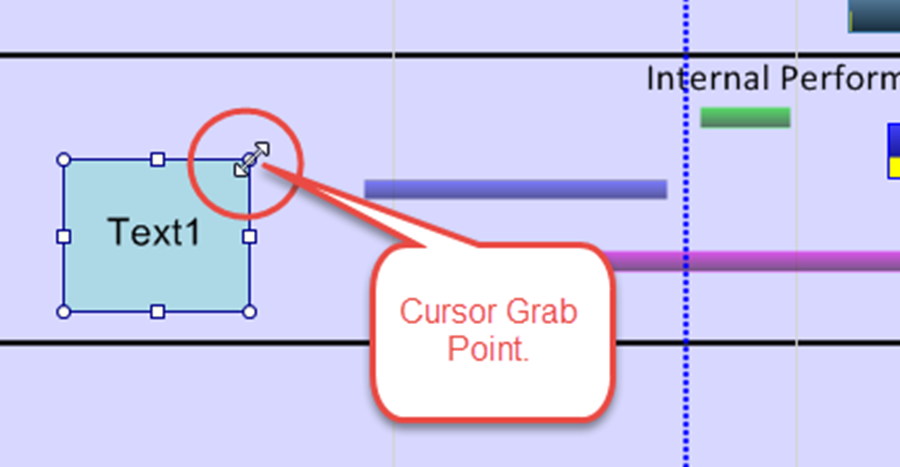
3) To resize a free floating box, left-click to select it and position the cursor on one of the eight (8) grab boxes or circles shown above. Drag the mouse so that the free floating box is resized to the desired dimensions as shown below:
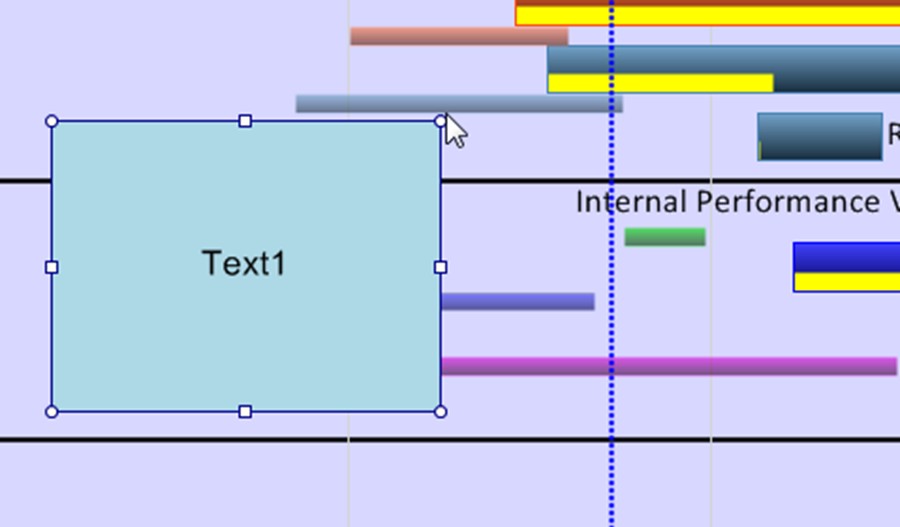
4) When the desired dimensions are achieved, release the mouse button and the free floating box will be resized as shown below:
(14.0)