Difference between revisions of "Creating and Managing Virtual Summary Tasks for Version 7.0"
(Created page with "==About Free Boxes== '''Free boxes''' are similar to '''comment boxes''', except that they are '''not''' attached to a task or milestone. '''Free boxes''' are similar to text...") |
|||
| Line 1: | Line 1: | ||
| − | ==About | + | ==About Creating and Managing Virtual Summary Tasks== |
| − | ''' | + | 1) A virtual summary task ('''VST''') is a summary task created by OnePager that does not exist in Microsoft Project or Excel. It represents the '''start date''' and '''end date''' of two or more constituent tasks or milestones. In this respect the '''VST''' is a OnePager '''summary''' task. |
| − | + | 2) OnePager computes the '''start and end dates''' of a '''VST''' as its constituent '''tasks dates''' change from '''snapshot to snapshot'''. It also constructs '''baselines''', '''percent complete bars''', and '''critical path segments''' (One Pager Pro ('''OPP''') only) for tasks being summarized. | |
| − | + | 3) The illustrations and examples in this article use OnePager Pro. | |
| − | + | ==Creating and Undoing Virtual Summary Tasks== | |
| − | + | To create a Virtual Summary Task ('''VST'''), follow these steps: | |
| − | + | 1) Select the '''first''' task or milestone. | |
| − | + | 2) Hold down the '''CTL key''' and select the '''second''' (and third, fourth, etc.) constituent tasks and milestones. Or '''lasso''' them with the selection rectangle. | |
| − | + | 3) Right-click on any of the selected tasks/milestones to bring up the '''context menu''' shown below. | |
| − | + | 4) Click the '''Make into virtual summary task''' command as shown below: | |
| − | + | <center>[[File:P61-18_0_1-61-(1)-11032017.png]]</center> | |
| + | <center>P61-18_0_1-61-(1)-11032017.png</center> | ||
| − | + | 5) The project view now looks like this: | |
| − | + | <center>[[File:P61-18_0_1-61-(2)-11032017.png]]</center> | |
| + | <center>P61-18_0_1-61-(2)-11032017.png</center> | ||
| − | + | 6) If there are Event Links associated with the selected tasks their Event Links are not shown in the resulting VST. | |
| − | + | 7) To unmake the '''VST''', right-click on the '''VST''', and click the '''Unmake virtual summary task''' command. | |
| − | <center>[[File: | + | <center>[[File:P61-18_0_1-61-(3)-11032017.png]]</center> |
| + | <center>P61-18_0_1-61-(3)-11032017.png</center> | ||
| − | + | 8) When a VST is unmade, any Event Links associated with the participating selected tasks are restored. | |
| − | == | + | ==Setting Percent Complete for Virtual Summary Tasks== |
| − | 1) | + | 1) Because a '''VST''' is really a collection of several other tasks, it is not always clear how to define its '''percent complete value'''. |
| − | 2) | + | 2) By default, the '''percent complete''' for a '''VST''' is computed by OnePager so that the '''progress bar''' touches the '''time now line''', as shown below: |
| − | + | <center>[[File:P61-18_0_1-61-(4)-11032017.png]]</center> | |
| + | <center>P61-18_0_1-61-(4)-11032017.png</center> | ||
| − | + | 3) This value can not always be appropriate because of the positions of the selected tasks with respect to the '''time now vertical line''' (usually the '''snapshot date'''). In some cases there won’t be a '''percent complete''' calculated or in other cases the '''percent complete''' is illogical. | |
| − | + | 4) You can override this default and set the '''percent complete''' value manually by using the following steps: | |
| − | : | + | :a) Right-click the '''VST''' and then click the '''Set % complete of virtual summary task''' command shown in the '''context menu''' below: |
| − | :( | + | <center>[[File:P61-18_0_1-61-(5)-11032017.png]]</center> |
| + | <center>P61-18_0_1-61-(5)-11032017.png</center> | ||
| − | + | :b) Enter the new '''percent complete''' value and click '''OK'''. | |
| − | + | <center>[[File:P52-18_-(6)-06042015.png]]</center> | |
| − | == | + | ==Critical Path Segments in Virtual Summary Tasks== |
| − | 1) | + | 1) '''OPP''' consolidates critical path segments into the '''VST''' from the constituent individual task bars and milestones. '''OPX''' cannot. |
| − | + | 2) In the OnePager Pro project view below there are four tasks that are selected to become part of a '''VST''': | |
| − | + | <center>[[File:P53-18_0_1-53-(6A1)-03182016.png]]</center> | |
| − | + | 3) When the '''VST''' is created, the '''VST''' itself looks like this with consolidated '''critical path segments'''. | |
| − | + | <center>[[File:P53-18_0_1-53-(6B)-03182016.png]]</center> | |
| − | + | ==Displaying Milestones on Virtual Summary Tasks== | |
| − | + | 1) Many users often represent their project views entirely with '''milestone symbols''' normally to focus attention to '''start dates''' and '''finish dates'''. | |
| − | + | 2) We enhanced OnePager so that any '''VST''' configured under circumstances where a '''VST''' is created from '''milestones only''' displays the '''VST''' bar with the collected milestone symbols '''shown on top''' of the bar as illustrated below: | |
| − | + | <center>[[File:P52-18_-(7)-06042015.png]]</center> | |
| − | + | 3) To control the use of this feature, a checkbox was added to the Project-View Properties ('''PVP''') form’s '''Advanced''' tab, '''Display options''' group called '''Overlay VST element''' to turn this feature on and off as shown below: | |
| − | + | <center>[[File:P61-18_0_1-61-(6)-11032017.png]]</center> | |
| + | <center>P61-18_0_1-61-(6)-11032017.png</center> | ||
| − | + | 4) The same checkbox is also available in the '''Template Properties''' form’s '''Advanced''' tab in the same options group to set the feature on for all project views and '''snapshots''' created under that '''Template'''. | |
| − | + | 5) As an example, take the portion of the '''BlueGrass...''' project view shown below where the seven (7) original tasks are now represented as milestones at the '''start date''' and the '''task labels''' hidden to better illustrate the result: | |
| − | + | <center>[[File:P52-18_-(9)-06042015.png]]</center> | |
| − | + | 6) With the '''Overlay VST elements''' checkbox checked, we created a '''VST''' as described in the previous section. The resulting '''VST''' looks like this: | |
| − | <center>[[File:P52- | + | <center>[[File:P52-18_-(10)-06042015.png]]</center> |
| − | + | 7) If you want to move the '''VST''' to another row or swimlane, we have two suggestions on how to do this efficiently: | |
| − | : | + | :(1) If the '''VST''' and milestone configuration is the only thing in the row or swimlane, it is recommended that the move be done by making the move as a row or swimlane move versus trying to select the '''VST''' as a task and move the task. The reason is that the overlays of milestones are separate graphics from the '''VST''' task bar and do not move with the '''VST''' task bar. |
| − | + | :(2) If the '''VST''' and milestone configuration occupy a row or swimlane with other items, we recommend that you '''lasso''' the entire configuration which selects all elements and with the selection '''lasso''' active, make the move up or down. | |
| − | + | ==Task Links and Virtual Summary Tasks (VST)== | |
| − | + | 1) If you are '''creating''' or '''editing''' '''Virtual Summary Tasks''' ('''VST''') that have either '''Data-Driven''' or manual '''Task Links''', it is important to be aware of how those '''Task Links''' appear after the '''creation''' or '''editing''' processes are complete. | |
| + | |||
| + | 2) For more information on the subject of '''Task Links''' and '''Virtual Summary Tasks''' please see the section on this subject at this link: [[Manual Editing of Task Links for OnePager Pro for Version 7.0#Task Links and Virtual Summary Tasks (VST) | Manual Editing of Task Links for OnePager Pro - Task Links and Virtual Summary Tasks (VST)]]. 19.4.1-70 | ||
| − | + | (18.0.1-70) | |
| − | + | ||
| − | + | ||
| − | + | ||
| − | + | ||
| − | + | ||
| − | + | ||
| − | + | ||
| − | + | ||
| − | + | ||
| − | + | ||
| − | + | ||
| − | + | ||
| − | + | ||
| − | + | ||
| − | + | ||
| − | + | ||
| − | + | ||
| − | + | ||
| − | + | ||
| − | + | ||
| − | + | ||
| − | + | ||
| − | + | ||
| − | + | ||
| − | + | ||
| − | + | ||
| − | + | ||
| − | + | ||
| − | + | ||
| − | + | ||
| − | + | ||
| − | + | ||
| − | + | ||
| − | + | ||
| − | + | ||
| − | + | ||
| − | + | ||
| − | + | ||
| − | + | ||
| − | + | ||
| − | + | ||
| − | + | ||
| − | + | ||
| − | + | ||
| − | + | ||
| − | + | ||
[[Category:Version 7.0]] | [[Category:Version 7.0]] | ||
[[Category:Editing a Project View]] | [[Category:Editing a Project View]] | ||
| − | [[Category: | + | [[Category:Virtual Summary Tasks]] |
| + | [[Category:Task/Milestone Editing]] | ||
[[Category:Ribbon]] | [[Category:Ribbon]] | ||
[[Category:Snapshots]] | [[Category:Snapshots]] | ||
[[Category:Project Views]] | [[Category:Project Views]] | ||
| + | [[Category:Templates]] | ||
| + | [[Category:Project-View Properties Form]] | ||
[[Category:OnePager Pro]] | [[Category:OnePager Pro]] | ||
[[Category:OnePager Express]] | [[Category:OnePager Express]] | ||
Revision as of 19:09, 18 January 2019
Contents
About Creating and Managing Virtual Summary Tasks
1) A virtual summary task (VST) is a summary task created by OnePager that does not exist in Microsoft Project or Excel. It represents the start date and end date of two or more constituent tasks or milestones. In this respect the VST is a OnePager summary task.
2) OnePager computes the start and end dates of a VST as its constituent tasks dates change from snapshot to snapshot. It also constructs baselines, percent complete bars, and critical path segments (One Pager Pro (OPP) only) for tasks being summarized.
3) The illustrations and examples in this article use OnePager Pro.
Creating and Undoing Virtual Summary Tasks
To create a Virtual Summary Task (VST), follow these steps:
1) Select the first task or milestone.
2) Hold down the CTL key and select the second (and third, fourth, etc.) constituent tasks and milestones. Or lasso them with the selection rectangle.
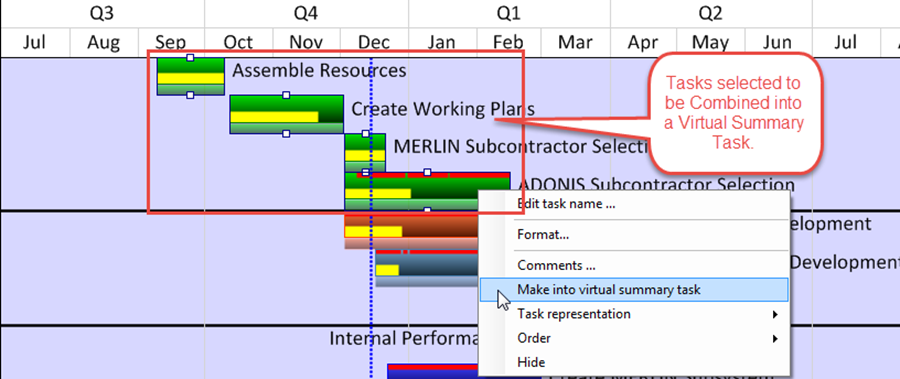
3) Right-click on any of the selected tasks/milestones to bring up the context menu shown below.
4) Click the Make into virtual summary task command as shown below:
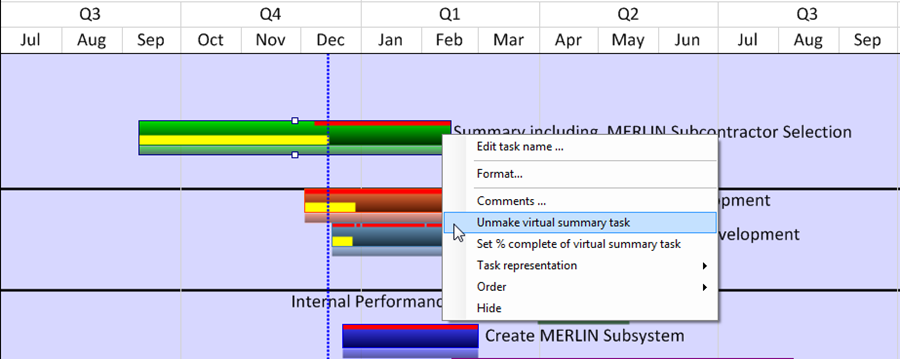
5) The project view now looks like this:

6) If there are Event Links associated with the selected tasks their Event Links are not shown in the resulting VST.
7) To unmake the VST, right-click on the VST, and click the Unmake virtual summary task command.
8) When a VST is unmade, any Event Links associated with the participating selected tasks are restored.
Setting Percent Complete for Virtual Summary Tasks
1) Because a VST is really a collection of several other tasks, it is not always clear how to define its percent complete value.
2) By default, the percent complete for a VST is computed by OnePager so that the progress bar touches the time now line, as shown below:

3) This value can not always be appropriate because of the positions of the selected tasks with respect to the time now vertical line (usually the snapshot date). In some cases there won’t be a percent complete calculated or in other cases the percent complete is illogical.
4) You can override this default and set the percent complete value manually by using the following steps:
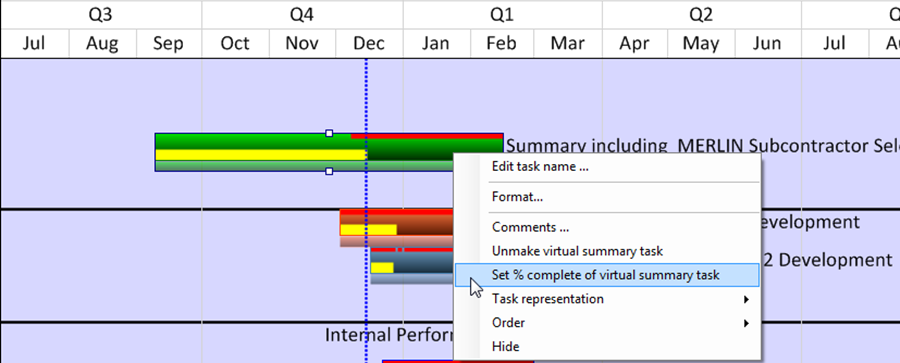
- a) Right-click the VST and then click the Set % complete of virtual summary task command shown in the context menu below:
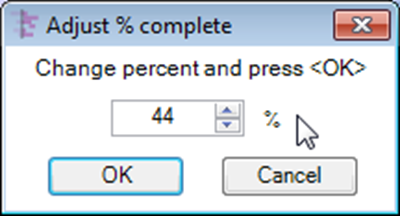
- b) Enter the new percent complete value and click OK.
Critical Path Segments in Virtual Summary Tasks
1) OPP consolidates critical path segments into the VST from the constituent individual task bars and milestones. OPX cannot.
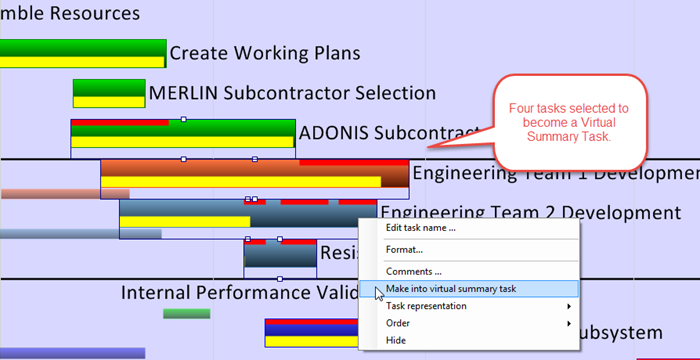
2) In the OnePager Pro project view below there are four tasks that are selected to become part of a VST:
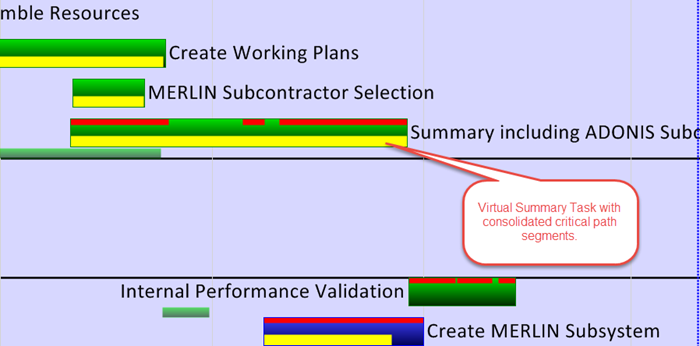
3) When the VST is created, the VST itself looks like this with consolidated critical path segments.
Displaying Milestones on Virtual Summary Tasks
1) Many users often represent their project views entirely with milestone symbols normally to focus attention to start dates and finish dates.
2) We enhanced OnePager so that any VST configured under circumstances where a VST is created from milestones only displays the VST bar with the collected milestone symbols shown on top of the bar as illustrated below:

3) To control the use of this feature, a checkbox was added to the Project-View Properties (PVP) form’s Advanced tab, Display options group called Overlay VST element to turn this feature on and off as shown below:
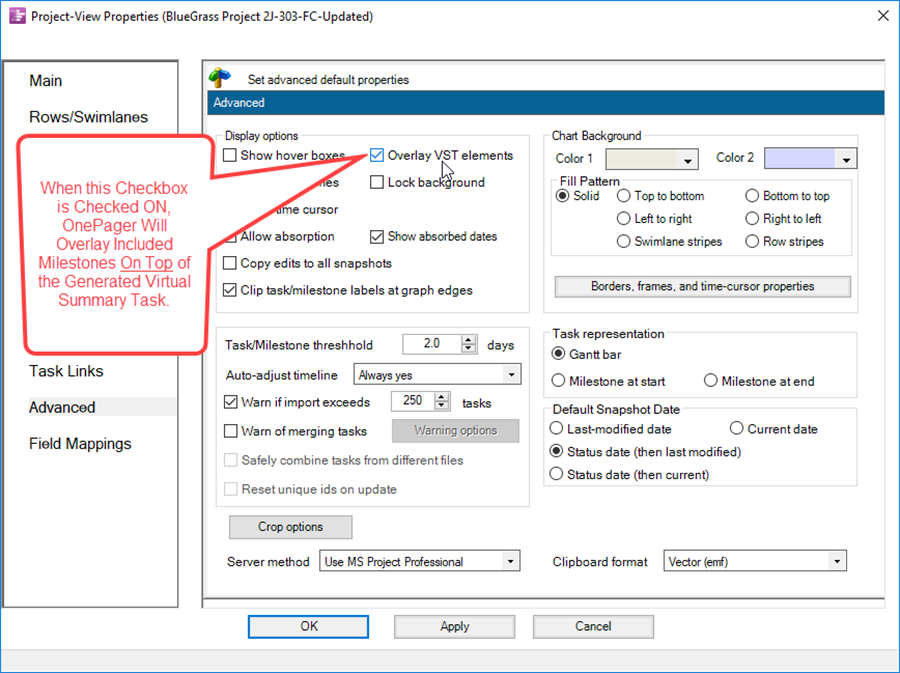
4) The same checkbox is also available in the Template Properties form’s Advanced tab in the same options group to set the feature on for all project views and snapshots created under that Template.
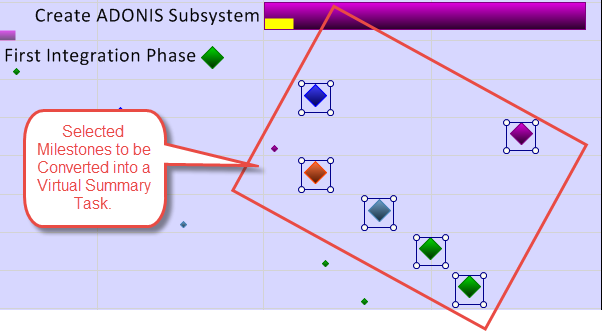
5) As an example, take the portion of the BlueGrass... project view shown below where the seven (7) original tasks are now represented as milestones at the start date and the task labels hidden to better illustrate the result:
6) With the Overlay VST elements checkbox checked, we created a VST as described in the previous section. The resulting VST looks like this:

7) If you want to move the VST to another row or swimlane, we have two suggestions on how to do this efficiently:
- (1) If the VST and milestone configuration is the only thing in the row or swimlane, it is recommended that the move be done by making the move as a row or swimlane move versus trying to select the VST as a task and move the task. The reason is that the overlays of milestones are separate graphics from the VST task bar and do not move with the VST task bar.
- (2) If the VST and milestone configuration occupy a row or swimlane with other items, we recommend that you lasso the entire configuration which selects all elements and with the selection lasso active, make the move up or down.
Task Links and Virtual Summary Tasks (VST)
1) If you are creating or editing Virtual Summary Tasks (VST) that have either Data-Driven or manual Task Links, it is important to be aware of how those Task Links appear after the creation or editing processes are complete.
2) For more information on the subject of Task Links and Virtual Summary Tasks please see the section on this subject at this link: Manual Editing of Task Links for OnePager Pro - Task Links and Virtual Summary Tasks (VST). 19.4.1-70
(18.0.1-70)