Difference between revisions of "Creating and Saving Color Palettes for Version 6.1"
m (Text replacement - ".png]]" to ".png|link=]]") |
|||
| (One intermediate revision by one other user not shown) | |||
| Line 1: | Line 1: | ||
| − | |||
| − | |||
==About Creating, Saving, and Sharing Color Palettes== | ==About Creating, Saving, and Sharing Color Palettes== | ||
| − | You can create and distribute custom '''color palettes''' so that you and others can build project views that have standard sets of colors. | + | 1) You can create and distribute custom '''color palettes''' so that you and others can build project views that have standard sets of colors. |
| − | OnePager is distributed with several '''standard color palettes''' which are available to all users. | + | 1) OnePager is distributed with several '''standard color palettes''' which are available to all users. |
==Creating Custom Color Palettes== | ==Creating Custom Color Palettes== | ||
| − | To create a '''color palette''' that others can use, you must create a '''custom color palette'''. | + | 1) To create a '''color palette''' that others can use, you must create a '''custom color palette'''. |
| − | Here are the steps: | + | 2) Here are the steps: |
| − | + | 3) Open any project view and click the Project-View Properties ('''PVP''') button and select the '''Edit color palettes…''' button in the '''Main''' tab as shown here: | |
| − | <center>[[File:P61-25_0_1-61-(1)-11282018.png]]</center> | + | <center>[[File:P61-25_0_1-61-(1)-11282018.png|link=]]</center> |
| − | <center>P61-25_0_1-61-(1)-11282018.png</center> | + | <!--center>P61-25_0_1-61-(1)-11282018.png</center--> |
| − | + | 4) Select an existing palette as the starting point for your '''custom color palette''' by choosing one of the palettes from the '''Palette name:''' dropdown list: | |
| − | <center>[[File:P61-25_0_1-61-(2)-11282018.png]]</center> | + | <center>[[File:P61-25_0_1-61-(2)-11282018.png|link=]]</center> |
| − | <center>P61-25_0_1-61-(2)-11282018.png</center> | + | <!--center>P61-25_0_1-61-(2)-11282018.png</center--> |
:a) You have the option to '''BROWSE…''' the available distributed '''color palettes''' or select a '''color palette''' group from the dropdown list shown above. | :a) You have the option to '''BROWSE…''' the available distributed '''color palettes''' or select a '''color palette''' group from the dropdown list shown above. | ||
| Line 27: | Line 25: | ||
:b) When you click on the '''BROWSE…''' OnePager accesses the '''Open''' window shown below: | :b) When you click on the '''BROWSE…''' OnePager accesses the '''Open''' window shown below: | ||
| − | <center>[[File:P61-25_0_1-61-(3)-11282018.png]]</center> | + | <center>[[File:P61-25_0_1-61-(3)-11282018.png|link=]]</center> |
| − | <center>P61-25_0_1-61-(3)-11282018.png</center> | + | <!--center>P61-25_0_1-61-(3)-11282018.png</center--> |
:c) Select the desired palette and click '''Open''' to make the selected palette the '''current palette'''. | :c) Select the desired palette and click '''Open''' to make the selected palette the '''current palette'''. | ||
| Line 34: | Line 32: | ||
:d) Clicking on any of the other options in the dropdown list above immediately makes that selected '''color palette''' the '''current palette'''. | :d) Clicking on any of the other options in the dropdown list above immediately makes that selected '''color palette''' the '''current palette'''. | ||
| − | + | 5) Create the '''custom color palette''' by navigating to the '''Palette Editor''' menu bar’s '''File''' button and click '''Save current color palette as…''' command, shown below: | |
| − | <center>[[File:P61-25_0_1-61-(4)-11282018.png]]</center> | + | <center>[[File:P61-25_0_1-61-(4)-11282018.png|link=]]</center> |
| − | <center>P61-25_0_1-61-(4)-11282018.png</center> | + | <!--center>P61-25_0_1-61-(4)-11282018.png</center--> |
| − | + | 6) Clicking the '''Save current palette as…''' dropdown menu command accesses the '''Export Chronicle Graphics color palette (.TAP) file''' form where you can name your '''custom color palette''' and even store it in a different folder than OnePager previously created. | |
| − | + | 7) The '''Export Chronicle Graphics color palette (TAP) file''' form looks like this: | |
| − | <center>[[File:P61-25_0_1-61-(5)-11282018.png]]</center> | + | <center>[[File:P61-25_0_1-61-(5)-11282018.png|link=]]</center> |
| − | <center>P61-25_0_1-61-(5)-11282018.png</center> | + | <!--center>P61-25_0_1-61-(5)-11282018.png</center--> |
| − | + | 8) Using the same process, you can create '''color palettes''' by using the '''Main''' tab on the '''Template''' form as demonstrated in the following sections. | |
==Modifying Color Palettes== | ==Modifying Color Palettes== | ||
| − | You can add a '''color''' to an existing '''color palette''', change, or delete a '''color''' from a '''color palette'''. | + | 1) You can add a '''color''' to an existing '''color palette''', change, or delete a '''color''' from a '''color palette'''. |
| − | This can be done by using the following steps: | + | 2) This can be done by using the following steps: |
| − | + | 3) Before you can make changes to an existing '''color palette''' it must be retrieved from its storage folder. | |
| − | :a) To do this, launch the '''Template Properties''' form for the '''Template''' involved as discussed elsewhere (See: [[Managing Templates for Version 6.1 (Portal) | Managing Templates (Portal)]] 24.0.1-61). | + | :a) To do this, launch the '''Template Properties''' form for the '''Template''' involved as discussed elsewhere (See: [[Managing Templates for Version 6.1 (Portal) | Managing Templates (Portal)]] <!--24.0.1-61-->). |
:b) Next, go to the '''Main''' tab and click the '''Edit color palettes…''' button. | :b) Next, go to the '''Main''' tab and click the '''Edit color palettes…''' button. | ||
| Line 62: | Line 60: | ||
:c) This accesses the '''current color palette''' as shown below: | :c) This accesses the '''current color palette''' as shown below: | ||
| − | <center>[[File:P61-25_0_1-61-(6)-11282018.png]]</center> | + | <center>[[File:P61-25_0_1-61-(6)-11282018.png|link=]]</center> |
| − | <center>P61-25_0_1-61-(6)-11282018.png</center> | + | <!--center>P61-25_0_1-61-(6)-11282018.png</center--> |
| − | + | 4) You have several areas where you can make a changes: | |
===Change Color Palette Name=== | ===Change Color Palette Name=== | ||
| Line 75: | Line 73: | ||
:c) Clicking the dropdown button reveals the following: | :c) Clicking the dropdown button reveals the following: | ||
| − | <center>[[File:P61-25_0_1-61-(7)-11282018.png]]</center> | + | <center>[[File:P61-25_0_1-61-(7)-11282018.png|link=]]</center> |
| − | <center>P61-25_0_1-61-(7)-11282018.png</center> | + | <!--center>P61-25_0_1-61-(7)-11282018.png</center--> |
::i) Click the '''BROWSE…''' command to access the Microsoft Windows '''Open''' form for the '''color palettes''' as shown here: | ::i) Click the '''BROWSE…''' command to access the Microsoft Windows '''Open''' form for the '''color palettes''' as shown here: | ||
| − | <center>[[File:P61-25_0_1-61-(8)-11282018.png]]</center> | + | <center>[[File:P61-25_0_1-61-(8)-11282018.png|link=]]</center> |
| − | <center>P61-25_0_1-61-(8)-11282018.png</center> | + | <!--center>P61-25_0_1-61-(8)-11282018.png</center--> |
::ii) When the desired '''color palette''' is selected, click the '''Open''' button and this '''color palette''' becomes the '''current color palette''' for '''editing''' purposes. | ::ii) When the desired '''color palette''' is selected, click the '''Open''' button and this '''color palette''' becomes the '''current color palette''' for '''editing''' purposes. | ||
::iii) Then, click the '''Save current palette as…''' command from the '''File''' dropdown to '''save''' the '''renamed color palette''' as shown below: | ::iii) Then, click the '''Save current palette as…''' command from the '''File''' dropdown to '''save''' the '''renamed color palette''' as shown below: | ||
| − | <center>[[File:P61-25_0_1-61-(9)-11282018.png]]</center> | + | <center>[[File:P61-25_0_1-61-(9)-11282018.png|link=]]</center> |
| − | <center>P61-25_0_1-61-(9)-11282018.png</center> | + | <!--center>P61-25_0_1-61-(9)-11282018.png</center--> |
::iv) Clicking on the '''Save current palette as…''' command accesses the '''Export Chronicle Graphics color palette (.TAP) file''' form as shown below: | ::iv) Clicking on the '''Save current palette as…''' command accesses the '''Export Chronicle Graphics color palette (.TAP) file''' form as shown below: | ||
| − | <center>[[File:P61-25_0_1-61-(10)-11282018.png]]</center> | + | <center>[[File:P61-25_0_1-61-(10)-11282018.png|link=]]</center> |
| − | <center>P61-25_0_1-61-(10)-11282018.png</center> | + | <!--center>P61-25_0_1-61-(10)-11282018.png</center--> |
::v) Type in the desired '''name''' for the '''renamed''' selected '''color palette'''. | ::v) Type in the desired '''name''' for the '''renamed''' selected '''color palette'''. | ||
| Line 104: | Line 102: | ||
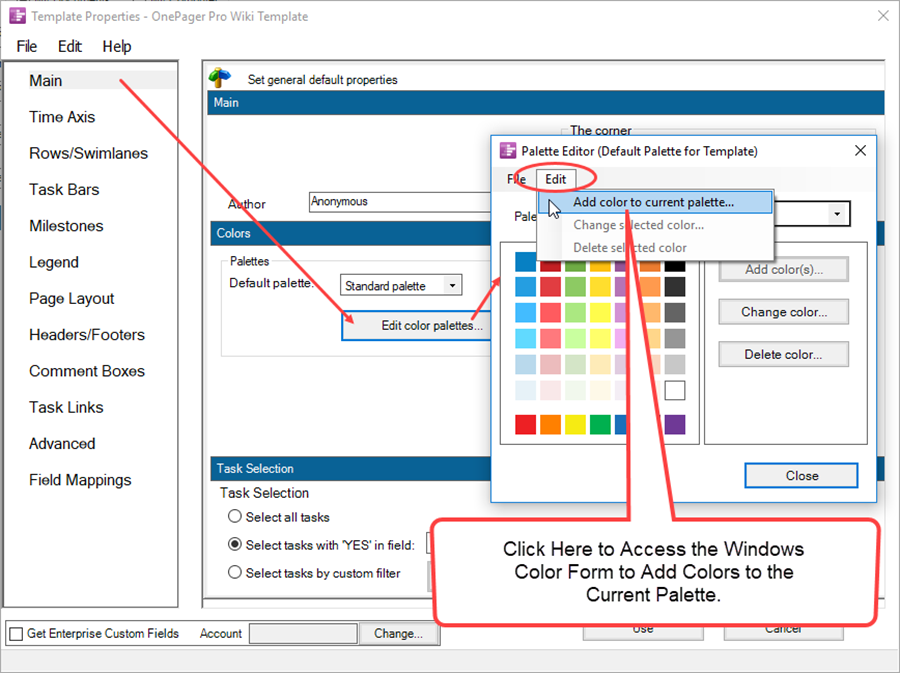
:e) Then click the '''Add color to current palette...''' command to access the Microsoft Windows '''Color''' form as shown below: | :e) Then click the '''Add color to current palette...''' command to access the Microsoft Windows '''Color''' form as shown below: | ||
| − | <center>[[File:P61-25_0_1-61-(11)-11282018.png]]</center> | + | <center>[[File:P61-25_0_1-61-(11)-11282018.png|link=]]</center> |
| − | <center>P61-25_0_1-61-(11)-11282018.png</center> | + | <!--center>P61-25_0_1-61-(11)-11282018.png</center--> |
:f) The '''Color''' form looks like this: | :f) The '''Color''' form looks like this: | ||
| − | <center>[[File:P61-25_0_1-61-(11-1)-11282018.png]]</center> | + | <center>[[File:P61-25_0_1-61-(11-1)-11282018.png|link=]]</center> |
| − | <center>P61-25_0_1-61-(11-1)-11282018.png</center> | + | <!--center>P61-25_0_1-61-(11-1)-11282018.png</center--> |
::i) There are already basic '''colors''' selected so to add your '''custom colors''' (up to 16 at a time), place the cursor into the '''color spectrum''' area for the desired color. As this is done, the '''color''' from the '''color spectrum''' is shown in the '''Color|Solid''' window. When the desired '''color''' is showing in the '''Color|Solid''' window, click the '''Add to Custom Colors''' button. The new '''Custom Color''' is placed in the next available '''Custom colors:''' box. | ::i) There are already basic '''colors''' selected so to add your '''custom colors''' (up to 16 at a time), place the cursor into the '''color spectrum''' area for the desired color. As this is done, the '''color''' from the '''color spectrum''' is shown in the '''Color|Solid''' window. When the desired '''color''' is showing in the '''Color|Solid''' window, click the '''Add to Custom Colors''' button. The new '''Custom Color''' is placed in the next available '''Custom colors:''' box. | ||
::ii) When this is done, the '''Color''' form looks like this: | ::ii) When this is done, the '''Color''' form looks like this: | ||
| − | <center>[[File:P61-25_0_1-61-(12)-11282018.png]]</center> | + | <center>[[File:P61-25_0_1-61-(12)-11282018.png|link=]]</center> |
| − | <center>P61-25_0_1-61-(12)-11282018.png</center> | + | <!--center>P61-25_0_1-61-(12)-11282018.png</center--> |
::iii) Repeat this process until all the new '''colors''' are selected. | ::iii) Repeat this process until all the new '''colors''' are selected. | ||
| Line 122: | Line 120: | ||
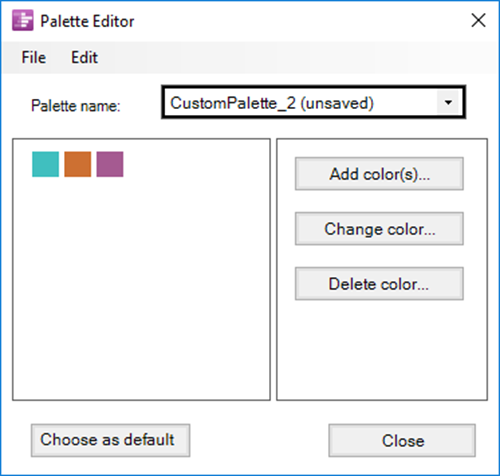
::v) At the end of the process described here the '''custom palette''' looks like this sample: | ::v) At the end of the process described here the '''custom palette''' looks like this sample: | ||
| − | <center>[[File:P61-25_0_1-61-(13)-11282018.png]]</center> | + | <center>[[File:P61-25_0_1-61-(13)-11282018.png|link=]]</center> |
| − | <center>P61-25_0_1-61-(13)-11282018.png</center> | + | <!--center>P61-25_0_1-61-(13)-11282018.png</center--> |
::vi) When you click the '''Close''' button the process is complete. | ::vi) When you click the '''Close''' button the process is complete. | ||
::vii) You are then asked if you want to save the '''color palette''' that was changed as shown here. | ::vii) You are then asked if you want to save the '''color palette''' that was changed as shown here. | ||
| − | <center>[[File:P61-25_0_1-61-(13-1)-11282018.png]]</center> | + | <center>[[File:P61-25_0_1-61-(13-1)-11282018.png|link=]]</center> |
| − | <center>P61-25_0_1-61-(13-1)-11282018.png</center> | + | <!--center>P61-25_0_1-61-(13-1)-11282018.png</center--> |
::viii) Answer '''Yes''' or '''No''' to this question and OnePager takes the appropriate action. | ::viii) Answer '''Yes''' or '''No''' to this question and OnePager takes the appropriate action. | ||
| Line 141: | Line 139: | ||
::ii) This accesses the '''Color''' form as shown below on the right: | ::ii) This accesses the '''Color''' form as shown below on the right: | ||
| − | <center>[[File:P61-25_0_1-61-(14)-11282018.png]]</center> | + | <center>[[File:P61-25_0_1-61-(14)-11282018.png|link=]]</center> |
| − | <center>P61-25_0_1-61-(14)-11282018.png</center> | + | <!--center>P61-25_0_1-61-(14)-11282018.png</center--> |
::iii) Select the new '''color''' that you want as discussed above in the '''Color''' form (3, 4, and 5). | ::iii) Select the new '''color''' that you want as discussed above in the '''Color''' form (3, 4, and 5). | ||
| Line 148: | Line 146: | ||
::v) Finally, click '''OK''' (8) and the changed '''color''' appears in the selected box of the '''Palette Editor''' form as shown in the sequence below: | ::v) Finally, click '''OK''' (8) and the changed '''color''' appears in the selected box of the '''Palette Editor''' form as shown in the sequence below: | ||
| − | <center>[[File:P61-25_0_1-61-(15)-11282018.png]]</center> | + | <center>[[File:P61-25_0_1-61-(15)-11282018.png|link=]]</center> |
| − | <center>P61-25_0_1-61-(15)-11282018.png</center> | + | <!--center>P61-25_0_1-61-(15)-11282018.png</center--> |
::vi) After the '''color''' is changed, click '''Close''' and the new '''color''' becomes part of the '''selected color palette'''. | ::vi) After the '''color''' is changed, click '''Close''' and the new '''color''' becomes part of the '''selected color palette'''. | ||
| Line 159: | Line 157: | ||
::i) Next, select the '''color''' box that contains the '''color''' you want to '''delete''' and click the '''Delete color…''' button as shown below: | ::i) Next, select the '''color''' box that contains the '''color''' you want to '''delete''' and click the '''Delete color…''' button as shown below: | ||
| − | <center>[[File:P61-25_0_1-61-(16)-11282018.png]]</center> | + | <center>[[File:P61-25_0_1-61-(16)-11282018.png|link=]]</center> |
| − | <center>P61-25_0_1-61-(16)-11282018.png</center> | + | <!--center>P61-25_0_1-61-(16)-11282018.png</center--> |
::ii) Click '''Close''' to complete the action. | ::ii) Click '''Close''' to complete the action. | ||
| Line 172: | Line 170: | ||
::i) First access the '''color palette file''' as shown below: | ::i) First access the '''color palette file''' as shown below: | ||
| − | <center>[[File:P61-25_0_1-61-(17)-11282018.png]]</center> | + | <center>[[File:P61-25_0_1-61-(17)-11282018.png|link=]]</center> |
| − | <center>P61-25_0_1-61-(17)-11282018.png</center> | + | <!--center>P61-25_0_1-61-(17)-11282018.png</center--> |
::ii) Once the '''color palette file''' for '''deletion''' is selected, press your keyboard’s '''Delete Key''' or right-click the selected file and click the '''Delete''' command in the '''context menu''' shown above. | ::ii) Once the '''color palette file''' for '''deletion''' is selected, press your keyboard’s '''Delete Key''' or right-click the selected file and click the '''Delete''' command in the '''context menu''' shown above. | ||
| Line 193: | Line 191: | ||
4) There are no special actions required to distribute a '''default color palette''' other than to export a '''Template''' or project view as discussed above. | 4) There are no special actions required to distribute a '''default color palette''' other than to export a '''Template''' or project view as discussed above. | ||
| − | 5) Whenever you export any '''Template''' in a '''.TAT''' file or project view in a '''.TAM''' file, the '''default color palette''' are included in the exported file. (See: [[Sharing Project Views for Version 6.1 (Portal) | Sharing Project Views (Portal)]] 23.2.1-61). | + | 5) Whenever you export any '''Template''' in a '''.TAT''' file or project view in a '''.TAM''' file, the '''default color palette''' are included in the exported file. (See: [[Sharing Project Views for Version 6.1 (Portal) | Sharing Project Views (Portal)]] <!--23.2.1-61-->). |
6) When the project view or '''Template''' is imported at the destination, '''color palettes''' are stored in the '''ColorPalettes''' folder as a '''.TAP''' file and aare available to select with the '''Edit color palettes...''' button. | 6) When the project view or '''Template''' is imported at the destination, '''color palettes''' are stored in the '''ColorPalettes''' folder as a '''.TAP''' file and aare available to select with the '''Edit color palettes...''' button. | ||
| Line 205: | Line 203: | ||
==Related Links== | ==Related Links== | ||
| − | [[Managing Templates for Version 6.1 (Portal) | Managing Templates (Portal)]] 24.0.1-61 | + | [[Managing Templates for Version 6.1 (Portal) | Managing Templates (Portal)]] <!--24.0.1-61--> |
| − | [[Sharing Project Views for Version 6.0 (Portal) | Sharing Project Views (Portal)]] 23.2.1-61 | + | [[Sharing Project Views for Version 6.0 (Portal) | Sharing Project Views (Portal)]] <!--23.2.1-61--> |
(25.0.1-61) | (25.0.1-61) | ||
Latest revision as of 19:46, 29 January 2024
Contents
About Creating, Saving, and Sharing Color Palettes
1) You can create and distribute custom color palettes so that you and others can build project views that have standard sets of colors.
1) OnePager is distributed with several standard color palettes which are available to all users.
Creating Custom Color Palettes
1) To create a color palette that others can use, you must create a custom color palette.
2) Here are the steps:
3) Open any project view and click the Project-View Properties (PVP) button and select the Edit color palettes… button in the Main tab as shown here:
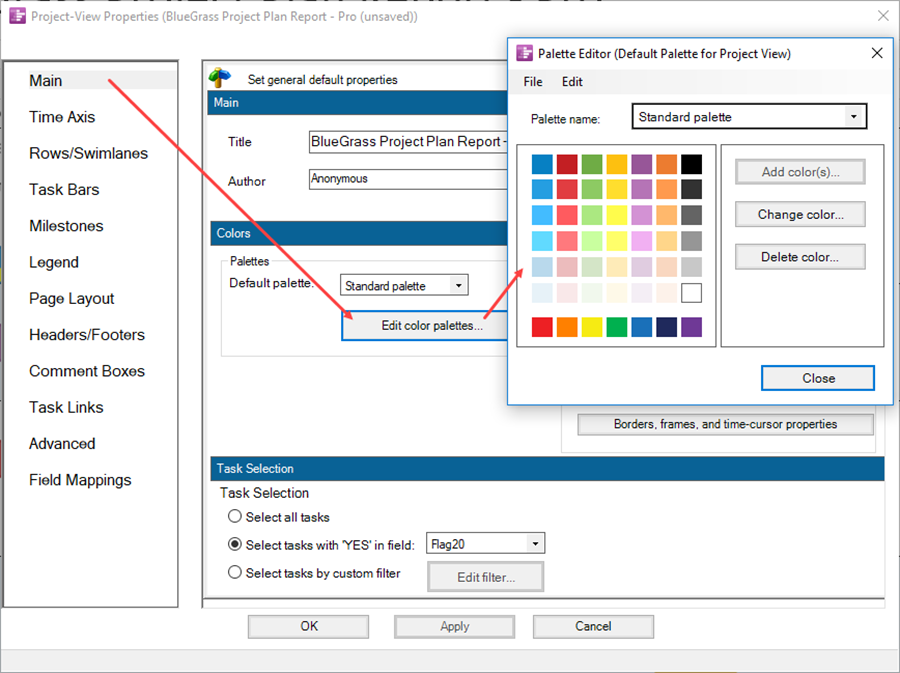
4) Select an existing palette as the starting point for your custom color palette by choosing one of the palettes from the Palette name: dropdown list:
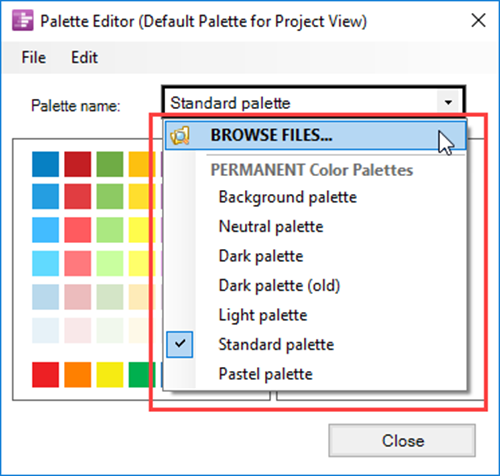
- a) You have the option to BROWSE… the available distributed color palettes or select a color palette group from the dropdown list shown above.
- b) When you click on the BROWSE… OnePager accesses the Open window shown below:
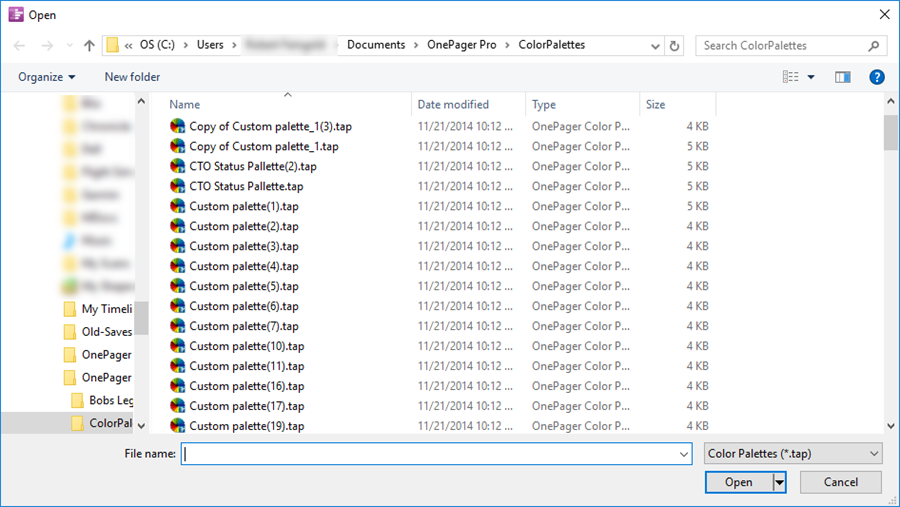
- c) Select the desired palette and click Open to make the selected palette the current palette.
- d) Clicking on any of the other options in the dropdown list above immediately makes that selected color palette the current palette.
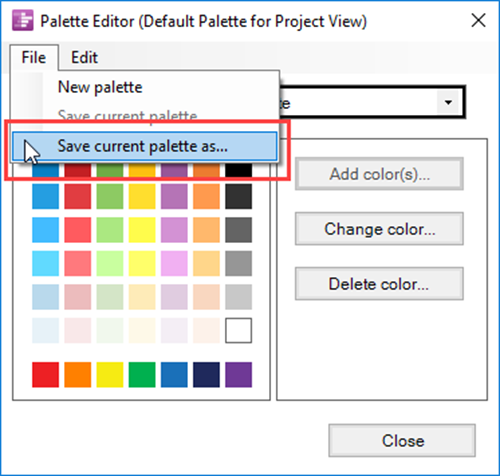
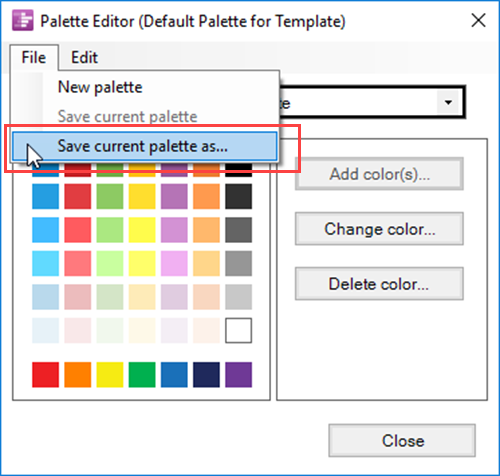
5) Create the custom color palette by navigating to the Palette Editor menu bar’s File button and click Save current color palette as… command, shown below:
6) Clicking the Save current palette as… dropdown menu command accesses the Export Chronicle Graphics color palette (.TAP) file form where you can name your custom color palette and even store it in a different folder than OnePager previously created.
7) The Export Chronicle Graphics color palette (TAP) file form looks like this:
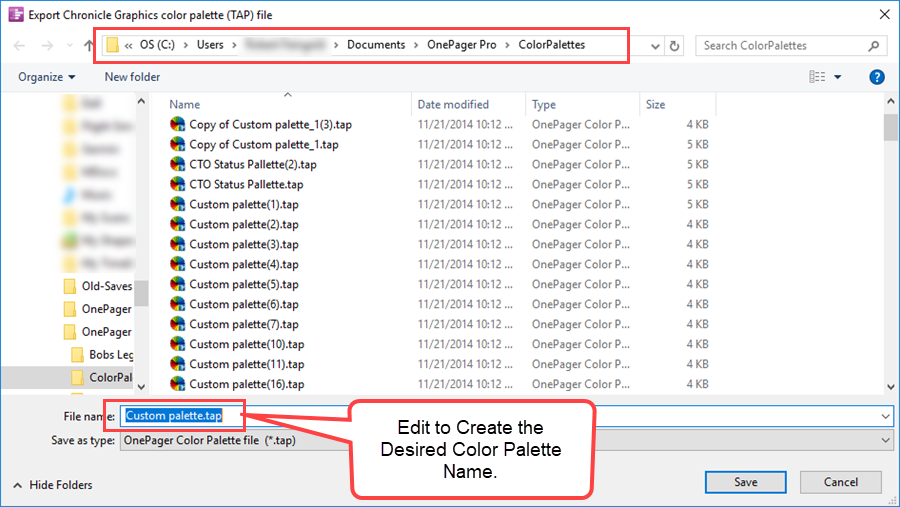
8) Using the same process, you can create color palettes by using the Main tab on the Template form as demonstrated in the following sections.
Modifying Color Palettes
1) You can add a color to an existing color palette, change, or delete a color from a color palette.
2) This can be done by using the following steps:
3) Before you can make changes to an existing color palette it must be retrieved from its storage folder.
- a) To do this, launch the Template Properties form for the Template involved as discussed elsewhere (See: Managing Templates (Portal) ).
- b) Next, go to the Main tab and click the Edit color palettes… button.
- c) This accesses the current color palette as shown below:
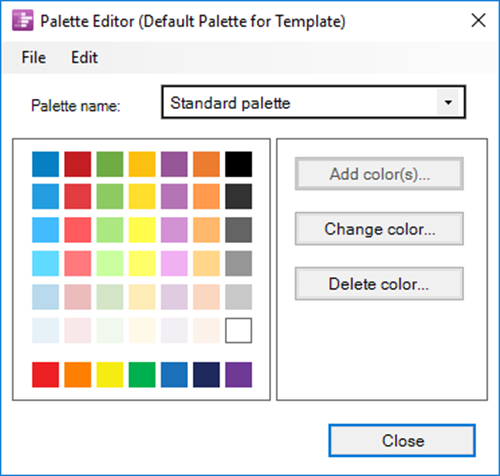
4) You have several areas where you can make a changes:
Change Color Palette Name
- a) This is done by retrieving the color palette that you want to rename by using the dropdown button opposite the field named Palette name.
- b) This gives you access to all the color palettes available by providing you access to the color palette storage folder.
- c) Clicking the dropdown button reveals the following:

- i) Click the BROWSE… command to access the Microsoft Windows Open form for the color palettes as shown here:

- ii) When the desired color palette is selected, click the Open button and this color palette becomes the current color palette for editing purposes.
- iii) Then, click the Save current palette as… command from the File dropdown to save the renamed color palette as shown below:
- iv) Clicking on the Save current palette as… command accesses the Export Chronicle Graphics color palette (.TAP) file form as shown below:
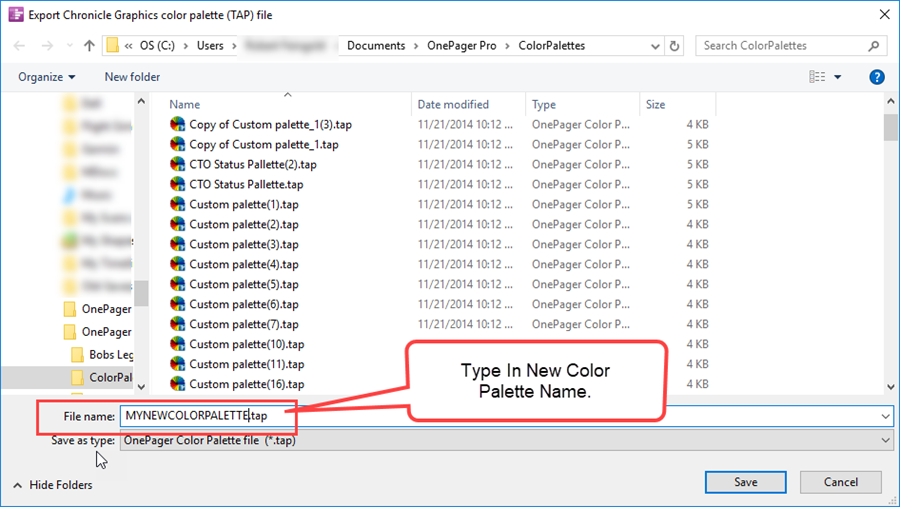
- v) Type in the desired name for the renamed selected color palette.
- vi) Click Save to save your renamed color palette.
- vii) It is not recommended that you change the color palette name for any PERMANENT color palettes.
Add Colors to a Color Palette
- d) This is done by first accessing the Palette Editor from the Main tab of the Template form and clicking the Edit button in the Palette Editor to access the dropdown command.
- e) Then click the Add color to current palette... command to access the Microsoft Windows Color form as shown below:
- f) The Color form looks like this:
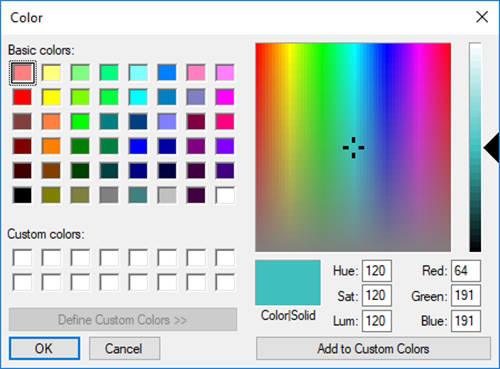
- i) There are already basic colors selected so to add your custom colors (up to 16 at a time), place the cursor into the color spectrum area for the desired color. As this is done, the color from the color spectrum is shown in the Color|Solid window. When the desired color is showing in the Color|Solid window, click the Add to Custom Colors button. The new Custom Color is placed in the next available Custom colors: box.
- ii) When this is done, the Color form looks like this:

- iii) Repeat this process until all the new colors are selected.
- iv) You can add up to 16 colors at a time before clicking OK to post the new colors into the color palette.
- v) At the end of the process described here the custom palette looks like this sample:
- vi) When you click the Close button the process is complete.
- vii) You are then asked if you want to save the color palette that was changed as shown here.
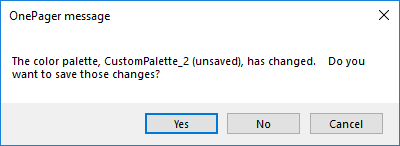
- viii) Answer Yes or No to this question and OnePager takes the appropriate action.
- ix) As shown above, you have the option to cause the color palette you just modified to become the default color palette by clicking the Choose as default button. If selected, in this example, Custom palette_2 becomes the default color palette for all color operations including round-robin color selection and other color related features in OnePager.
Changing Colors in a Color Palette
- f) To change a color within a color palette first access the desired color palette as described above so that it is visible. Then use the steps below:
- i) In the Palette Editor, shown on the left in the illustration below, click the color that you want to change (1). Then click the Change color… button (2).
- ii) This accesses the Color form as shown below on the right:

- iii) Select the new color that you want as discussed above in the Color form (3, 4, and 5).
- iv) Then, click the Add to Custom Colors button (6) so that it appears in the top left-most box in the Custom colors: group on the Color form (7).
- v) Finally, click OK (8) and the changed color appears in the selected box of the Palette Editor form as shown in the sequence below:
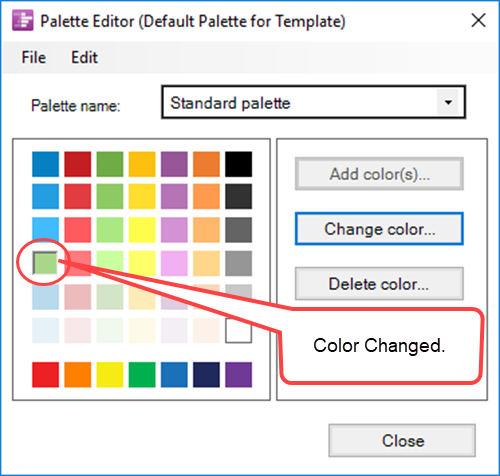
- vi) After the color is changed, click Close and the new color becomes part of the selected color palette.
Deleting a Color
- g) To delete a color from a color palette, first access the color palette with the color you intend to delete as described above.
- i) Next, select the color box that contains the color you want to delete and click the Delete color… button as shown below:
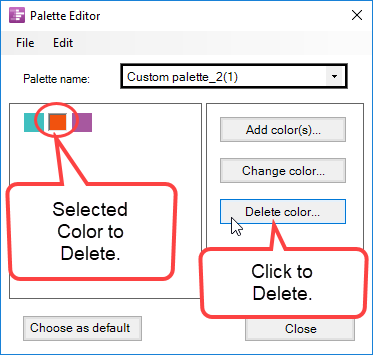
- ii) Click Close to complete the action.
Deleting a Color Palette
- h) Since color palettes are stored the same way as project views and Templates, this means that deleting a color palette can be done by going to the folder where the color palettes are stored, selecting the correct color palette to delete and using your keyboard's Delete Key to delete the file.
- i) Just follow the steps described below:
- i) First access the color palette file as shown below:
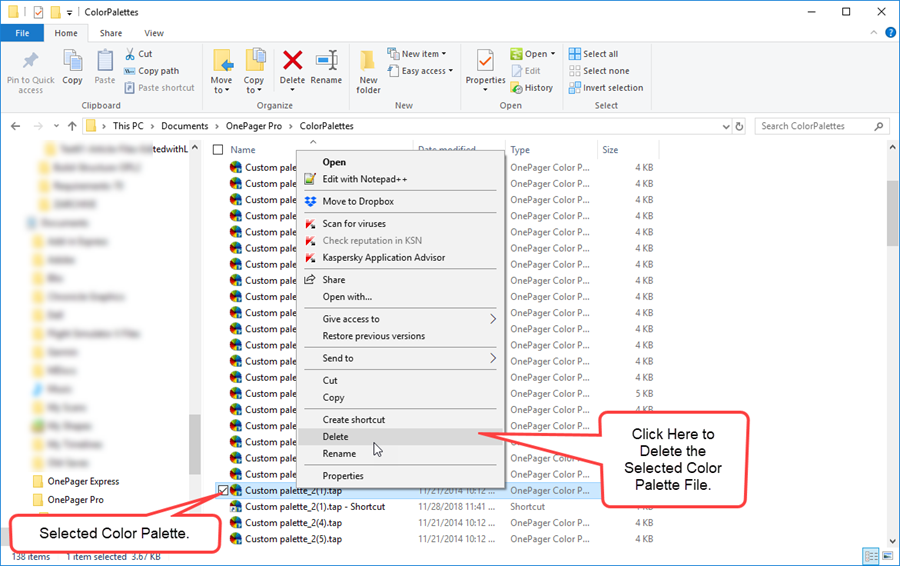
- ii) Once the color palette file for deletion is selected, press your keyboard’s Delete Key or right-click the selected file and click the Delete command in the context menu shown above.
Sharing Color Palettes
1) Project views are represented in your computer as a .TAM file and Templates as .TAT files.
- a) Whenever you create a project view there is a color palette associated with it and stored within the .TAM file.
- b) The same holds for named Template files (.TAT files).
- c) These color palettes are the default palette for the project view or Template in which they are stored and travel with the project view or Template where ever it might go (shared).
2) If you build custom color palettes or import one or more custom color palettes from elsewhere, these are stored in the ColorPalettes sub-folder under the same overall folder as your project views, Templates, and custom milestone symbols.
3) Custom color palettes are stored in .TAP files, where they are then accessible for use in the creation or modification of project views.
4) There are no special actions required to distribute a default color palette other than to export a Template or project view as discussed above.
5) Whenever you export any Template in a .TAT file or project view in a .TAM file, the default color palette are included in the exported file. (See: Sharing Project Views (Portal) ).
6) When the project view or Template is imported at the destination, color palettes are stored in the ColorPalettes folder as a .TAP file and aare available to select with the Edit color palettes... button.
7) A general warning message from OnePager is provided when you open an imported color palette that was exported from a different version of OnePager.
8) If this general warning message appears, it should be ignored and canceled.
9) You can at any time access any custom color palette file (.TAP) in the ColorPalettes folder and export them in any available fashion (e.g., email attachment, etc) to any other OnePager user.
Related Links
Sharing Project Views (Portal)
(25.0.1-61)