Difference between revisions of "Easier Multi-Source File Reports"
(→Example) |
m (Text replacement - ".png]]" to ".png|link=]]") |
||
| Line 9: | Line 9: | ||
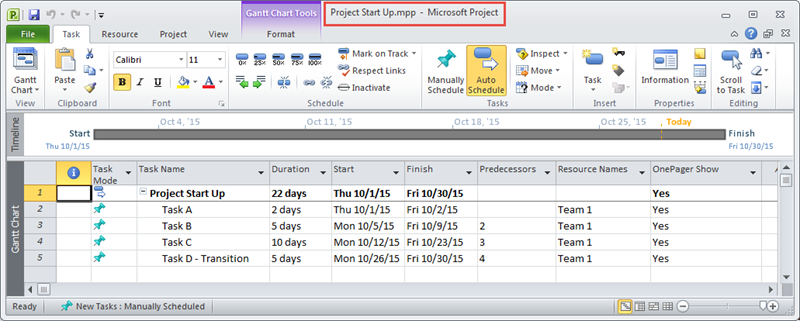
1) Using the new '''OPP''' version 5.3 '''desktop''' application, for example, we’ll show you how to create a multi-file project view from four (4) individual Microsoft Project source files shown below: | 1) Using the new '''OPP''' version 5.3 '''desktop''' application, for example, we’ll show you how to create a multi-file project view from four (4) individual Microsoft Project source files shown below: | ||
| − | <center>[[File:P53-0_2-(7A)-10282015.png]]</center> | + | <center>[[File:P53-0_2-(7A)-10282015.png|link=]]</center> |
| − | <center>[[File:P53-0_2-(7B)-10282015.png]]</center> | + | <center>[[File:P53-0_2-(7B)-10282015.png|link=]]</center> |
| − | <center>[[File:P53-0_2-(7C)-10282015.png]]</center> | + | <center>[[File:P53-0_2-(7C)-10282015.png|link=]]</center> |
| − | <center>[[File:P53-0_2-(7D)-10282015.png]]</center> | + | <center>[[File:P53-0_2-(7D)-10282015.png|link=]]</center> |
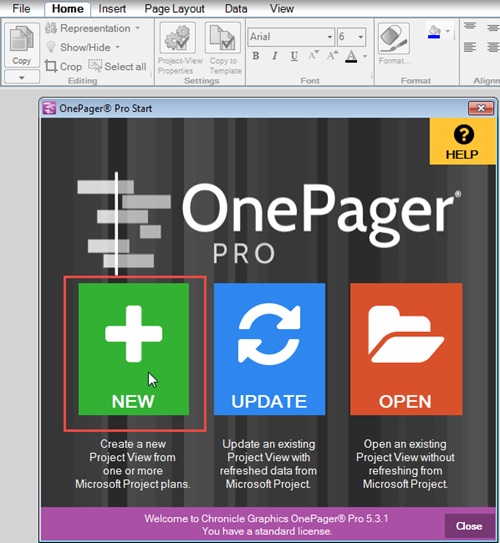
2) Given the four Microsoft Project '''source files''' shown above, it is a simple matter to combine these four into a single project view. First, launch '''OPP''' version 5.3 from the '''desktop''' icon and when the '''OnePager Start''' form appears click the '''NEW''' button: | 2) Given the four Microsoft Project '''source files''' shown above, it is a simple matter to combine these four into a single project view. First, launch '''OPP''' version 5.3 from the '''desktop''' icon and when the '''OnePager Start''' form appears click the '''NEW''' button: | ||
| − | <center>[[File:P53-0_2-(7E)-10282015.png]]</center> | + | <center>[[File:P53-0_2-(7E)-10282015.png|link=]]</center> |
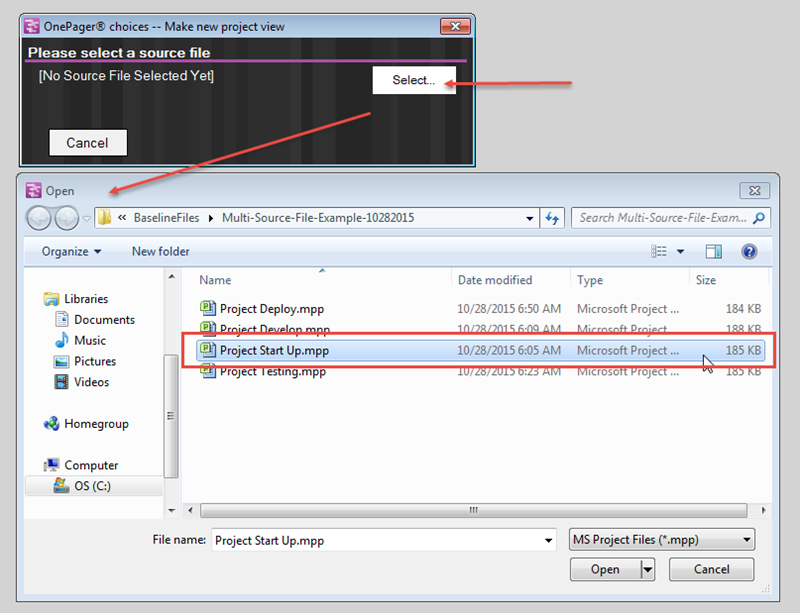
3) This action will bring up the abbreviated '''OnePager choices''' ('''OPC''') form where you’ll see the '''Select''' button. Click the '''Select''' button and OnePager will display a Window’s '''Open''' form. Navigate to the four Microsoft Project '''source files''' as in the illustration below and select the first '''source file''' and click '''Open''': | 3) This action will bring up the abbreviated '''OnePager choices''' ('''OPC''') form where you’ll see the '''Select''' button. Click the '''Select''' button and OnePager will display a Window’s '''Open''' form. Navigate to the four Microsoft Project '''source files''' as in the illustration below and select the first '''source file''' and click '''Open''': | ||
| − | <center>[[File:P53-0_2-(7F)-10282015.png]]</center> | + | <center>[[File:P53-0_2-(7F)-10282015.png|link=]]</center> |
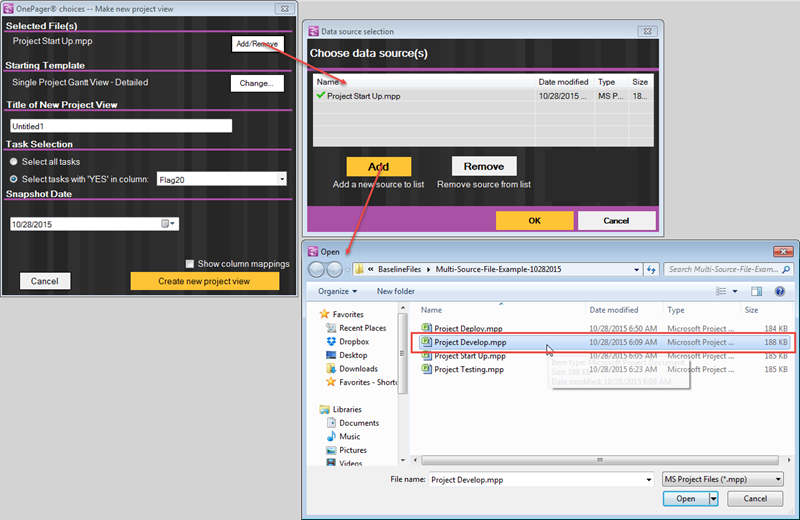
4) After you’ve made your first Microsoft Project '''source file''' selection, the '''OPC''' form will expand as shown below. At this point, click the '''Add/Remove''' button in the top right corner and the '''Data source selection''' form will appear showing the first Microsoft Project '''source file''' you selected. Then, click the '''Add''' button on the '''Data source selection''' form and the '''BROWSE''' option to bring up the Windows '''Open''' form from before. At this point select your next Microsoft Project '''source file''' and click '''Open''' as shown below: | 4) After you’ve made your first Microsoft Project '''source file''' selection, the '''OPC''' form will expand as shown below. At this point, click the '''Add/Remove''' button in the top right corner and the '''Data source selection''' form will appear showing the first Microsoft Project '''source file''' you selected. Then, click the '''Add''' button on the '''Data source selection''' form and the '''BROWSE''' option to bring up the Windows '''Open''' form from before. At this point select your next Microsoft Project '''source file''' and click '''Open''' as shown below: | ||
| − | <center>[[File:P53-0_2-53-(7G)-02122016.png]]</center> | + | <center>[[File:P53-0_2-53-(7G)-02122016.png|link=]]</center> |
5) Repeat these steps until the '''Data source selection''' form’s window shows all four Microsoft Project '''source files''' desired for this multi-file project view as shown here: | 5) Repeat these steps until the '''Data source selection''' form’s window shows all four Microsoft Project '''source files''' desired for this multi-file project view as shown here: | ||
| − | <center>[[File:P53-0_2-53-(7H)-02122016.png]]</center> | + | <center>[[File:P53-0_2-53-(7H)-02122016.png|link=]]</center> |
6) When you click the '''OK''' button on the '''Data source selection''' form, the '''OPC''' form will be updated and you can now specify the project view name and snapshot date as well as any other modifications you wish to make at this point as shown below: | 6) When you click the '''OK''' button on the '''Data source selection''' form, the '''OPC''' form will be updated and you can now specify the project view name and snapshot date as well as any other modifications you wish to make at this point as shown below: | ||
| − | <center>[[File:P53-0_2-(7I)-10282015.png]]</center> | + | <center>[[File:P53-0_2-(7I)-10282015.png|link=]]</center> |
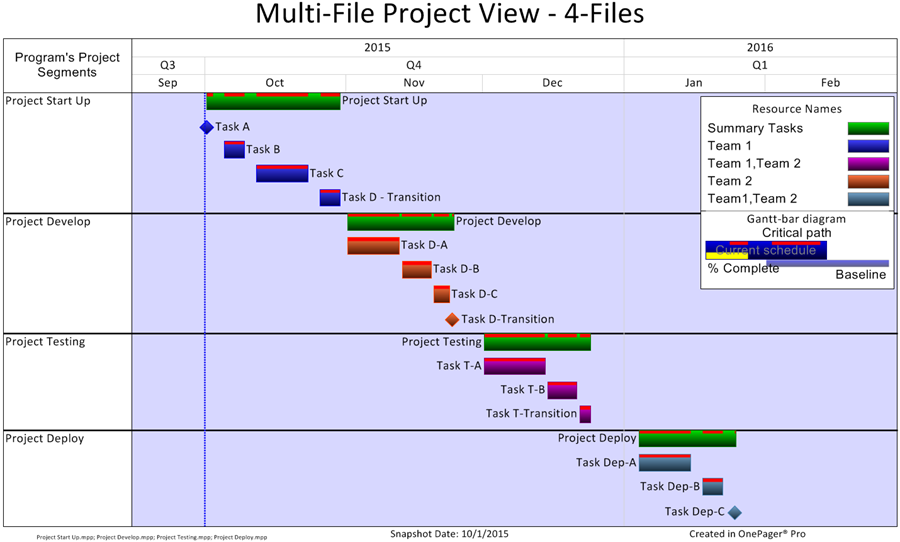
7) Clicking the '''Create new project view''' button shown above will generate the multi-file project view as seen below: | 7) Clicking the '''Create new project view''' button shown above will generate the multi-file project view as seen below: | ||
| − | <center>[[File:P53-0_2-(7J)-10282015.png]]</center> | + | <center>[[File:P53-0_2-(7J)-10282015.png|link=]]</center> |
8) Periodically you most likely will update the a project view to reflect changes in the project plan. To do so, first make the appropriate updates to the respective Microsoft Project source files. When that is done, launch '''OPP''' version 5.3 from the '''desktop''' and select the '''UPDATE''' function from the '''OnePager Start''' form. Clicking the '''UPDATE''' button will show available project view files. Now, select the project view to be updated as shown below: | 8) Periodically you most likely will update the a project view to reflect changes in the project plan. To do so, first make the appropriate updates to the respective Microsoft Project source files. When that is done, launch '''OPP''' version 5.3 from the '''desktop''' and select the '''UPDATE''' function from the '''OnePager Start''' form. Clicking the '''UPDATE''' button will show available project view files. Now, select the project view to be updated as shown below: | ||
| − | <center>[[File:P53-0_2-(7K)-10282015.png]]</center> | + | <center>[[File:P53-0_2-(7K)-10282015.png|link=]]</center> |
9) At this point, '''OPP''' will again display the '''OPC''' form to allow you to make any changes and specifically to set the snapshot date as shown below: | 9) At this point, '''OPP''' will again display the '''OPC''' form to allow you to make any changes and specifically to set the snapshot date as shown below: | ||
| − | <center>[[File:P53-0_2-(7L)-10282015.png]]</center> | + | <center>[[File:P53-0_2-(7L)-10282015.png|link=]]</center> |
<center></center> | <center></center> | ||
| Line 56: | Line 56: | ||
10) When you click the '''New''' button on the '''OPC''' form above, '''OPP''' will create an updated snapshot of the project view. In the example shown below, the snapshot date is 10/28/2015 and the Project Start Up file was updated with %Complete information. | 10) When you click the '''New''' button on the '''OPC''' form above, '''OPP''' will create an updated snapshot of the project view. In the example shown below, the snapshot date is 10/28/2015 and the Project Start Up file was updated with %Complete information. | ||
| − | <center>[[File:P53-0_2-(7M)-10282015.png]]</center> | + | <center>[[File:P53-0_2-(7M)-10282015.png|link=]]</center> |
<center></center> | <center></center> | ||
Latest revision as of 09:26, 11 February 2024
Overview
It’s now easier than ever to build OnePager project views from multiple data sources. Microsoft Project users can link multiple Microsoft Project documents to their OnePager Pro (OPP) reports without the need for a master file or Microsoft Project integrated master schedule (IMS).
Once you created or prepared your multiple Microsoft Project or Microsoft Excel files, OPP or OPX provides you with controls to efficiently create multi-project project view. Additionally, updating and creating new snapshots is made considerable easier because OnePager keeps the information necessary to later associate the Microsoft Project or Microsoft Excel files with the multi-project project view. Below is an example.
Example
1) Using the new OPP version 5.3 desktop application, for example, we’ll show you how to create a multi-file project view from four (4) individual Microsoft Project source files shown below:


2) Given the four Microsoft Project source files shown above, it is a simple matter to combine these four into a single project view. First, launch OPP version 5.3 from the desktop icon and when the OnePager Start form appears click the NEW button:
3) This action will bring up the abbreviated OnePager choices (OPC) form where you’ll see the Select button. Click the Select button and OnePager will display a Window’s Open form. Navigate to the four Microsoft Project source files as in the illustration below and select the first source file and click Open:
4) After you’ve made your first Microsoft Project source file selection, the OPC form will expand as shown below. At this point, click the Add/Remove button in the top right corner and the Data source selection form will appear showing the first Microsoft Project source file you selected. Then, click the Add button on the Data source selection form and the BROWSE option to bring up the Windows Open form from before. At this point select your next Microsoft Project source file and click Open as shown below:
5) Repeat these steps until the Data source selection form’s window shows all four Microsoft Project source files desired for this multi-file project view as shown here:
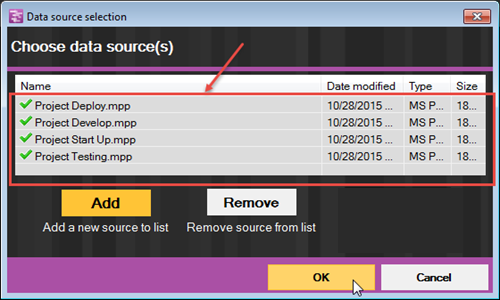
6) When you click the OK button on the Data source selection form, the OPC form will be updated and you can now specify the project view name and snapshot date as well as any other modifications you wish to make at this point as shown below:
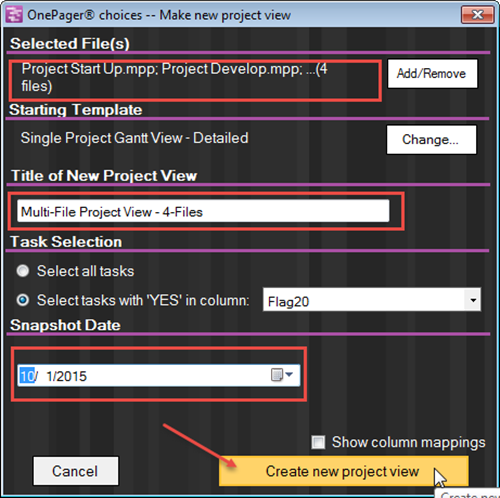
7) Clicking the Create new project view button shown above will generate the multi-file project view as seen below:
8) Periodically you most likely will update the a project view to reflect changes in the project plan. To do so, first make the appropriate updates to the respective Microsoft Project source files. When that is done, launch OPP version 5.3 from the desktop and select the UPDATE function from the OnePager Start form. Clicking the UPDATE button will show available project view files. Now, select the project view to be updated as shown below:

9) At this point, OPP will again display the OPC form to allow you to make any changes and specifically to set the snapshot date as shown below:
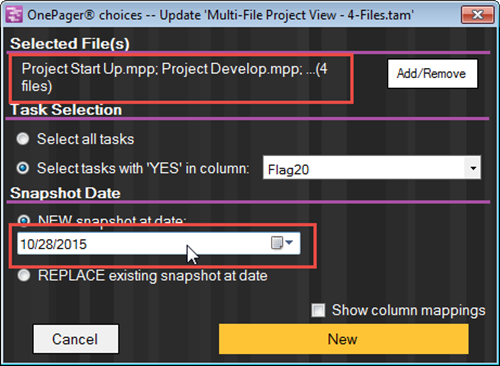
10) When you click the New button on the OPC form above, OPP will create an updated snapshot of the project view. In the example shown below, the snapshot date is 10/28/2015 and the Project Start Up file was updated with %Complete information.

11) This same sequence may be performed with the Add-in version of OPP, the desktop version of OPX, and the Add-in version of OPX as they behave in exactly the same way as shown above.
(0.2.1.3-53)