Difference between revisions of "Making Multi-Project Charts from MS Project Integrated Master Schedules for Version 7.1"
(→The OnePager Multi-Project Template Properties Form) |
|||
| (9 intermediate revisions by the same user not shown) | |||
| Line 3: | Line 3: | ||
One of OnePager's strength is its ability to create compact visual representations of '''multiple projects'''. These can be several projects that belong to one program or they can be several projects and programs in an organization’s portfolio. Microsoft Project supports the management of '''multiple projects''' through the creation of a Microsoft Project '''Master Project''' or '''Integrated Master Schedule''' ('''IMS'''). | One of OnePager's strength is its ability to create compact visual representations of '''multiple projects'''. These can be several projects that belong to one program or they can be several projects and programs in an organization’s portfolio. Microsoft Project supports the management of '''multiple projects''' through the creation of a Microsoft Project '''Master Project''' or '''Integrated Master Schedule''' ('''IMS'''). | ||
| − | This article is primarily focused on '''OPP'''. However, this article also applies to OnePager Bundle ('''OPB''') where '''OPB''' is accessing Microsoft Project '''source plans'''. | + | This article is primarily focused on OnePager Pro ('''OPP'''). However, this article also applies to OnePager Bundle ('''OPB''') where '''OPB''' is accessing Microsoft Project '''source plans'''. |
==Creating an IMS for Related Projects== | ==Creating an IMS for Related Projects== | ||
| − | + | To create an '''IMS''' from related projects, open Microsoft Project and go to the '''Insert Projects''' button to insert sub-projects into a '''Master Project'''. '''Save''' the '''Master Project''' with an appropriate '''Master Project file name''' for future reference. These reference links to our '''Blog''' are useful: | |
| − | + | ||
| − | + | ||
:* [https://www.onepager.com/community/blog/how-to-use-ms-project-and-onepager-to-make-visuals-of-multiple-project-files How to Use Master MS Project Files and OnePager to Create Visuals of Separate MS Project Files] | :* [https://www.onepager.com/community/blog/how-to-use-ms-project-and-onepager-to-make-visuals-of-multiple-project-files How to Use Master MS Project Files and OnePager to Create Visuals of Separate MS Project Files] | ||
| Line 17: | Line 15: | ||
==The OnePager Multi-Project Template Properties Form== | ==The OnePager Multi-Project Template Properties Form== | ||
| − | 1) Creating a One Pager '''multi-project''' chart is a matter of opening the Microsoft Project '''Master Project''' and using a different OnePager | + | 1) Creating a One Pager '''multi-project''' chart is a matter of opening the Microsoft Project '''Master Project''' and using a different OnePager '''Template Properties''' form to '''import''' data and '''create''' a new chart. |
2) To change to a different '''Templates''', click the '''Template...''' button on the Microsoft Project '''Add-in''' ribbon tool bar to access the '''Template Properties''' form. | 2) To change to a different '''Templates''', click the '''Template...''' button on the Microsoft Project '''Add-in''' ribbon tool bar to access the '''Template Properties''' form. | ||
| Line 23: | Line 21: | ||
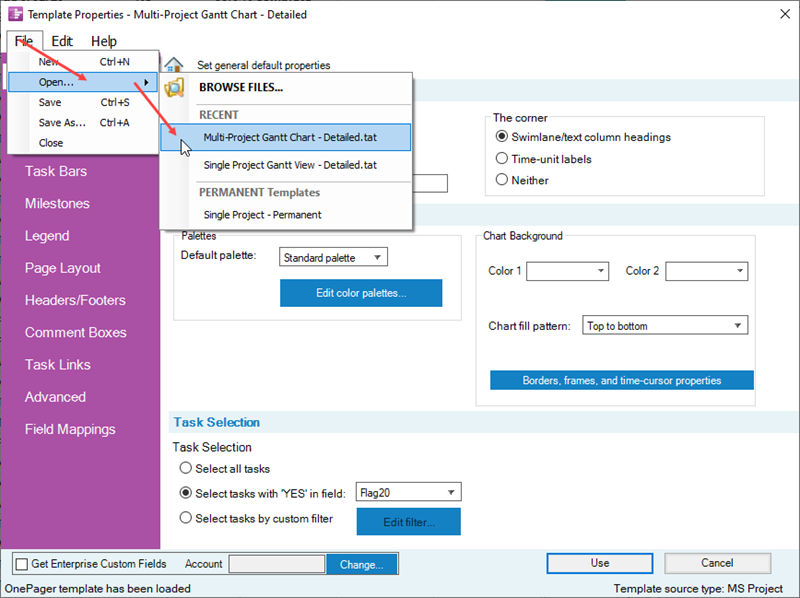
3) Then, click the '''File''' button as shown below: | 3) Then, click the '''File''' button as shown below: | ||
| − | |||
| − | |||
<center>[[File:P71-8_1_1-71-(1)-11232021.png]]</center> | <center>[[File:P71-8_1_1-71-(1)-11232021.png]]</center> | ||
| − | <center>P71-8_1_1-71-(1)-11232021.png</center> | + | <!--<center>P71-8_1_1-71-(1)-11232021.png</center>--> |
4) Clicking the '''BROWSE''' option accesses the Windows '''Open''' form where OnePager stores your '''Templates''' as shown below: | 4) Clicking the '''BROWSE''' option accesses the Windows '''Open''' form where OnePager stores your '''Templates''' as shown below: | ||
| Line 41: | Line 37: | ||
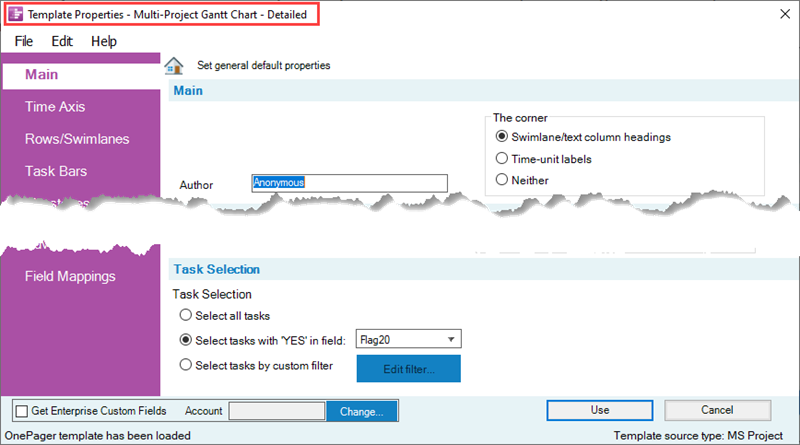
8) Making this choice changes the '''Template Properties''' form to have the multi-project '''Template Properties''' form name in the title bar, as is shown below: | 8) Making this choice changes the '''Template Properties''' form to have the multi-project '''Template Properties''' form name in the title bar, as is shown below: | ||
| − | <center>[[File: | + | <center>[[File:P71-8_1_1-71-(3)-11232021.png]]</center> |
| − | <center> | + | <!--<center>P71-8_1_1-71-(3)-11232021.png</center>--> |
9) You now have OnePager Pro/Bundle ready to use the '''multi-project Template Properties''' form. | 9) You now have OnePager Pro/Bundle ready to use the '''multi-project Template Properties''' form. | ||
| Line 50: | Line 46: | ||
1) The actions required to create a new chart from this point are as described elsewhere depending on whether you are creating a '''NEW''' chart, '''UPDATING''' an existing chart, or '''OPENING''' an existing chart. | 1) The actions required to create a new chart from this point are as described elsewhere depending on whether you are creating a '''NEW''' chart, '''UPDATING''' an existing chart, or '''OPENING''' an existing chart. | ||
| − | 2) For more information on '''workflow options''', please see the articles at: [[Basic Workflows for Version 7.1 (Portal) | Basic Workflows (Portal)]] 7.0.1-71 | + | 2) For more information on '''workflow options''', please see the articles at: [[Basic Workflows for Version 7.1 (Portal) | Basic Workflows (Portal)]] <!--7.0.1-71--> |
===Making the New Multi-Project Chart=== | ===Making the New Multi-Project Chart=== | ||
| Line 58: | Line 54: | ||
:a) Launch Microsoft Project with your '''multi-project source plan'''. | :a) Launch Microsoft Project with your '''multi-project source plan'''. | ||
| − | :b) Launch OnePager | + | :b) Launch OnePager and select the '''NEW''' button. |
:c) OnePager uses the loaded Microsoft Project '''multi-project source plan''' under control of the '''Multi-Project Gantt Chart – Detailed Template Properties''' form to create your '''new''' chart as shown below: | :c) OnePager uses the loaded Microsoft Project '''multi-project source plan''' under control of the '''Multi-Project Gantt Chart – Detailed Template Properties''' form to create your '''new''' chart as shown below: | ||
| Line 96: | Line 92: | ||
[https://www.onepager.com/community/blog/making-multi-project-graphs-from-separate-microsoft-project-plans/ Making Multi-Project Graphs from Separate Microsoft project Plans] | [https://www.onepager.com/community/blog/making-multi-project-graphs-from-separate-microsoft-project-plans/ Making Multi-Project Graphs from Separate Microsoft project Plans] | ||
| − | [[Creating a NEW Chart via Pull Operation Feature for Version 7.1 | Creating a NEW Chart via Pull Operation Feature]] 7.13.1-71 | + | [[Basic Workflows for Version 7.1 (Portal) | Basic Workflows (Portal)]] <!--7.0.1-71--> |
| + | |||
| + | [[Creating a NEW Chart via Pull Operation Feature for Version 7.1 | Creating a NEW Chart via Pull Operation Feature]] <!--7.13.1-71--> | ||
| − | [[REPLACING a Snapshot via Pull Operation for Version 7.1 | REPLACING a Snapshot via Pull Operation]] 7.14.1-71 | + | [[REPLACING a Snapshot via Pull Operation for Version 7.1 | REPLACING a Snapshot via Pull Operation]] <!--7.14.1-71--> |
| − | [[ADDING a Snapshot via Pull Operation for Version 7.1 | ADDING a Snapshot via Pull Operation]] 7.15.1-71 | + | [[ADDING a Snapshot via Pull Operation for Version 7.1 | ADDING a Snapshot via Pull Operation]] <!--7.15.1-71--> |
| − | [[Custom Update (Replacing) of a Snapshot via Pull Operation for Version 7.1 | Custom Update (Replacing) of a Snapshot via Pull Operation]] 7.16.1-71 | + | [[Custom Update (Replacing) of a Snapshot via Pull Operation for Version 7.1 | Custom Update (Replacing) of a Snapshot via Pull Operation]] <!--7.16.1-71--> |
| − | [[Using the OnePager "Data" Tab's "Selected file(s)" Button for Version 7.1 | Using the OnePager "Data" Tab's "Selected file(s)" Button]] 7.17.1-71 | + | [[Using the OnePager "Data" Tab's "Selected file(s)" Button for Version 7.1 | Using the OnePager "Data" Tab's "Selected file(s)" Button]] <!--7.17.1-71--> |
(8.1.1-71) | (8.1.1-71) | ||
| Line 110: | Line 108: | ||
[[Category:Version 7.1]] | [[Category:Version 7.1]] | ||
[[Category:Basic Workflows]] | [[Category:Basic Workflows]] | ||
| + | [[Category:Add-in]] | ||
| + | [[Category:Standalone]] | ||
[[Category:Multi-Project Formats]] | [[Category:Multi-Project Formats]] | ||
| − | [[Category: | + | [[Category:Template Properties Form]] |
[[Category:Enterprise Integration]] | [[Category:Enterprise Integration]] | ||
[[Category:Conditional Import Filters]] | [[Category:Conditional Import Filters]] | ||
Latest revision as of 14:12, 26 April 2022
Contents
Overview
One of OnePager's strength is its ability to create compact visual representations of multiple projects. These can be several projects that belong to one program or they can be several projects and programs in an organization’s portfolio. Microsoft Project supports the management of multiple projects through the creation of a Microsoft Project Master Project or Integrated Master Schedule (IMS).
This article is primarily focused on OnePager Pro (OPP). However, this article also applies to OnePager Bundle (OPB) where OPB is accessing Microsoft Project source plans.
Creating an IMS for Related Projects
To create an IMS from related projects, open Microsoft Project and go to the Insert Projects button to insert sub-projects into a Master Project. Save the Master Project with an appropriate Master Project file name for future reference. These reference links to our Blog are useful:
The OnePager Multi-Project Template Properties Form
1) Creating a One Pager multi-project chart is a matter of opening the Microsoft Project Master Project and using a different OnePager Template Properties form to import data and create a new chart.
2) To change to a different Templates, click the Template... button on the Microsoft Project Add-in ribbon tool bar to access the Template Properties form.
3) Then, click the File button as shown below:
4) Clicking the BROWSE option accesses the Windows Open form where OnePager stores your Templates as shown below:
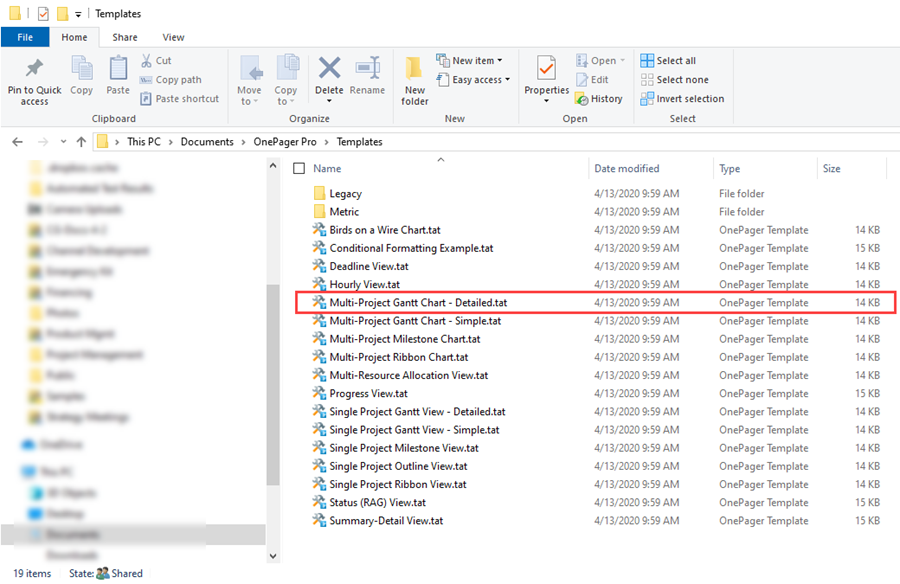
5) The default OnePager Pro/Bundle out-of-the-box Template Properties form is Single Project Gantt View – Detailed.
6) Instead, choose the Template Properties form named Multi-Project Gantt Chart - Detailed as shown above.
7) OnePager assumes that when the Multi-Project Gantt Chart - Detailed Template Properties form is in use, that you are using a Microsoft Project Master Project as the source plan.
8) Making this choice changes the Template Properties form to have the multi-project Template Properties form name in the title bar, as is shown below:
9) You now have OnePager Pro/Bundle ready to use the multi-project Template Properties form.
Creating the Multi-Project Chart
1) The actions required to create a new chart from this point are as described elsewhere depending on whether you are creating a NEW chart, UPDATING an existing chart, or OPENING an existing chart.
2) For more information on workflow options, please see the articles at: Basic Workflows (Portal)
Making the New Multi-Project Chart
3) Creating a NEW multi-project chart follows these steps:
- a) Launch Microsoft Project with your multi-project source plan.
- b) Launch OnePager and select the NEW button.
- c) OnePager uses the loaded Microsoft Project multi-project source plan under control of the Multi-Project Gantt Chart – Detailed Template Properties form to create your new chart as shown below:
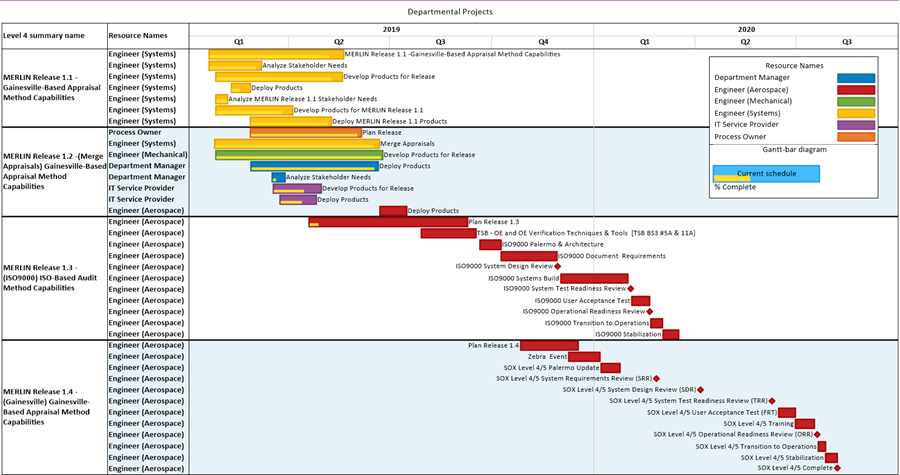
4) In the example above, the chart is organized with one swimlane level representing various projects at the Microsoft Project Level 4 name.
5) Rows are used to represent Resource Names as shown in the Text Column to the right of the swimlane level cells.
6) Colors are assigned randomly in a round-robin fashion based on Resource Names as well.
Changing Task Bar Shape Representation
7) We now can change the representation of some of the task bars from task bar shapes to milestone symbols by right-clicking them and clicking the As milestone at finish option as shown below:

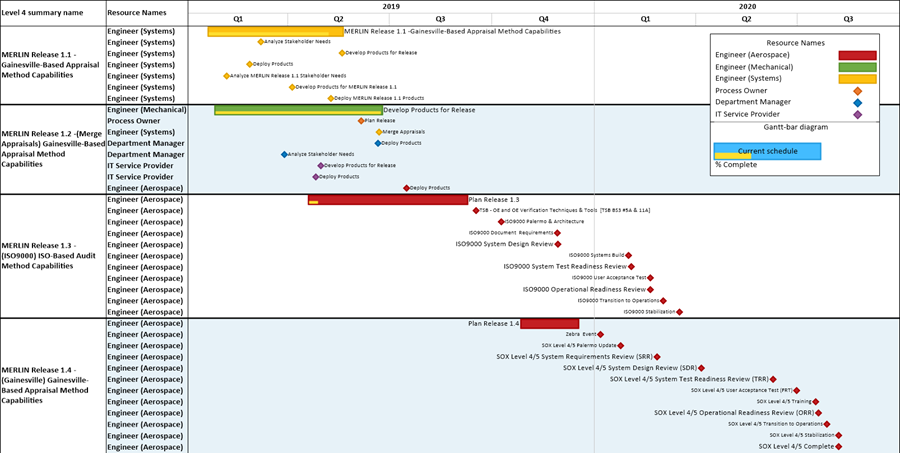
8) The chart below was produced by arbitrarily representing the longest project level task bars as rectangular shapes and the remaining task bars changed to milestone symbols:
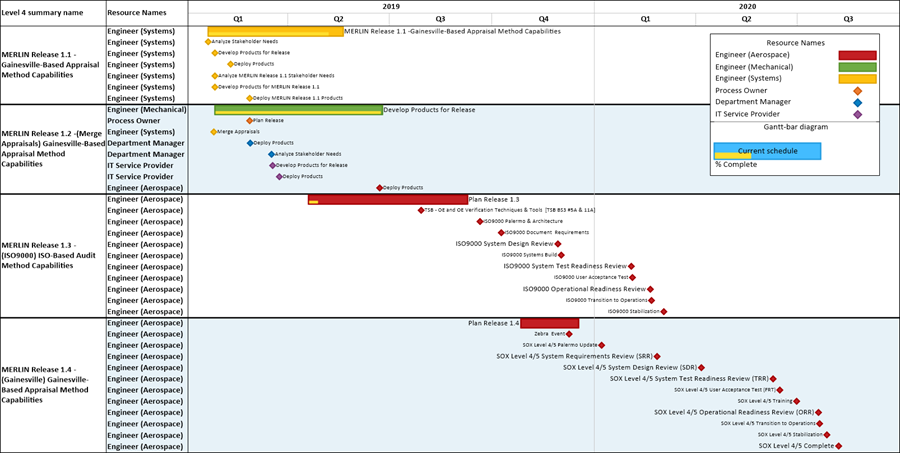
9) It is also possible to represent the task below the longest project level task bar as milestone symbols positioned at the start of the task period using the same technique used in the previous illustration as shown below:
10) These charts can now be copied into Microsoft PowerPoint for delivery to your audience.
Related Links
How to Use Master MS Project Files and OnePager to Create Visuals of Separate MS Project Files
Making Multi-Project Graphs from Separate Microsoft project Plans
Creating a NEW Chart via Pull Operation Feature
REPLACING a Snapshot via Pull Operation
ADDING a Snapshot via Pull Operation
Custom Update (Replacing) of a Snapshot via Pull Operation
Using the OnePager "Data" Tab's "Selected file(s)" Button
(8.1.1-71)