Difference between revisions of "Making Multi-Project Charts from Separate Microsoft Excel Plans for Version 7.1"
(→Preparation for Making a Multi-Project Chart from Separate Microsoft Excel Source Plans) |
(→Adding the Second Microsoft Excel Source Plan) |
||
| (39 intermediate revisions by the same user not shown) | |||
| Line 1: | Line 1: | ||
==Overview== | ==Overview== | ||
| − | Suppose you have '''multiple''' Microsoft Excel '''source plans''' that are related and you want to create a '''single''' chart that shows the important schedule items. You can do this as long as the related Microsoft Excel '''source plans''' are constructed with unique '''Task ID''' field contents. This means that you must adjust the '''Task ID''' column in the '''multiple''' Microsoft Excel '''source plans''' such that each row has a unique number or identifier in the '''Task ID''' field. This is necessary because unlike Microsoft Project, Microsoft Excel does not automatically provide a '''unique identifier''' for rows. Additionally, unique '''Task ID''' numbers are needed so that OnePager Express ('''OPX''') does not get rows confused when performing snapshot updates. | + | Suppose you have '''multiple''' Microsoft Excel '''source plans''' that are related and you want to create a '''single''' chart that shows the important schedule items. You can do this as long as the related Microsoft Excel '''source plans''' are constructed with unique '''Task ID''' field contents. This means that you must adjust the '''Task ID''' column in the '''multiple''' Microsoft Excel '''source plans''' such that each row has a unique number or identifier in the '''Task ID''' field. This is necessary because unlike Microsoft Project, Microsoft Excel does not automatically provide a '''unique identifier''' for rows. Additionally, unique '''Task ID''' numbers are needed so that OnePager Express ('''OPX''') or OnePager Bundle ('''OPB''') does not get rows confused when performing snapshot updates. |
| − | For more information on '''Task ID's''', please see the section in the article at: [[Merging the Wrong Tasks into a Chart for Version 7.1 - OnePager Express#Adding a Task ID Field to Your Microsoft Excel Source Plan | Adding a Task ID Field to Your Microsoft Excel Source Plan]] 7.12.1-71 | + | For more information on '''Task ID's''', please see the section in the article at: [[Merging the Wrong Tasks into a Chart for Version 7.1 - OnePager Express#Adding a Task ID Field to Your Microsoft Excel Source Plan | Adding a Task ID Field to Your Microsoft Excel Source Plan]] <!--7.12.1-71--> |
| + | |||
| + | This article is primarily focused on OnePager Express ('''OPX'''). However, this article also applies to OnePager Bundle ('''OPB''') where '''OPB''' is accessing Microsoft Excel '''source plans'''. | ||
==Preparation for Making a Multi-Project Chart from Separate Microsoft Excel Source Plans== | ==Preparation for Making a Multi-Project Chart from Separate Microsoft Excel Source Plans== | ||
| Line 21: | Line 23: | ||
===Important Note=== | ===Important Note=== | ||
| − | Each of the Microsoft Excel '''source plans''' above have unique '''Task ID''' fields with '''unique numbers'''. It is important throughout the use of these Microsoft Excel '''source plans''' that these assigned unique '''Task ID''' numbers remain with their respective tasks. '''Dates''' can change in the Microsoft Excel '''source plan's''' rows along with other '''updated''' information as the projects progress, but the '''Task ID''' number '''must''' remain associated with the task activity. Tasks can be '''deleted''', but the '''deleted Task ID''' should not be '''reused''' for a later snapshot. | + | Each of the Microsoft Excel '''source plans''' above have unique '''Task ID''' fields with '''unique numbers'''. It is important throughout the use of these Microsoft Excel '''source plans''' that these assigned unique '''Task ID''' numbers remain with their respective tasks. '''Dates''' can change in the Microsoft Excel '''source plan's''' rows along with other '''updated''' information as the projects progress, but the '''Task ID''' number '''must''' remain associated with the task activity. Tasks can be '''deleted''', but the '''deleted Task ID''' should not be '''reused''' for a later snapshot. OnePager can process out of sequence '''Task ID''' numbers. |
| − | ==Setting up the One Pager | + | ==Setting up the One Pager Template Properties Form for a Multi-Project Chart== |
| − | + | The next step is to select and '''update''' an appropriate OnePager '''Template Properties''' form. | |
| − | + | For this illustration we’ve selected the '''Multi-Project Gantt Chart – Detailed Template Properties''' form. Once the OnePager current '''Template Properties''' form is established as a '''multiple-project Template Properties''' form, go to the '''Rows/Swimlanes''' tab and make sure that the '''Group rows into swimlanes''' and '''Label swimlanes by''' windows are set to '''Project'''. Also, for this illustration, make sure that '''text columns''' are displayed and that the '''Custom Text Columns''' are set to '''Phase'''. | |
| − | + | The '''Rows/Swimlanes''' tab in the '''Template Properties''' form looks like this: | |
| − | + | <center>[[File:X71-8_4_1-71-(3)-11232021.png]]</center> | |
| + | <!--<center>X71-8_4_1-71-(3)-11232021.png</center>--> | ||
| − | + | When the steps above are completed and the '''Template Properties''' form for is '''updated''', click the '''Save and use''' button to make the modified '''Template Properties''' form the current '''Template'''. | |
| − | + | ||
| − | + | ||
| − | + | ||
| − | + | ||
| − | + | ||
==Create a Multi-Project Chart from Separate Multiple Microsoft Excel Separate Plans== | ==Create a Multi-Project Chart from Separate Multiple Microsoft Excel Separate Plans== | ||
| Line 44: | Line 42: | ||
===Launch Microsoft Excel and Load the First Microsoft Excel Source Plan=== | ===Launch Microsoft Excel and Load the First Microsoft Excel Source Plan=== | ||
| − | + | For this example the OnePager Express '''Add-in''' application is used. Launch Microsoft Excel and open the first of the multi-project Microsoft Excel '''source plans'''. In this case it’s the '''Merlin-Project Phase 1 and 2''' file. | |
| − | + | Next, launch OnePager Express from the Microsoft Excel '''Add-in''' tab. The '''OnePager Express Start''' form appears. | |
| − | + | Click the '''NEW''' button which accesses the OnePager choices ('''OPC''') form as shown below: | |
| − | 4) | + | <center>[[File:X71-8_4_1-71-(4-1)-05102022.png]]</center> |
| + | <!--<center>X71-8_4_1-71-(4-1)-05102022.png</center>--> | ||
| − | + | Note that the '''Merlin-Project Phase 1 and 2.xlsx''' Microsoft Excel '''source plan''' appears in the '''Selected File(s)''' group and that the '''Add/Remove''' button is active. | |
| − | + | ||
| − | + | ||
| − | + | ||
| − | + | ||
| − | + | ||
| − | + | ||
| − | + | ||
===Adding the Second Microsoft Excel Source Plan=== | ===Adding the Second Microsoft Excel Source Plan=== | ||
| − | + | Click the '''Add/Remove''' button which accesses the '''Data source selection''' form as shown below: | |
| − | <center>[[File: | + | <center>[[File:X71-8_4_1-71-(5-1)-05102022.png]]</center> |
| − | <!--<center> | + | <!--<center>X71-8_4_1-71-(5-1)-05102022.png</center>--> |
| − | + | We want to now '''add''' the other Microsoft Excel '''source plan''' to the '''source packet'''. To do this, click the '''ADD''' button in the '''Data source selection''' form and a Windows '''Open''' form appears. Navigate to the desired '''source plan''', select it, and then click the '''Open''' button as shown below: | |
| − | + | <center>[[File:X71-8_4_1-71-(6-1)-05102022.png]]</center> | |
| + | <!--<center>X71-8_4_1-71-(6-1)-05102022.png</center>--> | ||
| − | + | After you’ve completed placing the third Microsoft Excel '''source plan''' into the '''source packet''', the window in the '''Data source selection''' form looks like this: | |
| − | + | ||
| − | + | ||
| − | + | ||
| − | + | ||
| − | + | ||
<center>[[File:X70-8_4_1-70-(7)-08302019.png]]</center> | <center>[[File:X70-8_4_1-70-(7)-08302019.png]]</center> | ||
<!--<center>X70-8_4_1-70-(7)-08302019.png</center>--> | <!--<center>X70-8_4_1-70-(7)-08302019.png</center>--> | ||
| − | + | When you click the '''OK''' button above, the '''OPC''' form is '''updated''' to reflect that two (2) '''source plans''' are in the '''source packet''' and the '''title''' for the new chart that we typed in as shown here: | |
| − | <center>[[File: | + | <center>[[File:X71-8_4_1-71-(8-1)-05102022.png]]</center> |
| − | <!--<center> | + | <!--<center>X71-8_4_1-71-(8-1)-05102022.png</center>--> |
| − | ===Create the NEW OnePager | + | ===Create the NEW OnePager Multi-Project Chart=== |
| − | + | When you click the '''Next>''' button, OnePager goes to the second page of the '''OPC''' form where you can confirm other settings or make any '''Template Properties''' form setting changes. | |
| − | + | When these confirmations are complete, click the '''Create new chart''' button. The chart looks like this: | |
<center>[[File:X70-8_4_1-70-(9)-08302019.png]]</center> | <center>[[File:X70-8_4_1-70-(9)-08302019.png]]</center> | ||
<!--<center>X70-8_4_1-70-(9)-08302019.png</center>--> | <!--<center>X70-8_4_1-70-(9)-08302019.png</center>--> | ||
| − | + | Once you '''merge''' all your projects into a single snapshot, you can now '''add''' a new snapshot to the chart to show how tasks changed. | |
==Updating a Chart Created from Multiple Microsoft Excel Source Plans== | ==Updating a Chart Created from Multiple Microsoft Excel Source Plans== | ||
| − | + | Eventually you want to '''update''' your '''multi-project''' chart by either '''adding''' a snapshot or '''replacing''' a snapshot with '''updated''' data. To perform either the '''add''' or the '''replace''' snapshot, the processes described in these two referenced article references that follow can be used. | |
| − | + | ||
| − | + | ||
<center> | <center> | ||
{| class="wikitable" | {| class="wikitable" | ||
| − | | [[REPLACING a Snapshot via Pull Operation for Version 7.1 | REPLACING a Snapshot via Pull Operation]] 7.14.1-71 | + | | [[REPLACING a Snapshot via Pull Operation for Version 7.1 | REPLACING a Snapshot via Pull Operation]] <!--7.14.1-71--> |
|- | |- | ||
| − | | [[ADDING a Snapshot via Pull Operation for Version 7.1 | ADDING a Snapshot via Pull Operation]] 7.15.1-71 | + | | [[ADDING a Snapshot via Pull Operation for Version 7.1 | ADDING a Snapshot via Pull Operation]] <!--7.15.1-71--> |
|} | |} | ||
</center> | </center> | ||
| − | + | The key to making '''updated''' '''multi-project''' charts from '''multiple''' Microsoft '''source plan''' is the proper management of the Microsoft Excel data in the '''source packet'''. Recall that the '''source packet''' contains the '''source plan(s)''' that are to be used to either create or '''update''' a chart. | |
| − | + | ||
| − | + | ||
| − | + | They are stored as '''file names''' and '''path names''' in the chart’s '''.TAM''' file and can be accessed from the '''Data''' tab’s '''Selected file(s)''' button on the ribbon as shown below: | |
<center>[[File:X70-8_4_1-70-(10)-08302019.png]]</center> | <center>[[File:X70-8_4_1-70-(10)-08302019.png]]</center> | ||
<!--<center>X70-8_4_1-70-(10)-08302019.png</center>--> | <!--<center>X70-8_4_1-70-(10)-08302019.png</center>--> | ||
| − | + | Validating the contents of the '''source packet''' and assuring that these are the Microsoft Excel '''source plans''' that were '''updated''' is an essential step before proceeding to perform a project '''update'''. | |
==Related Links== | ==Related Links== | ||
| − | [[Merging the Wrong Tasks into a Chart for Version 7.1 - OnePager Express | Merging the Wrong Tasks into a Chart - OnePager Express]] 7.12.1-71 | + | [[Merging the Wrong Tasks into a Chart for Version 7.1 - OnePager Express | Merging the Wrong Tasks into a Chart - OnePager Express]] <!--7.12.1-71--> |
| − | [[Creating a NEW Chart via Pull Operation Feature for Version 7.1 | Creating a NEW Chart via Pull Operation Feature]] 7.13.1-71 | + | [[Creating a NEW Chart via Pull Operation Feature for Version 7.1 | Creating a NEW Chart via Pull Operation Feature]] <!--7.13.1-71--> |
| − | [[REPLACING a Snapshot via Pull Operation for Version 7.1 | REPLACING a Snapshot via Pull Operation]] 7.14.1-71 | + | [[REPLACING a Snapshot via Pull Operation for Version 7.1 | REPLACING a Snapshot via Pull Operation]] <!--7.14.1-71--> |
| − | [[ADDING a Snapshot via Pull Operation for Version 7.1 | ADDING a Snapshot via Pull Operation]] 7.15.1-71 | + | [[ADDING a Snapshot via Pull Operation for Version 7.1 | ADDING a Snapshot via Pull Operation]] <!--7.15.1-71--> |
(8.4.1-71) | (8.4.1-71) | ||
| Line 137: | Line 121: | ||
[[Category:Version 7.1]] | [[Category:Version 7.1]] | ||
[[Category:Add-In]] | [[Category:Add-In]] | ||
| − | [[Category: | + | [[Category:Standalone]] |
[[Category:Basic Workflows]] | [[Category:Basic Workflows]] | ||
[[Category:Multi-Project Formats]] | [[Category:Multi-Project Formats]] | ||
| − | [[Category: | + | [[Category:Template Properties Form]] |
[[Category:Conditional Import Filters]] | [[Category:Conditional Import Filters]] | ||
[[Category:OnePager Choices Form]] | [[Category:OnePager Choices Form]] | ||
[[Category:Charts]] | [[Category:Charts]] | ||
[[Category:Sharing Output]] | [[Category:Sharing Output]] | ||
| + | [[Category:Microsoft Excel]] | ||
[[Category:OnePager Express]] | [[Category:OnePager Express]] | ||
| + | [[Category:OnePager Bundle]] | ||
Latest revision as of 20:08, 10 May 2022
Contents
- 1 Overview
- 2 Preparation for Making a Multi-Project Chart from Separate Microsoft Excel Source Plans
- 3 Setting up the One Pager Template Properties Form for a Multi-Project Chart
- 4 Create a Multi-Project Chart from Separate Multiple Microsoft Excel Separate Plans
- 5 Updating a Chart Created from Multiple Microsoft Excel Source Plans
- 6 Related Links
Overview
Suppose you have multiple Microsoft Excel source plans that are related and you want to create a single chart that shows the important schedule items. You can do this as long as the related Microsoft Excel source plans are constructed with unique Task ID field contents. This means that you must adjust the Task ID column in the multiple Microsoft Excel source plans such that each row has a unique number or identifier in the Task ID field. This is necessary because unlike Microsoft Project, Microsoft Excel does not automatically provide a unique identifier for rows. Additionally, unique Task ID numbers are needed so that OnePager Express (OPX) or OnePager Bundle (OPB) does not get rows confused when performing snapshot updates.
For more information on Task ID's, please see the section in the article at: Adding a Task ID Field to Your Microsoft Excel Source Plan
This article is primarily focused on OnePager Express (OPX). However, this article also applies to OnePager Bundle (OPB) where OPB is accessing Microsoft Excel source plans.
Preparation for Making a Multi-Project Chart from Separate Microsoft Excel Source Plans
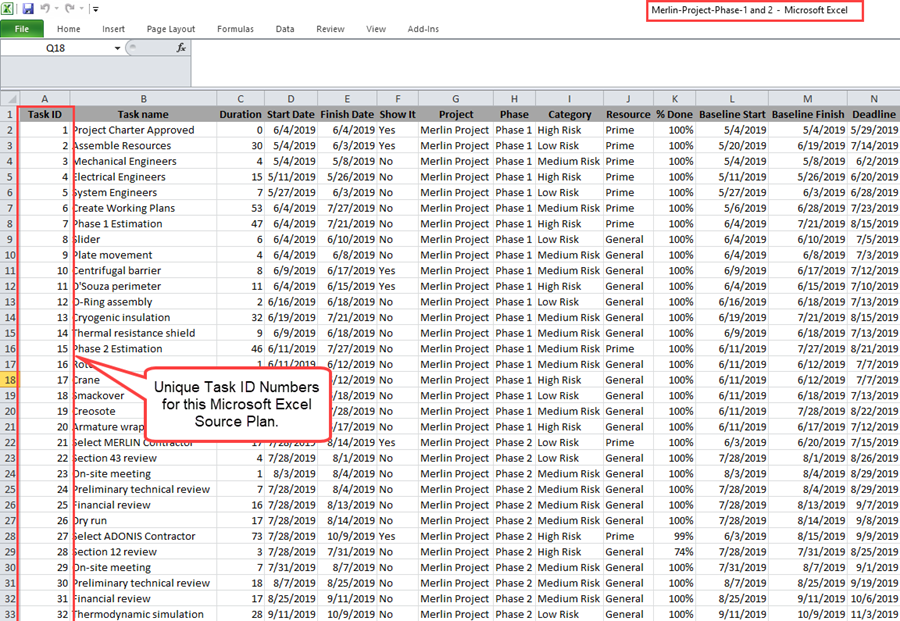
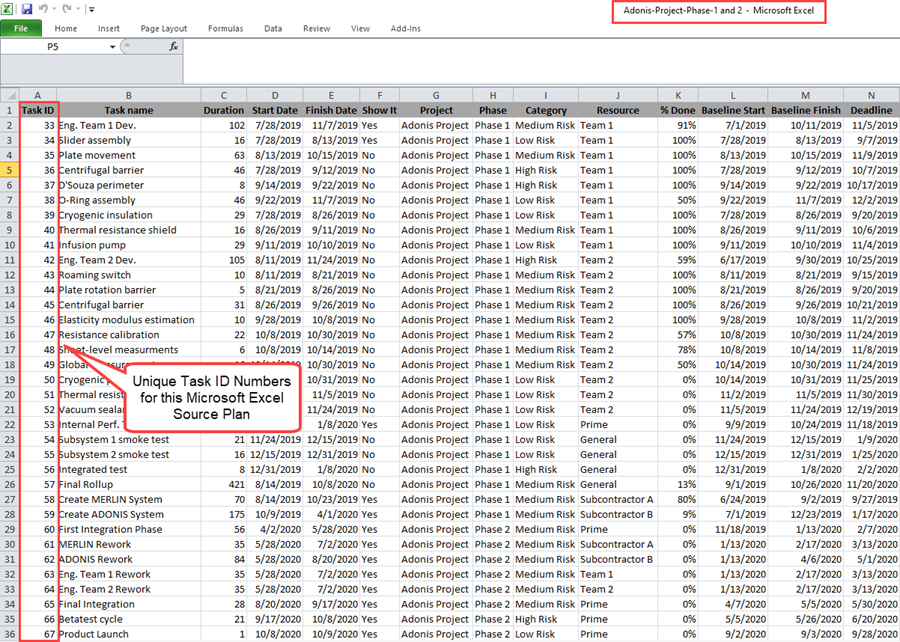
To illustrate what is needed, let’s construct a multi-project chart from the BlueGrass Project Plan Microsoft Excel source plan by splitting this source plan into two distinct files as shown below:
Important Note
Each of the Microsoft Excel source plans above have unique Task ID fields with unique numbers. It is important throughout the use of these Microsoft Excel source plans that these assigned unique Task ID numbers remain with their respective tasks. Dates can change in the Microsoft Excel source plan's rows along with other updated information as the projects progress, but the Task ID number must remain associated with the task activity. Tasks can be deleted, but the deleted Task ID should not be reused for a later snapshot. OnePager can process out of sequence Task ID numbers.
Setting up the One Pager Template Properties Form for a Multi-Project Chart
The next step is to select and update an appropriate OnePager Template Properties form.
For this illustration we’ve selected the Multi-Project Gantt Chart – Detailed Template Properties form. Once the OnePager current Template Properties form is established as a multiple-project Template Properties form, go to the Rows/Swimlanes tab and make sure that the Group rows into swimlanes and Label swimlanes by windows are set to Project. Also, for this illustration, make sure that text columns are displayed and that the Custom Text Columns are set to Phase.
The Rows/Swimlanes tab in the Template Properties form looks like this:
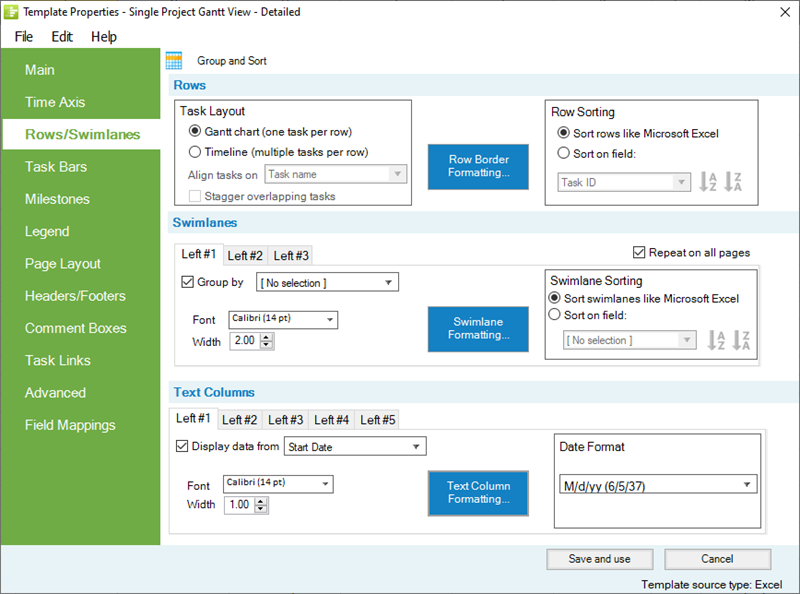
When the steps above are completed and the Template Properties form for is updated, click the Save and use button to make the modified Template Properties form the current Template.
Create a Multi-Project Chart from Separate Multiple Microsoft Excel Separate Plans
Launch Microsoft Excel and Load the First Microsoft Excel Source Plan
For this example the OnePager Express Add-in application is used. Launch Microsoft Excel and open the first of the multi-project Microsoft Excel source plans. In this case it’s the Merlin-Project Phase 1 and 2 file.
Next, launch OnePager Express from the Microsoft Excel Add-in tab. The OnePager Express Start form appears.
Click the NEW button which accesses the OnePager choices (OPC) form as shown below:
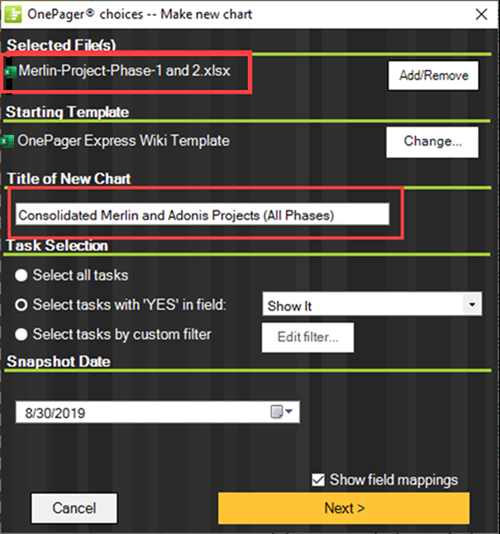
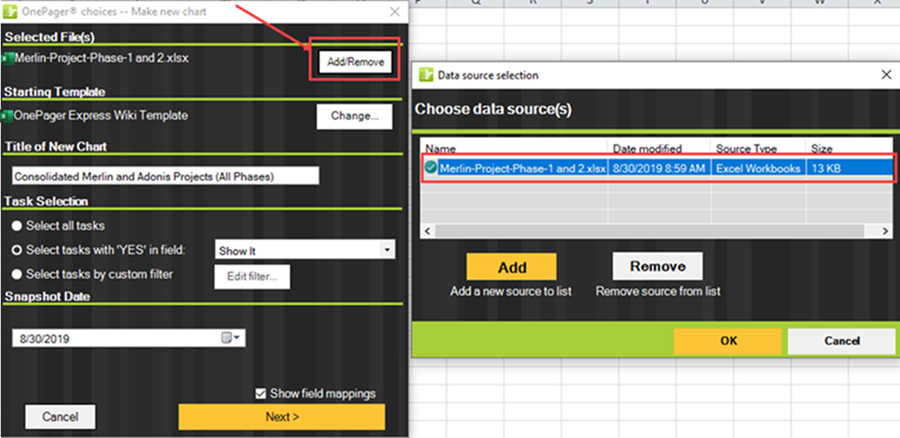
Note that the Merlin-Project Phase 1 and 2.xlsx Microsoft Excel source plan appears in the Selected File(s) group and that the Add/Remove button is active.
Adding the Second Microsoft Excel Source Plan
Click the Add/Remove button which accesses the Data source selection form as shown below:
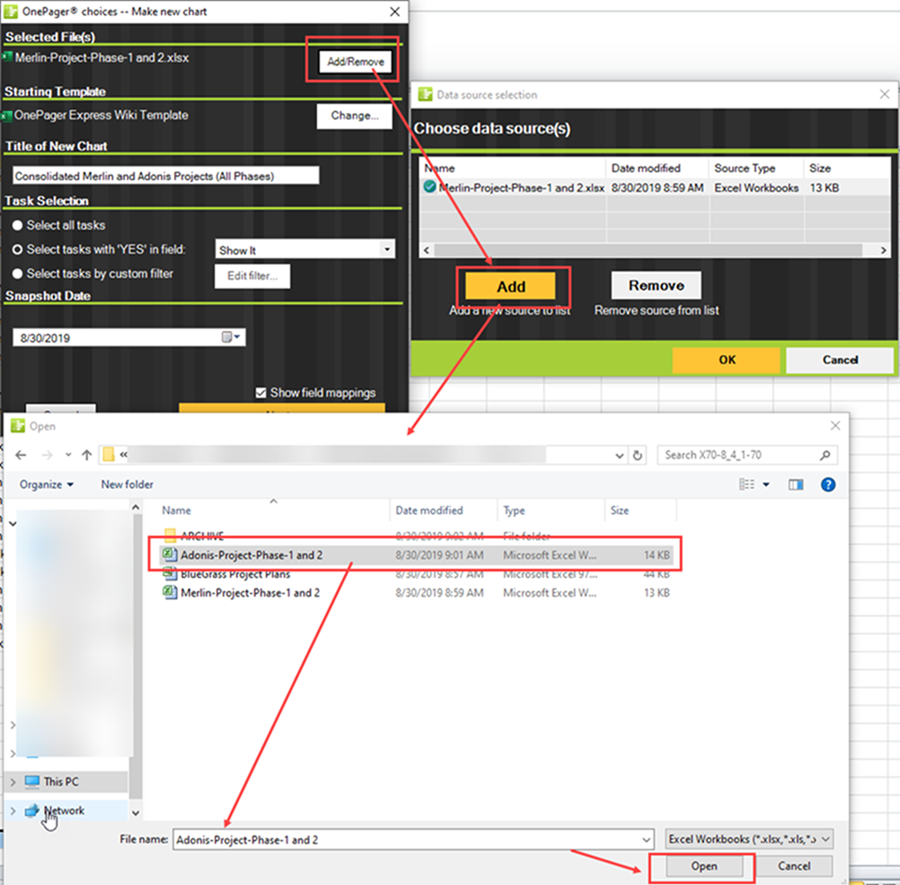
We want to now add the other Microsoft Excel source plan to the source packet. To do this, click the ADD button in the Data source selection form and a Windows Open form appears. Navigate to the desired source plan, select it, and then click the Open button as shown below:
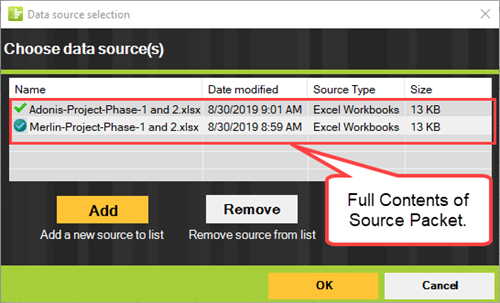
After you’ve completed placing the third Microsoft Excel source plan into the source packet, the window in the Data source selection form looks like this:
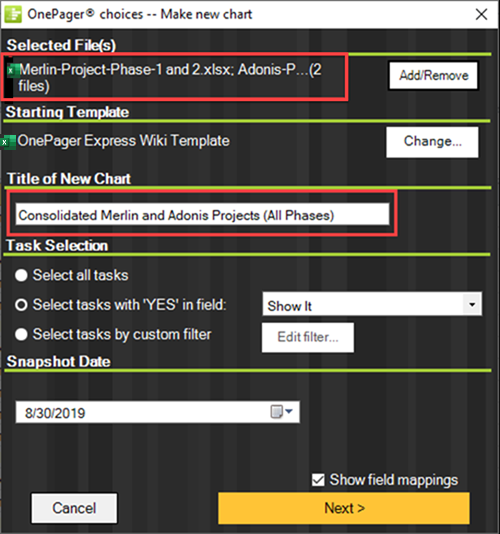
When you click the OK button above, the OPC form is updated to reflect that two (2) source plans are in the source packet and the title for the new chart that we typed in as shown here:
Create the NEW OnePager Multi-Project Chart
When you click the Next> button, OnePager goes to the second page of the OPC form where you can confirm other settings or make any Template Properties form setting changes.
When these confirmations are complete, click the Create new chart button. The chart looks like this:
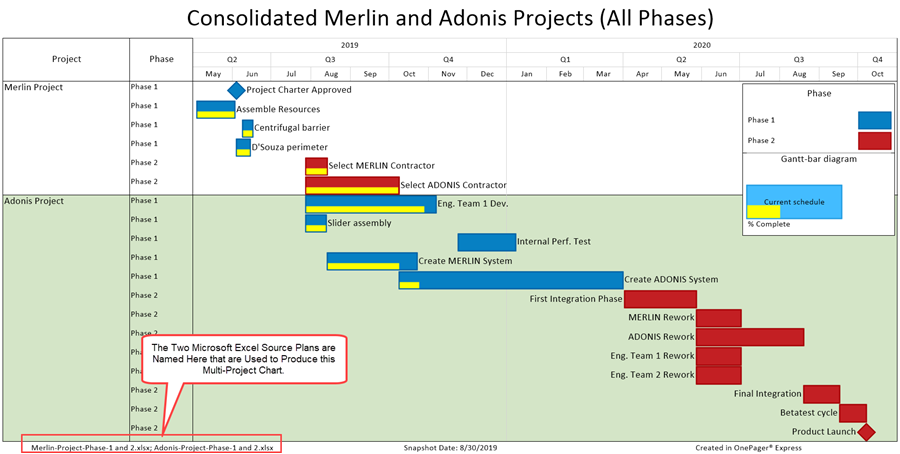
Once you merge all your projects into a single snapshot, you can now add a new snapshot to the chart to show how tasks changed.
Updating a Chart Created from Multiple Microsoft Excel Source Plans
Eventually you want to update your multi-project chart by either adding a snapshot or replacing a snapshot with updated data. To perform either the add or the replace snapshot, the processes described in these two referenced article references that follow can be used.
| REPLACING a Snapshot via Pull Operation |
| ADDING a Snapshot via Pull Operation |
The key to making updated multi-project charts from multiple Microsoft source plan is the proper management of the Microsoft Excel data in the source packet. Recall that the source packet contains the source plan(s) that are to be used to either create or update a chart.
They are stored as file names and path names in the chart’s .TAM file and can be accessed from the Data tab’s Selected file(s) button on the ribbon as shown below:
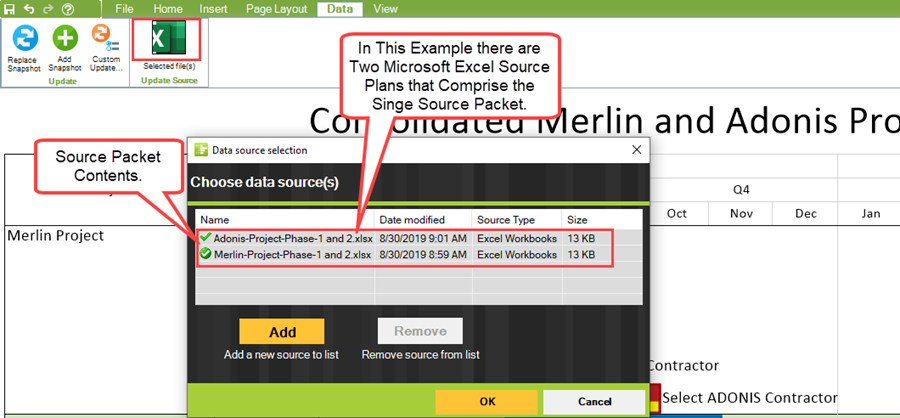
Validating the contents of the source packet and assuring that these are the Microsoft Excel source plans that were updated is an essential step before proceeding to perform a project update.
Related Links
Merging the Wrong Tasks into a Chart - OnePager Express
Creating a NEW Chart via Pull Operation Feature
REPLACING a Snapshot via Pull Operation
ADDING a Snapshot via Pull Operation
(8.4.1-71)