Difference between revisions of "Managing Conditional Formatting Rules for OnePager Pro for Version 7.0"
(→Delete Rule(s)) |
(→Add A Rule) |
||
| Line 37: | Line 37: | ||
3) To '''add''' a '''blank''' rule to the '''Conditional Formatting Rules''' form, click the '''Add Rule''' button at the bottom of the form and a '''blank''' rule row is placed in the grid as shown below: | 3) To '''add''' a '''blank''' rule to the '''Conditional Formatting Rules''' form, click the '''Add Rule''' button at the bottom of the form and a '''blank''' rule row is placed in the grid as shown below: | ||
| + | |||
| + | <center>[[File:P70-11_9_1-70-(1B)-09262019.png]]</center> | ||
| + | <center>P70-11_9_1-70-(1B)-09262019</center> | ||
==Delete Rule(s)== | ==Delete Rule(s)== | ||
Revision as of 14:41, 26 September 2019
Contents
About Editing Conditional Formatting Rules in the Form
1) The procedure for adding Conditional Formatting rules is covered here: Adding Conditional Formatting Rules-OnePager Pro. 11.3.1-70
2) The Conditional Formatting rules can be editing, added to, copied, or deleted at any time.
3) You can also un-check the On field checkboxes to disable any particular rule from being applied.
4) Finally, you can change the ordering of rule application by editing the sequence numbers in the Priority Action column.
Editing Rules in the Chart Properties Form Versus the Template
5) Editing a rule in Chart Properties form causes all current and future snapshots belonging to the chart to be impacted by the Conditional Formatting rule edit.
6) Editing a rule in Template Properties form has no impact on any existing charts created before the Template was edited but has an impact on conditional formatting of any future charts made from the edited Template.
Editing Existing Conditional Formatting Rules in the Grid
7) Once a conditional formatting rule is successfully entered into the grid of the Conditional Formatting Rules form, it can be edited individually by using your mouse to click on the grid cell of the rule you wish to edit.
8) The grid cell in turn responds in accordance with the type of cell it happens to be and either allows you to enter text, access a dropdown list, or access a OnePager form.
9) Editing the selected cell, then, is a matter of changing the information in the cell as described in the article at: Adding Conditional Formatting Rules-OnePager Pro. 11.3.1-70
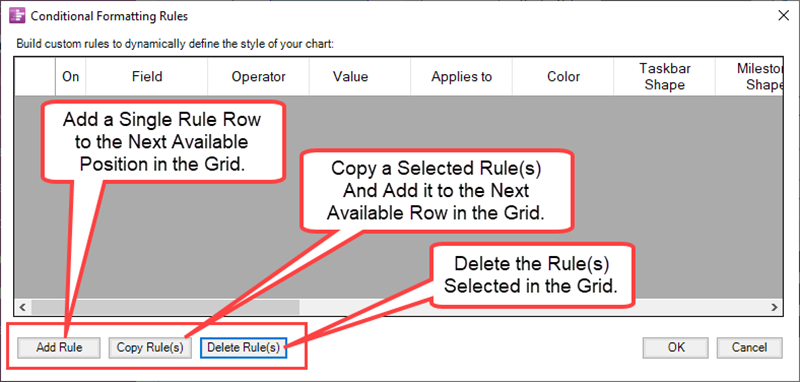
10) To assist in editing the Conditional Formatting Rules form has three buttons in the lower left of the form as shown here:

11) The remainder of this article deals with these three action buttons and how they are used in the conditional formatting rule editing process.
Add A Rule
1) To add a rule to the Conditional Formatting rule grid first access the Conditional Formatting Rule form through either the Template or Chart Properties form's Task Bars or Milestones tabs.
2) Clicking the Manage Rules... button at the bottom of the tab accesses the Conditional Formatting Rules form in its empty grid state if this is the first access of the form.
3) To add a blank rule to the Conditional Formatting Rules form, click the Add Rule button at the bottom of the form and a blank rule row is placed in the grid as shown below:
Delete Rule(s)
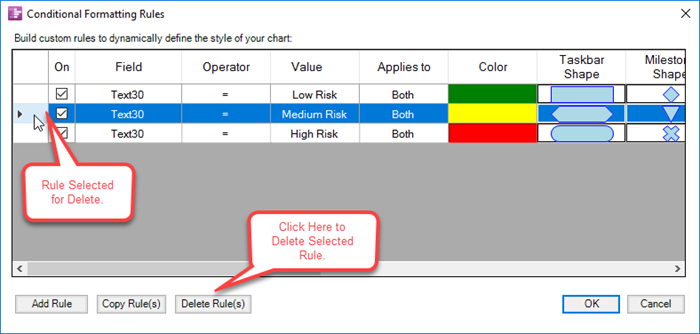
1) Whenever you are in the Conditional Formatting Rules form you can delete a rule or several rules by first selecting them by left clicking in the left grid cell and then clicking the Delete Rule(s) button at the bottom of the form as shown below:

Copy Rule(s)
2) The Copy Rule(s) button is provided to assist you in making additional rules that are similar to existing rules.
- a) To copy a rule or rules, select the rows as described above and click the Copy Rule(s) button.
- b) This action adds the copied rules without change to the bottom of the table.
- c) You can now edit columns in the copied rows of the table. When you click OK these added (modified) rules are in effect.
3) The illustrations below show a set of selected rules that are copied and subsequently modified:
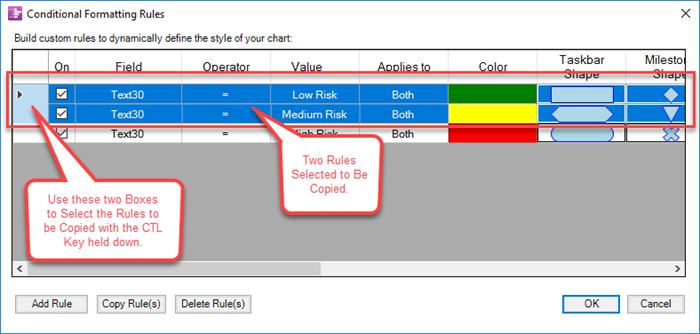
Select Rule(s) to Be Copied
- a) Use the left most column to select the rules you desire to copy. This can be done by individual row or in combination with the CTRL key and/or the Shift key.

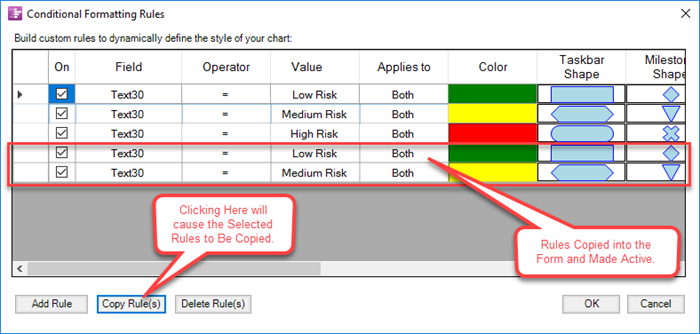
Click Copy Rule(s) Button
- b) To complete the copy function after the rules to be copied are selected simply click the Copy Rules(s).

Modify Copied Rules
- c) After the copied rules appear in the form as shown above you can modify the rules as desired. Click the OK button to complete the process.
(11.9.1-70)