Difference between revisions of "Managing Inserted Curtains for OnePager for Version 7.2"
(→Using the Grid to Insert A Curtain - An Example) |
(→Related Links) |
||
| Line 52: | Line 52: | ||
{| class="wikitable" | {| class="wikitable" | ||
| [[Creating and Managing Curtains for Version 7.2 | Creating and Managing Curtains]] <!--16.0.1-72--> | | [[Creating and Managing Curtains for Version 7.2 | Creating and Managing Curtains]] <!--16.0.1-72--> | ||
| − | | [[Editing Time Axes with the Chart Properties Form for OnePager for Version 7.2 | Editing Time Axes with the Chart Properties Form for OnePager]] <!--22.4.1- | + | | [[Editing Time Axes with the Chart Properties Form for OnePager for Version 7.2 | Editing Time Axes with the Chart Properties Form for OnePager]] <!--22.4.1-72--> |
|- | |- | ||
| [[Manual Editing the Time Axis for OnePager for Version 7.2 | Manual Editing the Time Axis for OnePager]] <!--22.4.3-72--> | | [[Manual Editing the Time Axis for OnePager for Version 7.2 | Manual Editing the Time Axis for OnePager]] <!--22.4.3-72--> | ||
Latest revision as of 13:52, 26 March 2024
Contents
Overview
Illustrations used in this article are from OnePager Pro using data from Microsoft Project but the features, function, controls, and manual edits apply equally to other OnePager editions that import from data sources like Microsoft Excel, Microsoft Project for the Web, Smartsheet, Oracle Primavera P6, Planisware Enterprise, Asana, and Wrike.
In addition to being able to insert a Curtain from the OnePager Insert ribbon tool bar tab, you can also insert a Curtain by using The Grid available in the Template Properties and Chart Properties form's Time Axis tab at the Format sub-tab. Inserting Curtains with this mechanism provides a great deal of control and flexibility when Curtains are an important part of your schedule presentation.
Inserting and Managing Curtains
In addition to being able to insert manual Curtains using the Curtain button on the OnePager Insert ribbon tool bar tab, OnePager provides the capability to insert Curtains from within the Chart Properties/Template Properties form’s Time Axis tab's Format sub-tab. The Chart Properties form Time Axis tab’s Format sub-tab is shown below:
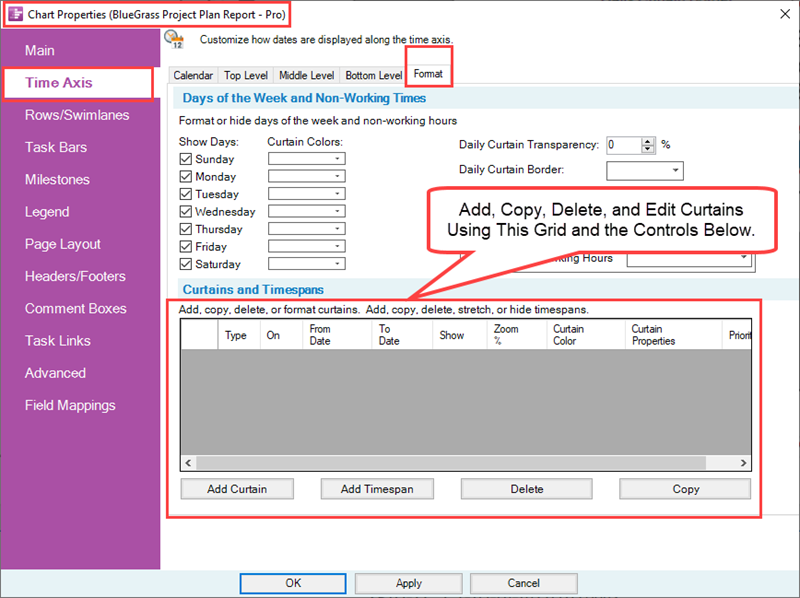
Controls are provided to (1) Add a Curtain, (2) Copy an existing Curtain entry to create another Curtain entry, and (3) Delete a selected Curtain entry. You can also edit most Curtain properties with the controls found in the Curtains and Timespans Grid shown above. Daily Curtains cannot be edited in The Grid.
Using the Grid to Insert A Curtain - An Example
A sample Curtain created within the Curtains and Timespans Grid above looks like this:
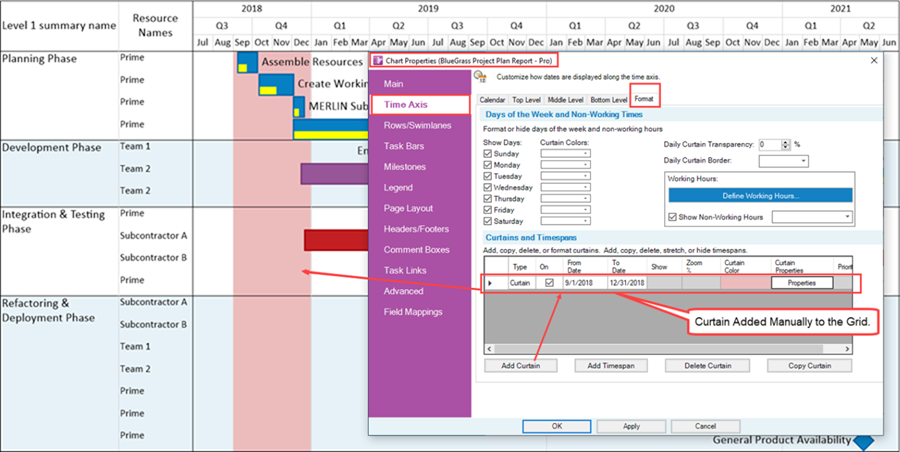
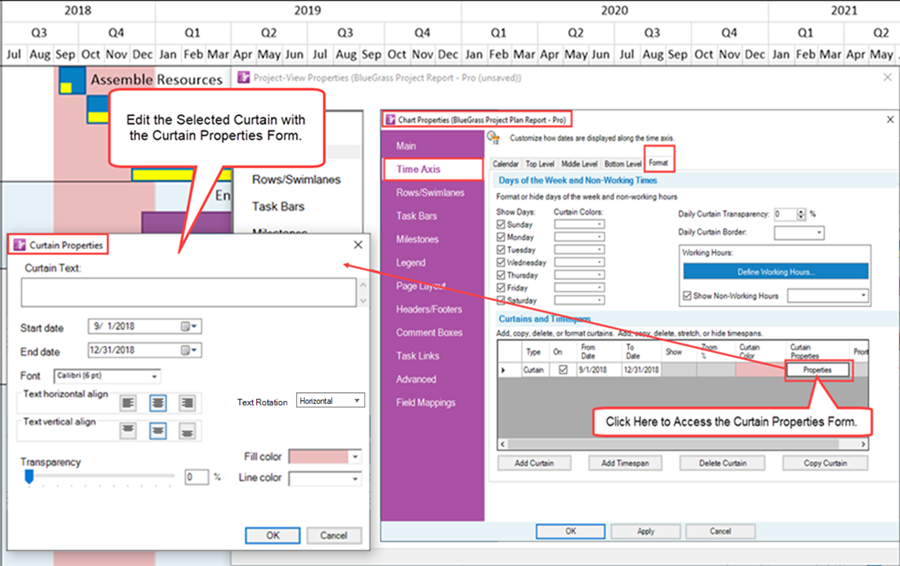
In the entry for the new Curtain, you can click the Properties button to access the Curtain Properties form to edit the Curtain just created as shown here:
Curtains can be edited exactly like a manually inserted Curtain by right-clicking on the Curtain itself to access the curtain right-click context menu:
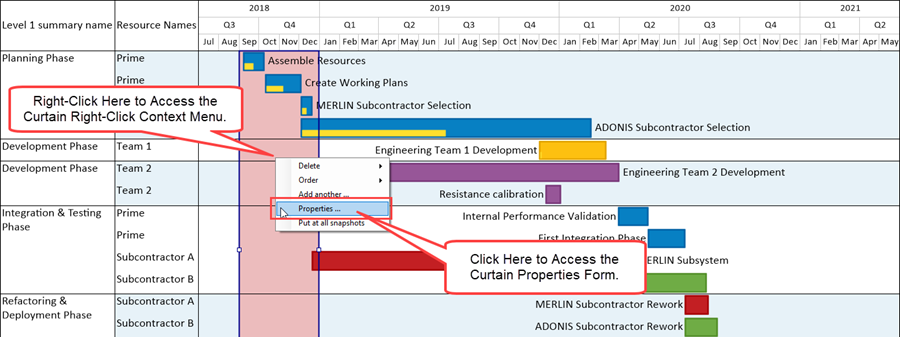
Clicking the Properties… command accesses the standard Curtain Properties form shown here:
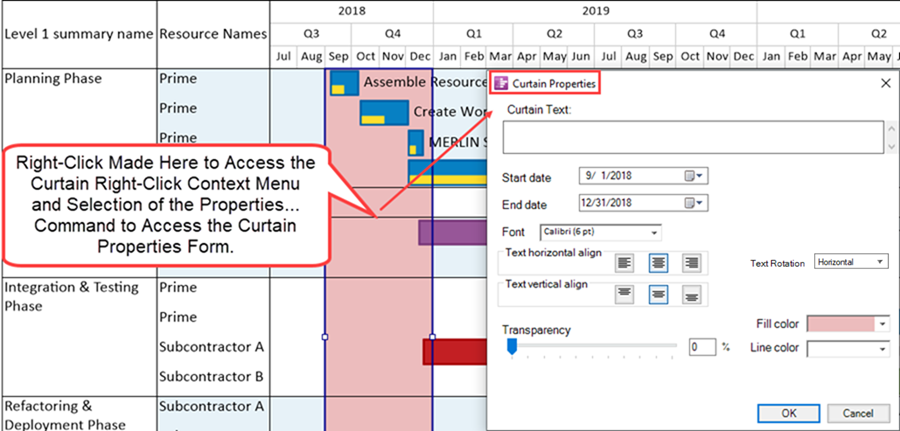
When there are multiple Curtains they are all listed in the Curtains and Timespans Grid individually. Curtains are snapshot-dependent. Daily Curtains are not managed using the Curtain Properties form nor do they appear as entries in The Grid.
For more information on Daily Curtains and the Curtain Properties form, please see the articles at:
| Creating, Editing, and Managing Time Axis Daily Curtains for OnePager |
| Creating and Managing Curtains |
Related Links
(22.5.7-72)
- Version 7.2
- Editing the Chart
- Charts
- Time Axis
- Time Axis Tab
- Background Color
- Fill Pattern
- Floating Time Axis
- Non-Linear Time Axis
- Color Palettes
- Curtains
- Inserted Curtains
- Working Hours
- Non-Working Hours
- The Grid
- Timespans
- Ribbon
- Snapshots
- Task/Milestone
- Template Properties Form
- Chart Properties Form
- OnePager Pro
- OnePager Express
- OnePager Bundle