Difference between revisions of "REPLACING a Snapshot via Push Update - OnePager Pro Desktop for Version 6.0"
(→Procedures) |
|||
| (3 intermediate revisions by the same user not shown) | |||
| Line 3: | Line 3: | ||
Once created, snapshots are saved in the project view’s '''.TAM''' file and are organized by snapshot date. Often there is a need to update a snapshot by replacing its task/milestone data with updated information. OnePager supports three ways to replace a snapshot: | Once created, snapshots are saved in the project view’s '''.TAM''' file and are organized by snapshot date. Often there is a need to update a snapshot by replacing its task/milestone data with updated information. OnePager supports three ways to replace a snapshot: | ||
| − | 1) '''Dates and Progress Mode''' This is the recommended mode. With this mode, OnePager changes all dynamic properties (e.g. start and finish dates, baseline dates, deadline dates, percent complete, critical path, dynamic color-coding, and conditional formatting properties). OnePager will also add new tasks that were not previously flagged. OnePager does not change task labels in this mode. | + | 1) '''Dates and Progress Mode'''. This is the recommended mode. With this mode, OnePager changes all dynamic properties (e.g. start and finish dates, baseline dates, deadline dates, percent complete, critical path, dynamic color-coding, and conditional formatting properties). OnePager will also add new tasks that were not previously flagged. OnePager does not change task labels in this mode. |
| − | 2) '''All Properties Mode''' In this rarely-used mode, OnePager does everything it does in '''Dates and Progress mode''' plus it updates the task names from Microsoft Project. It will also refresh fields that are used for row and swimlane organization. However, it will not automatically regroup or re-sort them unless you trigger a re-computation on the '''Rows and Swimlanes''' tab of the '''Project-View Properties''' ('''PVP''') form. | + | 2) '''All Properties Mode'''. In this rarely-used mode, OnePager does everything it does in '''Dates and Progress mode''' plus it updates the task names from Microsoft Project. It will also refresh fields that are used for row and swimlane organization. However, it will not automatically regroup or re-sort them unless you trigger a re-computation on the '''Rows and Swimlanes''' tab of the '''Project-View Properties''' ('''PVP''') form. |
| − | 3) '''All Properties (confirm) Mode''' In this mode, OnePager performs the same functions as in the '''All properties''' mode but requests individual confirmation from you before each change is performed. This is quite laborious and is very rarely used. | + | 3) '''All Properties (confirm) Mode'''. In this mode, OnePager performs the same functions as in the '''All properties''' mode but requests individual confirmation from you before each change is performed. This is quite laborious and is very rarely used. |
| − | 4) OnePager uses the updated Microsoft Project plan to REPLACE snapshots. | + | 4) OnePager uses the updated Microsoft Project '''source plan''' to REPLACE snapshots. |
| − | 5) One method that the OnePager '''Add-in''' uses is called the '''Push Update'''. By | + | 5) One method that the OnePager '''Add-in''' uses is called the '''Push Update'''. By '''push''' we mean that the updated Microsoft Project plan is '''Pushed''' to OnePager. This distinction is important since OnePager also enables the '''Pull Update'''method. (See article: [[REPLACING a Snapshot via Pull Operation - OnePager Pro for Version 6.0 | REPLACING a Snapshot via Pull Operation - OnePager Pro]] for a discussion of the '''Pull''' method for adding a snapshot to a project view. |
The scenario for accomplishing this periodic process is shown below: | The scenario for accomplishing this periodic process is shown below: | ||
| Line 19: | Line 19: | ||
==Procedures== | ==Procedures== | ||
| − | 1) Launch OnePager from the '''desktop''' icon. | + | 1) Launch OnePager Pro from the '''desktop''' icon. |
2) The OnePager splash page will appear briefly followed by the OnePager Project View Editor ('''PVE''') form displaying the '''OnePager Pro Start''' form. | 2) The OnePager splash page will appear briefly followed by the OnePager Project View Editor ('''PVE''') form displaying the '''OnePager Pro Start''' form. | ||
| Line 30: | Line 30: | ||
<center>[[File:P60-7_9_1-60-(2)-01312017.png]]</center> | <center>[[File:P60-7_9_1-60-(2)-01312017.png]]</center> | ||
| − | <center>P60-7_9_1-60-(2)-01312017.png</center> | + | <!--<center>P60-7_9_1-60-(2)-01312017.png</center>--> |
| − | :b) It is an excellent idea before proceeding further to check to make sure that the desired Microsoft Project ''' | + | :b) It is an excellent idea before proceeding further to check to make sure that the desired Microsoft Project '''source plans''' is selected and showing in the form depicted above. If changes need to be made, click the '''Add/Remove''' button to get you with access to controls allowing you to add or remove Microsoft Project '''source plans''' before going further. |
:c) Select the '''REPLACE existing snapshot at date:''' radio button as shown above and use the snapshot selection dropdown list to select the date of the snapshot to replace as shown below: | :c) Select the '''REPLACE existing snapshot at date:''' radio button as shown above and use the snapshot selection dropdown list to select the date of the snapshot to replace as shown below: | ||
<center>[[File:P60-7_9_1-60-(3)-01312016.png]]</center> | <center>[[File:P60-7_9_1-60-(3)-01312016.png]]</center> | ||
| − | <center>P60-7_9_1-60-(3)-01312016.png</center> | + | <!--<center>P60-7_9_1-60-(3)-01312016.png</center>--> |
4) Once '''REPLACE existing snapshot at date:''' is selected the OnePager choices ('''OPC''') form will display the '''Replace''' mode commands as shown above. | 4) Once '''REPLACE existing snapshot at date:''' is selected the OnePager choices ('''OPC''') form will display the '''Replace''' mode commands as shown above. | ||
| − | 5) The next step is to select what is to be replaced. Choose one of the three options discussed above. We recommend | + | 5) The next step is to select what is to be replaced. Choose one of the three options discussed above. We recommend using '''Dates and Progress''' unless you have changed the names of tasks in the Microsoft Project '''source plan'''. |
| − | <center>[[File:P60-7_9_1- | + | <center>[[File:P60-7_9_1-60-(4)-01312017.png]]</center> |
| + | <!--<center>P60-7_9_1-60-(4)-01312017.png</center>--> | ||
| − | 6) Then, click '''Next>''' or '''Replace dates''' at the bottom of the '''OPC''' form depending on whether the '''Show | + | 6) Then, click '''Next>''' or '''Replace dates''' at the bottom of the '''OPC''' form depending on whether the '''Show field mappings''' checkbox is checked. OnePager will import the data under the control of the '''Flag/Number''' field and replace the snapshot that was selected. |
| − | 7) Once the project view is displayed and available, you may edit, save, and copy the project view to a PowerPoint slide or elsewhere as described previously. | + | 7) Once the project view is displayed and available, you may edit, save, and copy the project view to a Microsoft PowerPoint slide or elsewhere as described previously. |
8) When you save the project view, the replaced snapshot is stored in the project view’s '''.TAM''' file along with all its other snapshots. | 8) When you save the project view, the replaced snapshot is stored in the project view’s '''.TAM''' file along with all its other snapshots. | ||
Latest revision as of 17:46, 4 April 2017
Overview
Once created, snapshots are saved in the project view’s .TAM file and are organized by snapshot date. Often there is a need to update a snapshot by replacing its task/milestone data with updated information. OnePager supports three ways to replace a snapshot:
1) Dates and Progress Mode. This is the recommended mode. With this mode, OnePager changes all dynamic properties (e.g. start and finish dates, baseline dates, deadline dates, percent complete, critical path, dynamic color-coding, and conditional formatting properties). OnePager will also add new tasks that were not previously flagged. OnePager does not change task labels in this mode.
2) All Properties Mode. In this rarely-used mode, OnePager does everything it does in Dates and Progress mode plus it updates the task names from Microsoft Project. It will also refresh fields that are used for row and swimlane organization. However, it will not automatically regroup or re-sort them unless you trigger a re-computation on the Rows and Swimlanes tab of the Project-View Properties (PVP) form.
3) All Properties (confirm) Mode. In this mode, OnePager performs the same functions as in the All properties mode but requests individual confirmation from you before each change is performed. This is quite laborious and is very rarely used.
4) OnePager uses the updated Microsoft Project source plan to REPLACE snapshots.
5) One method that the OnePager Add-in uses is called the Push Update. By push we mean that the updated Microsoft Project plan is Pushed to OnePager. This distinction is important since OnePager also enables the Pull Updatemethod. (See article: REPLACING a Snapshot via Pull Operation - OnePager Pro for a discussion of the Pull method for adding a snapshot to a project view.
The scenario for accomplishing this periodic process is shown below:
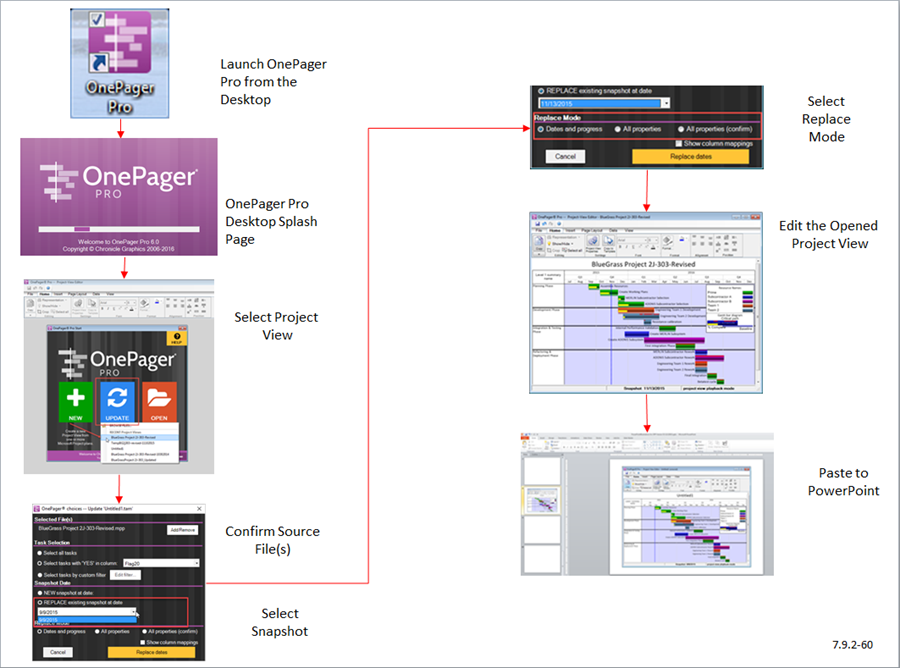
Procedures
1) Launch OnePager Pro from the desktop icon.
2) The OnePager splash page will appear briefly followed by the OnePager Project View Editor (PVE) form displaying the OnePager Pro Start form.
3) Select the UPDATE button on the OnePager Pro Start form as shown below:
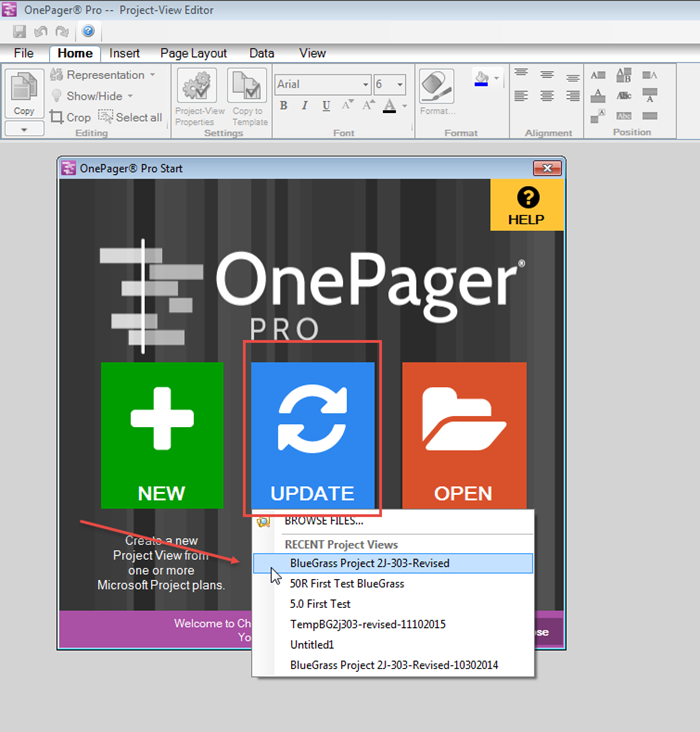
- a) Clicking the UPDATE button will display a list of recently-used project views and the word BROWSE FILES…option. Select the desired project view as shown above and OnePager will bring up the “OnePager choices” form shown here:
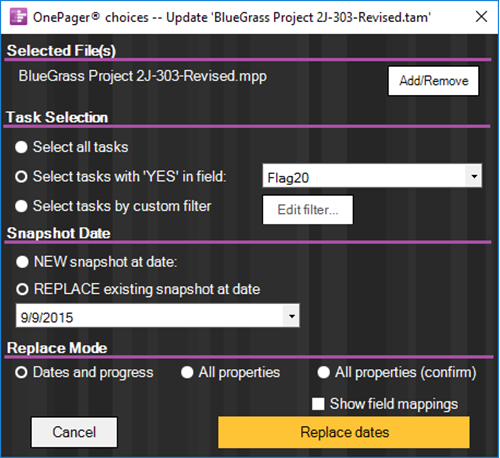
- b) It is an excellent idea before proceeding further to check to make sure that the desired Microsoft Project source plans is selected and showing in the form depicted above. If changes need to be made, click the Add/Remove button to get you with access to controls allowing you to add or remove Microsoft Project source plans before going further.
- c) Select the REPLACE existing snapshot at date: radio button as shown above and use the snapshot selection dropdown list to select the date of the snapshot to replace as shown below:
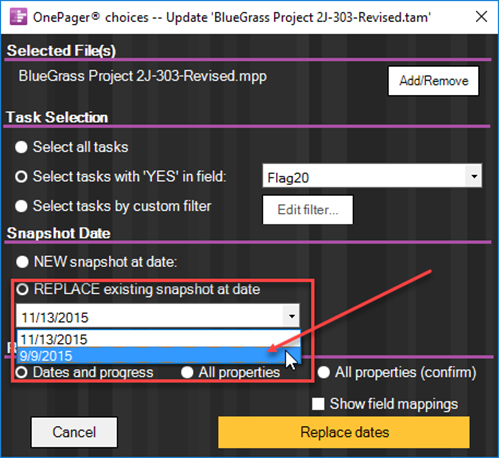
4) Once REPLACE existing snapshot at date: is selected the OnePager choices (OPC) form will display the Replace mode commands as shown above.
5) The next step is to select what is to be replaced. Choose one of the three options discussed above. We recommend using Dates and Progress unless you have changed the names of tasks in the Microsoft Project source plan.
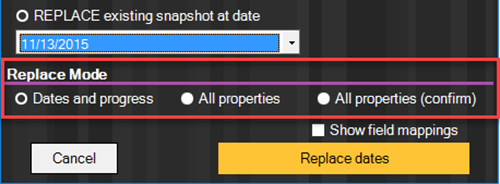
6) Then, click Next> or Replace dates at the bottom of the OPC form depending on whether the Show field mappings checkbox is checked. OnePager will import the data under the control of the Flag/Number field and replace the snapshot that was selected.
7) Once the project view is displayed and available, you may edit, save, and copy the project view to a Microsoft PowerPoint slide or elsewhere as described previously.
8) When you save the project view, the replaced snapshot is stored in the project view’s .TAM file along with all its other snapshots.
Related Links
Creating a NEW Project View via Pull Operation - OnePager Pro
Creating a NEW Project View via Pull Operation - OnePager Express
REPLACING a Snapshot via Pull Operation - OnePager Pro
REPLACING a Snapshot via Pull Operation - OnePager Express
ADDING a Snapshot via Pull Operation - OnePager Pro
ADDING a Snapshot via Pull Operation - OnePager Express
Custom Update (Replacing) of a Snapshot via Pull Operation - OnePager Pro
Custom Update (Replacing) of a Snapshot via Pull Operation - OnePager Express
Using the OnePager "Data" Tab's "Selected file(s)" Button
(7.9.2-60)