Difference between revisions of "Resizing Row or Swimlane Labels"
From OnePager Documentation
m (Text replacement - ".png]]" to ".png|link=]]") |
|||
| (2 intermediate revisions by one other user not shown) | |||
| Line 1: | Line 1: | ||
| − | If you need more space for the text in your row or swimlane labels, you can resize them. | + | If you need more space for the text in your row or swimlane labels, you can '''resize''' them. |
| − | + | 1) Hover your mouse over the edge of the row or swimlane label and left click to drag it to the left or right: | |
| − | As you resize the label width, the size of your overall OnePager document will be adjusted accordingly. | + | <center>[[File:P52-12_8-(1)-06022015.png|link=]]</center> |
| + | |||
| + | 2) As you '''resize''' the '''label width''', the size of your overall OnePager document will be adjusted accordingly. | ||
| + | |||
| + | 3) '''Note''' There may be an impact on the output formatting for multi-page project views. | ||
(12.8) | (12.8) | ||
[[Category:Version 5.2]] | [[Category:Version 5.2]] | ||
| + | [[Category:Version 5.3]] | ||
[[Category:Project Views]] | [[Category:Project Views]] | ||
[[Category:Templates]] | [[Category:Templates]] | ||
Latest revision as of 18:00, 16 February 2024
If you need more space for the text in your row or swimlane labels, you can resize them.
1) Hover your mouse over the edge of the row or swimlane label and left click to drag it to the left or right:
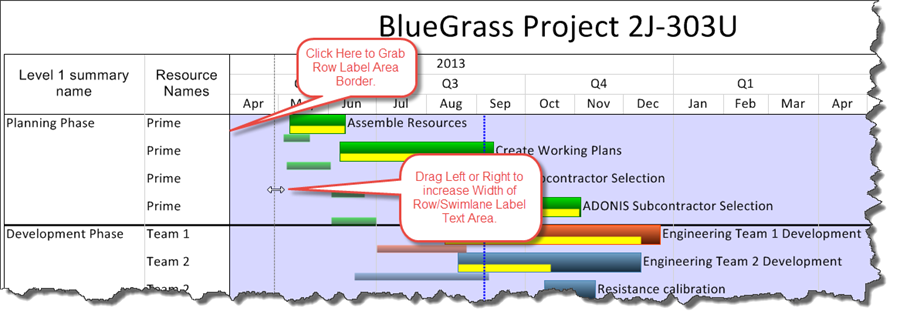
2) As you resize the label width, the size of your overall OnePager document will be adjusted accordingly.
3) Note There may be an impact on the output formatting for multi-page project views.
(12.8)