Difference between revisions of "Resizing the Height of Rows"
(→Using the Page Layout Tab) |
|||
| (14 intermediate revisions by the same user not shown) | |||
| Line 1: | Line 1: | ||
| − | + | ==Overview== | |
| − | 1) Begin by selecting one of more rows by left | + | OnePager allows you to '''resize the height''' of individual rows or groups of rows. |
| + | |||
| + | When tasks/milestones scale in height proportional to the '''row height''', changing the '''row height''' would not put more space between tasks and milestones. | ||
| + | |||
| + | Follow the steps below to '''resize the height''' of rows: | ||
| + | |||
| + | ==Manual Method== | ||
| + | |||
| + | 1) Begin by selecting one of more rows by left clicking the row '''label'''. | ||
| + | |||
| + | 2) To select multiple rows, hold down the '''CTRL key''' while selecting rows. The following illustrates how rows look when selected: | ||
<center>[[File:P52-12_11-(1)-06022015.png]]</center> | <center>[[File:P52-12_11-(1)-06022015.png]]</center> | ||
| − | + | 3) To change the height of the above row, grab the top '''grab box''', for example, with the cursor and move it up to increase the '''row height''' or down to decrease the '''row height'''. The results look like this: | |
<center>[[File:P52-12_11-(2)-06022015.png]]</center> | <center>[[File:P52-12_11-(2)-06022015.png]]</center> | ||
| − | + | 4) Changing the '''row height''' also changes the height of any task/milestone located in the row if the task/milestone height is set to be a '''percentage of the row height'''. | |
| − | + | :a) If a task/milestone is in '''relative height''' mode, changing the '''row height''' will '''automatically change''' the '''task/milestone’s height'''. | |
| − | + | :b) If the task/milestone is in '''absolute height''' mode, the '''task/milestone’s height''' will remain unchanged. | |
| − | + | ==Alternate Method== | |
| − | + | 5) OnePager has an alternate way to change the '''row height''' to an '''absolute height''' in '''inches''' or '''centimeters''' for a precision adjustment. | |
| + | :a) Right click the desired row '''label''' which brings up the following context menu. | ||
| + | |||
| + | <center>[[File:P52-12_11-(3)-06022015.png]]</center> | ||
| + | |||
| + | :b) Then click '''Row height…''' which will bring up '''Row height''' form as shown below: | ||
<center>[[File:P52-12_11-(4)-06022015.png]]</center> | <center>[[File:P52-12_11-(4)-06022015.png]]</center> | ||
| − | + | :c) Use this form to set the '''absolute height''' of the row or rows then click '''OK'''. | |
| + | |||
| + | ==Using the Page Layout Tab== | ||
| + | |||
| + | 6) '''Note''' The '''row height''' may be changed by resetting the '''Automatic: Use row height of…''' window in the '''Page Layout''' tab of the Project-View Properties ('''PVP''') form or the '''Template Properties''' form. | ||
| + | |||
| + | :a) Clicking the radio button as shown below tells OnePager to use the setting in the window to determine the '''row height''' of all rows. Additionally, you can change the setting in the window as required. | ||
| + | |||
| + | :b) Unchecking the radio button allows you to change '''row heights''' as described above. | ||
| − | + | c:) The '''Page Layout''' tab of the '''PVP''' form is shown below: | |
<center> [[File:P52-12_11-(5)-06022015.png]]</center> | <center> [[File:P52-12_11-(5)-06022015.png]]</center> | ||
| − | + | 7) By manually changing the '''row height''' by either method, you are creating a '''row height maverick'''. | |
(12.11) | (12.11) | ||
[[Category:Version 5.2]] | [[Category:Version 5.2]] | ||
| + | [[Category:Version 5.3]] | ||
[[Category:Project Views]] | [[Category:Project Views]] | ||
[[Category:Templates]] | [[Category:Templates]] | ||
Latest revision as of 22:03, 5 May 2016
Overview
OnePager allows you to resize the height of individual rows or groups of rows.
When tasks/milestones scale in height proportional to the row height, changing the row height would not put more space between tasks and milestones.
Follow the steps below to resize the height of rows:
Manual Method
1) Begin by selecting one of more rows by left clicking the row label.
2) To select multiple rows, hold down the CTRL key while selecting rows. The following illustrates how rows look when selected:

3) To change the height of the above row, grab the top grab box, for example, with the cursor and move it up to increase the row height or down to decrease the row height. The results look like this:

4) Changing the row height also changes the height of any task/milestone located in the row if the task/milestone height is set to be a percentage of the row height.
- a) If a task/milestone is in relative height mode, changing the row height will automatically change the task/milestone’s height.
- b) If the task/milestone is in absolute height mode, the task/milestone’s height will remain unchanged.
Alternate Method
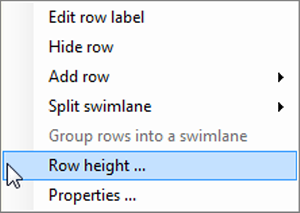
5) OnePager has an alternate way to change the row height to an absolute height in inches or centimeters for a precision adjustment.
- a) Right click the desired row label which brings up the following context menu.

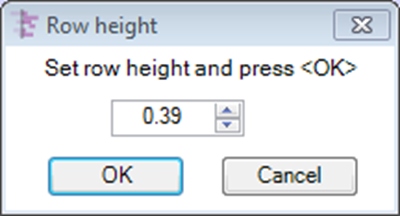
- b) Then click Row height… which will bring up Row height form as shown below:

- c) Use this form to set the absolute height of the row or rows then click OK.
Using the Page Layout Tab
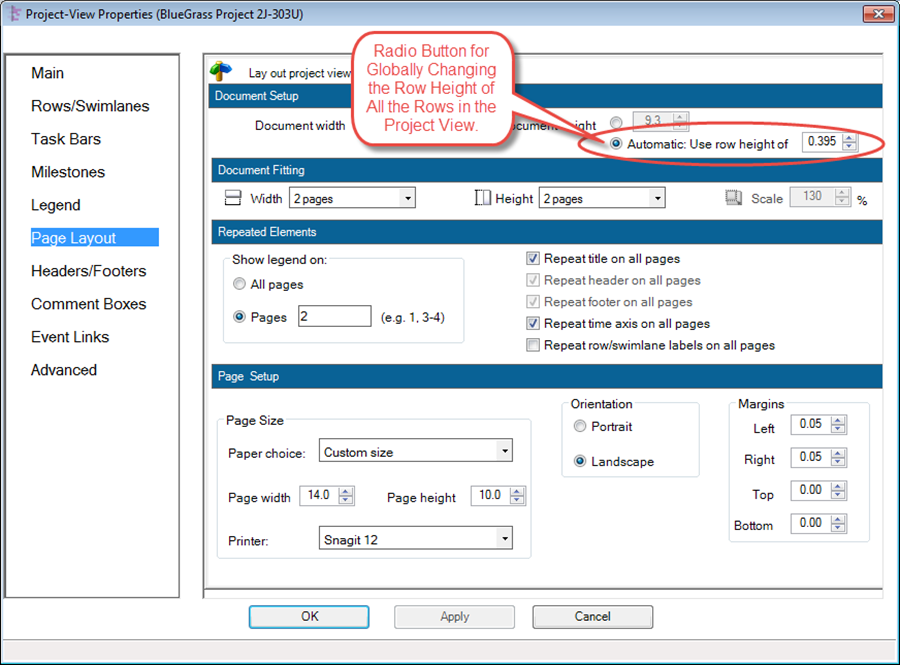
6) Note The row height may be changed by resetting the Automatic: Use row height of… window in the Page Layout tab of the Project-View Properties (PVP) form or the Template Properties form.
- a) Clicking the radio button as shown below tells OnePager to use the setting in the window to determine the row height of all rows. Additionally, you can change the setting in the window as required.
- b) Unchecking the radio button allows you to change row heights as described above.
c:) The Page Layout tab of the PVP form is shown below:

7) By manually changing the row height by either method, you are creating a row height maverick.
(12.11)