Difference between revisions of "Sharing Charts for Version 7.0 (Portal)"
(→Additional Articles On Sharing Charts) |
|||
| (20 intermediate revisions by the same user not shown) | |||
| Line 1: | Line 1: | ||
==About Sharing Charts== | ==About Sharing Charts== | ||
| − | + | Individual charts can be '''saved''' as '''.TAM''' files and '''shared''' with other OnePager users. This is especially useful when a chart needs to be '''updated''', when other team members are making contributions, when there are several different audiences, or when the primary project manager is out of the office. A '''.TAM''' file is a compact file that stores everything needed to '''recreate''' a chart. You can email a .'''TAM''' file to another OnePager user who wants to '''edit''' or add to your work. | |
| − | + | Please consult these detailed articles on '''sharing chart and files''' at these links: | |
| − | + | <center> | |
| + | {| class="wikitable" | ||
| + | | [[Opening Charts for Version 7.0 | Opening Charts]] <!--23.2.1.1-70--> | ||
| + | |- | ||
| + | | [[Sharing via Other Applications (e.g., PowerPoint) for Version 7.0 | Sharing via Other Applications (e.g., PowerPoint)]] <!--23.2.2.1-70--> | ||
| + | |- | ||
| + | |[[Sharing Charts with Older Versions of OnePager for Version 7.0 | Sharing Charts with Older Versions of OnePager]] <!--23.2.3.1-70--> | ||
| + | |} | ||
| + | </center> | ||
| − | + | The remainder of this article is a summary of '''share files''' in OnePager. | |
==There are Several Ways to Share== | ==There are Several Ways to Share== | ||
| Line 13: | Line 21: | ||
===Sharing a .TAM File=== | ===Sharing a .TAM File=== | ||
| − | + | To send your chart as a '''.TAM''' file to another person or to place the file in some other storage device, treat the '''.TAM''' file as any other Microsoft Windows based file. You don’t need the OnePager applications to do this if the .'''TAM''' is previously '''saved'''. | |
| − | + | First locate the file using the typical means that you normally do such as using Microsoft Windows Explorer as shown here: | |
| − | <center>[[File: | + | <center>[[File:P70-23_2_1-70-(1-1)-12172020.png]]</center> |
| + | <!--<center>P70-23_2_1-70-(1-1)-12172020.png</center>--> | ||
| − | + | Use the '''Cut''' function, the '''Copy''' function, '''drag and drop''' the file into the desired folder, or go to the new folder and use the '''Paste''' function. | |
===Sharing an Image=== | ===Sharing an Image=== | ||
| − | + | OnePager supports sending a chart as an '''image file''' in one of three formats to a '''Save As''' location you choose. This is useful if the colleague does not have OnePager installed and thus cannot open a '''.TAM''' file. First, make sure the desired chart is displayed in the '''Chart Editor''' window. Next, click the '''File''' button and click the '''Export''' tab as shown below: | |
| − | + | <center>[[File:P70-23_2_1-70-(2)-11272020.png]]</center> | |
| + | <!--<center>P70-23_2_1-70-(2)-11272020.png</center>--> | ||
| − | + | Then, select the '''image file type''' from the dropdown menu shown above and determine if you want to send the entire document or a portion of it for '''multi-page''' documents using the '''Page Range''' box provided at the right. Finally, click the '''Send to Image File(s) of Type:''' button shown above. This brings up the Microsoft Windows '''Save As''' form allowing you to save the '''image file''', in this case a '''.PNG''', to any location on disk or network as shown here: | |
| − | + | <center>[[File:P70-23_2_1-70-(3)-11272020.png]]</center> | |
| + | <!--<center>P70-23_2_1-70-(3)-11272020.png</center>--> | ||
| − | + | ===Saving to Previous Versions of OnePager=== | |
| − | + | ||
| − | + | '''Image files''' can also be '''saved''' in different formats, that is, different versions of OnePager, by using the '''Save as type:''' dropdown menu in the '''Save As''' tab of OnePager's '''File''' tab. You have several format options for saving the current chart. You can '''save''' the '''.TAM''' file as a '''.TAM''' file compatible with OnePager Pro ('''OPP''') or Express ('''OPX''') versions 5.0, 5.1, 5.2, 5.3, 6.0 and 6.1. You can also save the '''Image''' file formatted as a '''.PNG, .JPG, .GIF, or .BMP'''. | |
| − | + | The '''Save As''' form looks like this with the '''Save as type:''' dropdown menu extended: | |
| − | <center>[[File: | + | <center>[[File:P70-23_2_1-70-(4)-11272020.png]]</center> |
| + | <!--<center>P70-23_2_1-70-(4)-11272020.png</center>--> | ||
| − | + | '''Saving''' a chart as a '''.TAM''' file for a previous version of OnePager is useful when sharing files with colleagues who have not yet upgraded to '''OPP''' or '''OPX''' version 7.0. | |
| − | + | ||
| − | + | ||
| − | + | ||
| − | + | ||
| − | + | ||
| − | + | ||
| − | + | ||
| − | + | ||
| − | + | ||
| − | + | ||
===By Sending the Image File to Microsoft Outlook=== | ===By Sending the Image File to Microsoft Outlook=== | ||
| − | + | You can also send an '''image''' of your chart directly to a Microsoft Outlook message form as a graphics image ('''.PNG''') attachment to the message. First, make sure the desired chart is displayed in the '''Chart Editor'''. Next, click the '''File''' button and select the '''Export''' tab and select the '''image file type''' as shown below: | |
| − | : | + | <center>[[File:P70-23_2_1-70-(6)-11272020.png]]</center> |
| + | <!--<center>P70-23_2_1-70-(6)-11272020.png</center>--> | ||
| − | + | Then, determine if you want to send the entire document or a portion of it for '''multi-page''' documents using the '''Page Range''' box provided at the right. Finally, click the '''Send to Microsoft Outlook''' button. This accesses a Microsoft Outlook message form where below that the '''image file''' is attached to the message: | |
| − | <center>[[File: | + | <center>[[File:P70-23_2_1-70-(5)-11272020.png]]</center> |
| − | <center> | + | <!--<center>P70-23_2_1-70-(5)-11272020.png</center>--> |
| − | + | If Microsoft Outlook is not your email message handler, other messaging systems typically accommodate various files types including images. | |
| − | + | ||
| − | + | ||
| − | + | ||
| − | + | ||
| − | + | ||
| − | + | ||
| − | + | ||
| − | + | ||
| − | + | ||
| − | + | ||
| − | + | ||
| − | + | ||
| − | + | ||
| − | + | ||
| − | + | ||
| − | + | ||
| − | + | ||
| − | + | ||
| − | + | ||
| − | + | ||
| − | + | ||
| − | + | ||
| − | + | ||
| − | + | ||
| − | + | ||
| − | + | ||
| − | + | ||
(23.2.1-70) | (23.2.1-70) | ||
[[Category:Version 7.0]] | [[Category:Version 7.0]] | ||
| − | [[Category:Editing | + | [[Category:Editing the Chart]] |
| − | [[Category: | + | [[Category:Charts]] |
[[Category:OnePager Choices Form]] | [[Category:OnePager Choices Form]] | ||
[[Category:Data Management]] | [[Category:Data Management]] | ||
| Line 106: | Line 81: | ||
[[Category:Snapshots]] | [[Category:Snapshots]] | ||
[[Category:Templates]] | [[Category:Templates]] | ||
| − | [[Category: | + | [[Category:Chart Properties Form]] |
[[Category:OnePager Pro]] | [[Category:OnePager Pro]] | ||
[[Category:OnePager Express]] | [[Category:OnePager Express]] | ||
Latest revision as of 17:02, 15 January 2021
Contents
About Sharing Charts
Individual charts can be saved as .TAM files and shared with other OnePager users. This is especially useful when a chart needs to be updated, when other team members are making contributions, when there are several different audiences, or when the primary project manager is out of the office. A .TAM file is a compact file that stores everything needed to recreate a chart. You can email a .TAM file to another OnePager user who wants to edit or add to your work.
Please consult these detailed articles on sharing chart and files at these links:
| Opening Charts |
| Sharing via Other Applications (e.g., PowerPoint) |
| Sharing Charts with Older Versions of OnePager |
The remainder of this article is a summary of share files in OnePager.
Sharing a .TAM File
To send your chart as a .TAM file to another person or to place the file in some other storage device, treat the .TAM file as any other Microsoft Windows based file. You don’t need the OnePager applications to do this if the .TAM is previously saved.
First locate the file using the typical means that you normally do such as using Microsoft Windows Explorer as shown here:
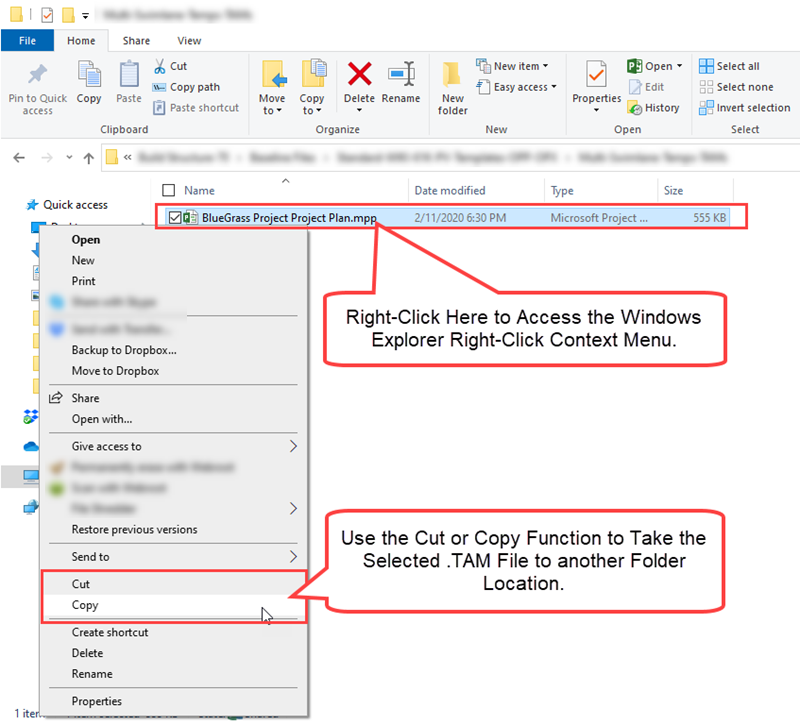
Use the Cut function, the Copy function, drag and drop the file into the desired folder, or go to the new folder and use the Paste function.
Sharing an Image
OnePager supports sending a chart as an image file in one of three formats to a Save As location you choose. This is useful if the colleague does not have OnePager installed and thus cannot open a .TAM file. First, make sure the desired chart is displayed in the Chart Editor window. Next, click the File button and click the Export tab as shown below:
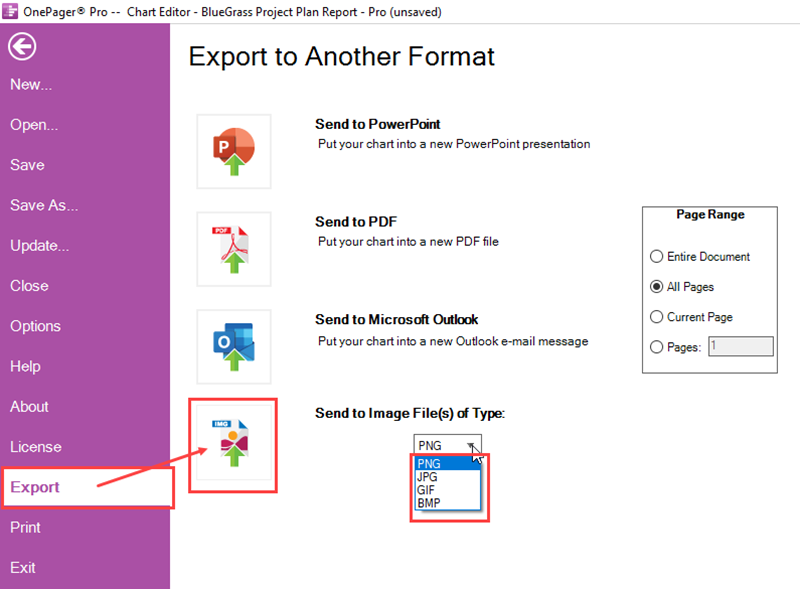
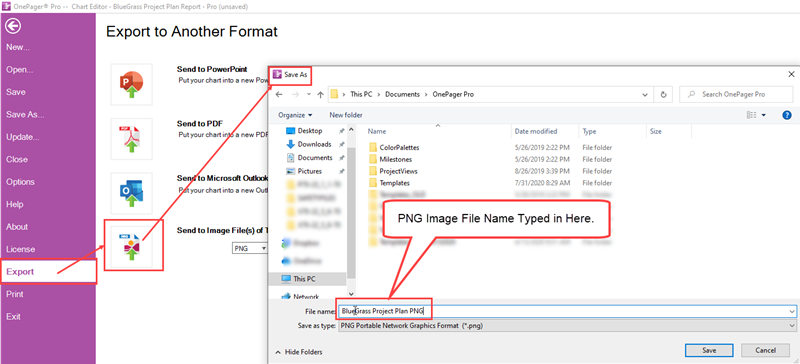
Then, select the image file type from the dropdown menu shown above and determine if you want to send the entire document or a portion of it for multi-page documents using the Page Range box provided at the right. Finally, click the Send to Image File(s) of Type: button shown above. This brings up the Microsoft Windows Save As form allowing you to save the image file, in this case a .PNG, to any location on disk or network as shown here:
Saving to Previous Versions of OnePager
Image files can also be saved in different formats, that is, different versions of OnePager, by using the Save as type: dropdown menu in the Save As tab of OnePager's File tab. You have several format options for saving the current chart. You can save the .TAM file as a .TAM file compatible with OnePager Pro (OPP) or Express (OPX) versions 5.0, 5.1, 5.2, 5.3, 6.0 and 6.1. You can also save the Image file formatted as a .PNG, .JPG, .GIF, or .BMP.
The Save As form looks like this with the Save as type: dropdown menu extended:
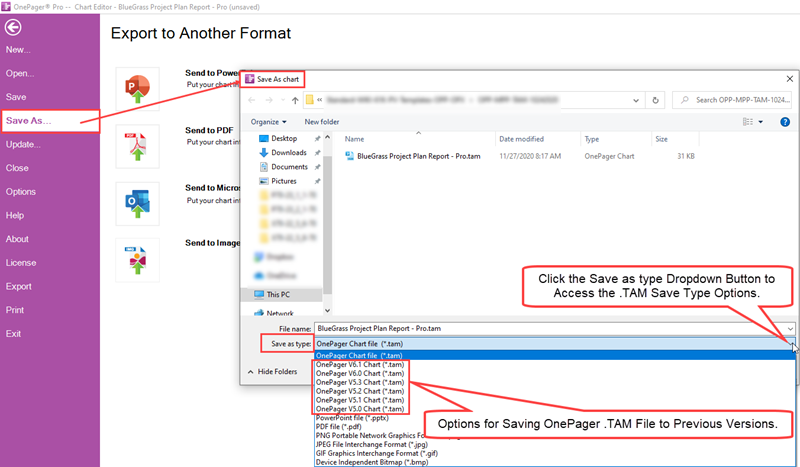
Saving a chart as a .TAM file for a previous version of OnePager is useful when sharing files with colleagues who have not yet upgraded to OPP or OPX version 7.0.
By Sending the Image File to Microsoft Outlook
You can also send an image of your chart directly to a Microsoft Outlook message form as a graphics image (.PNG) attachment to the message. First, make sure the desired chart is displayed in the Chart Editor. Next, click the File button and select the Export tab and select the image file type as shown below:
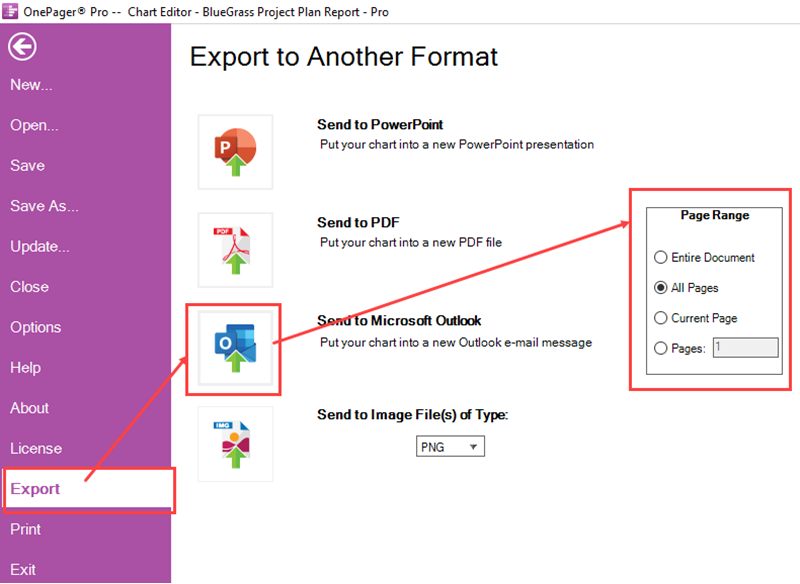
Then, determine if you want to send the entire document or a portion of it for multi-page documents using the Page Range box provided at the right. Finally, click the Send to Microsoft Outlook button. This accesses a Microsoft Outlook message form where below that the image file is attached to the message:
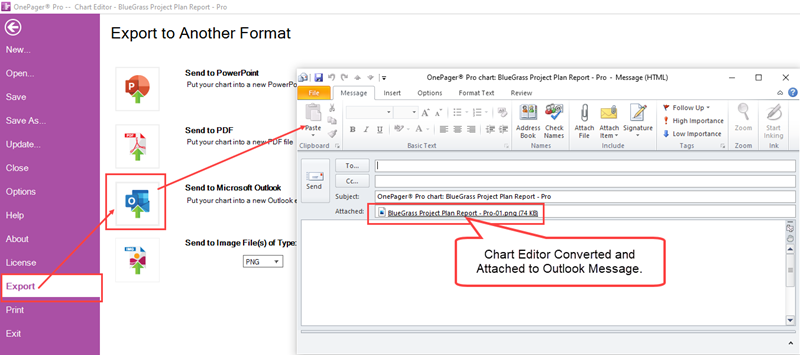
If Microsoft Outlook is not your email message handler, other messaging systems typically accommodate various files types including images.
(23.2.1-70)