Difference between revisions of "Sharing via Other Applications (e.g., PowerPoint) for Version 6.1"
(→Print to Paper) |
|||
| Line 1: | Line 1: | ||
==About Sharing via Other Applications (e.g. PowerPoint)== | ==About Sharing via Other Applications (e.g. PowerPoint)== | ||
| − | Sometimes you | + | 1) Sometimes you want to share OnePager outputs by using PowerPoint slides, Word documents, messages, or on internal websites. |
| − | When you are ready to distribute your OnePager visuals, you have several options: | + | 2) When you are ready to distribute your OnePager visuals, you have several options: |
==Copy & Paste== | ==Copy & Paste== | ||
| Line 17: | Line 17: | ||
<center>[[File:P53-23_2_2_1-53-(1)-10052016.png]]</center> | <center>[[File:P53-23_2_2_1-53-(1)-10052016.png]]</center> | ||
| − | :b) When the OnePager document does not have '''multiple pages''', clicking the '''Copy''' button itself (not the dropdown menu portion) | + | :b) When the OnePager document does not have '''multiple pages''', clicking the '''Copy''' button itself (not the dropdown menu portion) places the entire project view document into the Microsoft Windows clipboard. |
:c) If the OnePager document has '''multiple pages''', you have three options for placing OnePager output into the Microsoft Windows clipboard accessible by clicking the dropdown menu portion of the '''Copy''' button as shown below: | :c) If the OnePager document has '''multiple pages''', you have three options for placing OnePager output into the Microsoft Windows clipboard accessible by clicking the dropdown menu portion of the '''Copy''' button as shown below: | ||
| Line 23: | Line 23: | ||
<center>[[File:P53-23_2_2_1-53-(2)-10052016.png]]</center> | <center>[[File:P53-23_2_2_1-53-(2)-10052016.png]]</center> | ||
| − | :(1) '''Entire document'''. Selecting this copy option | + | :(1) '''Entire document'''. Selecting this copy option places the entire project view document, as displayed in the '''normal view''' mode, into the Microsoft Windows clipboard. |
| − | :(2) '''Current page'''. The current page, in the context of a '''multiple page''' OnePager document, is the '''last page''' that you performed an operation on such as clicking on a task/milestone. You can make such page selections either in the '''normal view''' or the '''page break view''' modes. On making the selection of the '''current page''' option, that page | + | :(2) '''Current page'''. The current page, in the context of a '''multiple page''' OnePager document, is the '''last page''' that you performed an operation on such as clicking on a task/milestone. You can make such page selections either in the '''normal view''' or the '''page break view''' modes. On making the selection of the '''current page''' option, that page is placed in the Microsoft Windows clipboard. |
| − | :(3) '''Specific page...'''. If this option is selected, you | + | :(3) '''Specific page...'''. If this option is selected, you see a form where you can select the one page to be placed in the Microsoft Windows clipboard as shown below: |
<center>[[File:P53-23_2_2_1-53-(3)-10052016.png]]</center> | <center>[[File:P53-23_2_2_1-53-(3)-10052016.png]]</center> | ||
| − | :d) A message in the status bar at the bottom of the One Pager '''PVE''' | + | :d) A message in the status bar at the bottom of the One Pager '''PVE''' confirms that the image was copied to the clipboard as shown below: |
<center>[[File:P52-23_2_2-(4)-06052015.png]]</center> | <center>[[File:P52-23_2_2-(4)-06052015.png]]</center> | ||
| − | :e) Paste the clipboard contents into a PowerPoint slide, Word document, email message, or any other Windows application that supports pasting from the clipboard. The project view from OnePager | + | :e) Paste the clipboard contents into a PowerPoint slide, Word document, email message, or any other Windows application that supports pasting from the clipboard. The project view from OnePager is in a vector format, which means that you can '''resize''' it in PowerPoint, Word, etc. without losing the sharpness of the tasks, milestones, decorations, and fonts. |
| − | :f) '''Note of Caution'''. The size of the copied and pasted image from the OnePager '''PVE''' is determined by its '''size''' in the '''normal view''' mode. So if you have '''zoomed''' the project view way out (i.e., made it small in the '''PVE'''), the pasted image | + | :f) '''Note of Caution'''. The size of the copied and pasted image from the OnePager '''PVE''' is determined by its '''size''' in the '''normal view''' mode. So if you have '''zoomed''' the project view way out (i.e., made it small in the '''PVE'''), the pasted image can be too small for PowerPoint, for example. Just to be safe, you should '''zoom in''' before copying to the clipboard. |
==Export of Single/Multi-Page Project Views to Microsoft PowerPoint and PDF’s== | ==Export of Single/Multi-Page Project Views to Microsoft PowerPoint and PDF’s== | ||
| Line 43: | Line 43: | ||
1) OnePager version 5.3 and later have added capabilities to output project views as files that can be loaded into Microsoft PowerPoint and displayed as '''.PDF''' images using a suitable '''PDF''' reader. | 1) OnePager version 5.3 and later have added capabilities to output project views as files that can be loaded into Microsoft PowerPoint and displayed as '''.PDF''' images using a suitable '''PDF''' reader. | ||
| − | 2) With a project view displayed in the '''PVE''', click the '''File''' tab on the OnePager tool bar and then click the '''Export''' tab which | + | 2) With a project view displayed in the '''PVE''', click the '''File''' tab on the OnePager tool bar and then click the '''Export''' tab which provides the following options: |
<center>[[File:P61-23_2_2_1-61-(9)-11032017.png]]</center> | <center>[[File:P61-23_2_2_1-61-(9)-11032017.png]]</center> | ||
| − | <center>P61-23_2_2_1-61-(9)-11032017.png</center> | + | <!--center>P61-23_2_2_1-61-(9)-11032017.png</center--> |
| − | 3) Clicking the '''Send to PowerPoint''' button | + | 3) Clicking the '''Send to PowerPoint''' button formats the project view as a Microsoft PowerPoint chart and bring up a Microsoft Windows '''Save As''' form as shown below: |
<center>[[File:P53-0_2-(9D)-10262015.png]]</center> | <center>[[File:P53-0_2-(9D)-10262015.png]]</center> | ||
| − | 4) Once saved, the file | + | 4) Once saved, the file can be opened in Microsoft PowerPoint. |
| − | 5) A similar option is used for '''.PDF''' file exports. Click the '''Send to PDF''' button and a Microsoft Windows '''Save As''' form | + | 5) A similar option is used for '''.PDF''' file exports. Click the '''Send to PDF''' button and a Microsoft Windows '''Save As''' form appears allowing you to save the formatted project view as a '''.PDF''' file. |
<center>[[File:P53-23_2_2_1-53-(3A)-10052016.png]]</center> | <center>[[File:P53-23_2_2_1-53-(3A)-10052016.png]]</center> | ||
| Line 65: | Line 65: | ||
<center>[[File:P61-23_2_1-61-(4)-11032017.png]]</center> | <center>[[File:P61-23_2_1-61-(4)-11032017.png]]</center> | ||
| − | <center>P61-23_2_1-61-(4)-11032017.png</center> | + | <!--center>P61-23_2_1-61-(4)-11032017.png</center--> |
==Print to Paper == | ==Print to Paper == | ||
| Line 74: | Line 74: | ||
<center>[[File:P61-23_2_2_1-61-(4)-11032017.png]]</center> | <center>[[File:P61-23_2_2_1-61-(4)-11032017.png]]</center> | ||
| − | <center>P61-23_2_2_1-61-(4)-11032017.png</center> | + | <!--center>P61-23_2_2_1-61-(4)-11032017.png</center--> |
| − | :b) The project view above is a '''multi-page''' project view. Clicking the '''Print''' button displaying the '''printer icon''' shown above | + | :b) The project view above is a '''multi-page''' project view. Clicking the '''Print''' button displaying the '''printer icon''' shown above accesses the standard Microsoft Windows '''Print''' form. |
:c) From this standard form you can select the pages to print, the printer to use, and any other special features implemented on the printer and available through the '''Preferences''' button. | :c) From this standard form you can select the pages to print, the printer to use, and any other special features implemented on the printer and available through the '''Preferences''' button. | ||
| Line 86: | Line 86: | ||
:e) Printer settings can also be changed by selecting the '''Settings''' button shown on the '''Printing your Project View''' page below. | :e) Printer settings can also be changed by selecting the '''Settings''' button shown on the '''Printing your Project View''' page below. | ||
| − | :f) By doing so, OnePager | + | :f) By doing so, OnePager displays the Project-View Properties ('''PVP''') form’s '''Page Setup''' tab. |
<center>[[File:P60-23_2_2_1-60-(6)-02222017.png]]</center> | <center>[[File:P60-23_2_2_1-60-(6)-02222017.png]]</center> | ||
Latest revision as of 16:08, 24 December 2018
Contents
About Sharing via Other Applications (e.g. PowerPoint)
1) Sometimes you want to share OnePager outputs by using PowerPoint slides, Word documents, messages, or on internal websites.
2) When you are ready to distribute your OnePager visuals, you have several options:
Copy & Paste
1) Copy/paste snapshots from a project view into other Microsoft Windows applications via the Windows clipboard.
2) This is one way to share via other Microsoft Office applications because it creates outputs that can be scaled in those other applications.
3) Copy/paste can be more appropriate than sharing as a graphics image format such as .PNG because it transfers the graph in a scaleable vector format called Microsoft Windows Enhanced Metafile (EMF).
- a) Click the Copy button as shown here:

- b) When the OnePager document does not have multiple pages, clicking the Copy button itself (not the dropdown menu portion) places the entire project view document into the Microsoft Windows clipboard.
- c) If the OnePager document has multiple pages, you have three options for placing OnePager output into the Microsoft Windows clipboard accessible by clicking the dropdown menu portion of the Copy button as shown below:
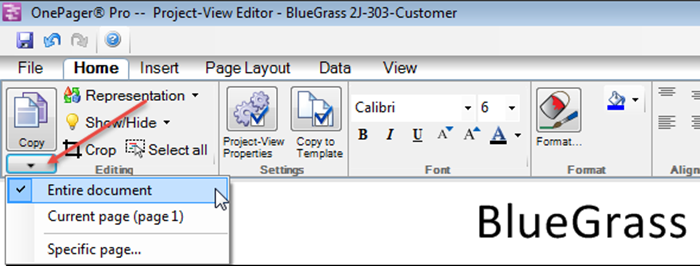
- (1) Entire document. Selecting this copy option places the entire project view document, as displayed in the normal view mode, into the Microsoft Windows clipboard.
- (2) Current page. The current page, in the context of a multiple page OnePager document, is the last page that you performed an operation on such as clicking on a task/milestone. You can make such page selections either in the normal view or the page break view modes. On making the selection of the current page option, that page is placed in the Microsoft Windows clipboard.
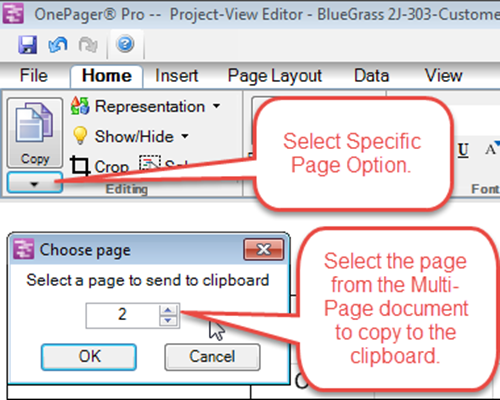
- (3) Specific page.... If this option is selected, you see a form where you can select the one page to be placed in the Microsoft Windows clipboard as shown below:
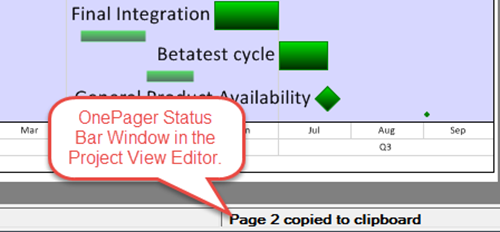
- d) A message in the status bar at the bottom of the One Pager PVE confirms that the image was copied to the clipboard as shown below:
- e) Paste the clipboard contents into a PowerPoint slide, Word document, email message, or any other Windows application that supports pasting from the clipboard. The project view from OnePager is in a vector format, which means that you can resize it in PowerPoint, Word, etc. without losing the sharpness of the tasks, milestones, decorations, and fonts.
- f) Note of Caution. The size of the copied and pasted image from the OnePager PVE is determined by its size in the normal view mode. So if you have zoomed the project view way out (i.e., made it small in the PVE), the pasted image can be too small for PowerPoint, for example. Just to be safe, you should zoom in before copying to the clipboard.
Export of Single/Multi-Page Project Views to Microsoft PowerPoint and PDF’s
1) OnePager version 5.3 and later have added capabilities to output project views as files that can be loaded into Microsoft PowerPoint and displayed as .PDF images using a suitable PDF reader.
2) With a project view displayed in the PVE, click the File tab on the OnePager tool bar and then click the Export tab which provides the following options:
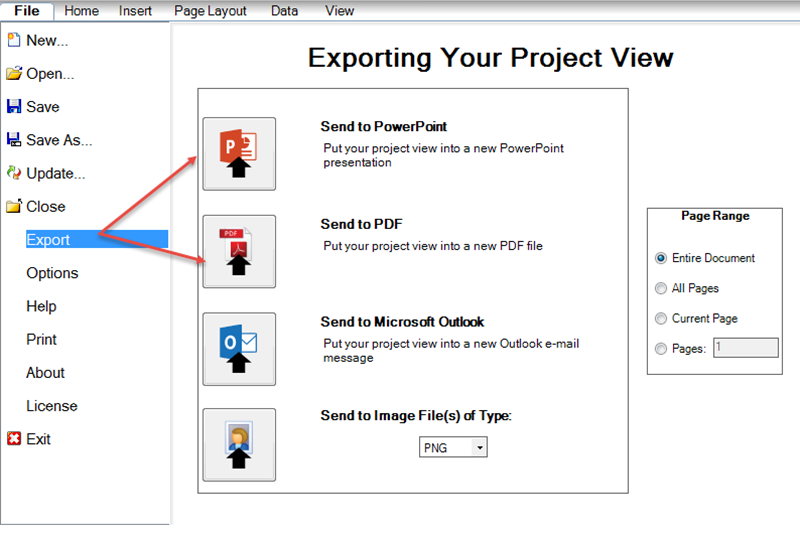
3) Clicking the Send to PowerPoint button formats the project view as a Microsoft PowerPoint chart and bring up a Microsoft Windows Save As form as shown below:
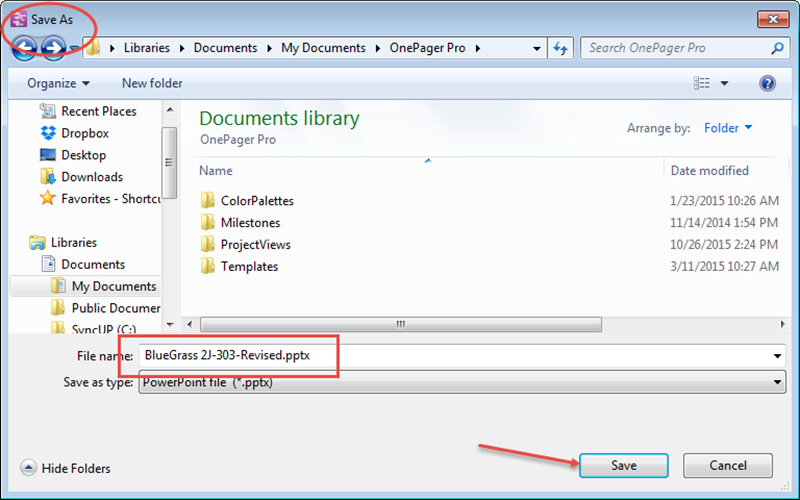
4) Once saved, the file can be opened in Microsoft PowerPoint.
5) A similar option is used for .PDF file exports. Click the Send to PDF button and a Microsoft Windows Save As form appears allowing you to save the formatted project view as a .PDF file.
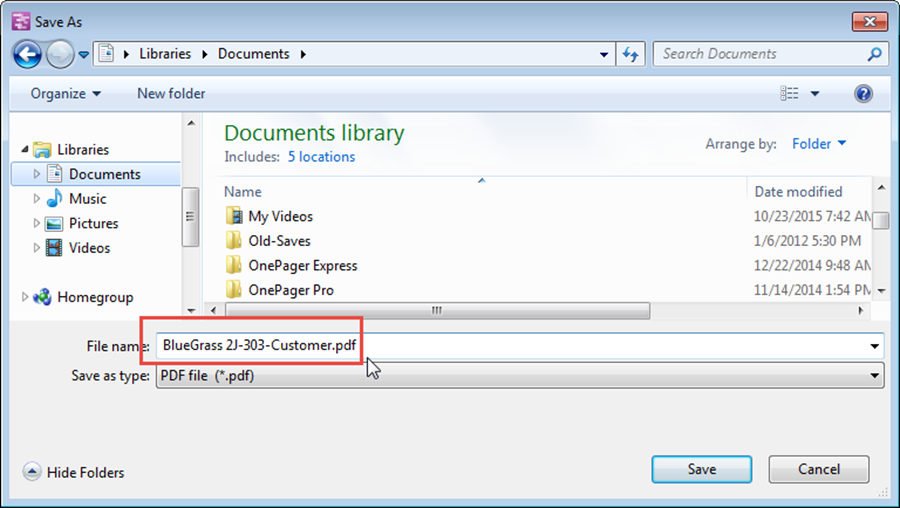
6) Once saved, the .PDF file can be opened in Adobe Acrobat® or other PDF reader.
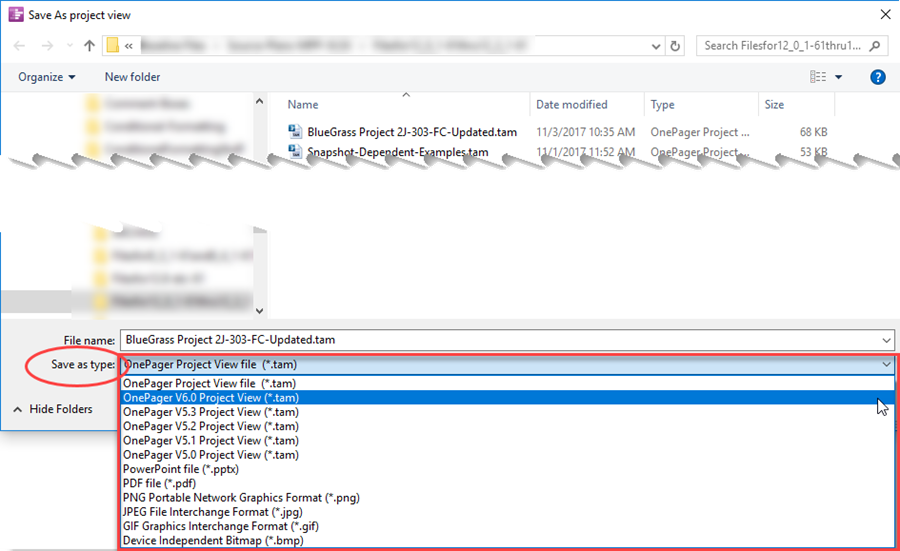
7) There is another way to save project views in a variety of formats using the Save As button on the ribbon’s File tab as shown in the figure above.
8) When you click the Save As button a form appears that allows you to select the Save as type: from the dropdown menu shown in the illustration below. Make sure that you establish the file save location as well as selecting the file save type before clicking the Save button on the form.
Print to Paper
You can distribute individual snapshots from a project view as hardcopy, which includes .PDF files.
- a) Select the File tab on the ribbon and then select the Print tab as shown below:
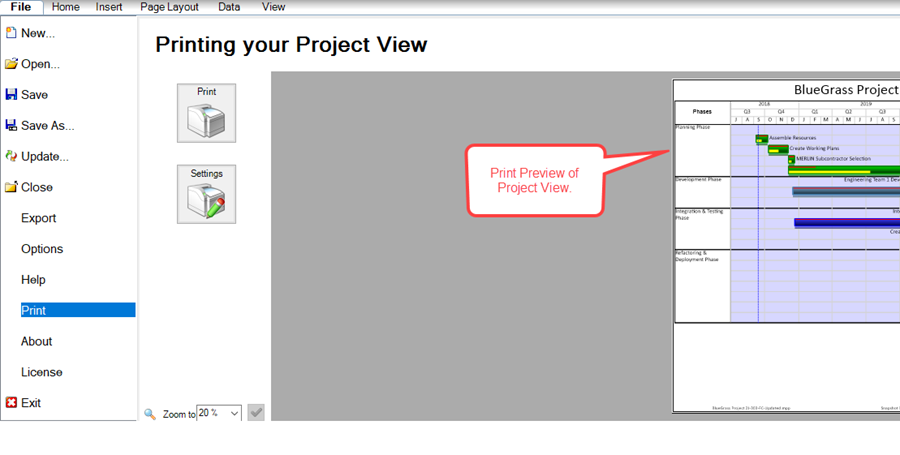
- b) The project view above is a multi-page project view. Clicking the Print button displaying the printer icon shown above accesses the standard Microsoft Windows Print form.
- c) From this standard form you can select the pages to print, the printer to use, and any other special features implemented on the printer and available through the Preferences button.
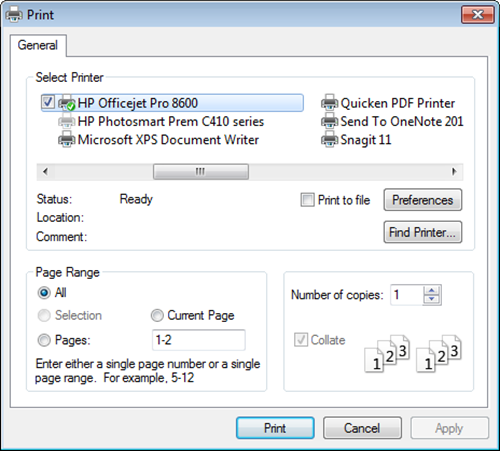
- d) Choose a printer and press the Print shown above.
- e) Printer settings can also be changed by selecting the Settings button shown on the Printing your Project View page below.
- f) By doing so, OnePager displays the Project-View Properties (PVP) form’s Page Setup tab.
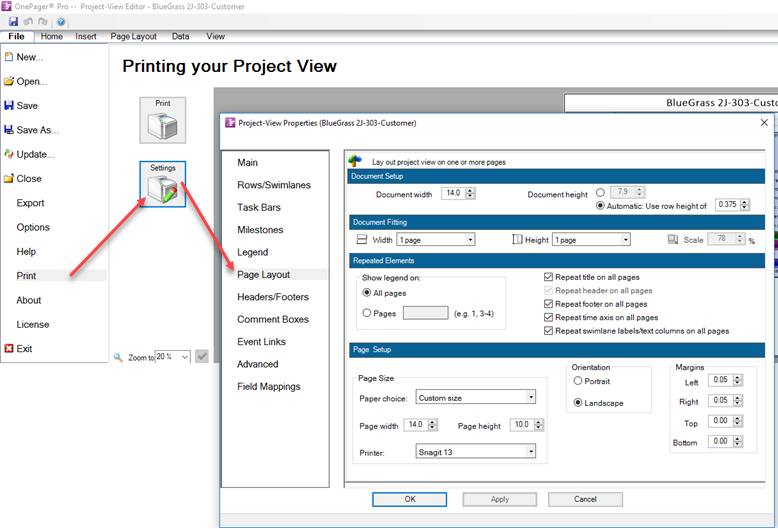
- g) You can print to a .PDF file if you have a .PDF virtual printer installed, such as various Adobe® products and third-party products.
(23.2.2.1-61)