Difference between revisions of "Snapshots (Versioning) for Version 7.0"
(→Changing a Snapshot's Date) |
|||
| Line 17: | Line 17: | ||
2) To do this, go to the OnePager Pro/Express '''View''' ribbon tool bar tab and click the '''List All''' button in the tab's '''Snapshots''' group as shown below: | 2) To do this, go to the OnePager Pro/Express '''View''' ribbon tool bar tab and click the '''List All''' button in the tab's '''Snapshots''' group as shown below: | ||
| − | <center>[[File:P70-23_4_1-70-(1)- | + | <center>[[File:P70-23_4_1-70-(1-1)-12172020.png]]</center> |
| − | <center><P70-23_4_1-70-(1)- | + | <center><P70-23_4_1-70-(1-1)-12172020.png></center> |
3) Clicking the '''List All''' button on the '''View''' ribbon tool bar tab accesses the '''Select snapshot''' form as shown here: | 3) Clicking the '''List All''' button on the '''View''' ribbon tool bar tab accesses the '''Select snapshot''' form as shown here: | ||
Revision as of 17:27, 17 December 2020
About Snapshots (Versioning)
1) OnePager can save versions of Microsoft Project/Excel source plans called snapshots which represent the state of a project through time.
2) Snapshots are contained in the OnePager Pro/Express chart as it's .TAM file.
3) Once snapshots are taken they can be edited in the Chart Editor.
4) Additionally, snapshots can be updated as described in the appropriate articles at: Basic Workflows (Portal) 7.0.1-70
5) Sometimes you have to change the date of a snapshot or delete snapshots that are no longer needed.
Changing a Snapshot's Date
1) You can easily change the date of an existing snapshot from the form that lists the snapshot dates.
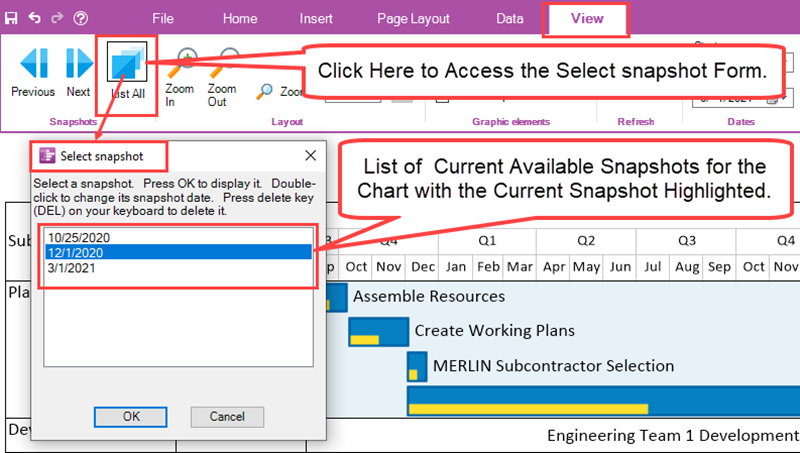
2) To do this, go to the OnePager Pro/Express View ribbon tool bar tab and click the List All button in the tab's Snapshots group as shown below:

3) Clicking the List All button on the View ribbon tool bar tab accesses the Select snapshot form as shown here:

4) When the Select snapshot form appears, the current snapshot date, visible in the Chart Editor, is automatically shown in the above form.
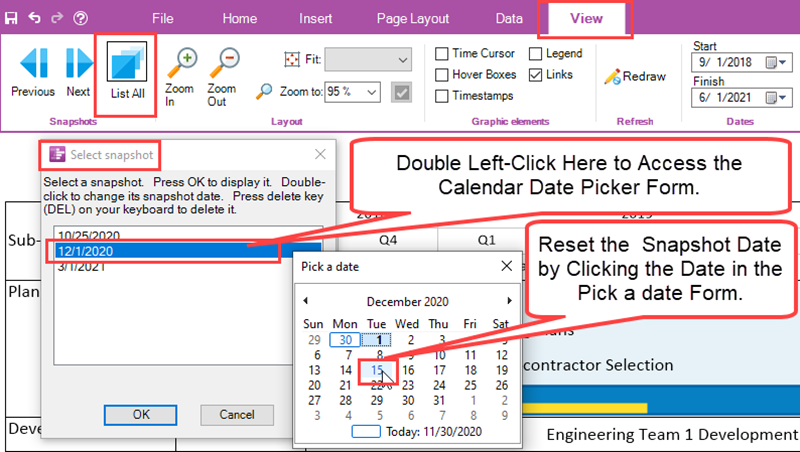
5) Double left-click the desired snapshot date to access the Calendar Date Picker form.
6) Use the Date picker form to select a new snapshot date as shown below:

Deleting a Snapshot
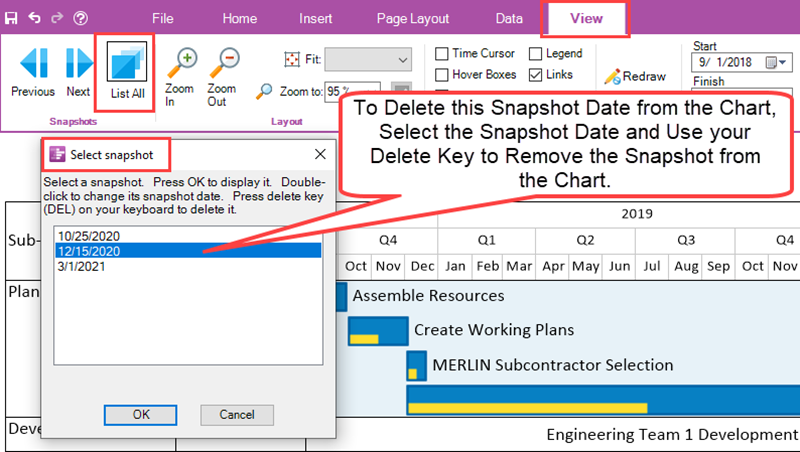
1) To delete a snapshot, select it with a left-click in the window of the Select snapshot form shown below:

2) Once the snapshot date is selected, click your keyboard’s Delete key.
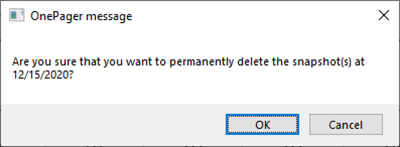
3) Clicking your Delete key prompts a OnePager message for asking for you to confirm your requested Delete action as shown here:

4) Clicking the OK button on the form deletes the snapshot from the chart.
5) Once you save the chart using the Chart Editor, the deleted snapshots is no longer accessible.
6) If, however, you have deleted a snapshot but have not yet saved the chart file using the Chart Editor, the UNDO function restores the deleted snapshot so that it can be further accessed.
7) As an alternative, you can just exit OnePager without saving the chart and then re-open the chart.
(23.4.1-70)