|
|
| (355 intermediate revisions by the same user not shown) |
| Line 1: |
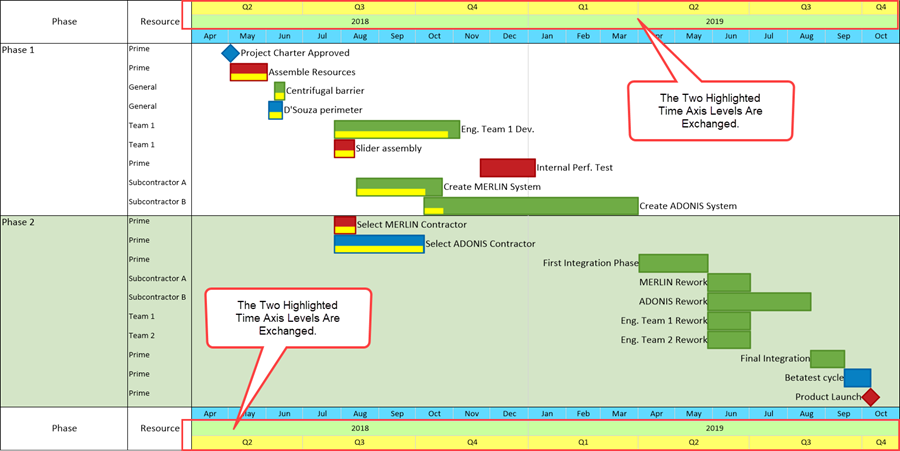
Line 1: |
| − | ==About Legend Editing== | + | ==Overview== |
| | | | |
| − | 1) The '''Legend''' can be '''shown''' or '''hidden''' in the chart as described in this article: [[Managing the Legend in the Chart for Version 7.0 | Managing the Legend in the Chart]] 15.1.1-70 | + | 1) OnePager Express has the capability to manually '''re-order''' the '''Time Axis Levels''' shown in the chart very easily. |
| | | | |
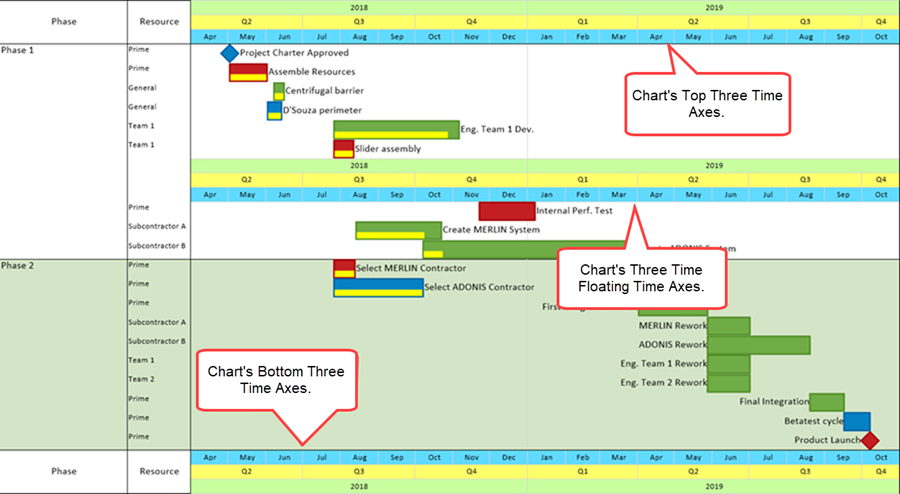
| − | 2) Additionally, the above article reference describes on how to '''move and resize''' the '''Legend''' in the chart. | + | 2) The '''Time Axis Re-Ordering''' capability is available in the '''Template Properties''' and '''Chart Properties''' form's '''Time Axis''' tab's '''Top, Middle, and Bottom''' sub-tabs. |
| | | | |
| − | 3) Further, '''Legend positioning options''' are discussed in the article at: [[Legend Position Options for Multi-Page Outputs for Version 7.0 | Legend Position Options for Multi-Page Outputs]] 15.2.1-70
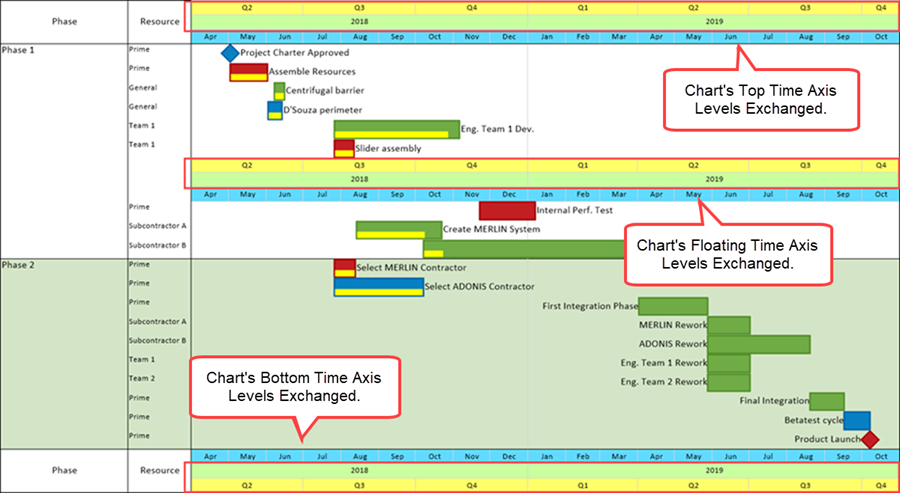
| + | ===Re-Ordering Example=== |
| | | | |
| − | 4) The purpose of this article is to describe:
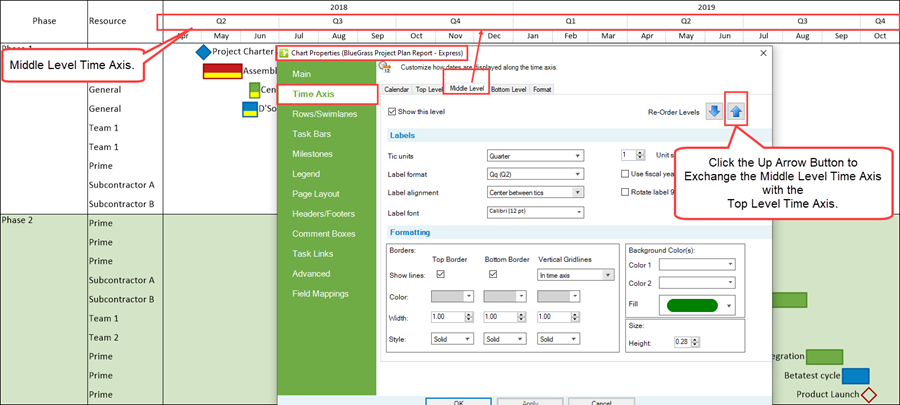
| + | 3) Given the chart below where the '''Top''', '''Middle''', and '''Bottom Time Axis Levels '''in Year, Quarter, and Month are ordered from '''top''' to '''bottom''', you can '''exchange '''the '''Middle Level''' with the '''Top Level''' by clicking the '''up arrow '''in the '''Re-Order Levels''' control group in the '''Chart Properties ''' form shown below: |
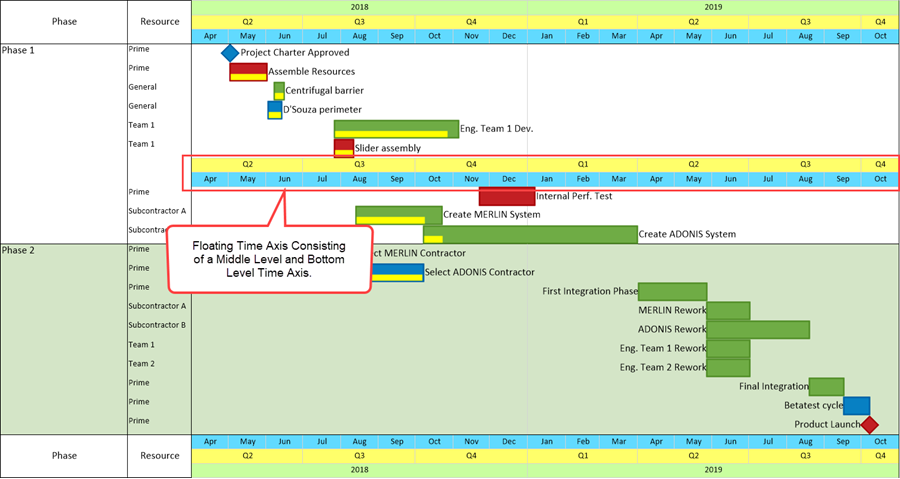
| | | | |
| − | :a) The '''controls''' available for '''editing''' the '''Legend''' '''globally''' before a chart is created | + | <center>[[File:X70-22_3_6-70-(1)-11182020.png]]</center> |
| | + | <center><X70-22_3_6-70-(1)-11182020.png></center> |
| | | | |
| − | :b) '''Editing '''operations using the '''Chart Properties''' form
| |
| | | | |
| − | :c) '''Editing the Legend''' in the chart with the '''Legend’s context menu'''
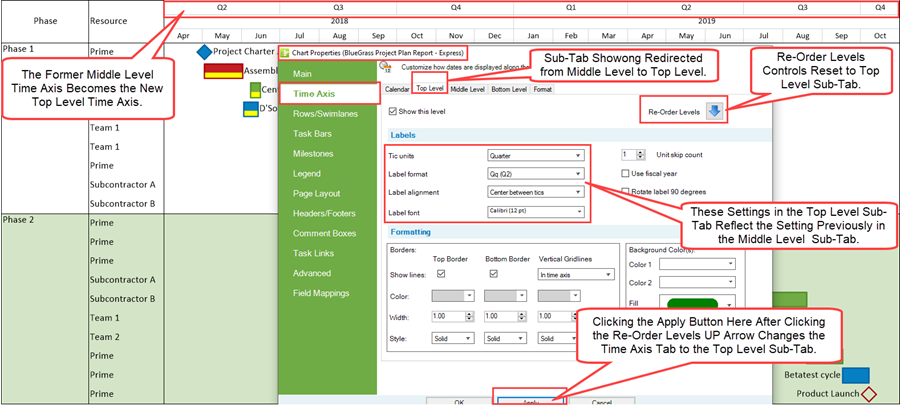
| + | 4) When you click the '''Apply''' or '''OK '''button in the '''Chart Properties '''form the '''Top''' and '''Middle Levels '''are '''exchanged''' as shown here: |
| | | | |
| − | :d) '''Editing''' individual '''Legend items''' with their '''context menu'''. | + | <center>[[File:X70-22_3_6-70-(2)-11182020.png]]</center> |
| | + | <center><X70-22_3_6-70-(12)-11182020.png></center> |
| | | | |
| − | ==Legend Global Editing==
| + | 5) This is a useful shortcut when you want to make the '''exchange''' quickly without going through the process of manually accessing each '''Time Axis Levels '''involved and manually changing the '''Tic unit '''and '''Label format '''setting in each '''Time Axis Level''' participating in the '''exchange'''. |
| | | | |
| − | 1) '''Global''' settings for the '''Legend''' are found in the '''Template''' form’s '''Legend''' tab as shown below:
| + | ==Re-Ordering Time Axis Levels == |
| | | | |
| − | <center>[[File:P70-15_3_1-70-(1)-10102019.png]]</center>
| + | ===Top and Bottom Time Axis Displays in the Chart=== |
| − | <center>P70-15_3_1-70-(1)-10102019.png</center>
| + | |
| | | | |
| − | 2) As shown above, the controls in the '''Legend '''tab are '''enabled''' when the '''Show legend''' checkbox is checked '''On'''. Otherwise, all the controls in the '''Legend '''tab are '''disabled'''.
| + | 1) The chart can display '''Time Axis Levels''' at either the '''top''', '''bottom, '''or in both positions in the chart. |
| | | | |
| − | 3) Above are the '''default''' setting for the '''Legend''' provided with all distributed '''Templates''' for OnePager Pro.
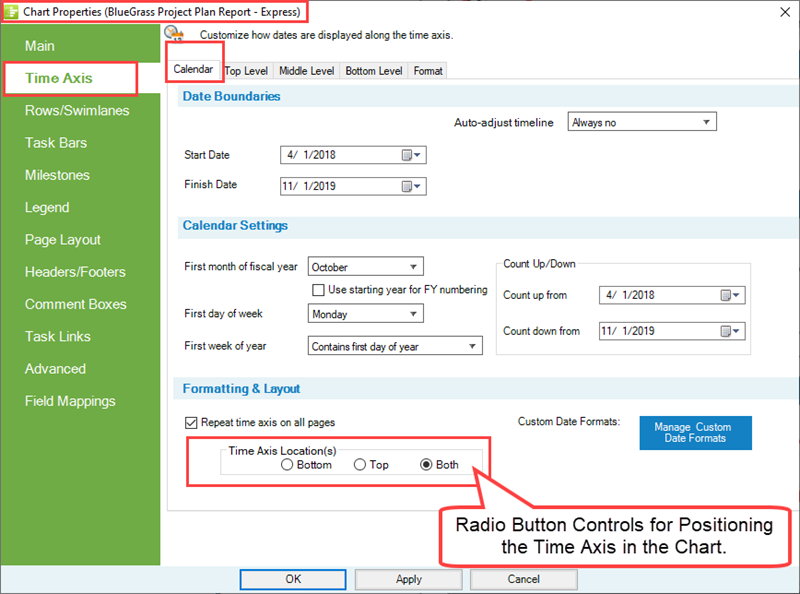
| + | 2) This is controlled in the '''Chart Properties '''form at the '''Time Axis '''tab’s '''Calendar '''sub-tab in the '''Formatting & Layout '''control group as shown below: |
| | | | |
| − | 4) Making '''edits''' to these settings impacts the '''Legend’s properties''' for all charts created with the '''edited Template''' form.
| + | <center>[[File:X70-22_3_6-70-(3)-11182020.png]]</center> |
| | + | <center><X70-22_3_6-70-(3)-11182020.png></center> |
| | | | |
| − | 5) These '''Legend '''settings are carried forward to the '''Chart Properties''' form for all charts created with the associated '''Template '''form and its settings in the '''Legend '''tab.
| + | 3) Identical controls for '''Time Axis Location''' are provided in the '''Template Properties '''form '''Time Axis '''tab '''Calendar '''sub-tab. |
| | | | |
| − | 6) Since the controls shown above for the '''Template''' form’s '''Legend '''tab are identical to the controls for the '''Legend '''tab in the '''Chart Properties''' form, discussion of each control is focused on the '''Chart Properties '''form’s '''Legend '''tab in the section that follows.
| + | 4) If the '''Time Axis '''is being '''located''' at both the '''top''' and '''bottom''' of the chart, OnePager Express performs the '''exchange '''automatically for both '''Time Axis '''displays. |
| | | | |
| − | ==Using the Chart Properties Form’s Legend Tab==
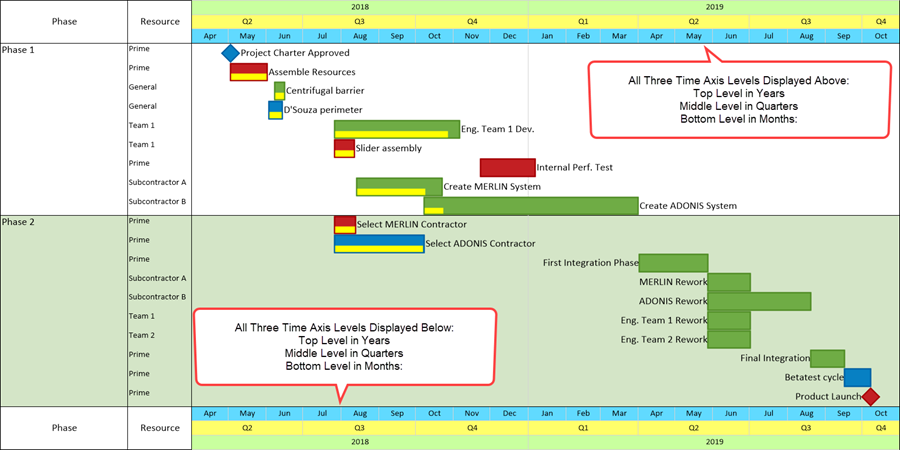
| + | 5) The chart below '''locates''' the '''Time Axis '''at both the '''Top '''and '''Bottom '''of the chart: |
| | | | |
| − | 1) The '''Legend '''tab for the '''Chart Properties''' form looks like this:
| + | <center>[[File:X70-22_3_6-70-(4)-11182020.png]]</center> |
| | + | <center><X70-22_3_6-70-(4)-11182020.png></center> |
| | | | |
| − | <center>[[File:P70-15_3_1-70-(2)-10102019.png]]</center>
| + | 6) If we use the '''Re-Order Levels''' control group in the '''Chart Properties '''form '''Time Axis '''tab’s '''Top Level '''sub-tab to '''exchange '''the '''Top Level '''with the '''Middle Level''', the two '''Time Axis '''displays in the chart above look like this''':''' |
| − | <center>P70-15_3_1-70-(2)-10102019.png</center>
| + | |
| | | | |
| − | 2) As with the '''Template''' form’s '''Legend''' tab, the controls in the '''Chart Properties''' form’s '''Legend''' tab are not '''enabled''' and cannot be '''edited''' until the '''Show legend''' checkbox is checked '''On'''.
| + | <center>[[File:X70-22_3_6-70-(5)-11182020.png]]</center> |
| | + | <center><X70-22_3_6-70-(5)-11182020.png></center> |
| | | | |
| − | 3) In the sub-sections that follow, each of the control groups and controls are discussed in detail.
| + | 7) Comparing the two illustrations above it is shown that the Year and Quarter '''Time Axis Tic Units''' in their respective '''Time Axis Levels''' are '''exchanged'''. |
| | | | |
| − | ===Layout Control Group=== | + | ===Floating Time Axis Displays and Re-Ordering=== |
| | | | |
| − | 4) The '''Layout''' control group consists of two radio buttons that position the '''Legend''' either '''vertically''' in the chart or '''horizontally''' in the chart.
| + | 8) If '''Floating Time Axes '''are '''located''' within the chart and the '''Floating Time Axis Levels''' are consistent with the '''Time Axis Level exchange '''being performed, OnePager Express makes appropriate '''exchanges '''for the '''Floating Time Axes''' as well. |
| | | | |
| − | 5) The '''default''' setting is '''Vertical''' and OnePager positions the '''Legend''', when '''shown''', in the '''upper right corner '''of the '''graph'''.
| + | 9) Using the example above, three '''Floating Time Axes '''can be easily added to the original chart display. |
| | | | |
| − | 6) The illustration below shows the '''Legend '''with the '''Horizontal''' radio button selected.
| + | 10) For illustrative purposes the '''Floating Time Axes '''added to the chart are in '''Top Level '''to '''Bottom Level '''order although the '''Floating Time Axis '''order in the chart is immaterial to the example. |
| | | | |
| − | <center>[[File:P70-15_3_1-70-(3)-10102019.png]]</center>
| + | 11) The sample chart looks like this: |
| − | <center>P70-15_3_1-70-(3)-10102019.png</center>
| + | |
| | | | |
| − | 7) OnePager initially positions the '''Horizontal Legend''' at the bottom of the '''graph'''.
| + | <center>[[File:X70-22_3_6-70-(6-1)-11182020.png]]</center> |
| | + | <center><X70-22_3_6-70-(6-1)-11182020.png></center> |
| | | | |
| − | 8) You can perform all the '''re-positioning''', '''resizing''', and '''editing''' operations on the '''Horizontal Legend''' as are available for the '''Vertical Legend'''.
| + | 12) If we use the '''Re-Order Levels''' control group in the '''Chart Properties '''form '''Time Axis '''tab’s '''Top Level '''sub-tab to again '''exchange '''the '''Top Level '''with the '''Middle Level''', the two '''Time Axis '''displays in the chart above with the '''Floating Time Axes '''look like this: |
| | | | |
| − | 9) Additionally, the '''Horizontal Legend’s context menu''' can be accesses as well as each individual '''Legend Item’s context menu''' and all allowable '''edits''' can be made.
| + | <center>[[File:X70-22_3_6-70-(7-1)-11182020.png]]</center> |
| | + | <center><X70-22_3_6-70-(7-1)-11182020.png></center> |
| | | | |
| − | 10) The '''Horizontal Legend''' can be reconfigured to the '''Vertical Legend '''at any time and any '''edits''' made to the '''Horizontal Legend''' are retained in the '''Vertical Legend'''.
| + | 13) Comparing the pair of illustrations above with the '''Floating Time Axes''', it is shown that the Year and Quarter '''Time Axis Tic Units''' in their respective '''Time Axis Levels''' and '''Floating Time Axis Levels '''are '''exchanged'''. |
| | | | |
| − | ===Legend-Item and Legend-Title Font Editing Controls===
| + | 14) For more information on the '''Floating Time Axis''', please see the article at: [[The Floating Time Axis Feature for OnePager Express for Version 7.0 | The Floating Time Axis Feature for OnePager Express]]. 22.3.10-70 |
| | | | |
| − | 11) There are two sets of controls for '''editing font properties''' of the '''Legend-items''' and '''Legend-title'''.
| + | 15) Where the '''Floating Time Axes located''' in the chart do not correspond exactly to those '''Time Axis Levels located '''in the '''Top''' and/or''' Bottom Time Axis locations''', OnePager Express performs the '''Time Axis Level exchange''' if the '''Floating Time Axis '''has at least one of the corresponding '''Time Axis Levels''' as illustrated below. |
| | | | |
| − | 12) For both sets of controls, clicking the dropdown button in the window to the immediate right of the control’s label access the standard '''Font properties''' form as shown below:
| + | 16) Suppose the '''Time Axes '''and '''Floating Time Axes '''are configured and '''located '''as shown below where the '''Floating Time Axes '''consist only of Quarters and Months: |
| | | | |
| − | <center>[[File:P70-15_3_1-70-(4)-10102019.png]]</center> | + | <center>[[File:X70-22_3_6-70-(8)-11182020.png]]</center> |
| − | <center>P70-15_3_1-70-(4)-10102019.png</center> | + | <center><X70-22_3_6-70-(8)-11182020.png></center> |
| | | | |
| − | 13) There are six (6) controls in the '''Font properties''' form shown above which are standard in most applications involving '''text editing'''.
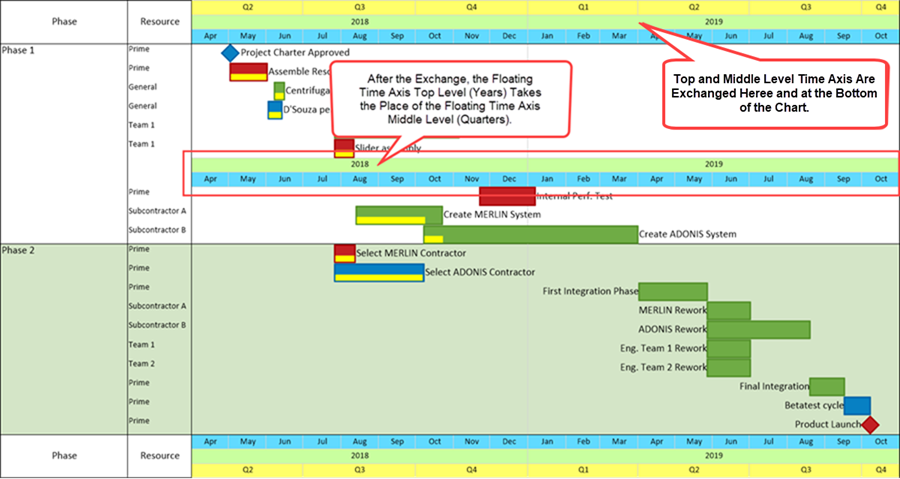
| + | 17) Performing the '''Time Axis Level re-ordering''' used in the previous examples (i.e., '''Exchanging '''the '''Top Time Axis Level '''with the '''Middle Time Axis Level'''), produces this result in the chart: |
| | | | |
| − | 14) These controls include:
| + | <center>[[File:X70-22_3_6-70-(9)-11182020.png]]</center> |
| | + | <center><X70-22_3_6-70-(9)-11182020.png></center> |
| | | | |
| − | :a) '''Font Style''', implemented as a dropdown list, includes the '''font styles''' installed on your computer.
| + | 18) The result above is that the '''Floating Time Axis Top Level '''is '''exchanged '''with the '''Floating Time Axis Middle Level''' as expected. |
| | | | |
| − | :b) The '''Size''' control is a dial window where you can either click up or down or type in a desired '''font size''' integer value.
| + | 19) However, since only the '''Middle '''and '''Bottom Floating Time Axes''' were inserted into the chart, the '''exchange''' only shows the Year replacing the Quarters in the '''Floating Time Axis location'''. |
| | | | |
| − | :c) Clicking the '''Color''' dropdown accesses the standard '''Color Chooser''' form.
| + | 20) Since there can be several single or sets of '''Floating Time Axes located''' in the chart, '''exchanges''' of '''Levels''' are consistent depending on the '''Levels''' incorporated into the displayed '''Floating Time Axes'''. |
| | | | |
| − | :d) The '''Bold''' button is a toggle that sets the selected '''text string''' as '''Bold text'''.
| + | 21) For more information on the '''Floating Time Axis''', please see the article at: [[The Floating Time Axis Feature for OnePager Express for Version 7.0 | The Floating Time Axis Feature for OnePager Express]]. 22.3.10-70 |
| | | | |
| − | :e) The '''Italics''' button, also a toggle, sets the selected '''text string '''as ''Italic text''.
| + | ==Other Related Features== |
| | | | |
| − | :f) The '''Underline''' button operates as a toggle that sets the selected '''text string'''s Underline.
| + | ===Re-Ordering Time Axis Levels in the Template Form=== |
| | | | |
| − | ===Legend Position Controls===
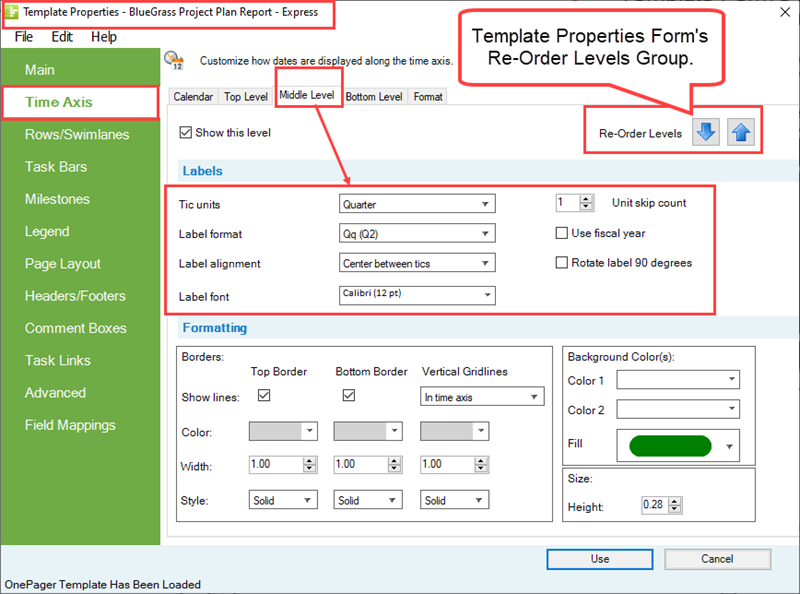
| + | 1) The '''Re-Order Levels''' control group shown in the '''Chart Properties '''form examples above is also available in the '''Template Properties '''form at the '''Time Axis '''tab’s '''Top''', '''Middle''', and '''Bottom Time Axis Levels''': |
| | | | |
| − | 15) The '''Legend position''' control group consists of a dropdown selection list and eight (8) radio buttons. The four (4) selection options for the dropdown list as shown below:
| + | <center>[[File:X70-22_3_6-70-(10)-11182020.png]]</center> |
| | + | <center><X70-22_3_6-70-(10)-11182020.png></center> |
| | | | |
| − | <center>[[File:P70-15_3_1-70-(5)-10102019.png]]</center>
| + | 2) Making '''exchanges''' in the '''Template Properties '''form applies these '''exchanges''' to any '''Chart Properties '''and chart created with the modified '''Template Properties '''form. |
| − | <center>P70-15_3_1-70-(5)-10102019.png</center>
| + | |
| | | | |
| − | 16) The detailed discussion and proper use of these controls can be found at this article: [[Legend Position Options for Multi-Page Outputs for Version 7.0 | Legend Position Options for Multi-Page Outputs]] 15.2.1-70
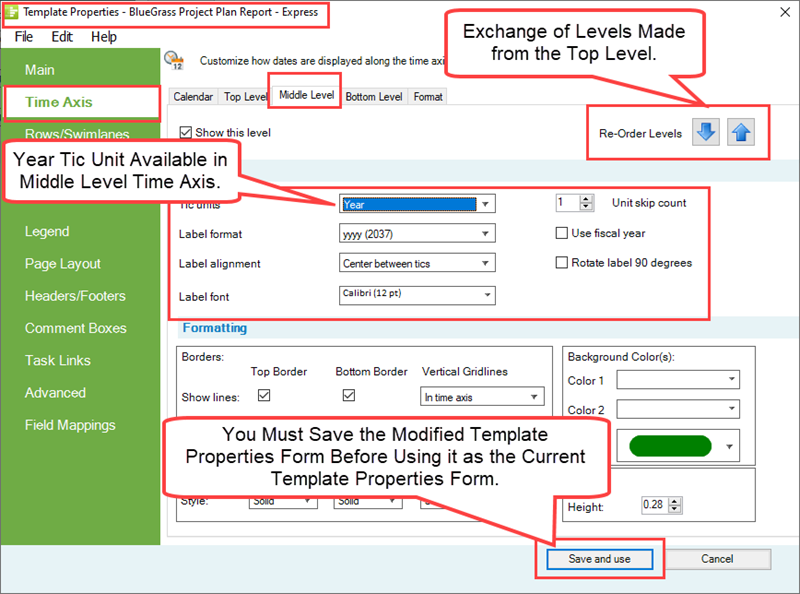
| + | 3) It is important to remember when making '''edits''' to the '''Template Properties '''form that the form must be '''saved''' before it can be used successfully to create a chart and/or snapshots with the '''Template Properties '''form’s '''edits applied'''. |
| | | | |
| − | ===Legend Width and Height Resizing Controls===
| + | 4) For more information on the '''Template Properties '''form, please see the article at: [[Managing Templates for Version 7.0 (Portal) | Managing Templates (Portal)]]. 24.0.1-70 |
| | | | |
| − | 17) There two controls are for '''editing''' the '''width''' and '''length '''of the '''Legend''' box in the chart as shown below
| + | ===Re-Ordering Time Axis Levels in Chart Properties Forms Converted into Template Forms=== |
| | | | |
| − | <center>[[File:P70-15_1_1-70-(10)-10092019.png]]</center>
| + | 5) Conversely, if any '''Chart Properties '''form with '''exchanged Time Axis Levels '''is made into a '''Template Properties '''form and '''saved''', subsequent use of the '''saved''' '''Template Properties '''form utilizes the '''exchanged Time Axis Levels '''in charts and snapshots produced under the modified '''Template Properties '''form. |
| − | <center>P70-15_1_1-70-(10)-10092019.png</center>
| + | |
| | | | |
| − | 18) '''Legend resizing''' using the controls in the '''Legend''' tab of the '''Chart Properties''' form is done exactly like using the corresponding controls for the '''Comment box''' at the '''Chart Properties''' form's '''Comment Boxes''' tab.
| + | <center>[[File:X70-22_3_6-70-(11)-11182020.png]]</center> |
| | + | <center><X70-22_3_6-70-(11)-11182020.png></center> |
| | | | |
| − | 19) Given the similarity, detailed instructions for using the '''resizing '''controls shown for the '''Comment box''' can be found at this link: [[Creating and Managing Comment Boxes for Version 7.0#Box Size Controls for Comment Boxes | Creating and Managing Comment Boxes-Box Size Controls for Comment Boxes]]. 13.0.1-70
| + | 6) For more information on '''Making a template from a chart''', please see this section in the article at: [[Managing the Current Template for Version 7.0#Making a Template from a Chart | Managing the Current Template - Making a Template from a Chart]]. 24.6.1-70 |
| − | | + | |
| − | ===Background Color Controls===
| + | |
| − | | + | |
| − | 20) The '''Background color''' controls for the '''Legend''' are positioned below the '''Width and Height''' controls shown in the illustration above.
| + | |
| − | | + | |
| − | 21) Clicking the window’s dropdown button accesses the standard '''Color Chooser''' form.
| + | |
| − | | + | |
| − | 22) You can use the standard '''Color Chooser '''form to select a '''background color''' for the '''Legend''' as well as use employ the '''No fill''' feature to give the '''Legend''' an appearance of '''transparency'''.
| + | |
| − | | + | |
| − | 23) As with '''resizing the Legend''', the controls and approach for using the '''No fill''' feature is the same as the approach for '''Comment boxes'''.
| + | |
| − | | + | |
| − | 24) Detailed instructions for using the '''No fill '''controls shown for the '''Comment box''' can be found at this link: [[Creating and Managing Comment Boxes for Version 7.0#Using the No fill Feature | Creating and Managing Comment Boxes-Using the No fill Feature]]. 13.0.1-70
| + | |
| − | | + | |
| − | ===Controlling Duplication of Legend Items===
| + | |
| − | | + | |
| − | 25) The OnePager '''Legend''' can '''show''' all task shapes and milestone symbols even if several of them have the same '''Color''' and '''Shape'''.
| + | |
| − | | + | |
| − | :a) This often resulted in unnecessarily busy-looking '''Legends'''.
| + | |
| − | | + | |
| − | :b) There is a control in the '''Template''' and '''Chart Properties''' forms at the '''Legend''' tab giving you a checkbox to specifically tell OnePager '''Do not duplicate task/milestones''' items in the '''Legend '''regardless of their differences in '''color''' and/or '''shape'''.
| + | |
| − | | + | |
| − | 26) This is shown in the '''Chart Properties''' form’s '''Legend''' tab below:
| + | |
| − | | + | |
| − | <center>[[File:P70-15_3_1-70-(6)-10102019.png]]</center>
| + | |
| − | <center>P70-15_3_1-70-(6)-10102019.png</center>
| + | |
| − | | + | |
| − | 27) As an example, the '''Legend''' below shows both a blue milestone symbol item and blue task shape with the '''Do not duplicate tasks/milestones''' checkbox checked '''Off''':
| + | |
| − | | + | |
| − | <center>[[File:P70-15_3_1-70-(7)-10102019.png]]</center>
| + | |
| − | <center>P70-15_3_1-70-(7)-10102019.png</center>
| + | |
| − | | + | |
| − | 28) When the checkbox is checked '''On''', only the task shape for each '''color''' appears in the '''Legend'''.
| + | |
| − | | + | |
| − | 29) '''Legend items''' for milestone symbols can be suppressed by checking the '''Do not duplicate tasks/milestones''' checkbox is checked '''On''' as shown below:
| + | |
| − | | + | |
| − | <center>[[File:P70-15_3_1-70-(8)-10102019.png]]</center>
| + | |
| − | <center>P70-15_3_1-70-(8)-10102019.png</center>
| + | |
| − | | + | |
| − | 30) On occasion, it can become necessary when checking the '''Do not duplicate tasks/milestones''' checkbox '''On and Off '''to right-click on the '''Legend''' and then click the '''Rebuild Legend''' command in the '''context menu '''as shown below:
| + | |
| − | | + | |
| − | <center>[[File:P70-15_3_1-70-(9)-10102019.png]]</center>
| + | |
| − | <center>P70-15_3_1-70-(9)-10102019.png</center>
| + | |
| − | | + | |
| − | 31) Performing this action tells OnePager to rescan the '''graph '''and '''rebuild '''the '''Legend''' to assure that the appearance of the '''Legend''' corresponds to the information displayed in the '''Chart Editor'''.
| + | |
| − | | + | |
| − | ===Make Title Automatically and Legend Title===
| + | |
| − | | + | |
| − | 32) The '''Make title automatically''' checkbox, when checked '''On''' (the '''default setting'''), tells OnePager to automatically generate the '''Legend title '''based on the Microsoft Project '''source plan '''field '''name''' selected for '''Task Bar/Milestone Fill Color''' on the '''Task Bars''' or '''Milestone''' tabs on the '''Chart Properties''' form shown here:
| + | |
| − | | + | |
| − | <center>[[File:P70-15_3_1-70-(10)-10102019.png]]</center>
| + | |
| − | <center>P70-15_3_1-70-(10)-10102019.png</center>
| + | |
| − | | + | |
| − | 33) When the checkbox is checked '''Off''', as shown below, the '''Legend title''' window under the '''Make title automatically '''checkbox is '''enabled''' and you can enter any desired '''Legend title''' for the '''Legend '''box displayed in the chart.
| + | |
| − | | + | |
| − | <center>[[File:P70-15_3_1-70-(11)-10102019.png]]</center>
| + | |
| − | <center>P70-15_3_1-70-(11)-10102019.png</center>
| + | |
| − | | + | |
| − | 34) If the above illustrated '''edits''' are applied, the '''Legend '''looks like this:
| + | |
| − | | + | |
| − | <center>[[File:P70-15_3_1-70-(12)-10102019.png]]</center>
| + | |
| − | <center>P70-15_3_1-70-(12)-10102019.png</center>
| + | |
| − | | + | |
| − | 35) If the '''Make title automatically '''checkbox is subsequently rechecked '''On''', the '''Legend title''' window is '''disabled'''.
| + | |
| − | | + | |
| − | 36) Its '''edited''' contents may remain in the window and the '''title of the Legend''' in the chart reverts to the '''Legend title '''selected for '''Task Bar/Milestone Fill Color''' on the '''Task Bars''' or '''Milestone''' tabs on the '''Chart Properties''' form as shown here:
| + | |
| − | | + | |
| − | <center>[[File:P70-15_3_1-70-(13)-10102019.png]]</center>
| + | |
| − | <center>P70-15_3_1-70-(13)-10102019.png</center>
| + | |
| − | | + | |
| − | 37) The '''Make title automatically''' checkbox and the '''Legend title''' window are '''disabled '''on the '''Template''' form’s '''Legend '''tab.
| + | |
| − | | + | |
| − | ===Show Legend On: Control Group===
| + | |
| − | | + | |
| − | 38) The '''Show legend on:''' control group is provided to give you specific control over where the '''Legend '''is to appear on '''multi-page outputs'''.
| + | |
| − | | + | |
| − | 39) The '''default '''setting in the '''Template '''and '''Chart Properties '''form’s '''Legend '''tab is '''All pages'''.
| + | |
| − | | + | |
| − | 40) You can click the '''Pages '''radio button in the control group to '''enable '''the entry of specific '''output page numbers''' or '''series of page numbers '''in the window to the immediate right of the radio button.
| + | |
| − | | + | |
| − | 41) The '''entry window '''accepts:
| + | |
| − | | + | |
| − | :a) Single integer digit values separated by a comma.
| + | |
| − | | + | |
| − | :b) A starting page number followed by a dash and an ending page number.
| + | |
| − | | + | |
| − | :c) Combinations of these are acceptable if separated by a comma as shown below:
| + | |
| − | | + | |
| − | <center>[[File:P70-15_3_1-70-(14)-10102019.png]]</center>
| + | |
| − | <center>P70-15_3_1-70-(14)-10102019.png</center>
| + | |
| − | | + | |
| − | ===Show or Hide Legend Elements Control Group===
| + | |
| − | | + | |
| − | 42) The '''Show or hide legend elements''' control group provides options for how the '''Legend '''can be configured in the chart.
| + | |
| − | | + | |
| − | 43) The '''Show or hide legend elements '''control group is shown here:
| + | |
| − | | + | |
| − | <center>[[File:P70-15_3_1-70-(15)-10102019.png]]</center>
| + | |
| − | <center>P70-15_3_1-70-(15)-10102019.png</center>
| + | |
| − | | + | |
| − | 44) The '''default '''settings in the '''Template '''and '''Chart Properties '''form’s '''Legend '''tab is to have the '''Title''' and '''Color/symbol items''' checkboxes checked '''On'''.
| + | |
| − | | + | |
| − | 45) When the '''Gantt-bar diagram '''checkbox is checked '''On''', with the '''Title '''and '''Color/symbol items''' checkboxes checked '''On''' as well, the '''Legend''' looks like this:
| + | |
| − | | + | |
| − | <center>[[File:P70-15_3_1-70-(16)-10102019.png]]</center>
| + | |
| − | <center>P70-15_3_1-70-(16)-10102019.png</center>
| + | |
| − | | + | |
| − | 46) When the '''Gantt-bar diagram '''and '''Milestone diagram''' checkboxes are checked '''On''', with the '''Title '''and '''Color/symbol items''' checkboxes checked '''On''', the '''Legend''' looks like this:
| + | |
| − | | + | |
| − | <center>[[File:P70-15_3_1-70-(17)-10102019.png]]</center>
| + | |
| − | <center>P70-15_3_1-70-(17)-10102019.png</center>
| + | |
| − | | + | |
| − | ===Freeze Legend When Updating===
| + | |
| − | | + | |
| − | 47) The '''Freeze legend when updating '''checkbox, where the '''default '''setting is '''Off''', prevents the '''Legend''' from being '''updated''' if new tasks or milestone items are found by OnePager when you '''add or replace a snapshot'''.
| + | |
| − | | + | |
| − | 48) To prevent or '''freeze legend updates''', check the '''Freeze legend when updating''' checkbox to '''On '''in the '''Chart Properties''' form’s '''Legend''' tab as shown below:
| + | |
| − | | + | |
| − | <center>[[File:P70-15_3_1-70-(18)-10102019.png]]</center>
| + | |
| − | <center>P70-15_3_1-70-(18)-10102019.png</center>
| + | |
| − | | + | |
| − | ==Editing the Legend with the Legend Context Menu==
| + | |
| − | | + | |
| − | ===Legend Context Menu===
| + | |
| − | | + | |
| − | 1) Once the '''Legend''' is displayed in the chart, a right click in a white space area accesses the '''Legend context menu''' as shown here:
| + | |
| − | | + | |
| − | <center>[[File:P70-15_3_1-70-(19)-10102019.png]]</center>
| + | |
| − | <center>P70-15_3_1-70-(19)-10102019.png</center>
| + | |
| − | | + | |
| − | ===Legend Context Menu Commands===
| + | |
| − | | + | |
| − | 2) The '''Legend context menu''' allows you to make adjustments to the overall format of the '''Legend''' itself with the following controls:
| + | |
| − | | + | |
| − | ====Hide Legend====
| + | |
| − | | + | |
| − | 3) Clicking the '''Hide legend''' command causes the '''Legend''' to disappear from the chart no matter where the '''Legend''' happens to be positioned.
| + | |
| − | | + | |
| − | 4) To retrieve the '''Legend''', go to the OnePager ribbon’s '''View''' tab and check the '''Legend''' checkbox in the '''Graphic Elements''' group '''On'''.
| + | |
| − | | + | |
| − | 5) You can also go to the '''Chart Properties''' form’s '''Legend''' tab and check the '''Show legend''' checkbox '''On'''.
| + | |
| − | | + | |
| − | ====Unhide All Items====
| + | |
| − | | + | |
| − | 6) The '''Unhide all items''' command is '''disabled''' unless one or more '''Legend '''items in the displayed '''Legend '''are '''hidden'''.
| + | |
| − | | + | |
| − | 7) When the '''Unhide all items '''command is '''enabled''', clicking the command makes all previously '''hidden Legend items''' visible again.
| + | |
| − | | + | |
| − | ====Rebuild Legend====
| + | |
| − | | + | |
| − | 8) The '''Rebuild Legend''' command tells OnePager to scan the chart and '''rebuild''' the '''Legend''' from scratch, incorporating any changes that were made to specific tasks/milestones properties.
| + | |
| − | | + | |
| − | 9) This is normally not necessary, but can be used if you think that the '''Legend''' has gotten out of sync with what is currently in the chart.
| + | |
| − | | + | |
| − | ====Edit Legend Title …====
| + | |
| − | | + | |
| − | 10) This command accesses '''Enter text '''form that lets you '''edit''' the '''Legend’s title''' as shown below:
| + | |
| − | | + | |
| − | <center>[[File:P70-15_3_1-70-(20)-10102019.png]]</center>
| + | |
| − | <center>P70-15_3_1-70-(20)-10102019.png</center>
| + | |
| − | | + | |
| − | ====Title Font…====
| + | |
| − | | + | |
| − | 11) '''Title font…''' This command access the OnePager standard '''Font properties '''form shown below that lets you '''edit''' the six (6) '''font properties''' of the '''Legend title''':
| + | |
| − | | + | |
| − | <center>[[File:P70-15_3_1-70-(21)-10102019.png]]</center>
| + | |
| − | <center>P70-15_3_1-70-(21)-10102019.png</center>
| + | |
| − | | + | |
| − | ====Item Font…====
| + | |
| − | | + | |
| − | 12) This command also accesses the OnePager standard '''Font properties''' form shown above that lets you '''edit''' the six (6) '''font properties''' of all '''Legend item text '''appearing in the '''Legend''' (as opposed to the '''Legend’s title''').
| + | |
| − | | + | |
| − | 13) When '''edits''' are made using the OnePager standard '''Font properties''' form, all displayed '''text Legend items''' are '''edited. '''
| + | |
| − | | + | |
| − | ====Background Color…====
| + | |
| − | | + | |
| − | 14) This commands accesses the OnePager standard '''Color Chooser '''form that lets you select the '''background color''' for the '''Legend'''.
| + | |
| − | | + | |
| − | 15) In addition to being able to use any '''color palette '''or '''color''', you have the option to use the '''No fill '''feature for the '''Legend’s background'''.
| + | |
| − | | + | |
| − | ====Order====
| + | |
| − | | + | |
| − | 16) Clicking the '''Order '''command displays an additional '''sub-context menu''' as shown below:
| + | |
| − | | + | |
| − | <center>[[File:P70-15_3_1-70-(22)-10102019.png]]</center>
| + | |
| − | <center>P70-15_3_1-70-(22)-10102019.png</center>
| + | |
| − | | + | |
| − | | + | |
| − | 17) The '''sub-context menu''' for the '''Order''' command allows you to select any of the four '''sub-commands''' that create the following results:
| + | |
| − | | + | |
| − | :a) '''Bring to front'''. This '''sub-command '''puts the '''Legend''' in front of all other shapes in the chart.
| + | |
| − | | + | |
| − | :b) '''Send to back'''. This '''sub-command '''puts the '''Legend''' behind all other foreground shapes in the chart (but not behind background shapes).
| + | |
| − | | + | |
| − | :c) '''Bring forward'''. Selecting the '''Bring forward sub-command '''option steps the '''Legend’s Z-Axis''' position forward by one increment of '''Z-level'''. This is not very useful.
| + | |
| − | | + | |
| − | :d) '''Send backward'''. This '''sub-command '''steps the '''Legend''' backward by one '''Z-level'''. This also is not very useful.
| + | |
| − | | + | |
| − | ==Editing Legend Items with the Legend Item Context Menu==
| + | |
| − | | + | |
| − | ===Editing All Task/Milestone Shape in the Chart from the Legend===
| + | |
| − | | + | |
| − | 1) When the '''Legend''' and '''Legend items '''are displayed in the chart, a right click on a specific '''Legend item’s text''' or '''color bar''' accesses the '''Legend context menu''' as shown here:
| + | |
| − | | + | |
| − | <center>[[File:P70-15_3_1-70-(23)-10102019.png]]</center>
| + | |
| − | <center>P70-15_3_1-70-(23)-10102019.png</center>
| + | |
| − | | + | |
| − | 2) You can also access the '''Edit Legend Item '''form by double-left clicking the '''color bar'''.
| + | |
| − | | + | |
| − | ===Edit Legend Item Form===
| + | |
| − | | + | |
| − | 3) The '''Edit Legend Item '''form has seven (7) specific controls for '''editing''' the '''Legend item’s text''', the task/milestone’s '''color''', '''shape''', and the positon of the '''Legend item '''in the list of '''Legend items '''in the '''Legend''' as shown in more close up below:
| + | |
| − | | + | |
| − | <center>[[File:P70-15_3_1-70-(24)-10102019.png]]</center>
| + | |
| − | <center>P70-15_3_1-70-(24)-10102019.png</center>
| + | |
| − | | + | |
| − | ====Show Legend Item Checkbox====
| + | |
| − | | + | |
| − | 4) This checkbox is checked '''On''' as the '''Legend item '''is '''shown''' and can thereby access the '''Edit Legend item''' form.
| + | |
| − | | + | |
| − | :a) Checking the checkbox '''Off hides''' the '''selected Legend item''' after the '''OK '''button at the bottom of the form is clicked.
| + | |
| − | | + | |
| − | :b) To restore the '''hidden Legend item''' to visibility, you must access the '''Legend’s context menu''' as described in the previous section and click the '''Unhide all items '''command which is '''enabled '''in this circumstance.
| + | |
| − | | + | |
| − | ====Legend Text Window====
| + | |
| − | | + | |
| − | 5) When the form is accessed, the '''Legend text window '''contains the '''Legend text '''associated with the '''selected Legend item'''.
| + | |
| − | | + | |
| − | :a) To change the '''text content''', type in the new '''Legend item text '''and either continue to '''edit '''or
| + | |
| − | | + | |
| − | :b) Click '''OK '''to apply the change to the '''selected Legend item.'''
| + | |
| − | | + | |
| − | ====Color====
| + | |
| − | | + | |
| − | 6) Clicking the dropdown button on the '''Color''' control accesses the standard OnePager '''Color Chooser''' form which is used to change the '''Color of all Task/Milestone shapes''' in the chart associated with the '''selected Legend item'''. | + | |
| − | | + | |
| − | :a) Making an '''edit''' of the '''color''' in this way '''updates''' the '''color '''of '''all''' task/milestone shapes associated with the '''selected Legend item''' in the current snapshot, historical snapshots, and all future snapshots where the associated task/milestone shape appears.
| + | |
| − | | + | |
| − | :b) Some care needs to be exercised when using the '''No fill''' checkbox on the standard OnePager '''Color Chooser '''as checking the '''No fill '''checkbox '''On''' makes the task/milestone shape essentially '''transparent'''.
| + | |
| − | | + | |
| − | :c) To illustrate this, suppose that the '''Prime''' '''Legend item’s color bar ''' is double-left clicked to access the '''Edit Legend Item''' form and the '''Color '''dropdown button is clicked to access the '''Color Chooser''' form where the '''No fill''' checkbox is checked as shown below:
| + | |
| − | | + | |
| − | <center>[[File:P70-15_3_1-70-(24A)-10132019.png]]</center>
| + | |
| − | <center>P70-15_3_1-70-(24A)-10132019.png</center>
| + | |
| − | | + | |
| − | :d) After you check the '''No fill''' checkbox '''On''' the '''Color Chooser '''form disappears. With the action taken in the '''Color Chooser '''form, click the '''OK '''button on the '''Edit Legend Item '''form and the '''Prime '''task bars in the chart look like this:
| + | |
| − | | + | |
| − | <center>[[File:P70-15_3_1-70-(24B)-10132019.png]]</center>
| + | |
| − | <center>P70-15_3_1-70-(24B)-10132019.png</center>
| + | |
| − | | + | |
| − | :e) As a note, unchecking the '''No fill''' checkbox to '''Off''' is a three step process described at this link: [[Changing Individual Task/Milestone Properties (Color, Shape, Labels, etc.) for Version 7.0#Using the No Fill Option of the Color Chooser on Task/Milestone Fill Colors | Using the No Fill Option of the Color Chooser on Task/Milestone Fill Colors]]. 9.2.1-70
| + | |
| − | | + | |
| − | ====Marker Symbols for Task Bars====
| + | |
| − | | + | |
| − | 7) If you select a task bar’s '''Legend item''', the list of available shapes in the '''Marker Symbol''' window scroll list consists of those shapes associated with task bars as shown below:
| + | |
| − | | + | |
| − | <center>[[File:P70-15_3_1-70-(24)-10102019.png]]</center>
| + | |
| − | <center>P70-15_3_1-70-(24)-10102019.png</center>
| + | |
| − | | + | |
| − | ====Marker Symbols for Milestones====
| + | |
| − | | + | |
| − | 8) If you select a milestone shape '''Legend item''', the list of available shapes in the '''Marker Symbol''' window scroll list consists of those shapes associated with milestones as shown below:
| + | |
| − | | + | |
| − | <center>[[File:P70-15_3_1-70-(25)-10102019.png]]</center>
| + | |
| − | <center>P70-15_3_1-70-(25)-10102019.png</center>
| + | |
| − | | + | |
| − | ====Sequence====
| + | |
| − | | + | |
| − | 9) The '''Sequence '''set of controls consist of an '''up arrow '''button, a '''down arrow '''button, and a window for the integer number position of the '''selected Legend item''' in the list.
| + | |
| − | | + | |
| − | :a) If the '''selected Legend item''' is the top most '''Legend item '''in the list, the '''up arrow''' button is '''disabled''' because the '''selected Legend item '''cannot be moved further '''up '''in the list.
| + | |
| − | | + | |
| − | :b) If the '''selected Legend item '''is the bottom most '''Legend item''' in the list, the '''down arrow''' button is '''disabled''' because the '''selected Legend item '''cannot be moved further '''down '''in the list.
| + | |
| − | | + | |
| − | :c) For any '''selected Legend item''' not occupying either a top or bottom position in the list, both '''up''' and '''down arrow '''buttons are '''enabled'''.
| + | |
| − | | + | |
| − | :d) Clicking the '''up arrow '''button once moves the '''selected Legend item up''' one position in the list and '''decrements''' the value in the integer number window by one. The action is applied to the '''Legend '''when you click the '''OK '''button at the bottom of the '''Edit Legend Item '''form.
| + | |
| − | | + | |
| − | :e) In a similar fashion, clicking the '''down arrow '''button once moves the '''selected Legend item down''' one position in the list and '''increments''' the value in the integer number window by one. The action is applied to the '''Legend '''when you click the '''OK '''button at the bottom of the '''Edit Legend Item '''form.
| + | |
| − | | + | |
| − | :f) You can observe the position of any '''selected Legend item''' in the list by '''consulting''' the integer number in the window between the '''up '''and '''down arrow '''buttons.
| + | |
| − | | + | |
| − | :g) Whenever the position of a '''selected Legend item changes''' in the list, the value of the integer number in the window is updated.
| + | |
| − | | + | |
| − | ===Editing a Single Task/Milestone Shape in the Chart and the Legend===
| + | |
| − | | + | |
| − | ====Manually Editing A Single Task Shape====
| + | |
| − | | + | |
| − | 10) You can '''edit''' a single task/milestone shape in the chart using the '''Change Task/Milestone Properties''' form as described in this link: [[Changing Individual Task/Milestone Properties (Color, Shape, Labels, etc.) for Version 7.0 | Changing Individual Task/Milestone Properties (Color, Shapes, Labels, etc.)]] 9.2.1-70.
| + | |
| − | | + | |
| − | 11) Some '''edits''' to individual task/milestone '''properties''' can '''add''' entries to the '''Legend''' if the '''edit''' involves a change in '''color''' or '''shape'''.
| + | |
| − | | + | |
| − | ====Example====
| + | |
| − | | + | |
| − | 12) For example, suppose we select a single task shape in the chart with a left click and then click the '''Format… '''button on the OnePager ribbon’s '''Home '''tab to access the '''Change Task/Milestone Properties '''form as shown below:
| + | |
| − | | + | |
| − | <center>[[File:P70-15_3_1-70-(24C)-10132019.png]]</center>
| + | |
| − | <center>P70-15_3_1-70-(24C)-10132019.png</center>
| + | |
| − | | + | |
| − | ====Legend Updated====
| + | |
| − | | + | |
| − | 13) After making the desired task shape '''edit''', click the '''OK '''button on the '''Change Task/Milestone Properties '''form and the chart and the '''Legend '''looks like this:
| + | |
| − | | + | |
| − | <center>[[File:P70-15_3_1-70-(24D)-10132019.png]]</center>
| + | |
| − | <center>P70-15_3_1-70-(24D)-10132019.png</center>
| + | |
| − | | + | |
| − | 14) The single '''selected '''task bar exhibits its new '''shape''' and an entry for that '''shape''' is '''added''' to the '''Legend''' as a new '''Legend item'''.
| + | |
| − | | + | |
| − | 15) For a more detailed description of other options, please see the section '''starting at''' this link: [[Changing Individual Task/Milestone Properties (Color, Shape, Labels, etc.) for Version 7.0#Changing Individual Task/Milestone Shapes | Changing Individual Task/Milestone Shapes]] 9.2.1-70
| + | |
| | | | |
| | ==Related Links== | | ==Related Links== |
| | | | |
| − | [[Conditional Import for Version 7.0 (Portal) | Conditional Import Filters (Portal)]] 7.18.1-70 | + | [[The Floating Time Axis Feature for OnePager Express for Version 7.0 | The Floating Time Axis Feature for OnePager Express]] 22.3.10-70 |
| | | | |
| − | [[Creating Multi-Page Charts with Version 7.0 (Portal) | Creating Multi-Page Charts (Portal)]] 8.6.1-70 | + | [[Managing Templates for Version 7.0 (Portal) | Managing Templates (Portal)]] 24.0.1-70 |
| | | | |
| − | [[Manual Editing Task/Milestone Shapes and Text Labels for Version 7.0 (Portal) | Manual Editing Task/Milestone Shapes and Text Labels (Portal)]] 9.0.1-70 | + | [[Managing the Current Template for Version 7.0 | Managing the Current Template]] 24.6.1-70 |
| | | | |
| − | [[Creating and Managing Comment Boxes for Version 7.0 | Creating and Managing Comment Boxes]]. 13.0.1-70
| + | (22.3.6-70) |
| − | | + | |
| − | [[Creating and Managing Free Boxes for Version 7.0#Resizing a Free Box | Creating and Managing Free Boxes-Resizing a Free Box]] 14.0.1-70
| + | |
| − | | + | |
| − | [[Editing with the Chart Properties form for Version 7.0 (Portal) | Editing with the Chart Properties form (Portal)]] 21.0.1-70
| + | |
| − | | + | |
| − | [[Legend Tab for Version 7.0 (OnePager Pro) | Legend Tab for OnePager Pro]] 21.7.1-70
| + | |
| − | | + | |
| − | [[Managing Templates for Version 7.0 (Portal) | Managing Templates (Portal)]]24.0.1-70
| + | |
| − | | + | |
| − | (15.3.1-70) | + | |
| | | | |
| | [[Category:Version 7.0]] | | [[Category:Version 7.0]] |
| | + | [[Category:OnePager Express]] |
| | [[Category:Editing the Chart]] | | [[Category:Editing the Chart]] |
| − | [[Category:Legend]] | + | [[Category:Charts]] |
| − | [[Category:Ribbon]] | + | [[Category:Time Axis]] |
| | + | [[Category:Time Axis Tab]] |
| | + | [[Category:Floating Time Axis]] |
| | + | [[Category:Color Palettes]] |
| | [[Category:Snapshots]] | | [[Category:Snapshots]] |
| − | [[Category:Charts]] | + | [[Category:Template]] |
| − | [[Category:OnePager - Tool Bar]]
| + | [[Category:Chart Properties]] |
| − | [[Category:Charts]]
| + | |
| − | [[Category:Editing the Chart]]
| + | |
| − | [[Category:Task/Milestone Editing]]
| + | |
| − | [[Category:Multi-Page Output]]
| + | |
| − | [[Category:Templates]]
| + | |
| − | [[Category:Chart Properties Form]] | + | |
| − | [[Category:OnePager Pro]]
| + | |
