Difference between revisions of "TEMPzz3"
| Line 1: | Line 1: | ||
| − | == | + | ==Adjusting Background Image Transparency== |
| − | + | When '''background images''' are initially '''inserted''' into the '''graph''' they are opaque. Initially the presence of such a '''background image''' can distract from the project management information the chart is intended to convey. To resolve such a situation and provide more flexibility, you have the option of '''editing''' how '''transparent''' the '''inserted background image''' can be in the '''graph'''. | |
| − | + | The greater the '''transparency''', the less potential distraction the '''inserted background image''' can appear. Conversely, the less the '''transparency''' setting, the more prominent the '''inserted background image''' appears in the '''graph'''. | |
| − | + | ===Increasing Background Image Transparency=== | |
| − | + | '''Editing background image transparency''' is done by accessing the '''background image''' right-click '''context menu''' in the '''background image's area''' where there are no task bars/milestone symbols, decorations, or adornments as shown here: | |
| − | + | <center>[[File:P70-20_3-1-70-(1)-10292019.png]]</center> | |
| + | <!--<center>P70-20_3-1-70-(1)-10292019.png</center>--> | ||
| − | + | Then click the '''Properties …''' command to accesses the '''Image Properties''' form that lets you adjust '''transparency''' as shown below: | |
| − | + | <center>[[File:P70-20_3-1-70-(2)-10292019.png]]</center> | |
| + | <!--<center>P70-20_3-1-70-(2)-10292019.png</center>--> | ||
| − | + | To '''increase''' the '''transparency''', that is, to be able to see task bars/milestone symbols and other objects behind the image, slide the '''Transparency''' bar to the '''right''': | |
| − | + | <center>[[File:P70-20_3-1-70-(3)-10292019.png]]</center> | |
| + | <!--<center>P70-20_3-1-70-(3)-10292019.png</center>--> | ||
| − | + | When you are at the level of '''transparency''' you want, click the '''OK''' button on the '''Image Properties''' form and the '''background image''' looks like this: | |
| − | + | ||
| − | + | <center>[[File:P70-20_3-1-70-(4)-10292019.png]]</center> | |
| + | <!--<center>P70-20_3-1-70-(4)-10292019.png</center>--> | ||
| − | === | + | ===Decreasing Background Image Transparency=== |
| − | When | + | When a '''background image''' is first '''inserted''' into the '''graph''', the '''default transparency''' is zero (0%) percent or its maximum opacity. To '''decrease''' the '''transparency''', that is, to be able to '''hide''' task bars/milestone symbols and other objects behind the '''background image''', slide the '''Transparency''' bar to the '''left''' from the position the slide was previously located. |
| − | + | ===Additional Editing Controls in the Image Properties Form=== | |
| − | + | ||
| − | + | There are other controls in the '''Image Properties''' form that are useful for doing manual '''editing''' of the '''selected background image'''. The '''Image Properties''' form is shown here: | |
| − | <center>[[File:P70- | + | <center>[[File:P70-20_3-1-70-(5)-10292019.png]]</center> |
| − | <!--<center>P70- | + | <!--<center>P70-20_3-1-70-(5)-10292019.png</center>--> |
| − | + | ====Width and Height==== | |
| − | + | The '''Width''' and '''Height''' windows support two (2) functions: | |
| − | + | ||
| − | + | :1) When you '''edit''' the '''size''' of a '''background image''' in the chart, the '''Width''' and '''Height''' windows display the actual '''size''' of the '''background image''' in either '''inches''' or '''centimeters''' depending on your selection of '''Template Properties''' form for the chart. | |
| − | + | :2) The '''Width''' and '''Height''' windows can also be accessed and their contents changed as an alternate method for changing the dimensions of the '''background image''' in the '''graph'''. | |
| − | + | ====Maintain Aspect Ratio==== | |
| − | + | When the '''Maintain aspect ratio''' checkbox is checked '''ON''', OnePager retains the initial '''aspect ratio''' of the '''background image''' whenever you use the mouse the '''resize''' the '''background image''' using one of the eight (8) available '''grab boxes or circles'''. Also, when the '''Maintain aspect ratio''' checkbox is checked '''ON''', making a single '''edit''' to either the '''Width''' or '''Height''' window value makes a corresponding change to the other value to '''maintain the aspect ratio'''. When the '''Maintain aspect ratio''' checkbox is checked '''OFF''', you can change either the '''Width''' value or the '''Height''' value without OnePager making a change to the other value automatically. | |
| − | + | When making manual '''resizing edits''' with your mouse, OnePager does not honor the setting of the '''Maintain aspect ratio''' checkbox. Rather all manual '''resizing edits''' made with the mouse in the '''graph''' also '''maintains the standard aspect ratio'''. | |
| − | + | (20.3.1-71) | |
| − | + | ||
| − | + | ||
| − | + | ||
| − | + | ||
| − | + | ||
| − | + | ||
| − | + | ||
| − | + | ||
| − | + | ||
| − | + | ||
| − | + | ||
| − | + | ||
| − | + | ||
| − | + | ||
| − | + | ||
| − | + | ||
| − | + | ||
| − | + | ||
| − | + | ||
| − | + | ||
| − | + | ||
| − | + | ||
| − | + | ||
| − | + | ||
| − | + | ||
| − | + | ||
| − | + | ||
| − | + | ||
| − | + | ||
| − | + | ||
| − | + | ||
| − | + | ||
| − | + | ||
| − | + | ||
| − | + | ||
| − | + | ||
| − | + | ||
| − | + | ||
| − | + | ||
| − | + | ||
[[Category:Version 7.1]] | [[Category:Version 7.1]] | ||
[[Category:Editing the Chart]] | [[Category:Editing the Chart]] | ||
| − | [[Category: | + | [[Category:Backgrounds, Images, and Logos]] |
| − | + | ||
| − | + | ||
| − | + | ||
[[Category:Ribbon]] | [[Category:Ribbon]] | ||
[[Category:Snapshots]] | [[Category:Snapshots]] | ||
| + | [[Category:Charts]] | ||
[[Category:Templates]] | [[Category:Templates]] | ||
[[Category:Chart Properties Form]] | [[Category:Chart Properties Form]] | ||
[[Category:OnePager Pro]] | [[Category:OnePager Pro]] | ||
| + | [[Category:OnePager Express]] | ||
| + | [[Category:OnePager 360]] | ||
Revision as of 18:40, 24 February 2021
Contents
Adjusting Background Image Transparency
When background images are initially inserted into the graph they are opaque. Initially the presence of such a background image can distract from the project management information the chart is intended to convey. To resolve such a situation and provide more flexibility, you have the option of editing how transparent the inserted background image can be in the graph.
The greater the transparency, the less potential distraction the inserted background image can appear. Conversely, the less the transparency setting, the more prominent the inserted background image appears in the graph.
Increasing Background Image Transparency
Editing background image transparency is done by accessing the background image right-click context menu in the background image's area where there are no task bars/milestone symbols, decorations, or adornments as shown here:
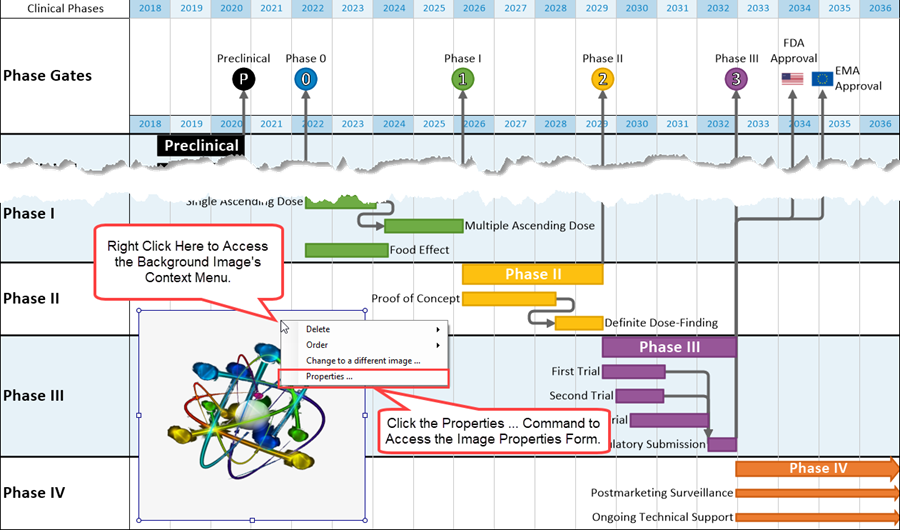
Then click the Properties … command to accesses the Image Properties form that lets you adjust transparency as shown below:
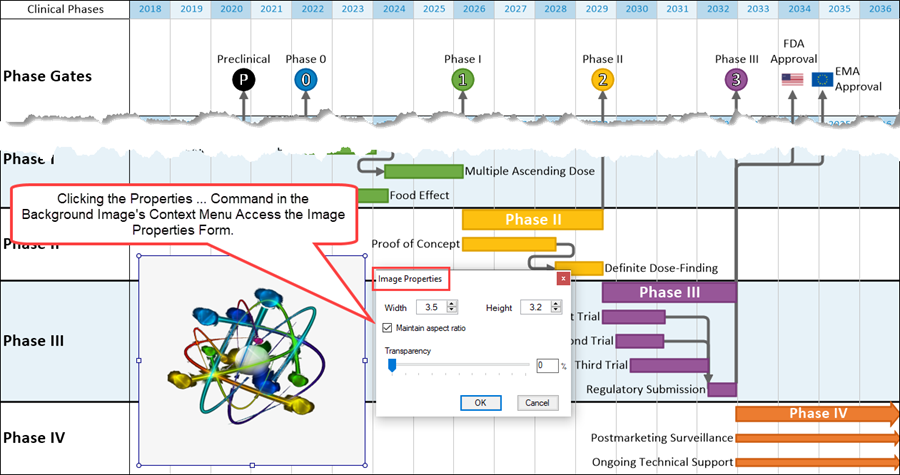
To increase the transparency, that is, to be able to see task bars/milestone symbols and other objects behind the image, slide the Transparency bar to the right:
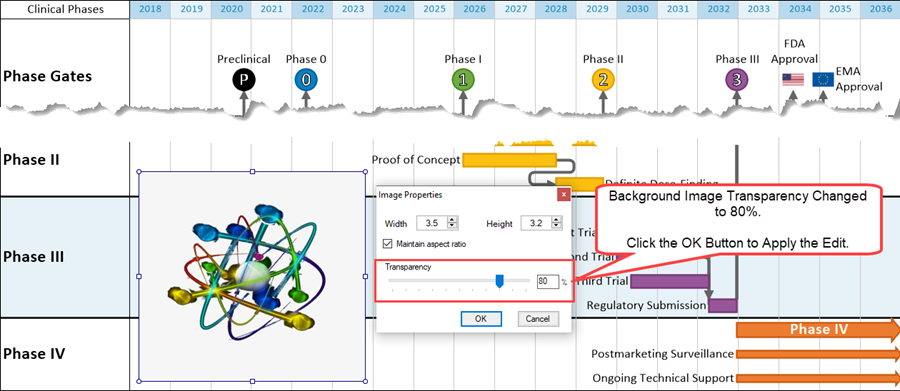
When you are at the level of transparency you want, click the OK button on the Image Properties form and the background image looks like this:
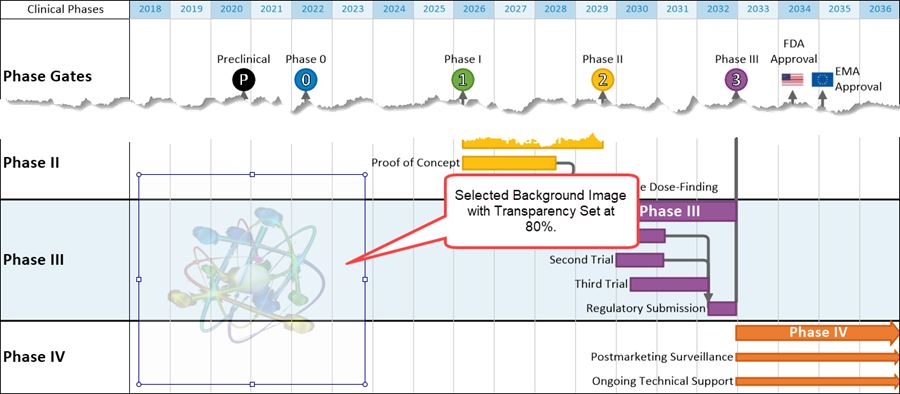
Decreasing Background Image Transparency
When a background image is first inserted into the graph, the default transparency is zero (0%) percent or its maximum opacity. To decrease the transparency, that is, to be able to hide task bars/milestone symbols and other objects behind the background image, slide the Transparency bar to the left from the position the slide was previously located.
Additional Editing Controls in the Image Properties Form
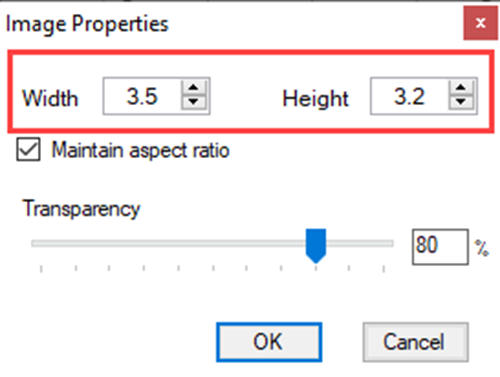
There are other controls in the Image Properties form that are useful for doing manual editing of the selected background image. The Image Properties form is shown here:
Width and Height
The Width and Height windows support two (2) functions:
- 1) When you edit the size of a background image in the chart, the Width and Height windows display the actual size of the background image in either inches or centimeters depending on your selection of Template Properties form for the chart.
- 2) The Width and Height windows can also be accessed and their contents changed as an alternate method for changing the dimensions of the background image in the graph.
Maintain Aspect Ratio
When the Maintain aspect ratio checkbox is checked ON, OnePager retains the initial aspect ratio of the background image whenever you use the mouse the resize the background image using one of the eight (8) available grab boxes or circles. Also, when the Maintain aspect ratio checkbox is checked ON, making a single edit to either the Width or Height window value makes a corresponding change to the other value to maintain the aspect ratio. When the Maintain aspect ratio checkbox is checked OFF, you can change either the Width value or the Height value without OnePager making a change to the other value automatically.
When making manual resizing edits with your mouse, OnePager does not honor the setting of the Maintain aspect ratio checkbox. Rather all manual resizing edits made with the mouse in the graph also maintains the standard aspect ratio.
(20.3.1-71)