|
|
| Line 1: |
Line 1: |
| | ==Overview== | | ==Overview== |
| | | | |
| − | In OnePager Express provides a feature for controlling the '''showing''' and '''hiding''' '''Time Axis Level Cells'''. In previous versions of OnePager Express all '''Time Axis cells''' in a given '''Time Axis Level '''are always '''shown'''. While this made it possible to have a complete and contiguous '''timespan '''displayed in the chart, for very long '''timespans''' there was no way '''cut out''' a proportion of the '''timespan''' where less interest should be focused in a schedule discussion.
| + | OnePager Pro has the capability to manually '''re-order''' the '''Time Axis Levels''' shown in the chart very easily. The '''Time Axis Re-Ordering '''capability is available in the '''Template Properties''' and '''Chart Properties''' form's '''Time Axis''' tab's '''Top, Middle, and Bottom''' sub-tabs. |
| | | | |
| − | The capability to '''hide Time Axis Level Cells''' anywhere in the chart’s '''timespan''' provides a way to tailor long '''timespan '''charts to achieve the desired focus.
| + | ===Re-Ordering Example=== |
| | | | |
| − | ===Global Showing and Hiding of Time Axis Level Cells===
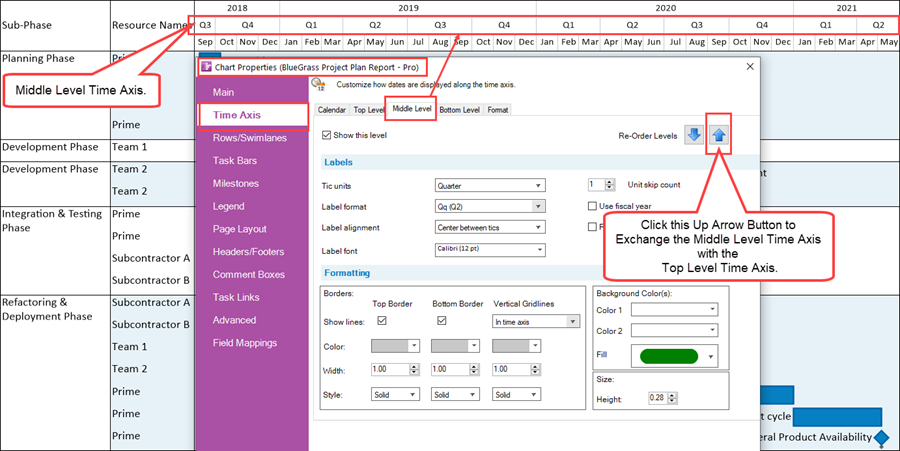
| + | Given the chart below where the '''Top''', '''Middle''', and '''Bottom Time Axis Levels '''in Year, Quarter, and Month are ordered from '''top''' to '''bottom''', you can '''exchange '''the '''Middle Level''' with the '''Top Level''' by clicking the '''up arrow '''in the '''Re-Order Levels''' control group in the '''Chart Properties ''' form shown below: |
| | | | |
| − | The controls for both globally '''showing''' and '''hiding Time Axis Level Cells '''using the '''Template Properties '''and '''Chart Properties ''' forms and manual '''editing '''in the chart itself. Additionally, there are provisions for recording '''hidden Time Axis Level Cells '''in the '''Template Properties '''and '''Chart Properties''' forms as well as an '''editing '''technique to make all '''hidden Time Axis Level Cells''' visible with one click. In the '''Template Properties '''form there is a sub-tab of the '''Time Axis '''tab called the '''Format '''sub-tab that provides two control group with the one of interest here called the '''Curtains and Timespans '''control group shown below the '''Days of the Week and Non-Working Times''' control group in the following illustration:
| + | <center>[[File:P70-22_3_5-70-(1)-11042020.png]]</center> |
| | + | <!--<center>P70-22_3_5-70-(1)-11042020.png</center>--> |
| | | | |
| − | <center>[[File:X70-22_3_4-70-(2)-11182020.png]]</center>
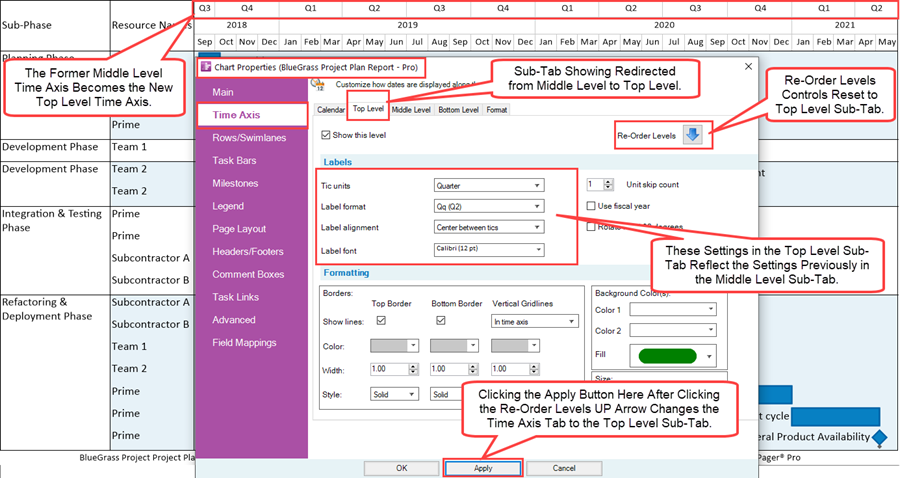
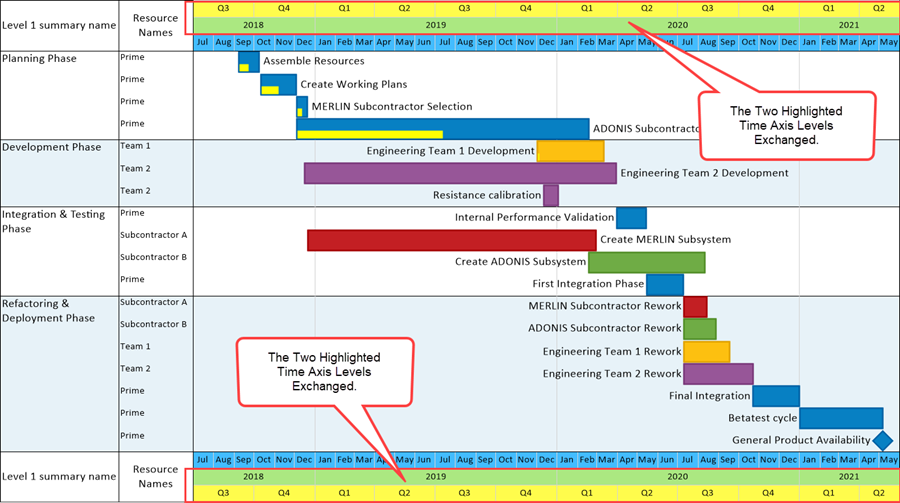
| + | When you click the '''Apply''' or '''OK '''button in the '''Chart Properties '''form the '''Top''' and '''Middle Levels '''are '''exchanged''' as shown here: |
| − | <!--<center>X70-22_3_4-70-(2)-11182020.png</center>-->
| + | |
| | | | |
| − | There is a corresponding '''Format '''sub-tab located in the '''Chart Properties '''form '''Time Axis '''tab with the same two control groups as shown here:
| + | <center>[[File:P70-22_3_5-70-(2)-11042020.png]]</center> |
| | + | <!--<center>P70-22_3_5-70-(2)-11042020.png</center>--> |
| | | | |
| − | <center>[[File:X70-22_3_4-70-(1)-11182020.png]]</center>
| + | This is a useful shortcut when you want to make the '''exchange''' quickly without going through the process of manually accessing each '''Time Axis Levels '''involved and manually changing the '''Tic unit '''and '''Label format '''setting in each '''Time Axis Level''' participating in the '''exchange'''. |
| − | <!--<center>X70-22_3_4-70-(1)-11182020.png</center>-->
| + | |
| | | | |
| − | In the two forms above, the '''Curtains and Timespans '''control group, which is referred to often in this document as '''The Grid''', records any '''Time Axis Level Cells '''that are '''hidden''' manually with the attributes of the '''hidden cells''' recorded in each of the columns of '''The Grid''' shown above. '''The Grid''' is also used to record and '''edit Curtains''' of all types shown in the chart and its snapshots.
| + | ==Re-Ordering Time Axis Levels== |
| | | | |
| − | For more information on '''Creating, editing, and managing time axis daily curtains''', please see the article at: [[Creating, Editing, and Managing Time Axis Daily Curtains for OnePager Express for Version 7.0 | Creating, Editing, and Managing Time Axis Daily Curtains for OnePager Express]] <!--22.5.6-70-->
| + | ===Top and Bottom Time Axis Displays in the Chart=== |
| | | | |
| − | Additionally, note the buttons below '''The Grid''' where you can be used to '''add '''a '''timespan''', '''delete '''a selected '''timespan entry '''in '''The Grid''', and '''copy '''a selected '''timespan entry '''in order to '''create/edit''' the copy as desired. '''Timespans''' are '''snapshot-independent''' which means that the content of '''The Grid '''in terms of '''hidden Time Axis Level Cells''' is a function of the '''hidden Time Axis Level Cells''' in each snapshot in a chart. OnePager builds '''The Grid''' and its entries based upon the snapshot being displayed in the '''Chart Editor.'''
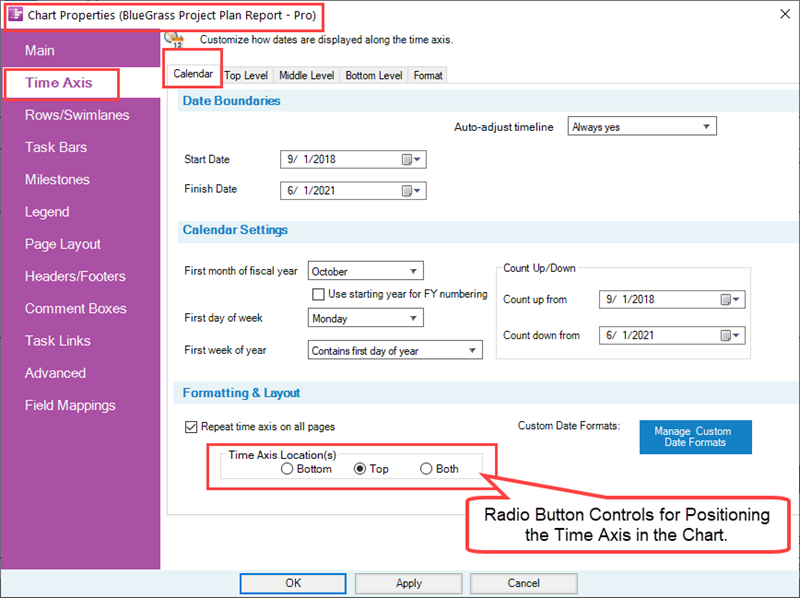
| + | The chart can display '''Time Axis Levels''' at either the '''top''', '''bottom, '''or in '''both positions''' in the chart. This is controlled in the '''Chart Properties '''form at the '''Time Axis '''tab’s '''Calendar '''sub-tab in the '''Formatting & Layout '''control group as shown below: |
| | | | |
| − | ===Manually Hiding, Showing, and Formatting of Individual Time Axis Level Cells===
| + | <center>[[File:P70-22_3_5-70-(3)-11042020.png]]</center> |
| | + | <!--<center>P70-22_3_5-70-(3)-11042020.png</center>--> |
| | | | |
| − | '''Time Axis Level Cells''' as well as '''Floating Time Axis Level Cells''' can be '''hidden''' by manually selecting one or more '''Cells '''in a '''Time Axis Level '''with left-clicks and then right-clicking on a selected '''Cell '''to access the '''time axis''' right-click '''context menu''' shown below: | + | Identical controls for '''Time Axis Location''' are provided in the '''Template Properties '''form '''Time Axis '''tab '''Calendar '''sub-tab. |
| | | | |
| − | <center>[[File:X70-22_3_4-70-(3)-11182020.png]]</center>
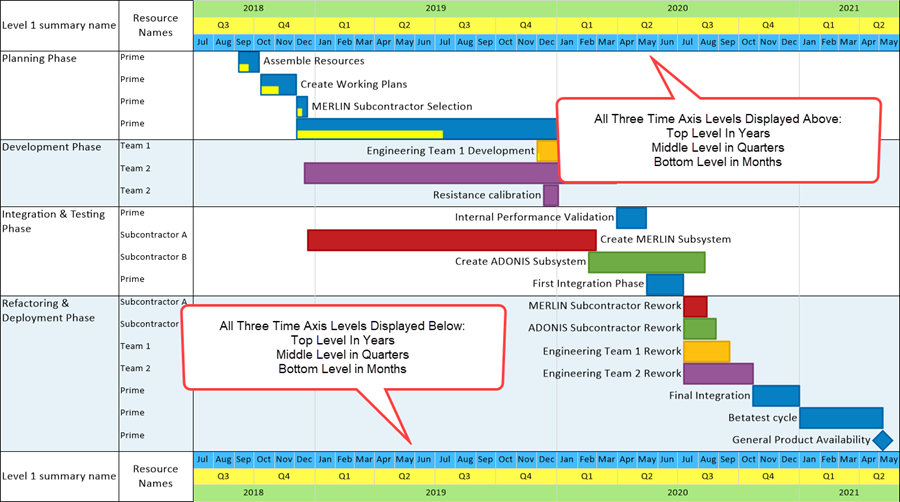
| + | If the '''Time Axis '''is being '''located''' at both the '''top''' and '''bottom''' of the chart, OnePager performs the '''exchange '''automatically for both '''Time Axis '''displays. The chart below '''locates''' the '''Time Axis '''at both the '''Top '''and '''Bottom '''of the chart: |
| − | <!--<center>X70-22_3_4-70-(3)-11182020.png</center>-->
| + | |
| | | | |
| − | Clicking the '''Hide cell''' command in the above '''time axis''' right-click '''context menu''' makes the three selected '''Bottom Time Axis Level Cells''' disappear from the chart along with portions of the task bars/milestone symbols occupying the '''timespan''' being '''hidden''' in the '''graph'''. The result of clicking the '''Hide cell '''command looks like this:
| + | <center>[[File:P70-22_3_5-70-(4)-11042020.png]]</center> |
| | + | <!--<center>P70-22_3_5-70-(4)-11042020.png</center>--> |
| | | | |
| − | <center>[[File:X70-22_3_4-70-(4)-11182020.png]]</center>
| + | If we use the '''Re-Order Levels''' control group in the '''Chart Properties '''form '''Time Axis '''tab’s '''Top Level '''sub-tab to '''exchange '''the '''Top Level '''with the '''Middle Level''', the two '''Time Axis '''displays in the chart above look like this''':''' |
| − | <!--<center>X70-22_3_4-70-(4)-11182020.png</center>-->
| + | |
| | | | |
| − | OnePager provides a single control to '''unhide''' all '''hidden Time Axis Level Cells''' with one click using the '''Show/Hide '''dropdown on the OnePager '''Home''' ribbon tool bar tab’s '''Editing '''group as shown below:
| + | <center>[[File:P70-22_3_5-70-(5)-11042020.png]]</center> |
| | + | <!--<center>P70-22_3_5-70-(5)-11042020.png</center>--> |
| | | | |
| − | <center>[[File:X70-22_3_4-70-(4A)-11182020.png]]</center>
| + | Comparing the two illustrations above it is shown that the Year and Quarter '''Time Axis Tic Units''' in their respective '''Time Axis Levels''' are '''exchanged'''. |
| − | <!--<center>X70-22_3_4-70-(4A)-11182020.png</center>-->
| + | |
| | | | |
| − | The purpose of this article is to cover '''global''' and '''manual showing '''and''' hiding '''of''' Time Axis Level Cells''' as over viewed above. In addition, this article covers the manual '''editing '''of '''Time Axis Level Cell properties''' in the chart.
| + | ===Floating Time Axis Displays and Re-Ordering=== |
| | | | |
| − | ==The Timespans Grid in the Template Properties and Chart Properties Form’s Time Axis-Format Sub-Tab==
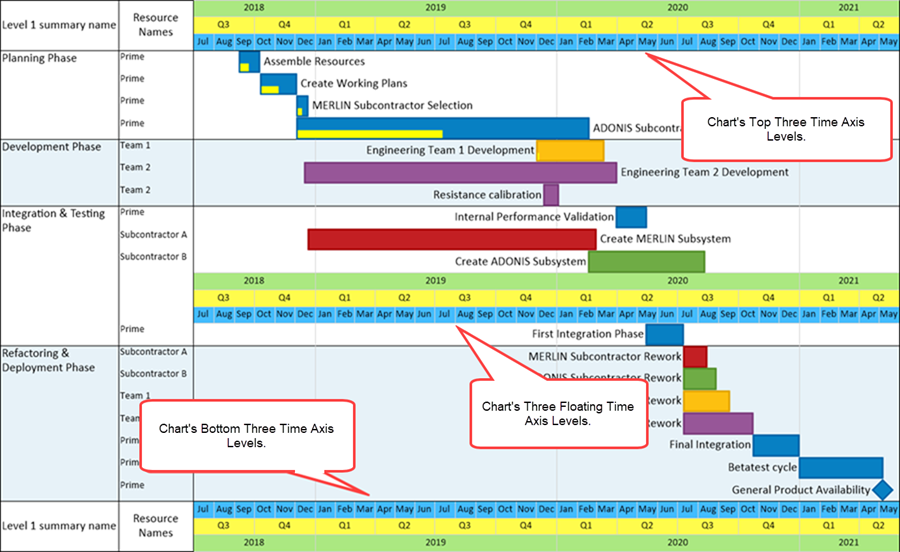
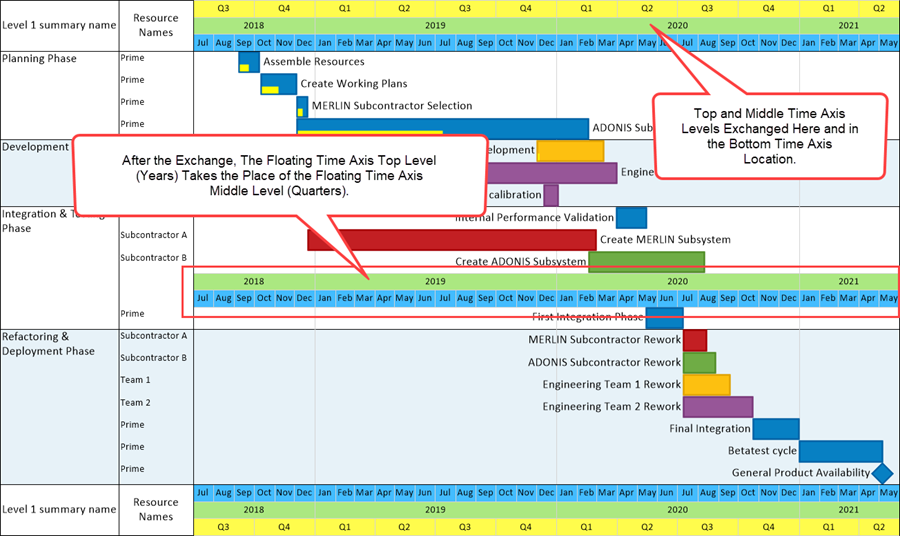
| + | If '''Floating Time Axes '''are '''located''' within the chart and the '''Floating Time Axis Levels''' are consistent with the '''Time Axis Level exchange '''being performed, OnePager Pro makes appropriate '''exchanges '''for the '''Floating Time Axes''' as well. Using the illustration above, three '''Floating Time Axes '''can be easily added to the original chart display. |
| | | | |
| − | ===The Grid Controls in the Chart Properties Form===
| + | For illustrative purposes the '''Floating Time Axes '''added to the chart are in '''Top Level '''to '''Bottom Level '''order although the '''Floating Time Axis '''order in the chart is immaterial to the example. The sample chart looks like this: |
| | | | |
| − | '''The Grid''', found in both the '''Template Properties '''form and '''Chart Properties '''form '''Time Axis '''tab at the '''Format '''sub-tab,''' '''is an important addition to OnePager Express. It is used for '''recording''', '''creating''', and '''editing''' '''hidden timespans '''in your chart. '''The Grid''' is also used for '''recording''', '''creating''', and '''editing''' '''all Curtains''' in the chart.
| + | <center>[[File:P70-22_3_5-70-(6)-11042020.png]]</center> |
| | + | <!--<center>P70-22_3_5-70-(6)-11042020.png</center>--> |
| | | | |
| − | For more information on '''Creating, editing, and managing time axis daily curtains''', please see the article at: [[Creating, Editing, and Managing Time Axis Daily Curtains for OnePager Express for Version 7.0 | Creating, Editing, and Managing Time Axis Daily Curtains for OnePager Express]] <!--22.5.6-70-->
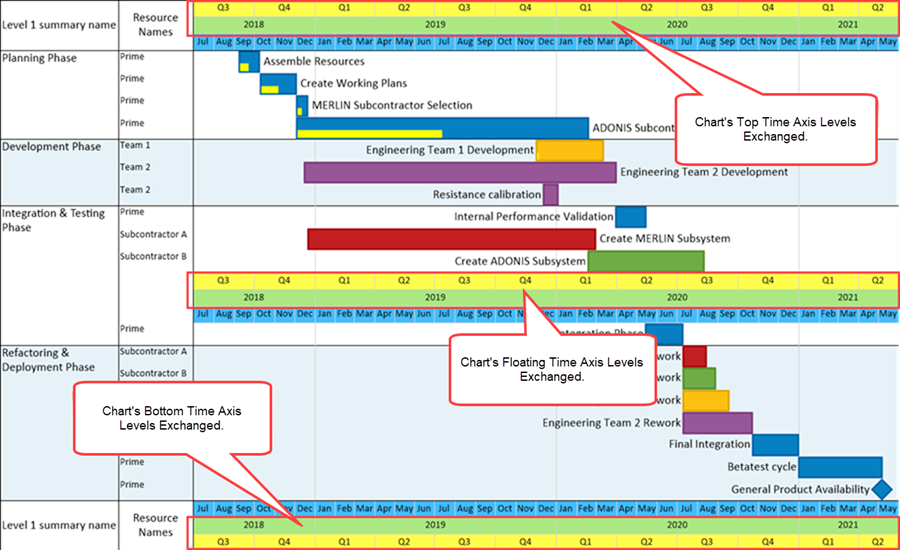
| + | If we use the '''Re-Order Levels''' control group in the '''Chart Properties '''form '''Time Axis '''tab’s '''Top Level '''sub-tab to again '''exchange '''the '''Top Level '''with the '''Middle Level''', the two '''Time Axis '''displays in the chart above with the '''Floating Time Axes '''look like this: |
| | | | |
| − | For the context here, focusing on '''showing ''' and '''hiding Time Axis Cells''', whenever a '''Time Axis Cell '''is '''hidden '''in the chart, an entry is place in '''The Grid''' as follows:
| + | <center>[[File:P70-22_3_5-70-(7)-11042020.png]]</center> |
| | + | <!--<center>P70-22_3_5-70-(7)-11042020.png</center>--> |
| | | | |
| − | ====Hiding Time Axis Cells Example====
| + | Comparing the pair of illustrations above with the '''Floating Time Axes''', it is shown that the Year and Quarter '''Time Axis Tic Units''' in their respective '''Time Axis Levels''' and '''Floating Time Axis Levels '''are '''exchanged'''. |
| | | | |
| − | Suppose we have the chart below and wish to '''hide '''three contiguous '''Time Axis Level Cells '''in the '''Bottom Time Axis Level'''. To do this, select the three '''Time Axis Level Cells''' and right-click on any of them to access the '''time axis''' right-click '''context menu''' shown below:
| + | For more information on the '''Floating Time Axis''', please see the article at: [[The Floating Time Axis Feature for OnePager Pro for Version 7.0 | The Floating Time Axis Feature for OnePager Pro]] <!--22.3.9-70--> |
| | | | |
| − | <center>[[File:X70-22_3_4-70-(3)-11182020.png]]</center>
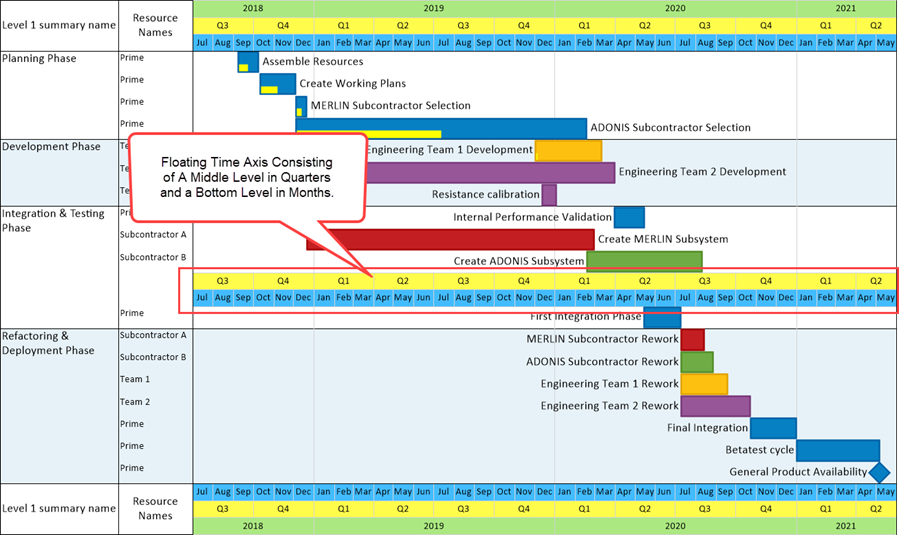
| + | Where the '''Floating Time Axes located''' in the chart do not correspond exactly to those '''Time Axis Levels located '''in the '''Top''' and/or''' Bottom Time Axis locations''', OnePager Pro performs the '''Time Axis Level exchange''' if the '''Floating Time Axis '''has at least one of the corresponding '''Time Axis Levels'''. Suppose the '''Time Axes '''and '''Floating Time Axes '''are configured and '''located '''as shown below where the '''Floating Time Axes '''consist only of Quarters and Months: |
| − | <!--<center>X70-22_3_4-70-(3)-11182020.png</center>-->
| + | |
| | | | |
| − | After clicking the '''Hide cell '''command in the '''time axis''' right-click '''context menu''', the chart looks like this:
| + | <center>[[File:P70-22_3_5-70-(8)-11042020.png]]</center> |
| | + | <!--<center>P70-22_3_5-70-(8)-11042020.png</center>--> |
| | | | |
| − | <center>[[File:X70-22_3_4-70-(4)-11182020.png]]</center>
| + | Performing the '''Time Axis Level re-ordering''' used in the previous examples (i.e., '''Exchanging '''the '''Top Time Axis Level '''with the '''Middle Time Axis Level'''), produces this result in the chart: |
| − | <!--<center>X70-22_3_4-70-(4)-11182020.png</center>-->
| + | |
| | | | |
| − | The three contiguous '''Time Axis Level Cells''' are '''hidden''' at the location in the '''timespan '''shown above. Additionally, an entry is made in '''The Grid''' to record this '''edit''' as shown below:
| + | <center>[[File:P70-22_3_5-70-(9)-11042020.png]]</center> |
| | + | <!--<center>P70-22_3_5-70-(9)-11042020.png</center>--> |
| | | | |
| − | <center>[[File:X70-22_3_4-70-(5)-11182020.png]]</center>
| + | The result above is that the '''Floating Time Axis Top Level '''is '''exchanged '''with the '''Floating Time Axis Middle Level''' as expected. However, since only the '''Middle '''and '''Bottom Floating Time Axes''' were inserted into the chart, the '''exchange''' only shows the Year replacing the Quarters in the '''Floating Time Axis location'''. Since there can be several single or sets of '''Floating Time Axes located''' in the chart, '''exchanges''' of '''Levels''' are consistent depending on the '''Levels''' incorporated into the displayed '''Floating Time Axes'''. |
| − | <!--<center>X70-22_3_4-70-(5)-11182020.png</center>-->
| + | |
| | | | |
| − | There are now three entries in '''The Grid''' showing the properties of each '''hidden Time Axis Level Cell''' including its '''From/To dates''', '''Zoom% '''(discussed elsewhere as noted below), and its '''Priority''' which is a control that helps OnePager to properly restore the '''hidden '''entry to '''show status''' when requested.
| + | For more information on the '''Floating Time Axis''', please see the article at: [[The Floating Time Axis Feature for OnePager Pro for Version 7.0 | The Floating Time Axis Feature for OnePager Pro]] <!--22.3.9-70--> |
| | | | |
| − | ====The Grid's Organization and Controls==== | + | ==Other Related Features== |
| | | | |
| − | The other columns in '''The Grid '''are used as follows:
| + | ===Re-Ordering Time Axis Levels in the Template Properties Form=== |
| | | | |
| − | :1) The column on the left is used for selecting the entry with a left-click which identifies which entry is to be referenced for the '''Delete Timespan''' and '''Copy Timespan '''buttons.
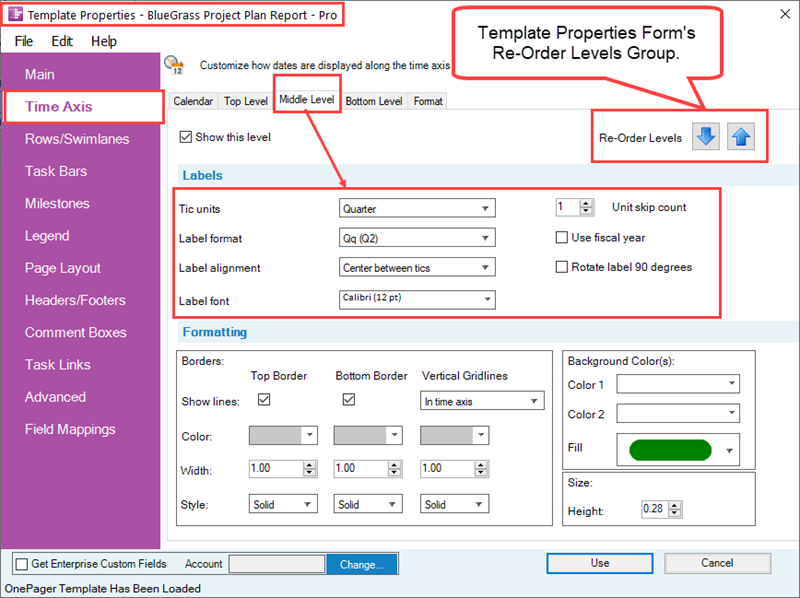
| + | The '''Re-Order Levels''' control group shown in the '''Chart Properties '''form examples above is also available in the '''Template Properties '''form at the '''Time Axis '''tab’s '''Top''', '''Middle''', and '''Bottom Time Axis Levels''': |
| | | | |
| − | :2) The '''ON''' column can be used to '''disable '''the particular '''Grid '''entry by unchecking it. | + | <center>[[File:P70-22_3_5-70-(10-1)-11042020.png]]</center> |
| | + | <!--<center>P70-22_3_5-70-(10-1)-11042020.png</center>--> |
| | | | |
| − | :3) All new '''Grid '''entries are created with the '''ON '''column checkbox checked '''ON'''.
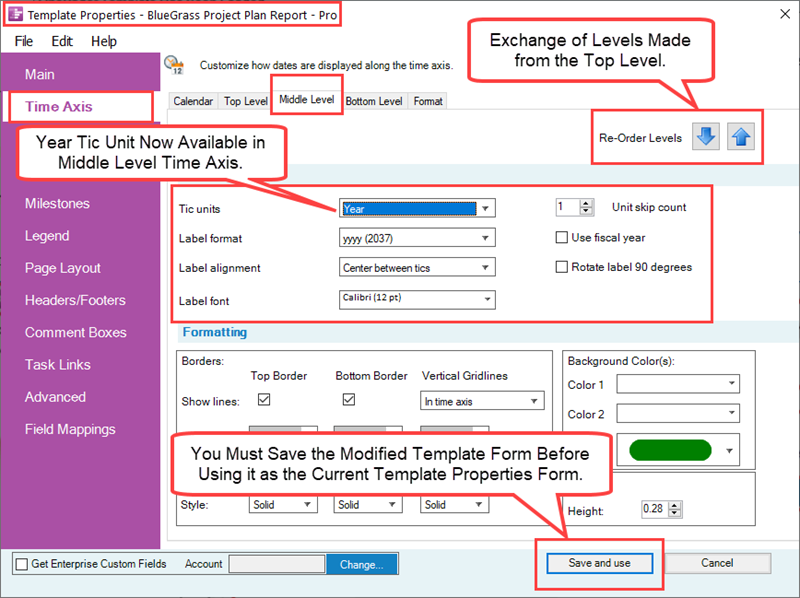
| + | Making '''exchanges''' in the '''Template Properties '''form applies these '''exchanges''' to any '''Chart Properties '''and chart created with the modified '''Template Properties '''form. It is important to remember when making '''edits''' to the '''Template Properties '''form that the form must be '''saved''' before it can be used successfully to create a chart and/or snapshots with the '''Template Properties '''form’s '''edits applied'''. |
| | | | |
| − | :4) When the checkbox is unchecked of '''OFF''', the corresponding '''Time Axis Level Cell''' becomes '''shown '''in the chart when the '''Chart Properties '''form’s '''OK '''or '''Apply '''buttons are clicked. The entry remains in '''The Grid''' if needed in the future.
| + | For more information on the '''Template Properties '''form, please see the article at: [[Managing Templates for Version 7.0 (Portal) | Managing Templates (Portal)]]. 24.0.1-70 |
| | | | |
| − | :5) The '''Show '''column and its checkboxes are used to '''unhide''' the corresponding '''Time Axis Level Cell '''with one click in '''The Grid'''. The entry in '''The Grid''' remains for future use.
| + | ===Re-Ordering Time Axis Levels in Chart Properties Forms Converted into Template Properties Forms=== |
| | | | |
| − | :6) The '''Zoom% '''column represents the '''width '''of the '''hidden Time Axis Level Cell '''as a percentage of the size of other '''Time Axis Cells '''in that '''Level'''.
| + | Conversely, if any '''Chart Properties '''form with '''exchanged Time Axis Levels '''is made into a '''Template Properties '''form and '''saved''', subsequent use of the '''saved''' '''Template Properties '''form utilizes the '''exchanged Time Axis Levels '''in charts and snapshots produced under the modified '''Template Properties '''form. |
| | | | |
| − | For more information on '''Zoom%''', please see the article at: [[The Non-Linear Time Axis Feature for OnePager Express for Version 7.0 | The Non-Linear Time Axis Feature for OnePager Express]] <!--22.3.8-70-->
| + | <center>[[File:P70-22_3_5-70-(11)-11042020.png]]</center> |
| | + | <!--<center>P70-22_3_5-70-(11)-11042020.png</center>--> |
| | | | |
| − | In '''The Grid''', there are three (3) buttons below that are relevant to '''timespans''' that are '''enabled '''when there are '''timespan '''entries in '''The Grid.'''
| + | For more information on '''Making a template from a chart''', please see this section in the article at: [[Managing the Current Template for Version 7.0#Making a Template Properties Form from a Chart | Managing the Current Template - Making a Template Properties Form from a Chart]] <!--24.6.1-70--> |
| − | | + | |
| − | =====Add Timespan to Grid=====
| + | |
| − | | + | |
| − | The '''Add Timespan '''button places a '''timespan '''entry in '''The Grid''' that allows you to create a '''hidden Time Axis Cell '''entry by filling in data for the '''From '''and '''To Dates '''as required. The entry is created with '''From '''and '''To Dates '''that '''spans''' the entire extent of the '''graph'''. However, the '''Show '''column checkbox checked '''ON '''so you have an opportunity to reset or '''edit''' the '''From '''and '''To Dates '''to meet your needs.
| + | |
| − | | + | |
| − | A basic '''Added Timespan entry '''is shown below:
| + | |
| − | | + | |
| − | <center>[[File:X70-22_3_4-70-(6)-11182020.png]]</center>
| + | |
| − | <!--<center>X70-22_3_4-70-(6)-11182020.png</center>-->
| + | |
| − | | + | |
| − | =====Delete Timespan in Grid=====
| + | |
| − | | + | |
| − | The '''Delete Timespan '''button requires that you first select '''The Grid timespan '''entry to be '''deleted''' before clicking the '''Delete Timespan '''button by first clicking the left most column of the desired entry. Then clicking the '''Delete Timespan '''button removes the entry.
| + | |
| − | | + | |
| − | =====Copy Timespan in Grid=====
| + | |
| − | | + | |
| − | The '''Copy Timespan '''button also requires that you first select '''The Grid timespan '''entry that you want to '''copy '''before clicking the '''Copy Timespan '''button by first clicking the left most column of the desired entry. Then clicking the '''Copy Timespan '''button adds a '''copy '''of the selected entry to the bottom of '''The Grid '''as shown here:
| + | |
| − | | + | |
| − | <center>[[File:X70-22_3_4-70-(7)-11182020.png]]</center>
| + | |
| − | <!--<center>X70-22_3_4-70-(7)-11182020.png</center>-->
| + | |
| − | | + | |
| − | ===The Grid and Snapshot-Independence===
| + | |
| − | | + | |
| − | Since '''timespans''' are '''snapshot-independent''', OnePager builds '''The Grid '''for '''timespans''' uniquely for each snapshot that you access in the '''Chart Editor'''. As such, '''timespans '''can be '''hidden''' in one snapshot and '''shown''' in another all under your control.
| + | |
| − | | + | |
| − | For more information on '''the relationship between charts and snapshots''', please see the article at: [[Understanding Charts and Snapshots for OnePager Express for Version 7.0 | Understanding Charts and Snapshots for OnePager Express]] <!--4.0.1.2-70--> | + | |
| − | | + | |
| − | ===The Template Properties Form’s Timespan Grid===
| + | |
| − | | + | |
| − | The '''Template Properties '''form '''Time Axis '''tab '''Format '''sub-tab has the same capabilities for '''The Grid''' as the '''Chart Properties '''form. In the '''Template Properties''' form, '''The Timespan Grid''' is used to define '''hidden Time Axis Cells''' that you want '''not to show '''in every chart created using that particular '''Template Properties '''form. This is one way that '''hidden Time Axis Level Cells''' are created '''globally'''.
| + | |
| − | | + | |
| − | ==Manually Hiding Timespans in the Chart==
| + | |
| − | | + | |
| − | In the section above, the discussion primarily focused on using '''The Grid''' for '''global hiding''' and '''showing '''of '''Time Axis Level Cells'''. Using '''The Grid''' in this manner is useful when your schedule discussion presentation plan is to '''hide '''certain '''Time Axis Level Cells '''in all snapshots by making the appropriate '''Grid entries '''in the '''Template Properties '''form '''Time Axis''' tab '''Format '''sub-tab’s '''Grid'''. When you use the '''Template Properties '''form’s related capabilities in this way, '''The Grid''' is a convenient short cut. In addition to using '''The Grid''' in the '''Template Properties '''and '''Chart Properties''' forms for '''creating''' and '''editing''' '''hidden Time Axis Level Cells''', OnePager Express, as mentioned earlier, provides you with manual '''editing''' capabilities as well.
| + | |
| − | | + | |
| − | These capabilities are discussed in the sections that follow.
| + | |
| − | | + | |
| − | ===Hiding Time Axis Level Cells in One Time Axis Level===
| + | |
| − | | + | |
| − | You have the capability, as discussed in the first section of this article to select '''Time Axis Level Cells '''at any '''Level''' and '''hide '''them by first selecting the '''cell''' or '''cells''' and right-clicking to access the '''time axis''' right-click '''context menu''' as shown here:
| + | |
| − | | + | |
| − | <center>[[File:X70-22_3_4-70-(3)-11182020.png]]</center>
| + | |
| − | <!--<center>X70-22_3_4-70-(3)-11182020.png</center>-->
| + | |
| − | | + | |
| − | After clicking the '''Hide cell '''command above, the chart looks like this:
| + | |
| − | | + | |
| − | <center>[[File:X70-22_3_4-70-(4)-11182020.png]]</center>
| + | |
| − | <!--<center>X70-22_3_4-70-(4)-11182020.png</center>-->
| + | |
| − | | + | |
| − | The '''hidden Time Axis Level Cells''' are not shown in the chart and any task bars/milestone symbols or portions of the '''graph''' occupying the '''hidden timespan''' are also '''hidden'''.
| + | |
| − | | + | |
| − | There are several conditions that should be kept in mind. '''Decorations '''on task bars/milestone symbols remain visible if any portion of a task bar/milestone symbol remains visible in the chart after a corresponding '''Time Axis Level Cell''' or '''Cells '''are '''hidden.''' If there are '''Free Boxes''' in the chart that occupy the '''timespan '''that is going to be '''hidden''', that '''Free Box''' or '''Boxes''' are relocated by OnePager so they remain visible. You can subsequently '''select''' them and manually '''relocate''' them where needed. If there are attached '''Comment Boxes''' associated with task bars/milestone symbols that are partially '''hidden '''by '''hiding '''certain '''Time Axis Cells''', the '''Comment Boxes '''remain visible and are relocated by OnePager as long as any portion of the parent task bar/milestone symbol is visible in the chart. If a task bar/milestone symbol is completely '''hidden''' by '''hiding Time Axis Level Cells''', the associated '''Comment Boxes''' are no longer visible.
| + | |
| − | | + | |
| − | ===Hiding Cells in a Time Axis Level with Timespans in a Lower Level===
| + | |
| − | | + | |
| − | As a further example, if we '''hide''' a greater extent of the total chart’s '''timespan''', it is more likely that entire task bars/milestone symbols are '''hidden '''as shown here where two Quarters in '''Middle Level Time Cell '''are '''hidden''':
| + | |
| − | | + | |
| − | <center>[[File:X70-22_3_4-70-(8)-11182020.png]]</center>
| + | |
| − | <!--<center>X70-22_3_4-70-(8)-11182020.png</center>-->
| + | |
| − | | + | |
| − | There are two '''timespan '''entries in '''The Grid '''to reflect this action because only two '''Middle Level Time Axis Cells '''were '''hidden'''. '''The Grid''' is shown below:
| + | |
| − | | + | |
| − | <center>[[File:X70-22_3_4-70-(9)-11182020.png]]</center>
| + | |
| − | <!--<center>X70-22_3_4-70-(9)-11182020.png</center>-->
| + | |
| − | | + | |
| − | OnePager also keeps track of any task bars/milestone symbols that are '''hidden''' as a result of the action taken to '''hide '''the two Quarters in the Middle Level Time Axis'''. Examining the chart above reveals that some '''rows '''in the chart can become '''empty''' as a result of the '''Time Axis Level Cell '''becoming '''hidden'''. OnePager does not automatically '''hide '''(previously called '''crop''') empty '''rows'''.
| + | |
| − | | + | |
| − | ===Using the Where’s My Stuff?! Form===
| + | |
| − | | + | |
| − | You can access the '''Where’s My Stuff?! '''form to see the list of '''hidden''' task bars and milestone symbols by going to the OnePager '''Home ''' ribbon tool bar tab and clicking the '''Show/Hide '''dropdown and clicking the '''Where’s My Stuff?! '''command as shown below:
| + | |
| − | | + | |
| − | <center>[[File:X70-22_3_4-70-(9A)-11182020.png]]</center>
| + | |
| − | <!--<center>X70-22_3_4-70-(9A)-11182020.png</center>-->
| + | |
| − | | + | |
| − | Accessing the '''Where’s My Stuff?! '''form shows the '''hidden '''task bars and milestone symbols and the reason for them to be '''hidden''' as shown below:
| + | |
| − | | + | |
| − | <center>[[File:X70-22_3_4-70-(10)-11182020.png]]</center>
| + | |
| − | <!--<center>X70-22_3_4-70-(10)-11182020.png</center>-->
| + | |
| − | | + | |
| − | For more information on using the '''Where’s My Stuff?! '''form, please see the article at: [[Managing Hidden Tasks and Milestones Using "Where's My Stuff?!" for Version 7.0 | Managing Hidden Tasks and Milestones Using "Where's My Stuff?!"]] <!--9.4.1-70-->
| + | |
| − | | + | |
| − | If you use the '''Where’s My Stuff?! '''form to '''Fix Selected '''entries, doing so results in the '''hidden timespan '''becoming '''shown''' along with any '''hidden timespans '''in '''Time Axis Levels below the hidden timespan '''being '''fixed'''. Should additional '''hidden '''task bars and milestone symbols become '''shown''' in this operation, the '''Where’s My Stuff?! '''form is appropriately updated to reflect the correct '''show/hide status''' of task bars and milestone symbols in the chart.
| + | |
| − | | + | |
| − | ===Hiding Timespans in the Floating Time Axis===
| + | |
| − | | + | |
| − | Briefly, if '''Floating Time Axes''' are present in the chart and you '''hide '''a '''Time Axis Level Cell(s)''', the corresponding '''Floating Time Axis Level Cell(s)''' are also '''hidden '''by the same action. Conversely, if you select and '''hide''' a '''Floating Time Axis Cell(s)''', the corresponding '''Time Axis Level Cell(s) '''are also '''hidden'''. '''The Grid''', given either of the above two actions only contains a '''timespan '''entry representing the '''hidden timespan''' for the '''Time Axis Level Cell(s) hidden'''.
| + | |
| − | | + | |
| − | For more information on the '''Floating Time Axis '''feature, please see the article at: [[The Floating Time Axis Feature for OnePager Express for Version 7.0 | The Floating Time Axis Feature for OnePager Express]] <!--22.3.10-70-->
| + | |
| − | | + | |
| − | ==Formatting Individual Time Axis Level Cells==
| + | |
| − | | + | |
| − | In addition to being able to manually '''hide Time Axis Level Cells''', you also have additionally '''editing '''capabilities for '''Time Axis Level Cells '''and some of their properties. These additional '''editing''' capabilities include being able to '''format properties '''of a '''Time Axis Level Cell''', '''Unstretch all cells '''(explained fully elsewhere), access the '''Chart Properties '''form '''Time Axis '''tab at the corresponding '''Level '''sub-tab, and '''insert a curtain''' corresponding to the '''From/To Dates '''of the selected '''Time Axis Level Cell(s)'''. Some of these capabilities are explained below.
| + | |
| − | | + | |
| − | The remaining capabilities can be found by going to these articles:
| + | |
| − | | + | |
| − | <center>
| + | |
| − | {| class="wikitable"
| + | |
| − | | [[The Non-Linear Time Axis Feature for OnePager Express for Version 7.0 | The Non-Linear Time Axis Feature for OnePager Express]] <!--22.3.8-70-->
| + | |
| − | |-
| + | |
| − | | [[Creating, Editing, and Managing Time Axis Daily Curtains for OnePager Express for Version 7.0 | Creating, Editing, and Managing Time Axis Daily Curtains for OnePager Express]] <!--22.5.6-70-->
| + | |
| − | |}
| + | |
| − | </center>
| + | |
| − | | + | |
| − | ===Using the Format Cell Command and the Time Axis Cell Properties Form===
| + | |
| − | | + | |
| − | '''Time Axis Level Cells''' as well as '''Floating Time Axis Level Cells''' can be '''Formatted''' by manually selecting one or more '''Cells '''and right-clicking on the selected '''Cell(s)''' to access the '''time axis''' right-click '''context menu''' shown below:
| + | |
| − | | + | |
| − | <center>[[File:X70-22_3_4-70-(11)-11182020.png]]</center>
| + | |
| − | <!--<center>X70-22_3_4-70-(11)-11182020.png</center>-->
| + | |
| − | | + | |
| − | Clicking the '''Format cell …''' command accesses the '''Time Axis Cell Properties''' form as shown below where you can '''edit''' some of the most important '''properties '''of the selected '''Cell(s)''':
| + | |
| − | | + | |
| − | <center>[[File:X70-22_3_4-70-(12)-11182020.png]]</center>
| + | |
| − | <!--<center>X70-22_3_4-70-(12)-11182020.png</center>-->
| + | |
| − | | + | |
| − | In the '''Time Axis Cell Properties''' form there are two familiar controls – '''Color '''and '''Font'''. Clicking the '''Color''' dropdown accesses the Standard '''Color Chooser '''form that is used to change the '''background color''' of the selected '''Time Axis Level Cell''' or '''Cells'''. Clicking the '''Font '''dropdown accesses the Standard '''Font properties '''form so that you can '''edit''' the text content of the selected '''Time Axis Level Cells.''' The '''Zoom% '''dial control and the associated '''Cell width '''window are used in the '''Time Axis Cell Properties''' form to manually '''stretch '''or '''compress '''the '''width '''of the selected '''Time Axis Level Cell(s)'''.
| + | |
| − | | + | |
| − | For more information on the '''Zoom% '''feature, please see the article at: [[The Non-Linear Time Axis Feature for OnePager Express for Version 7.0 | The Non-Linear Time Axis Feature for OnePager Express]] <!--22.3.8-70-->
| + | |
| − | | + | |
| − | Attempting to set the '''Zoom%''' in the '''Time Axis Cell Properties''' form to zero (0) or a negative '''Zoom% '''value is not accepted by OnePager Express. Instead, OnePager sets the '''Zoom% '''value for entries values less than or equal to zero to a '''Zoom% '''value of 2.0 percent. Making any '''edits''' to the selected '''Time Axis Level Cells''' using the '''Time Axis Cell Properties''' form '''edits''' only these selected '''Cells'''. After the '''edits''' are made, the selected '''Cells''' are considered '''mavericks'''. Likewise, if you use the '''drag and drop method''' to alter the '''width '''of selected '''Time Axis Level Cell(s)''', these also cause the selected '''Cells''' to be treated as '''mavericks'''. Selecting any '''maverick Time Axis Level Cell''' using the procedure above and clicking the '''Use default properties''' button in the '''Time Axis Cell Properties '''form shown above restores the selected '''Cells''' to the '''global''' '''properties''' established in the '''Chart Properties '''form.
| + | |
| − | | + | |
| − | ===Accessing the Chart Properties Form from a Time Axis Level Cell===
| + | |
| − | | + | |
| − | Clicking the '''Time-axis properties… '''command in the '''time axis''' right-click '''context menu '''accesses the '''Chart Properties''' form at the '''Time Axis '''tab and the sub-tab for the '''Time Axis Level '''you selected. Selecting a '''Time Axis Level Cell''' from the '''Bottom Level''' and right-clicking the '''Cell '''accesses the '''time axis''' right-click '''context menu '''where you can then click the '''Time-axis properties… '''command:
| + | |
| − | | + | |
| − | <center>[[File:X70-22_3_4-70-(13-1)-11182020.png]]</center>
| + | |
| − | <!--<center>X70-22_3_4-70-(13-1)-11182020.png</center>--> | + | |
| − | | + | |
| − | Clicking the '''Time-axis properties… '''command accesses the '''Chart Properties''' form’s '''Time Axis '''tab for the '''Bottom Level''' as shown below:
| + | |
| − | | + | |
| − | <center>[[File:X70-22_3_4-70-(14)-11182020.png]]</center>
| + | |
| − | <!--<center>X70-22_3_4-70-(14)-11182020.png</center>-->
| + | |
| − | | + | |
| − | By using the '''Chart Properties '''form in this way you are able to '''edit''' the '''global properties''' of all '''Time Axis Level Cells '''in the '''Time Axis Level '''selected. You can also use the sub-tabs in the form above to go to other '''Time Axis Levels''', to the '''Calendar '''sub-tab or the '''Format '''sub-tab.
| + | |
| − | | + | |
| − | ===Manually Editing the Width of Time Axis Level Cells (Stretching and Compressing)===
| + | |
| − | | + | |
| − | ====Selecting Time Axis Level Cells in a Single Level====
| + | |
| − | | + | |
| − | '''Time Axis Level Cells''' can be '''stretched '''or '''compressed''' manually by first selecting the '''Cell''' with a left-click and using the '''handlebars''' to '''drag''' the selection rectangle to the desired '''width''' as shown here:
| + | |
| − | | + | |
| − | <center>[[File:X70-22_3_4-70-(15)-11182020.png]]</center>
| + | |
| − | <!--<center>X70-22_3_4-70-(15)-11182020.png</center>-->
| + | |
| − | | + | |
| − | If you use your mouse to click on the right '''handlebar''' and '''drag''' it to the right, when you release the mouse left-click button, the selected '''Time Axis Level Cell''' looks like this:
| + | |
| − | | + | |
| − | <center>[[File:X70-22_3_4-70-(16)-11182020.png]]</center>
| + | |
| − | <!--<center>X70-22_3_4-70-(16)-11182020.png</center>-->
| + | |
| − | | + | |
| − | You can use '''time axis '''right-click '''context menu''' and the '''Format cell…''' command to see the new value of the '''Zoom%''' which is the amount of '''stretch''' applied by the '''drag and drop method''' to the selected '''Cell''' as shown here:
| + | |
| − | | + | |
| − | <center>[[File:X70-22_3_4-70-(17)-11182020.png]]</center>
| + | |
| − | <!--<center>X70-22_3_4-70-(17)-11182020.png</center>-->
| + | |
| − | | + | |
| − | In addition to the '''Time Axis Cell Properties '''form’s '''Zoom% '''and '''Cell width '''windows being updated by the '''Time Axis Level Cell stretch '''action above, there is an entry placed in '''The Grid''' as well:
| + | |
| − | | + | |
| − | <center>[[File:X70-22_3_4-70-(18)-11182020.png]]</center>
| + | |
| − | <!--<center>X70-22_3_4-70-(18)-11182020.png</center>-->
| + | |
| − | | + | |
| − | ====Selecting Time Axis Level Cells in Multiple Levels====
| + | |
| − | | + | |
| − | You can use your mouse to select '''Time Axis Level Cells '''in different '''Time Axis Levels''' by using the '''CTL+Left-Click method '''as shown here:
| + | |
| − | | + | |
| − | <center>[[File:X70-22_3_4-70-(19)-11182020.png]]</center>
| + | |
| − | <!--<center>X70-22_3_4-70-(19)-11182020.png</center>-->
| + | |
| − | | + | |
| − | Above, there are five (5) '''Time Axis Level Cells''' selected in the order shown.
| + | |
| − | | + | |
| − | Although there are five (5) '''Time Axis Level Cells '''selected above, you can only '''stretch '''or '''compress '''selected '''Cell '''using the '''drag and drop method '''in '''one Time Axis Level only '''as shown below:
| + | |
| − | | + | |
| − | <center>[[File:X70-22_3_4-70-(20)-11182020.png]]</center>
| + | |
| − | <!--<center>X70-22_3_4-70-(20)-11182020.png</center>-->
| + | |
| − | | + | |
| − | If you now use the mouse to '''stretch '''the 2018 Quarter 3 '''Middle Time Axis Level Cell''', OnePager '''de-selects''' all selected '''Time Axis Level Cells''' highlighted in other '''Time Axis Levels''' such that only the '''Middle Time Axis Level Cells''' that are candidates for '''stretching''' remain selected. On the other hand, if you start to '''stretch '''the '''Bottom Level''' '''Time Axis Cells''', OnePager '''de-selects''' the '''Middle Level Time Axis Cells''' before performing the desired '''stretch''' as shown below:
| + | |
| − | | + | |
| − | <center>[[File:X70-22_3_4-70-(21)-11182020.png]]</center>
| + | |
| − | <!--<center>X70-22_3_4-70-(21)-11182020.png</center>-->
| + | |
| − | | + | |
| − | ====Selecting A Sequence of Multiple Time Axis Level Cells====
| + | |
| − | | + | |
| − | You can also select a sequential set of '''Time Axis Cells''' in the same '''Level '''by using the '''SHIFT+Left-Click''' keys as shown below:
| + | |
| − | | + | |
| − | <center>[[File:X70-22_3_4-70-(22)-11182020.png]]</center>
| + | |
| − | <!--<center>X70-22_3_4-70-(22)-11182020.png</center>-->
| + | |
| − | | + | |
| − | Once the set of '''Time Axis Level Cells''' are selected anyone of them can be used to '''stretch '''or '''compress '''the set as shown here:
| + | |
| − | | + | |
| − | <center>[[File:X70-22_3_4-70-(23)-11182020.png]]</center>
| + | |
| − | <!--<center>X70-22_3_4-70-(23)-11182020.png</center>-->
| + | |
| − | | + | |
| − | The general rule is that you cannot '''stretch '''multiple '''Time Axis Level Cells''' that are selected in '''multiple Time Axis Levels'''.
| + | |
| − | | + | |
| − | ===Unstretching Time Axis Level Cells ===
| + | |
| − | | + | |
| − | Clicking the '''Unstretch all cells '''command in the '''time axis''' right-click '''context menu''' causes OnePager to “normalize” all previously '''stretched '''or '''compress cells '''to their original '''Cell widths'''.
| + | |
| − | | + | |
| − | The '''Unstretch all cells '''command is shown below:
| + | |
| − | | + | |
| − | <center>[[File:X70-22_3_4-70-(24)-11182020.png]]</center>
| + | |
| − | <!--<center>X70-22_3_4-70-(24)-11182020.png</center>-->
| + | |
| − | | + | |
| − | When the command is clicked, all '''stretched''' or''' compressed Time Axis Level Cells '''on '''all''' '''Time Axes '''and '''Floating Time Axes''' as shown in the illustration above are returned to their original '''widths''' and the '''Document’s width''' is returned back to its original '''size''' before any '''Time Axis Level Cells '''are '''stretched''' or '''compressed'''.
| + | |
| − | | + | |
| − | <center>[[File:X70-22_3_4-70-(25)-11182020.png]]</center>
| + | |
| − | <!--<center>X70-22_3_4-70-(25)-11182020.png</center>-->
| + | |
| − | | + | |
| − | Another result of using the '''Unstretch all cells''' command is that any entries in '''The Grid '''related to '''stretched Time Axis Level Cells '''are '''deleted''' for the snapshot in the '''Chart Editor'''.
| + | |
| − | | + | |
| − | ===Using the Time Axis Right-Click Context Menu’s Insert Curtain Command===
| + | |
| − | | + | |
| − | It can be advantageous from time to time to insert a '''Curtain''' into the chart that has exactly the same '''Start/End Date boundaries''' as a particular '''Time Axis Level Cell '''or '''Cells'''. For example, it can be necessary to highlight a particular Quarter as important in a schedule conversation. '''Time Axis Level Cell '''related '''Curtains''' can be added to the chart using the right-click on '''time axis''' right-click '''context menu '''and its '''Insert curtain '''command. To insert a '''Curtain '''with '''Time Axis Level Cell boundaries''', first select the '''Cell '''or '''Cells''' to access the '''time axis''' right-click '''context menu''' as shown below:
| + | |
| − | | + | |
| − | <center>[[File:X70-22_3_4-70-(26)-11182020.png]]</center>
| + | |
| − | <!--<center>X70-22_3_4-70-(26)-11182020.png</center>-->
| + | |
| − | | + | |
| − | When you click the '''Insert curtain''' command a basic '''Curtain '''is inserted into the chart with '''Start/End Date boundaries''' the same as those for the selected '''Time Axis Level Cell''' as shown here:
| + | |
| − | | + | |
| − | <center>[[File:X70-22_3_4-70-(27)-11182020.png]]</center>
| + | |
| − | <!--<center>X70-22_3_4-70-(27)-11182020.png</center>-->
| + | |
| − | | + | |
| − | The '''Insert curtain time axis''' right-click '''context menu '''command only creates a single '''Curtain'''. If multiple '''Time Axis Level Cells '''are selected, either in one '''Time Axis Level''' or multiple '''Levels''', the '''Insert curtain''' command is '''disabled'''.
| + | |
| − | | + | |
| − | For more information on '''inserting curtains''' into the chart, please see the article at: [[Creating, Editing, and Managing Time Axis Daily Curtains for OnePager Express for Version 7.0 | Creating, Editing, and Managing Time Axis Daily Curtains for OnePager Express]] <!--22.5.6-70-->
| + | |
| − | | + | |
| − | ==Notes on Selecting Time Axis Level Cells==
| + | |
| − | | + | |
| − | Using a combination of the '''CTL+Left-Click''' and the '''SHIFT+Left-Click''' is restricted. You can use the '''CTL+Left-Click''' to select any '''Time Axis Level Cell '''in any '''Level'''. However, attempting to '''stretch '''a single '''Time Axis Level Cell''' when '''cells '''are selected in two or more '''Levels''' results in only the selected '''cell '''being '''stretched'''. The selected '''Time Axis Level Cells''' in other '''Levels''' are '''de-selected'''.
| + | |
| − | | + | |
| − | You can use the '''SHIFT+Left-Click''' to select a series of '''Time Axis Level Cells''' that are all in the same '''Level'''. This results in a contiguous series of '''Time Axis Level Cells '''being selected all of which can be '''edited''' as one or '''stretched '''or '''compressed''' together. When you have a contiguous series of '''Time Axis Level Cells''' selected you can right-click on any one of them to access the '''time axis''' right-click '''context menu'''.
| + | |
| − | | + | |
| − | You can use the '''CTL+Left-Click '''in multiple '''Time Axis Levels '''and then any attempts to utilize the '''SHIFT+Left-Click''' only work if the contiguous '''Time Axis Level Cells '''being selected are in '''one''' '''Time Axis Level'''. Attempting to use the '''SHIFT+Left-Click''' across two or more '''Levels''' is not honored. For example, suppose you use the '''CTL+Left-Click '''to select several '''cells''' each in the '''Bottom Level Time Axis''' and the '''Middle Level Time Axis''' all the while holding the '''CTL '''Key down. This results in the clicked '''Time Axis Level Cells''' in the two '''Levels''' being selected.
| + | |
| − | | + | |
| − | Attempting to use the '''SHIFT+Left-Click '''in either the '''Bottom Level''' or the '''Middle Level Time Axes''' results in contiguous '''cells''' being selected. If, however, after multiple '''Time Axis Level Cells''' are selected in the '''Bottom''' and '''Middle''' '''Time Axis Levels''', attempting to use the '''SHIFT+Left-Click '''in the '''Top Level Time Axis''' is not honored although the previously selected '''cells''' remain selected.
| + | |
| | | | |
| | ==Related Links== | | ==Related Links== |
| | | | |
| − | [[Creating, Editing, and Managing Time Axis Daily Curtains for OnePager Express for Version 7.0 | Creating, Editing, and Managing Time Axis Daily Curtains for OnePager Express]] <!--22.5.6-70-->
| + | [[The Floating Time Axis Feature for OnePager Pro for Version 7.0 | The Floating Time Axis Feature for OnePager Pro]] <!--22.3.9-70--> |
| − | | + | |
| − | [[The Non-Linear Time Axis Feature for OnePager Express for Version 7.0 | The Non-Linear Time Axis Feature for OnePager Express]] <!--22.3.8-70--> | + | |
| − | | + | |
| − | [[Understanding Charts and Snapshots for OnePager Express for Version 7.0 | Understanding Charts and Snapshots for OnePager Express]] <!--4.0.1.2-70-->
| + | |
| | | | |
| − | [[Managing Hidden Tasks and Milestones Using "Where's My Stuff?!" for Version 7.0 | Managing Hidden Tasks and Milestones Using "Where's My Stuff?!"]] <!--9.4.1-70--> | + | [[Managing Templates for Version 7.0 (Portal) | Managing Templates (Portal)]] <!--24.0.1-70v |
| | | | |
| − | [[The Floating Time Axis Feature for OnePager Express for Version 7.0 | The Floating Time Axis Feature for OnePager Express]] <!--22.3.10-70--> | + | [[Managing the Current Template for Version 7.0 | Managing the Current Template]] <!--24.6.1-70--> |
| | | | |
| − | (22.3.4-70) | + | (22.3.5-70) |
| | | | |
| | [[Category:Version 7.0]] | | [[Category:Version 7.0]] |
| − | [[Category:OnePager Express]] | + | [[Category:OnePager Pro]] |
| | [[Category:Editing the Chart]] | | [[Category:Editing the Chart]] |
| | [[Category:Charts]] | | [[Category:Charts]] |
| Line 345: |
Line 111: |
| | [[Category:Time Axis Tab]] | | [[Category:Time Axis Tab]] |
| | [[Category:Floating Time Axis]] | | [[Category:Floating Time Axis]] |
| − | [[Category:Non-Linear Time Axis]] | + | [[Category:Color Palettes]] |
| − | [[Category:Curtains]]
| + | |
| − | [[Category:Ribbon]]
| + | |
| | [[Category:Snapshots]] | | [[Category:Snapshots]] |
| − | [[Category:Snapshot Independent]]
| |
| − | [[Category:Task/Milestone]]
| |
| | [[Category:Template]] | | [[Category:Template]] |
| | [[Category:Chart Properties]] | | [[Category:Chart Properties]] |
