Difference between revisions of "Testing Article1"
| Line 1: | Line 1: | ||
| − | ==About | + | ==About Using Enterprise Custom Fields== |
| − | + | OnePager Pro ('''OPP''') offers access to Microsoft Project Server’s Enterprise Custom Fields ('''ECF'''). You can use these fields to determine '''swimlanes, colors, flagging of tasks, and other properties'''. | |
| − | For | + | For some basic information on Microsoft Project Server's Enterprise Custom Fields, please see the website article at: [https://www.onepager.com/tips/project-online/create-enterprise-custom-field-pwa.html Create a new enterprise custom field in Project Server or Project Online] |
| − | + | This article covers how to log-in to your Microsoft Project Server accounts and how to access your '''ECF''' data through '''OPP's Template Properties''' form. | |
| − | + | ==Logging-in to Your Microsoft Project Server Account from Microsoft Project Professional== | |
| − | + | You can '''always''' log-in to your Microsoft Project Server account from Microsoft Project. Once you are logged-in, you can follow the steps below from that point, where OnePager Pro ('''OPP''') is launched, and access the '''Template Properties''' form to access your '''ECF''' data. | |
| − | === | + | ===Logging-in to Your Microsoft Project Server Account through the OnePager Pro Add-in=== |
| − | + | Logging-in to your Microsoft Project Server Account can also be done directly from the '''OPP Add-in''' application. | |
| − | + | Launch Microsoft Project Professional and load the Microsoft Project '''source plan''' desired from its storage location. | |
| − | + | Click the '''Template Properties''' button on the Microsoft Project '''Add-in''' tab which accesses the '''OPP Template Properties''' form shown below: | |
| − | + | <center>[[File:P70-24_3_1-70-(1)-12022020.png]]</center> | |
| + | <!--<center>P70-24_3_1-70-(1)-12022020.png</center>--> | ||
| − | + | The bottom of the form above contains the '''Get Enterprise Custom Fields''' checkbox and the window used in conjunction with the '''Change''' button that helps you to access and manage your Microsoft Project Server Accounts. This method does not apply when using the OnePager Pro '''Desktop''' application. | |
| − | == | + | ===Accessing Your Microsoft Project Server’s Enterprise Custom Fields - OnePager Pro Add-in=== |
| − | + | When you check the '''Get Enterprise Custom Fields''' checkbox to '''ON''', OnePager checks to see if it is already logged-in to your Microsoft Project Server account. If so, the '''ECF''' data are loaded into the '''Template Properties''' form’s dropdown list of fields as shown below: | |
| − | <center>[[File: | + | <center>[[File:P70-24_3_1-70-(7)-12022020.png]]</center> |
| − | <!--<center> | + | <!--<center>P70-24_3_1-70-(7)-12022020.png</center>--> |
| − | + | If OnePager is not already logged-in, '''OPP Add-in''' attempts to log-in using the '''URL''' for whatever Microsoft Project Server account Microsoft Project is connected to. If OnePager finds that Microsoft Windows has stored '''default credentials''' for Microsoft Project to log-in to Microsoft Project Server, OnePager attempts to use these '''credentials''' without prompting you and without ever actually knowing the username and password. If successful, OnePager '''creates''' a OnePager log-in account with just the '''URL''' but with no username and password. | |
| − | <center>[[File: | + | <center>[[File:P70-24_3_1-70-(3)-12022020.png]]</center> |
| − | <!--<center> | + | <!--<center>P70-24_3_1-70-(3)-12022020.png</center>--> |
| − | + | Once OnePager connects to your Microsoft Project Server server account, it retrieves the '''ECF''' data and displays a success message, '''Added Enterprise Custom Fields''', as shown here: | |
| − | + | <center>[[File:P70-24_3_1-70-(4)-12022020.png]]</center> | |
| + | <!--<center>P70-24_3_1-70-(4)-12022020.png</center>--> | ||
| − | + | The '''ECF''' data are now loaded into the dropdown lists as shown above. | |
| − | + | You can now select the '''ECF''' for various purposes such as for controlling '''(1) rows/swimlane organization, (2) selection of task bar/milestone symbol colors, or (3) Field Mappings selections''' on the '''Template Properties''' form's '''Advanced''' tab. When you click the '''Save and use''' button, the action makes the '''Template Properties''' form with the '''ECF''' data the '''current Template Properties''' form. It now can be used to create a '''NEW''' chart or '''UPDATE/OPEN''' an existing one. | |
| − | + | When a new chart is '''created''' using the desired '''ECF''' information, you can '''open''' the chart, access the '''Chart Properties''' form, and make '''edits''' to the row/swimlane organization as described above by selecting the desired '''ECF''' now available. As a '''note''', other '''ECF’s''' are not available to you unless you already included them in some mapping in the original '''Template Properties''' form. | |
| − | + | For more information on the '''Field Mappings Tab'''. please see the article at: [[Template Only Features for Version 7.0 (OnePager Pro) | Template Only Features for OnePager Pro]] <!--24.1.1-70--> | |
| − | <!-- | + | |
| − | + | A similar approach using the '''OPP Add-in''' application can be used to '''UPDATE''' a chart build with '''ECF’s'''. The '''note''' in the previous paragraph also applies. | |
| − | == | + | ===Suspending the Use of Enterprise Custom Fields=== |
| − | + | To '''suspend''' the use of '''Enterprise Custom Fields''', uncheck the '''Get Enterprise Custom Fields''' checkbox to '''OFF''' and click '''Save and use''' on the '''Template Properties''' form. This action '''removes''' the '''ECF’s''' from the '''Template Properties''' form's dropdown lists so that '''creating and updating''' charts can take place with these '''Template Properties''' forms without the '''ECF’s'''. | |
| − | + | ==Logging-in to Your Microsoft Project Server Account through the OnePager Pro Desktop== | |
| − | + | ||
| − | + | Logging-in to your Microsoft Project Server Account can also be done from the OnePager Pro '''Desktop''' application as well as the '''Add-in''' application. | |
| − | + | To do this, launch '''OPP''' from the '''Desktop icon'''. The log-in is performed in the '''Template Properties''' form. You can access the '''Template Properties''' form for the '''OPP Desktop''' application by clicking the '''File''' tab on the ribbon and then clicking the '''Options''' tab. This accesses the '''OnePager Options''' page where you’ll find the '''Template''' button in the lower right of the page. Clicking the '''Template''' button which accesses the '''Template Properties''' form shown below: | |
| − | + | <center>[[File:P70-24_3_1-70-(1)-12022020.png]]</center> | |
| + | <!--<center>P70-24_3_1-70-(1)-12022020.png</center>--> | ||
| − | + | ===Accessing Your Microsoft Project Server’s Enterprise Custom Fields - OnePager Desktop=== | |
| − | + | ||
| − | + | Now, check the '''Get Enterprise Custom Fields''' checkbox to '''ON''' and the '''OPP Desktop''' application accesses the log-in form shown below: | |
| − | + | <center>[[File:P70-24_3_1-70-(3)-12022020.png]]</center> | |
| + | <!--<center>P70-24_3_1-70-(3)-12022020.png</center>--> | ||
| − | + | Once you enter your '''credentials''', click the '''OK''' button to attempt the '''connection'''. The '''OPP Desktop''' application logs into your account and download your '''ECF''' information into the '''Template Properties''' form’s dropdown lists as shown below: | |
| − | + | <center>[[File:P70-24_3_1-70-(7)-12022020.png]]</center> | |
| + | <!--<center>P70-24_3_1-70-(7)-12022020.png</center>--> | ||
| − | + | When the '''OPP Desktop''' application is launched and running, Microsoft Project is '''not running''' so it is not possible to connect to your Microsoft Project Server account through Microsoft Project. If the '''OPP Desktop''' application is '''not able to connect''' to the Microsoft Project Server you’ve requested, a message appears at the bottom of the '''Template Properties''' form as shown below: | |
| − | <center>[[File: | + | <center>[[File:P70-24_3_1-70-(8)-12022020.png]]</center> |
| − | <!--<center> | + | <!--<center>P70-24_3_1-70-(8)-12022020.png</center>--> |
| − | + | Once you are logged-in to your Microsoft Project Server account through the '''OPP Desktop''' application, all features and functions with respect to '''ECF''' are available as if you were using the '''OPP Add-in''' application. | |
| − | + | ||
| − | + | ||
| − | + | ||
| − | + | ||
| − | + | ||
| − | + | ||
| − | + | ||
| − | + | ||
| − | + | ||
| − | + | ||
| − | + | ||
| − | + | ||
| − | + | ||
| − | + | ||
| − | + | ||
| − | + | ||
| − | + | ||
| − | + | ||
| − | + | ||
| − | + | ||
| − | + | ||
| − | + | ||
| − | + | ||
| − | + | ||
| − | + | ||
| − | + | ||
| − | + | ||
| − | + | ||
| − | + | ||
| − | + | ||
| − | + | ||
| − | + | ||
| − | + | ||
| − | + | ||
| − | + | ||
| − | + | ||
| − | + | ||
| − | + | ||
| − | + | ||
| − | + | ||
| − | + | ||
| − | + | ||
| − | + | ||
| − | + | ||
| − | + | ||
| − | + | ||
| − | + | ||
| − | + | ||
| − | + | ||
| − | + | ||
| − | + | ||
| − | + | ||
| − | + | ||
| − | + | ||
| − | + | ||
| − | + | ||
| − | + | ||
| − | + | ||
| − | + | ||
| − | + | ||
| − | + | ||
| − | + | ||
| − | + | ||
| − | + | ||
| − | + | ||
| − | + | ||
==Related Links== | ==Related Links== | ||
| − | + | [[Templates versus Charts for Version 7.0 | Templates versus Charts]] <!--4.0.1.3-70--> | |
| − | + | ||
| − | [[Templates versus Charts for Version 7.0 | Templates versus Charts]] <!--4 | + | |
| − | + | ||
| − | + | ||
| − | + | ||
| − | + | ||
| − | + | ||
| − | + | ||
| − | + | ||
| − | + | ||
[[Editing with the Chart Properties form for Version 7.0 (Portal) | Editing with the Chart Properties form (Portal)]] <!--21.0.1-70--> | [[Editing with the Chart Properties form for Version 7.0 (Portal) | Editing with the Chart Properties form (Portal)]] <!--21.0.1-70--> | ||
| − | + | [[Template Only Features for Version 7.0 (OnePager Pro) | Template Only Features for OnePager Pro]]. 24.1.1-70 | |
| − | + | ||
| − | + | ||
| − | + | ||
| − | [[Template Only Features for Version 7.0 (OnePager Pro) | Template Only Features | + | |
| − | + | ||
| − | + | ||
| − | + | ||
| − | + | ||
| − | (24. | + | (24.3.1-70) |
[[Category:Version 7.0]] | [[Category:Version 7.0]] | ||
[[Category:Editing the Chart]] | [[Category:Editing the Chart]] | ||
| − | |||
| − | |||
[[Category:Task/Milestone Editing]] | [[Category:Task/Milestone Editing]] | ||
| − | |||
| − | |||
[[Category:Charts]] | [[Category:Charts]] | ||
| + | [[Category:Enterprise Integration]] | ||
| + | [[Category:Enterprise Custom Fields]] | ||
[[Category:Ribbon]] | [[Category:Ribbon]] | ||
[[Category:Snapshots]] | [[Category:Snapshots]] | ||
[[Category:Templates]] | [[Category:Templates]] | ||
| − | |||
| − | |||
[[Category:Chart Properties Form]] | [[Category:Chart Properties Form]] | ||
| − | [[Category:OnePager | + | [[Category:OnePager Pro]] |
Revision as of 15:44, 15 January 2021
Contents
About Using Enterprise Custom Fields
OnePager Pro (OPP) offers access to Microsoft Project Server’s Enterprise Custom Fields (ECF). You can use these fields to determine swimlanes, colors, flagging of tasks, and other properties.
For some basic information on Microsoft Project Server's Enterprise Custom Fields, please see the website article at: Create a new enterprise custom field in Project Server or Project Online
This article covers how to log-in to your Microsoft Project Server accounts and how to access your ECF data through OPP's Template Properties form.
Logging-in to Your Microsoft Project Server Account from Microsoft Project Professional
You can always log-in to your Microsoft Project Server account from Microsoft Project. Once you are logged-in, you can follow the steps below from that point, where OnePager Pro (OPP) is launched, and access the Template Properties form to access your ECF data.
Logging-in to Your Microsoft Project Server Account through the OnePager Pro Add-in
Logging-in to your Microsoft Project Server Account can also be done directly from the OPP Add-in application.
Launch Microsoft Project Professional and load the Microsoft Project source plan desired from its storage location.
Click the Template Properties button on the Microsoft Project Add-in tab which accesses the OPP Template Properties form shown below:
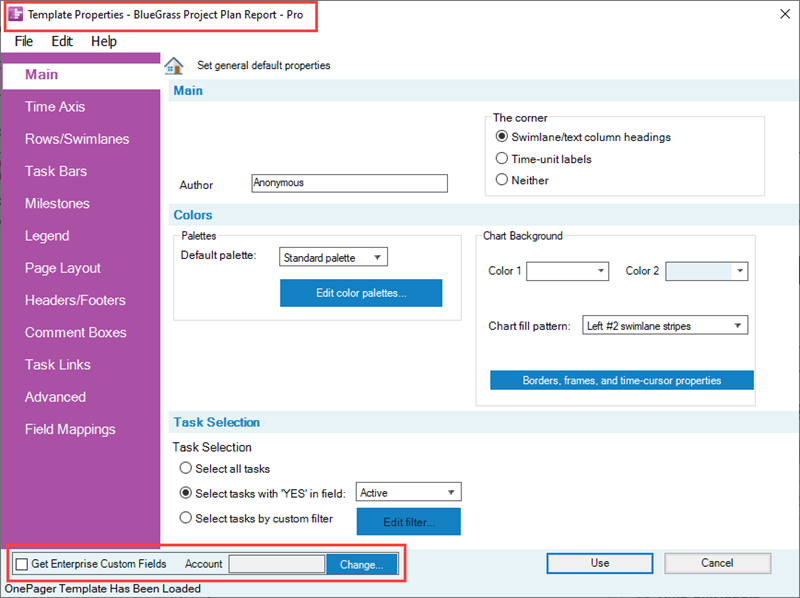
The bottom of the form above contains the Get Enterprise Custom Fields checkbox and the window used in conjunction with the Change button that helps you to access and manage your Microsoft Project Server Accounts. This method does not apply when using the OnePager Pro Desktop application.
Accessing Your Microsoft Project Server’s Enterprise Custom Fields - OnePager Pro Add-in
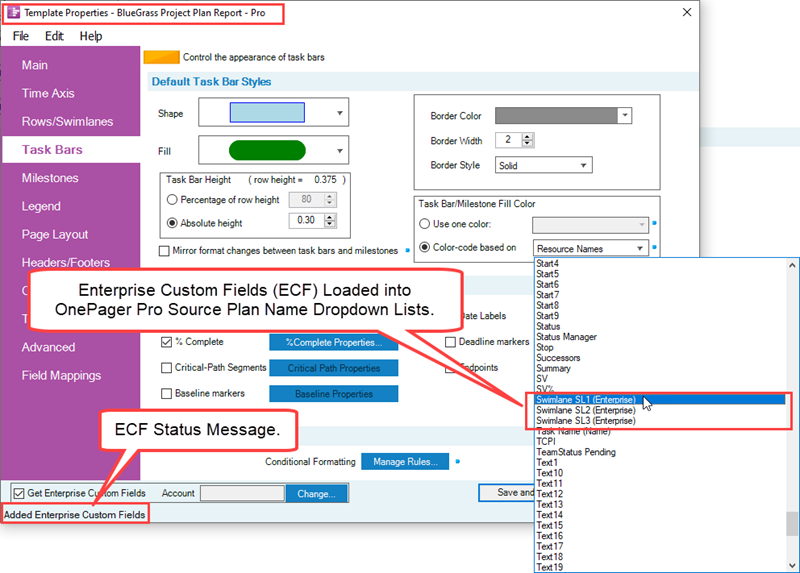
When you check the Get Enterprise Custom Fields checkbox to ON, OnePager checks to see if it is already logged-in to your Microsoft Project Server account. If so, the ECF data are loaded into the Template Properties form’s dropdown list of fields as shown below:
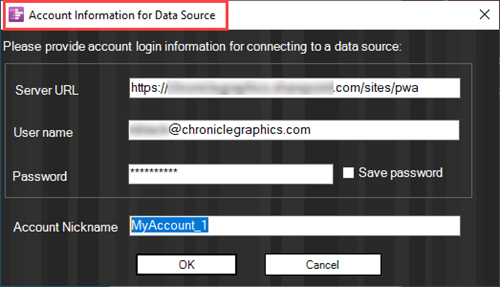
If OnePager is not already logged-in, OPP Add-in attempts to log-in using the URL for whatever Microsoft Project Server account Microsoft Project is connected to. If OnePager finds that Microsoft Windows has stored default credentials for Microsoft Project to log-in to Microsoft Project Server, OnePager attempts to use these credentials without prompting you and without ever actually knowing the username and password. If successful, OnePager creates a OnePager log-in account with just the URL but with no username and password.
Once OnePager connects to your Microsoft Project Server server account, it retrieves the ECF data and displays a success message, Added Enterprise Custom Fields, as shown here:
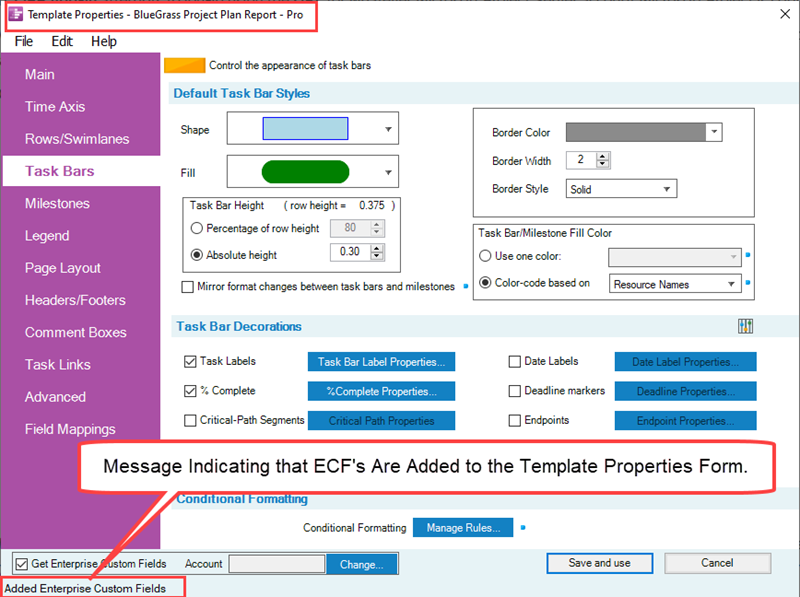
The ECF data are now loaded into the dropdown lists as shown above.
You can now select the ECF for various purposes such as for controlling (1) rows/swimlane organization, (2) selection of task bar/milestone symbol colors, or (3) Field Mappings selections on the Template Properties form's Advanced tab. When you click the Save and use button, the action makes the Template Properties form with the ECF data the current Template Properties form. It now can be used to create a NEW chart or UPDATE/OPEN an existing one.
When a new chart is created using the desired ECF information, you can open the chart, access the Chart Properties form, and make edits to the row/swimlane organization as described above by selecting the desired ECF now available. As a note, other ECF’s are not available to you unless you already included them in some mapping in the original Template Properties form.
For more information on the Field Mappings Tab. please see the article at: Template Only Features for OnePager Pro
A similar approach using the OPP Add-in application can be used to UPDATE a chart build with ECF’s. The note in the previous paragraph also applies.
Suspending the Use of Enterprise Custom Fields
To suspend the use of Enterprise Custom Fields, uncheck the Get Enterprise Custom Fields checkbox to OFF and click Save and use on the Template Properties form. This action removes the ECF’s from the Template Properties form's dropdown lists so that creating and updating charts can take place with these Template Properties forms without the ECF’s.
Logging-in to Your Microsoft Project Server Account through the OnePager Pro Desktop
Logging-in to your Microsoft Project Server Account can also be done from the OnePager Pro Desktop application as well as the Add-in application.
To do this, launch OPP from the Desktop icon. The log-in is performed in the Template Properties form. You can access the Template Properties form for the OPP Desktop application by clicking the File tab on the ribbon and then clicking the Options tab. This accesses the OnePager Options page where you’ll find the Template button in the lower right of the page. Clicking the Template button which accesses the Template Properties form shown below:

Accessing Your Microsoft Project Server’s Enterprise Custom Fields - OnePager Desktop
Now, check the Get Enterprise Custom Fields checkbox to ON and the OPP Desktop application accesses the log-in form shown below:

Once you enter your credentials, click the OK button to attempt the connection. The OPP Desktop application logs into your account and download your ECF information into the Template Properties form’s dropdown lists as shown below:

When the OPP Desktop application is launched and running, Microsoft Project is not running so it is not possible to connect to your Microsoft Project Server account through Microsoft Project. If the OPP Desktop application is not able to connect to the Microsoft Project Server you’ve requested, a message appears at the bottom of the Template Properties form as shown below:
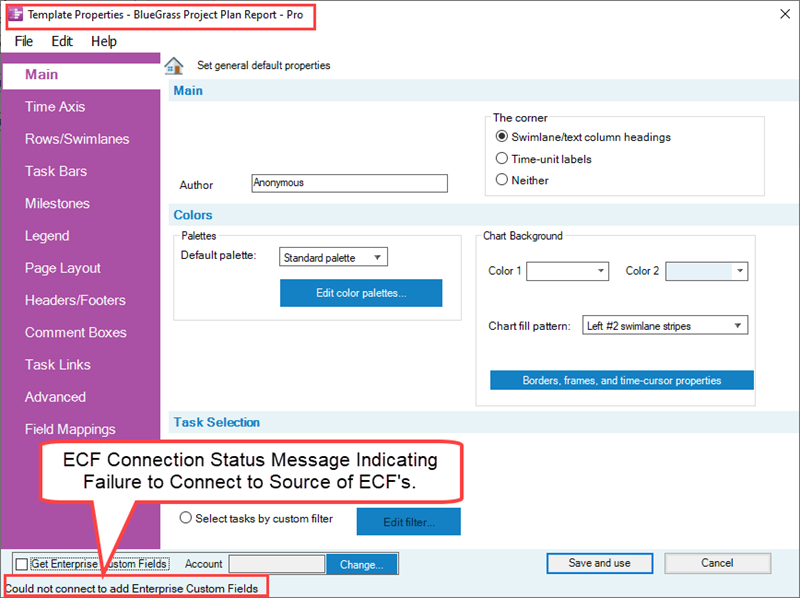
Once you are logged-in to your Microsoft Project Server account through the OPP Desktop application, all features and functions with respect to ECF are available as if you were using the OPP Add-in application.
Related Links
Editing with the Chart Properties form (Portal)
Template Only Features for OnePager Pro. 24.1.1-70
(24.3.1-70)