ADDING a Snapshot via Pull Operation for OnePager Live Beta 2 (MS Excel Source)
Contents
Overview
7.15.2-OPL2 from 7.15.2-60 7/19/2017
The purpose of these articles is to acquaint you with the new pull features of OnePager Pro (OPP) and Express (OPX). There are eight (8) articles in this series, four (4) providing examples of the pull feature for OPP and four (4) for OPX. Please see the links at the end of this article to access other articles in the series.
What is a Pull Operation?
A pull operation starts in the Project View Editor (PVE). That is, you already have OnePager running and decide to update the open project view or (rarely) create a new project view. In contrast, a push operation begins in the OnePager Express Start from which you make a new project view or update an existing project view.
We added the pull operation because we found that our users were often creating a project view, finding something in the source plan that they needed to change, going back to the source plan, making the change, and then re-launching OnePager to update the project view.
The pull update lets you open a project view and update it repeatedly as you edit its source plan. After each set of changes to the source plan, you can quickly see the effect on the screen by using OnePager’s new Data tab to pull the source plan changes into the project view.
The example below will illustrate a pull operation when adding a snapshot.
Example
1) Let’s suppose you have a Microsoft Excel source plan with an already created a snapshot for a particular date, say, 12/1/2015. Later on in the project, say on 12/15/2015 you receive updated status information that updates your Microsoft Excel source plan accordingly. You now want to add this latest status information to your project view as an additional snapshot for 12/15/2015 to reflect the new status information.
2) Further, let’s suppose that there are two different project views created form this one Microsoft Excel source plan:
- (1) One for the PMO audience created with the Show It1 field and
- (2) The second created for the customer audience created with the Show It2 field. In this example, we’ll do a replacement for the PMO audience first and then do the same replacement for the customer audience.
3) Since the Microsoft Excel source plan was updated and now reflects the latest status information for 12/15/2015 we just need to use the pull operation to bring in the updated Microsoft Excel source plan data and add the snapshot.
Launching OnePager Express from the Desktop Icon
4) First, update the Microsoft Excel source plan with the updated data you want to add in a new snapshot.
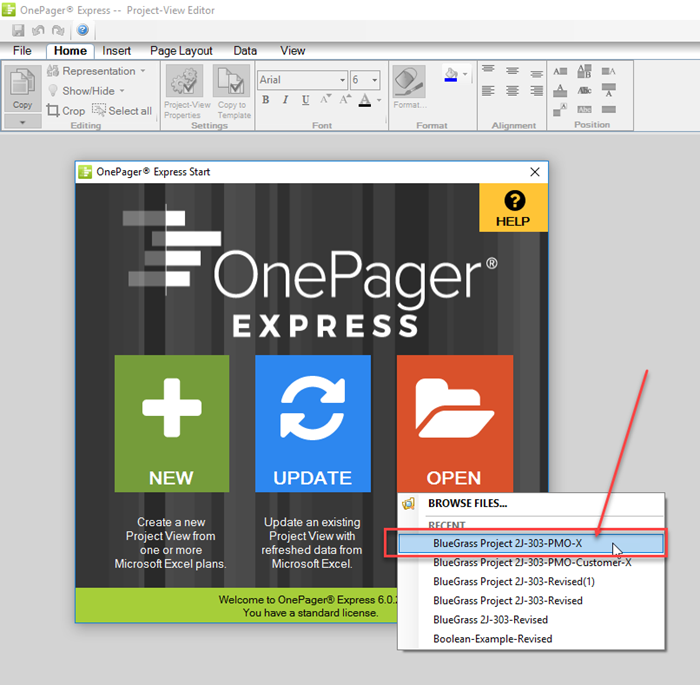
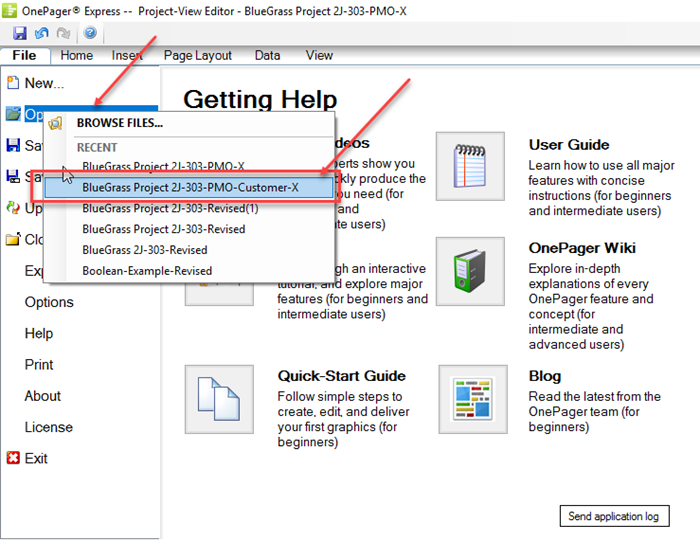
5) Launch OPX from the desktop and when the OnePager Express Start form appears click the OPEN button which, in our example, will provide a dropdown menu with the name of the project view you wish to update by adding a new snapshot. In this case it’s BlueGrass 2J-303-PMO-X as shown below:
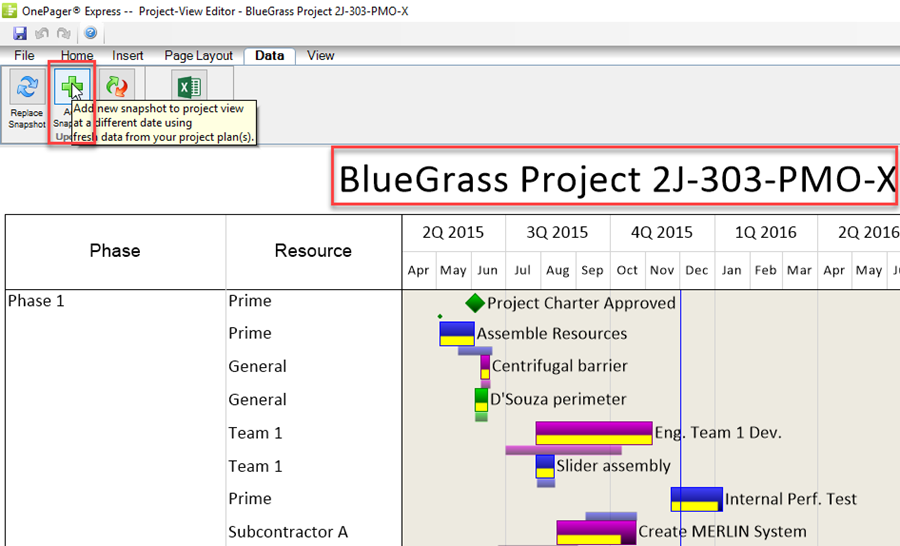
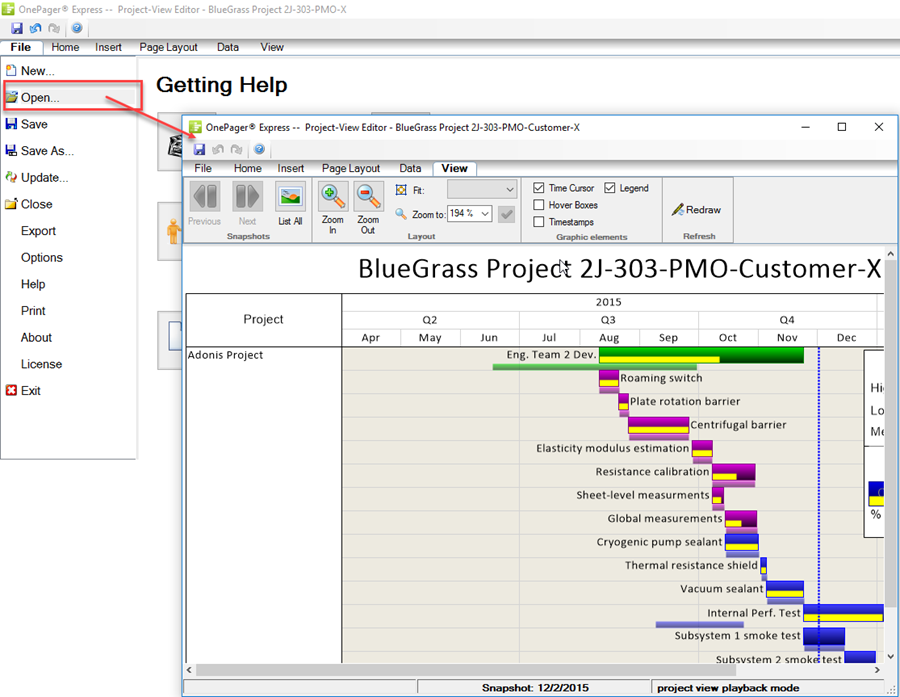
6) The OPX desktop application will bring the selected project view up in the Project View Editor (PVE) window. This is the project view that has one snapshot currently for 12/1/2015 for which we want to add a second snapshot for 12/15/2015. To proceed with the snapshot add click the Data tab on the ribbon and prepare to click the Add Snapshot button. The PVE will look like this:
Use the Microsoft Excel Source Plan to Add a Snapshot
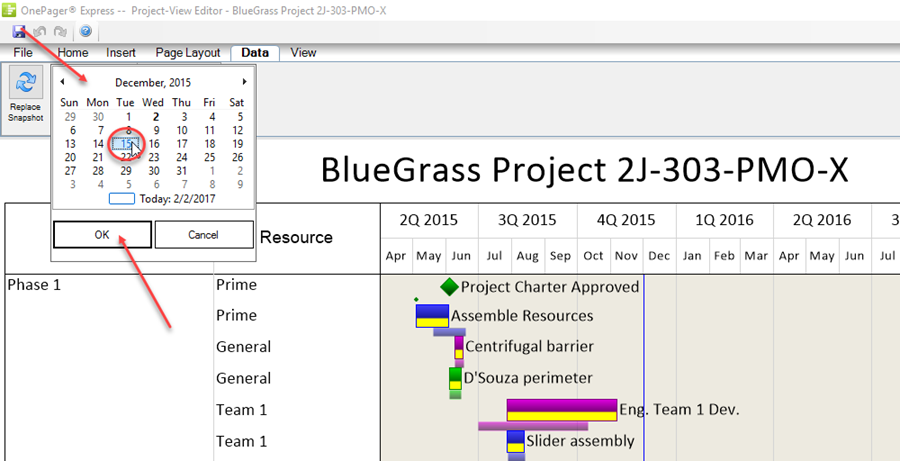
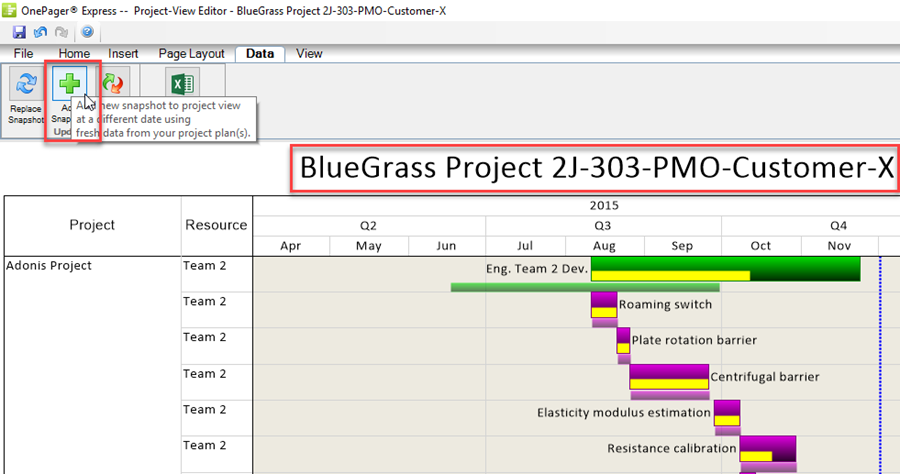
7) To add a snapshot, click the Add Snapshot button on the Data tab of the ribbon. A calendar dropdown will appear. Select the date of the new snapshot in the calendar and click OK in the calendar drop down as shown below:
8) OPX adds the snapshot by loading the Microsoft Excel source planassociated with the project view and uses it to add a new snapshot as shown above.
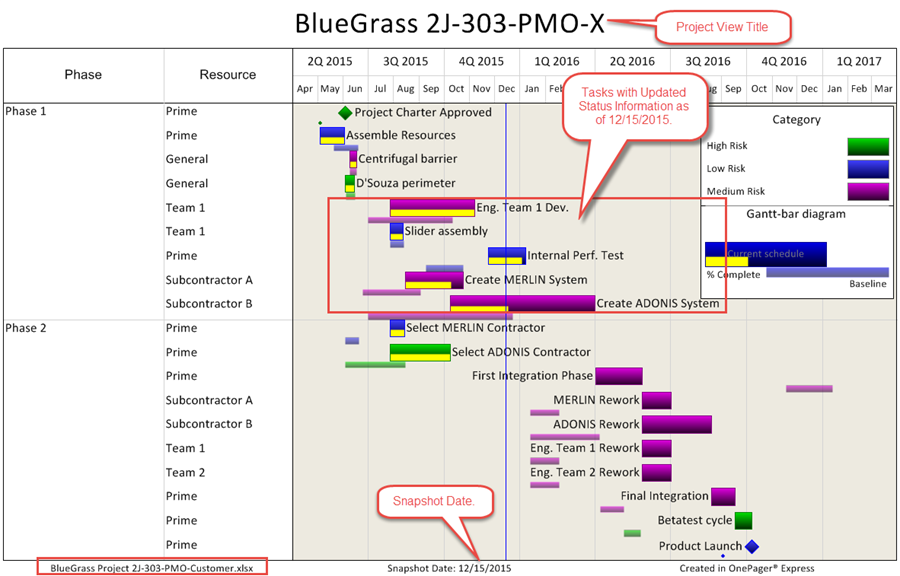
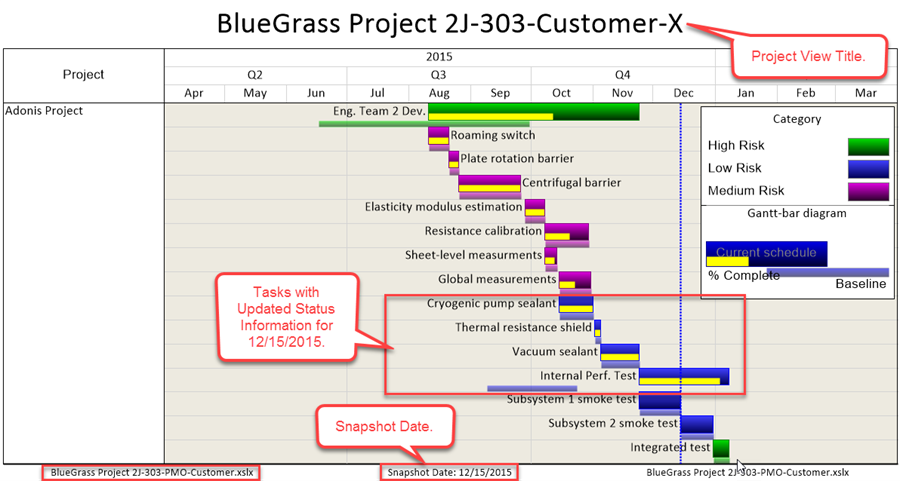
9) The added snapshot for project view BlueGrass 2J-303-PMO-X is shown below:
10) Since we are using the OPX desktop application for this example, it was not necessary to launch Microsoft Excel first. As long as you’ve properly prepared your Microsoft Excel source plan just launching OPX from the desktop icon is basically all that is necessary to utilize the new pull operation for adding a snapshot.
11) At this point it is recommended that you save this the project view for access later.
Preparing a Second Project View for Adding a Snapshot
12) There are two ways of updating the second project view from the same Microsoft Excel source plan:
- (1) After saving the first project view, close the OPX desktop application and repeat the above process by opening the second project view and then using Show It2 to select the tasks.
- (2) Remain in the current OnePager Express desktop application window and update the second project view from there.
13) Here we will demonstrate the second method as it is more efficient.
14) With the above project view visible in the PVE window, click on the File tab on the ribbon and then click the Open… tab on the page that appears. Then click the project view for the customer audience as shown below:
15) When you click the desired project view name as shown above, OnePager will display that project view in a separate PVE window as shown here:
16) You may want to expand this PVE window. Now, navigate to the Data tab on the ribbon as shown below:
17) Click the Add Snapshot button on the Data tab and select the new snapshot date from the dropdown calendar as shown previously. This tells OPX to go to the Microsoft Excel plan's source plan for this project view (previously updated with the 12/15/2015 status information), perform the snapshot replacement under the control of the Show It2 field of the plan, and display the results in the current PVE window.
18) The added snapshot is shown below:
19) In this example, we used the pull operation twice to update two project views from the same Microsoft Excel source plan but using different flag fields. Now that the second project view is created, we recommend that it too be saved for future access.
Compare Results, Edit, Copy to PowerPoint
20) Once you are satisfied with your project views you may save them, copy them into Microsoft PowerPoint presentations, or share time in other ways.
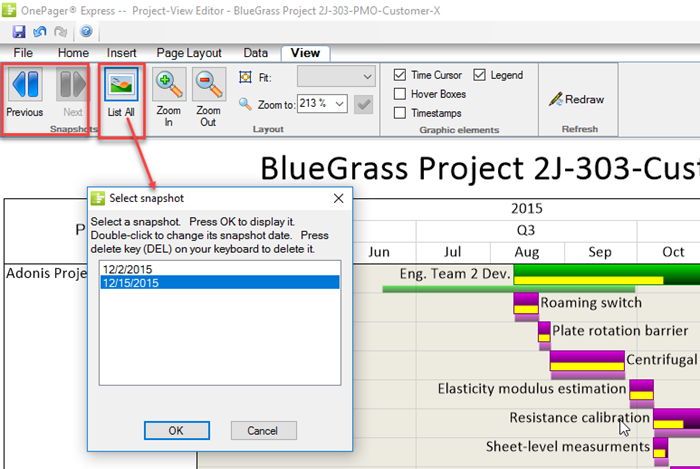
21) At the end of the ADD Snapshot process described in this article, your projects will contain multiple snapshots. You may move from one to another in the PVE window by going to the View tab on the ribbon and either click the Forward/Back buttons to switch from snapshot to snapshot or use the List All button to display snapshot dates associated with the project view as shown below:
22) The pull operation is an easy, fast, and convenient way to create multiple project views which will make you more efficient.
Related Links
Creating a NEW Project View via Pull Operation for MS Project Source 7.13.1-OPL2
Creating a NEW Project View via Pull Operation for MS Excel Source 7.13.2-OPL2
REPLACING a Snapshot via Pull Operation for MS Project Source 7.14.1-OPL2
REPLACING a Snapshot via Pull Operation for MS Excel Source 7.14.2-OPL2
ADDING a Snapshot via Pull Operation for MS Project Source 7.15.1-OPL2
Custom Update (Replacing) of a Snapshot via Pull Operation for MS PRoject Source 7.16.1-OPL2
Custom Update (Replacing) of a Snapshot via Pull Operation for MS Excel Source 7.16.2-OPL2
Using the OnePager "Data" Tab's "Selected file(s)" Button 7.17.1-OPL2
(7.15.2-OPL2)