Advanced Tab for OnePager Live Beta 2 (MS Project Source)
Contents
- 1 About the Advanced Tab-OnePager Pro
- 2 Display Options
- 3 Task/Milestone Threshold
- 4 Auto-adjust Timeline
- 5 Warn If Import Exceeds
- 6 Warn Of Merging Tasks
- 7 Safely Combine Tasks From Different Files
- 8 Reset Unique Ids On Update
- 9 Chart Background
- 10 Borders, Frame, and Tme-cursor Properties
- 11 Task Representation
- 12 Default Snapshot Date
- 13 Clipboard Format
- 14 Cropping Empty Rows
- 15 Server Method Selection
- 16 Related Links
About the Advanced Tab-OnePager Pro
21.13.1-OPL2 from 21.13.1-60 7/17/2017
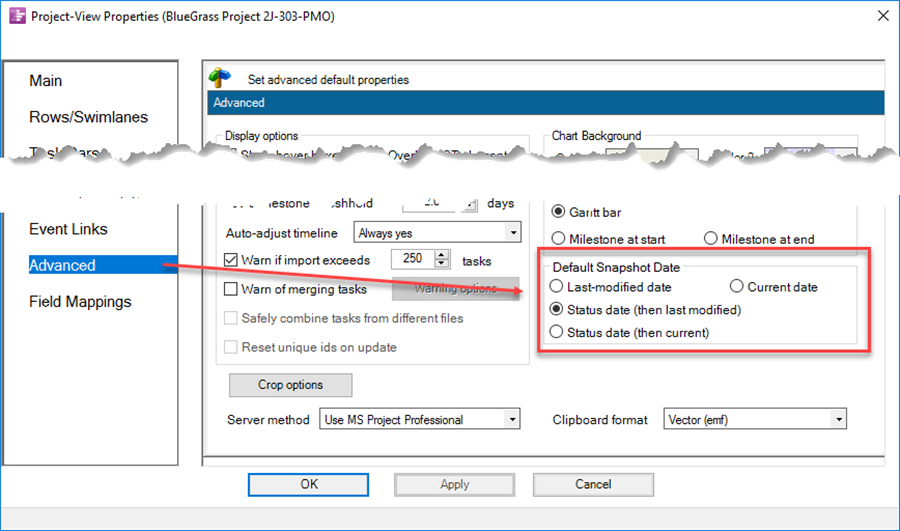
This tab controls various other properties of the project view and looks like this:

Display Options
The Display Options group contains a number of checkboxes for making yes/no choices:
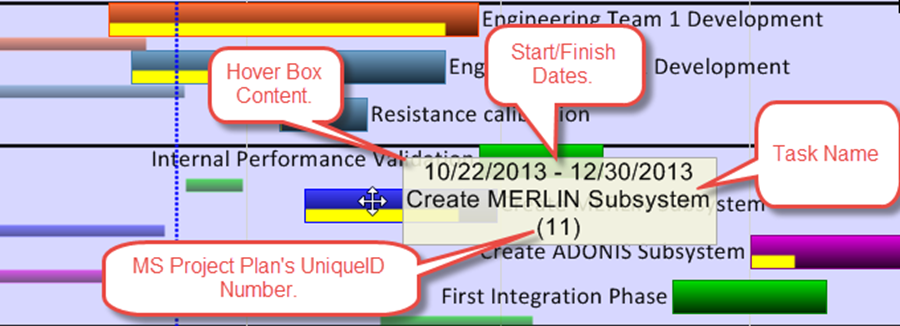
- a) Show hover boxes. This checkbox controls the display of detailed information about each task/milestone when the mouse cursor hovers over it. This information includes the start/finish dates, the task/milestone name, and the Unique-ID of the task from the Microsoft Project source plan. An example is shown below.
- b) Format with times. When this checkbox is checked, the snapshot dates are displayed with a time of day component. Snapshot dates that differ by their time of day component are considered different snapshot dates.
- i) For example, June 5, 2015 becomes June 5, 2015 5:23 PM and is a different snapshot date than June 5, 2015 6:00PM.
- ii) Note that this setting no longer controls the format of the dates on the tasks and milestones.
- c) Show time cursor. When this checkbox is unchecked, the vertical time-cursor line is hidden.
- d) Allow absorption. When this checkbox is checked, you can drag one task onto another task and be prompted to absorb the former into the latter. When the checkbox is unchecked, this process will not take place and one task dragged over another will be displayed as two separate tasks superimposed.
- e) Copy edits to all snapshots (CTAS). The checkbox is a toggle switch that turns on and off the propagation of maverick changes to all snapshots (turned on) or to keep maverick changes to tasks/milestones in the current snapshot (turned off). This checkbox affects editing of the following task/milestone properties:
- i) Color
- ii) Shape
- iii) Fill Pattern
- iv) Border
- v) Text Font
- vi) Task/milestone height
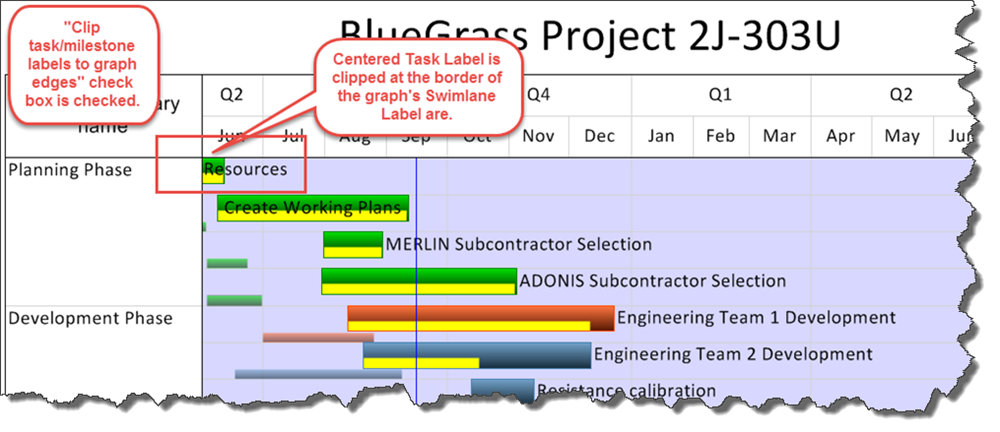
- f) Clip task/milestone labels at graph edges. If this checkbox is checked, OnePager will clip all task/milestone labels that extend over the edge of the graph so that the labels will no longer extend over the graph boundaries. The project view below shows how OnePager will handle task/milestone labels that extend into the displayed swimlane label area when the checkbox is checked:
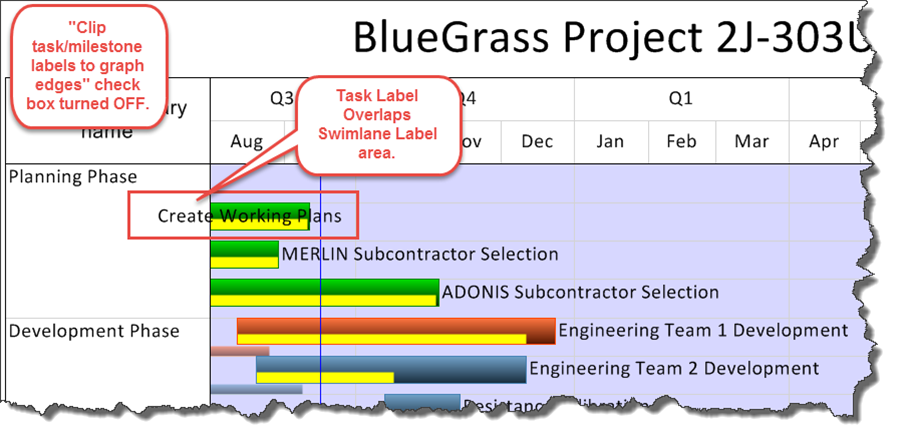
- Here is the same project view with the checkbox unchecked:
- g) Overlay VST elements. When this checkbox is checked, during the construction of a Virtual Summary Task (VST) with milestones, the milestones will be displayed on top of the created VST bar. See the article at this link for more information: Creating and Managing Virtual Summary Tasks 18.0.1-OPL2. An example is provided below:

- h) Lock background. When this checkbox is checked, all background shapes are frozen. This includes images, swimlane titles, graph title, and time axis annotation. Clicking them with the mouse no longer selects them, so it becomes easier to select tasks and milestones with the selection lasso.
- i) Show absorbed dates. When this checkbox is checked, the date labels for absorbed task will appear in comment boxes. The date label component displayed is controlled by the Absorption Options form accessible when the selected task/milestone is being absorbed. For more information please see the article at this link: Absorbing one task into another 17.0.1-OPL2.
Task/Milestone Threshold
1) This numeric window controls whether short duration tasks are displayed as task bars or as milestone symbols. The unit of measure is task bar duration in number of days.
2) With the setting shown in the PVP form at the top of this article of two (2) days, any task in the project view that is less than two (2) days duration will be displayed as a milestone symbol. Therefore, one day tasks will display as milestones symbols with the default settings of two (2) days. Since no duration can be less than zero (0), setting the parameter to zero (0) turns off all conversion of tasks into milestones symbols, which means that you may see Gantt bars with very small width, which will make them very hard to see and to select.
Auto-adjust Timeline
1) This dropdown menu lets you tell OnePager to automatically change the start date and/or end date of the project view when it re-opens or updates the project view and finds that some tasks or milestones lie outside the current extent. You can choose from one of the three options shown below:
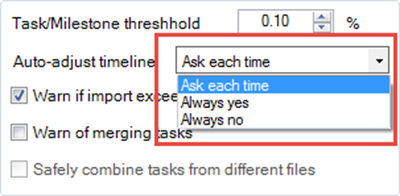
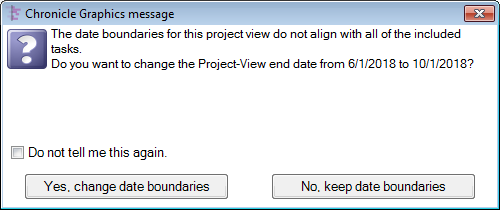
- (1) If you choose Ask each time, the following form will appear whenever OnePager detects tasks or milestones outside the current boundaries:
- (2) If you choose Always yes, OnePager will automatically adjust the timeline.
- (3) If you choose Always no, OnePager will not adjust the timeline if tasks or milestones are outside the current project view boundaries.
2) OnePager can also detect that the timeline needs to be shortened rather than lengthened.
Warn If Import Exceeds
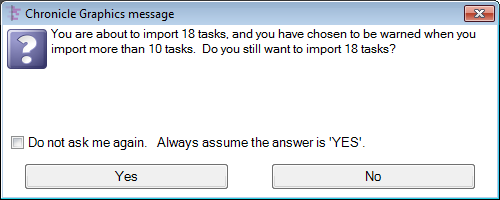
1) This checkbox tells OnePager to provide a warning message if the number of task/milestones imported exceeds the quantity set in the adjacent window.
2) Recall that OnePager has the capability to make multiple pages of output both vertically and horizontally. The warning message example below was configured so that it would issue the warning if more than 10 tasks were imported.
Warn Of Merging Tasks
1) The checkbox shown in the Advanced tab at the beginning of this article is accompanied by a Warning options button.
2) When this checkbox is checked, the Warning options button is active. Clicking the Warning options button will bring up the Set warning thresholds form shown below:
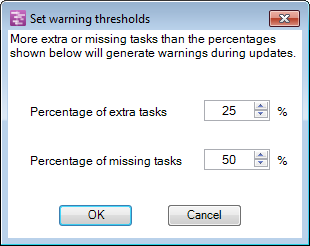
3) This form allows you to set your own parameters for when you wish to be warned if too many extra tasks are being merged or too many tasks are missing.
- a) Setting these percentages to 100% has the impact of turning the fixes and warning off.
- b) Setting the percentages to 0% provides an assurance that any extra or missing tasks will trigger the fixes and warnings.
4) When this checkbox is checked, OnePager looks to see if too many newly introduced task/milestones are being imported when updating a snapshot or if too many tasks are missing per the thresholds set in the form above.
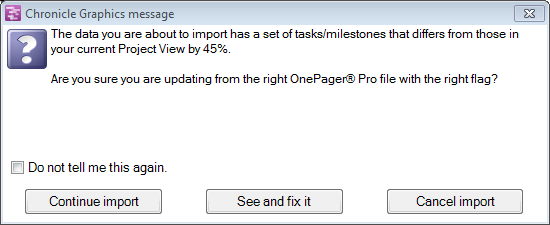
5) After making the calculation, OnePager will provide a warning message asking if you want to proceed with the update of the snapshot or not.
6) Additionally, the warning message also give you access to the See Extra and Missing Tasks form so you can make a fix if desired. The warning message example below was configured so that it would issue the warning if more than 45 percent of the tasks differ from those of the current project view.
7) For more information on how to make fixes to these situations please go to this article: Merging the Wrong Tasks into a Project View - OnePager Pro .
Safely Combine Tasks From Different Files
1) The Safely combine tasks from different files checkbox is disabled so that you will see that it is there.
2) To avoid confusing OnePager Pro when importing additional Microsoft Project source plans during the Replace operation, it is necessary for this feature to be on and functioning.
3) The reason for this is that the tasks being imported from the second Microsoft Project source plan in the Replace function have the same UniqueID numbers as the tasks from the first Microsoft Project source plan.
4) OPP would be fooled into thinking that these are the same tasks (coming in from the second Microsoft Project source plan) are from the first Microsoft Project source plan when they are clearly not.
5) Having the Safely combine tasks from different file checkbox checked will avoid confusing the identity of replacement tasks in the Replace snapshot function.
Reset Unique Ids On Update
1) The Reset unique ids on update checkbox is disabled so that you will see that it is there. This feature can be activated as a last resort under the situation where you are attempting to merge Microsoft Project source plans from different physical files into a single source plan where the Microsoft Project Unique IDs do not match. Contact OnePager support for information on how to use this rarely-used feature: Getting Support and Contacting Chronicle Graphics for OnePager Live 30.0.1-OPL2.
2) Please see the article at: Field Mappings Tab for MS Project Source 21.15.1-OPL2 for more details on selecting alternate Unique ID fields for this purpose.
3) For additional help please go to the following link to the OnePager Frequently Asked Questions page: Selecting a Custom Unique ID.
4) If you encounter difficulties, contact our Support Team at support ticket, by e-mailing us, or by calling +1.303.779.0344.
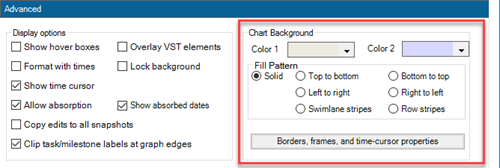
Chart Background
1) This group of controls allows you to mange the project view's background colors and create striping highlights.
2) To show a phasing of color across the background, choose two colors to blend and choose the blending direction. Alternatively, you can choose to have a single-color background.
3) Additionally, this group allows zebra-striping of rows and swimlanes. Please see the article at this link for more information on zebra-striping: Zebra Striping for Rows and Swimlanes for MS Project Source 12.23.1-OPL2
4) See the graphic immediately below.
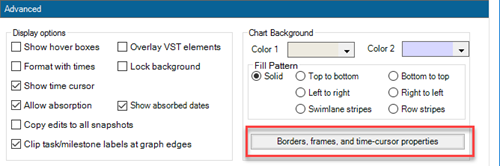
Borders, Frame, and Tme-cursor Properties
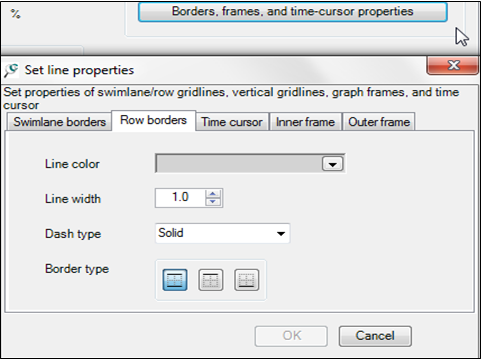
Click this button to bring up the Set line properties form that lets you customize the properties of various lines: row/swimlane boundaries, vertical gridlines (at time axis tics), frames (the rectangles that surround the graph), and the time cursor.
1) The form looks like this with five tabs as shown below:
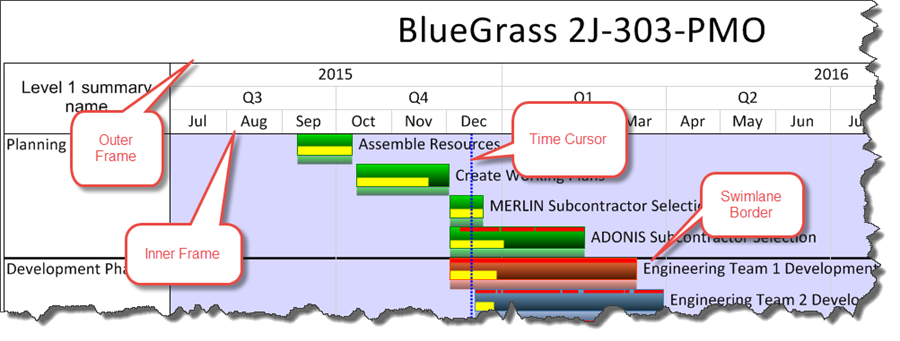
2) And the affected graphical elements look like this:
Task Representation
These radio buttons let you select how a task is represented: as a task by a Gantt bar or by a milestone at the start or end date of the task.
Default Snapshot Date
1) OnePager establishes the default date of the snapshot based upon data imported from the Microsoft Project source plan. You can, of course, change the snapshot date to a value different from the default date in the OnePager Choices form. In this group you have four (4) options for setting the default snapshot date:
- (1) Last-modified date. This is the date that the Microsoft Project source plan was last modified.
- (2) Status date (then last modified). This is the date established in the Microsoft Project source plan for the status date of the source plan. If there is no value for the status date in the Microsoft Project source plan, OnePager will use the Last-Modified date.
- (3) Status date (then current). This is the date established in the Microsoft Project source plan for the status date of the plan. If there is no value for the status date in the Microsoft Project source plan, OnePager will use the current date.
- (4) Current date. This date is the date when you imported the data from your Microsoft Project source plan into OnePager to create the snapshot.
2) The controls for the snapshot date selection feature are shown in the Advanced tab shown below:
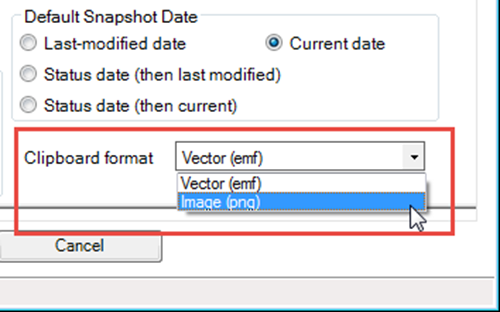
Clipboard Format
1) The default clipboard format is Vector EMF (Enhanced Meta File).
2) Essentially, this format is vector output with capabilities to retain high quality resolution when moving from the project view snapshot to Microsoft PowerPoint, Word, Excel, or email messages.
3) Although the default option is EMF format, you may change the default to the alternative option of Image PNG as shown below:
Cropping Empty Rows
1) The controls in this group govern the operation of automatic cropping (hiding) of rows as follows:
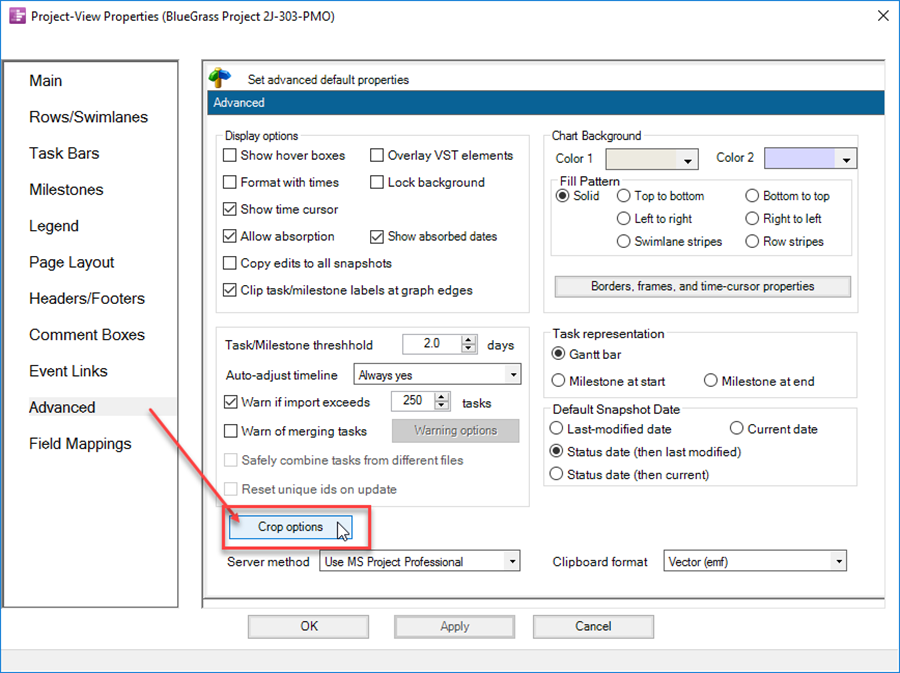
2) When the Crop options button is clicked, the Row Hiding Options form shown below will appear providing you with four (4) options to select:
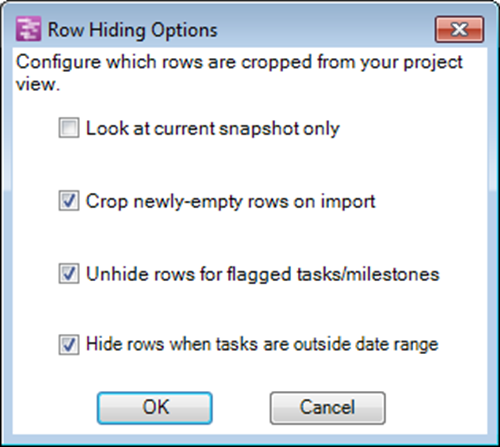
- (1) Look at current snapshot only. When this checkbox is checked, OnePager will only examine the current snapshot when deciding which rows are empty. When this checkbox is unchecked, OnePager considers a row empty only if it is unoccupied across all snapshots. In either case, the auto-cropping action hides rows in all snapshots.
- (2) Crop newly-empty rows on import. When this checkbox is checked, OnePager will automatically hide any rows that become empty because tasks are missing when you UPDATE a project view. When this checkbox is unchecked, OnePager will leave any empty rows that became empty because of such missing tasks.
- (3) Unhide rows for flagged tasks/milestones. When this checkbox is checked, OnePager will automatically unhide hidden rows if they contain any of the tasks/milestones that are flagged for import on the current snapshot. If the checkbox is unchecked, OnePager will continue to hide previously hidden rows.
- (4) Hide rows when tasks are outside date range. When this option is selected, OnePager will automatically hide any empty rows where tasks and/or milestones are outside the Start date and End date established for the project view. The Start date and End date settings are either generated by OnePager based upon the range of dates provided from the source packet or as set in the Main tab of the PVP form.
3) Where’s My Stuff?! When tasks and their respective rows are hidden and subsequently cropped, the Where’s My Stuff?! feature can be invoked from the OnePager ribbon’s Home tab in the Editing group and shown here:
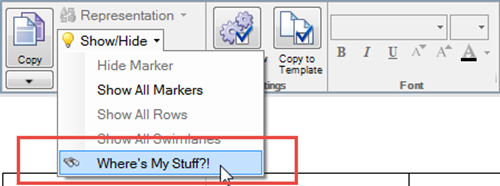
4) See the article at this link for more information: Managing Hidden Tasks and Milestones Using "Where's My Stuff?!" 9.4.1-OPL2
Server Method Selection
1) The Server method dropdown on the Advanced tab for OPP Add-in application lets you specify whether to use Microsoft Project Professional to read data from Microsoft Project Server/Online source plans or to directly read your project data from the server.
- a) Using Microsoft Project Professional to read the data is recommended because it makes more local custom fields available to you.
- b) For example the numbered baseline fields (Baseline 1 Start, etc.) are generally not available when you ask OnePager to read the data directly from the server but are available when you let MS Project do the reading for OnePager.
2) This option is only available in OPP Add-in and not for the OPP Desktop application.
3) To make your selection click on the dropdown and click your choice as shown below:

4) For more information please go to this article: Creating Project Views from Server Resident Project Plans with OnePager Live 8.5.1-OPL
Related Links
Creating and Managing Virtual Summary Tasks 18.0.1-OPL2
Zebra Striping for Rows and Swimlanes for MS Project Source 12.23.1-OPL2
Managing Hidden Tasks and Milestones Using "Where's My Stuff?!" 9.4.1-OPL2
(21.13.1-OPL2)
- OnePager Live
- Editing a Project View
- Task/Milestone Editing
- Task/Milestone Decorations
- Time Cursor
- Absorbing/Unabsorbing
- Labels
- Backgrounds, Images, and Logos
- Sharing Output
- Virtual Summary Tasks
- Cropping Rows
- Row Stripes
- Swimlane Stripes
- Color Palettes
- Hover Box
- Time Axis
- Importing
- Row/Swimlane Borders
- Clip
- Unique ID
- Where's My Stuff?!
- Ribbon
- Snapshots
- Project Views
- Templates
- Project-View Properties Form
- MS Project