Creating and Managing Free Boxes for Version 7.0
Contents
- 1 About Creating and Managing Free Boxes
- 2 Creating a Free Box Using the Insert Tab on the OnePager Ribbon
- 3 Changing the Properties of a Free Box
- 4 Editing Free Boxes
- 5 Free Box Right-Click Context Menu Options
- 6 Related Links
About Creating and Managing Free Boxes
Free boxes are similar to Comment boxes, except that they are not attached to or associated with a task bar or milestone symbol. Free boxes are similar to text boxes in Microsoft PowerPoint. Unlike Comment boxes, Free boxes can only be created in the chart by using the OnePager Insert ribbon tool bar tab and the Free Box button along with manipulation of your mouse and left-click button.
Default Free Box Settings
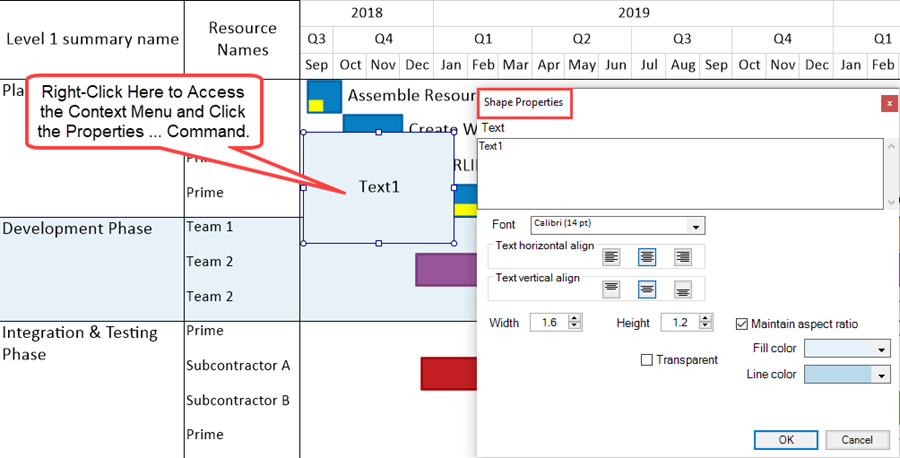
Also, unlike Comment boxes the Free box's setting options are limited and preset within OnePager Pro and Express. That is, there are no Template Properties or Chart Properties form tabs devoted to Free boxes. The Shape Properties form shown below represents the default properties of any Free box created using the OnePager Pro or Express Insert ribbon tool bar tab's Free Box button on the ribbon:
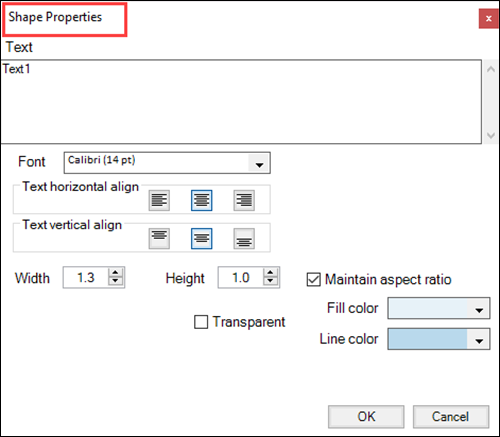
As shown in the above Shape Properties form, the editing options are limited to text string, typical text string editing tools, Free box width and height value setting, color choices for the Free box's background and border line, and Transparency checkbox. The Maintain aspect ratio checkbox is discussed below.
Editing Free Box Global Setting in the Chart
As mentioned above, OnePager does not provide any global editing controls for Free boxes. Rather, the initial settings for Free box parameters are preset in the Shape Properties form for both OnePager Pro and Express. After creating a Free box you can edit these initial Free box properties as needed. To reduce workload when you expect to have several Free boxes in your chart and snapshots, OnePager provides a Make a copy command whereby you can copy a Free box with the desired configuration, move it to a different position in the chart, and edit its text string or other properties as needed.
Creating a Free Box Using the Insert Tab on the OnePager Ribbon
Creating a Free Box Using the Free Box Button
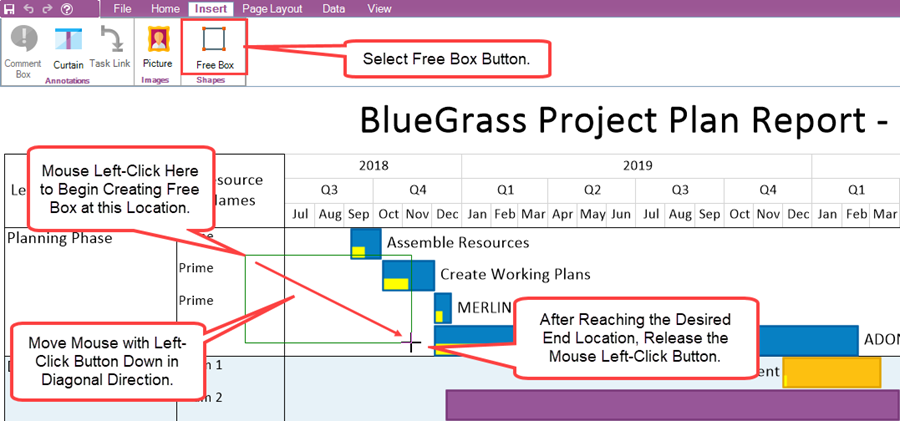
To create a Free box in the chart, go to the OnePager Insert ribbon tool bar tab and click the Free Box button as shown below:

Mouse Cursor Actions For Creating a Free Box
Next, move the mouse cursor to the location on the graph where you want to place the Free box's initial corner, click once, hold down the left-click button, and drag the mouse to place the Free box's other corner in the document area:
You can create a Free box in any direction from the initial corner and by dragging the mouse in the document area you can adjust the size of the Free box.
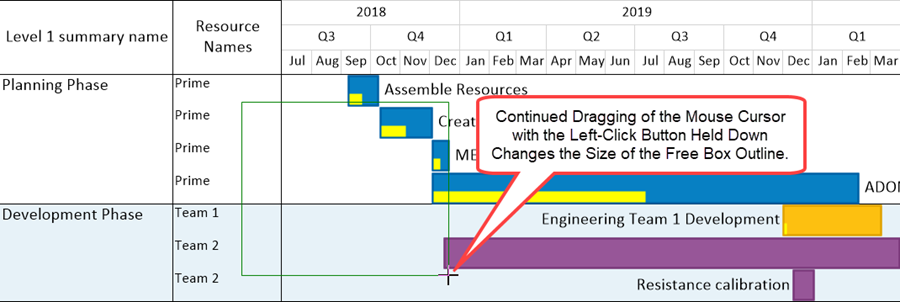
When you release the left-click mouse button the Free box looks something like this:
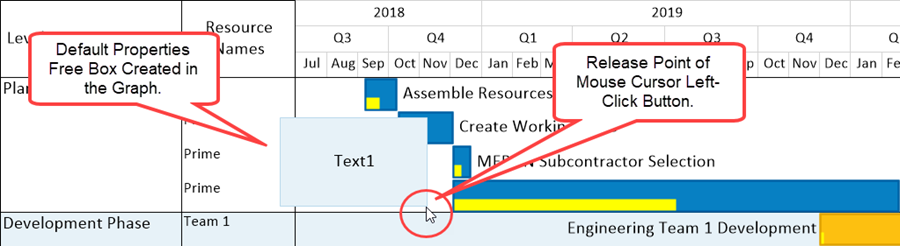
The Free box created in the illustration above is configured with the starting properties of Free boxes as defined in the Shape Properties form.
Changing the Properties of a Free Box
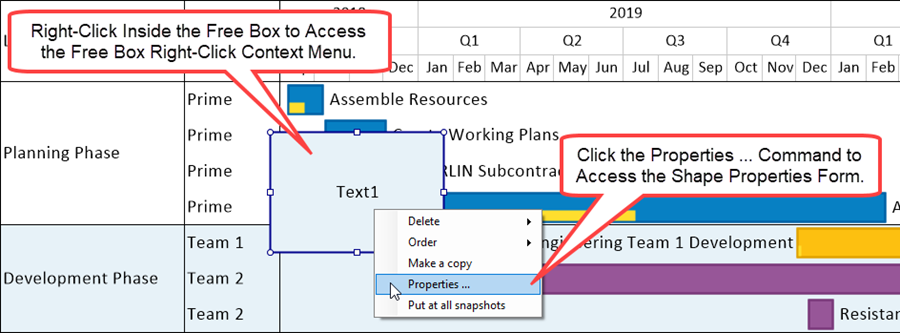
Once a Free box is created its properties can be edited using the Shape Properties form accessed by right-clicking the Free box to access the Free box right-click context menu and selecting the Properties ... command as shown below:
Shape Properties Form
The Shape properties form shown here:
Text Strings
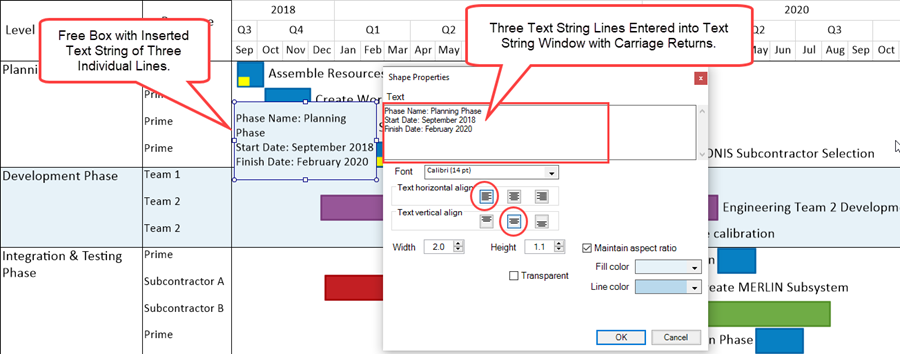
On this form, the window at the top is used for inserting or editing the text string that occupies the inside of the Free box. The text string can be of any length and consist of several individual lines. OnePager configures long text strings into multiple lines to fit within the defined Free box and adjusts the font size to retain the fit. Resizing the Free box alters the appearance of the text string in the Free box to maintain the minimum number of text string lines by further adjusting the font size. Throughout all text string editing, OnePager maintains the selected text string alignments in the Free box in the horizontal and vertical directions. You can insert multiple lines in the text string window by placing your own carriage returns in the text string as shown here:
You can edit the Free box’s Font properties, its text alignments, its dimensions, its fill color and its line color through the use of the standard controls shown in the Shape Properties form above.
Editing Free Box Text Fonts
There are six (6) controls in the Font properties form shown below accessed from the Shape Properties form which are standard in most applications involving text editing:

These controls include:
- The Font Style, implemented as a dropdown list, includes the font styles installed on your computer.
- Clicking the Text Color button accesses the standard Color Chooser form.
- The Font Size control is a dropdown list of possible sizes from 1 to 48. You can also click in this window and type in a desired font size integer value.
- The Bold button is a toggle that sets the selected text string as Bold text.
- The Italics button, also a toggle, sets the selected text string as Italic text.
- The Underline button operates as a toggle that setts the selected text string as Underline.
Editing Free Box Text Alignments
There are two (2) sets of three (3) alignment buttons each in the Shape Properties shown above positioning text strings in the Free box. The top three (3) alignment buttons align the selected text string in a Free box horizontally within the space enclosed by the Free box. The bottom three (3) alignment buttons align the selected text string in a Free box vertically within the space enclosed by the Free box. When the size of the Free box changes either in a horizontal or vertical direction, the horizontal and vertical text string alignments are maintained. OnePager automatically increases or decreases the number of lines of the text string within the Free box to prevent the text string from overlapping a Free box boundary.
Editing Free Box Width and Height
You can manually set the width and height of an established Free box by changing the values in the Width and Height dial windows of the Shape Properties form. The units used for the Width and the Height values are in either inches or centimeters depending on the Template form used to create the chart.
Maintain Aspect Ratio Checkbox
When the Maintain aspect ratio checkbox is checked ON the two dial windows for Width and Height change together to maintain the same aspect ration for the selected Free box as when it was first created. Editing the Width and Height controls does not automatically change the Font size of the text string in the Free box to maintain correspondence with the change in Free box dimensions. With the Maintain aspect ratio checkbox checked OFF, the two dial windows for Width and Height can be edited independently of one another. Independent operation of the Width and Height dial window controls offers more control over the dimensions of a Free box in the chart.
Transparency
The Transparency checkbox in the Shape Properties form for the Free box as the Transparency checkbox has for the same function in the Create or edit comment box form for the Comment box.
For more information on the Transparency checkbox in the Comment box, please see the section in the article at: Creating and Managing Comment Boxes-Transparency Controls
Fill Color and Line Color Options
You can edit the Fill color in the Free box as well as Line color or Border color on the Free box to accent its appearance. There are also No fill options on the Free Box’s Fill color and Line color by using the OnePager standard Color Chooser form accessed through the dropdown buttons on these two controls. To use this feature access the Shape Properties form and do the following:
1) Go to the Fill color control and click the dropdown button to access the standard Color Chooser form as shown below:
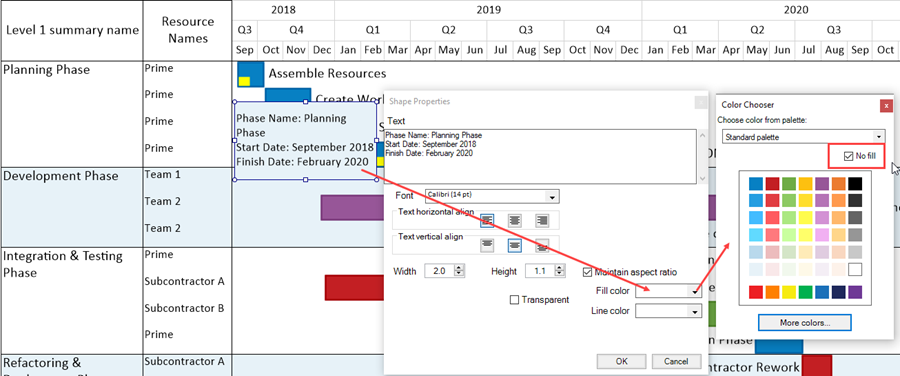
2) Check the No fill checkbox ON which causes the standard Color Chooser form to close.
3) Then, click OK and the selected Free box looks like this:

Editing Free Boxes
Once a Free box is created in the document area, you can move it around, resize it, edit its properties, or delete it just as you do for a Comment box.
Moving Free Boxes
Free boxes' can be easily moved to different positions in the document area by first selecting the Free box with a left-click. Then, with the mouse cursor left-click button held down drag the Free box to the desired position as shown below:
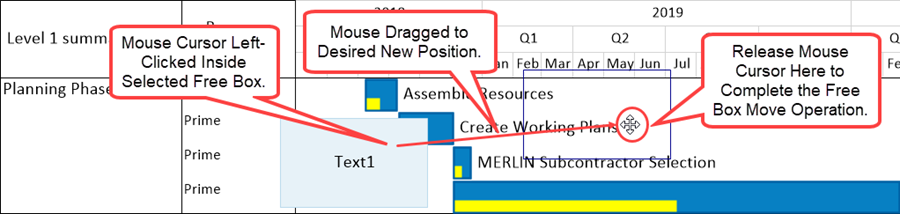
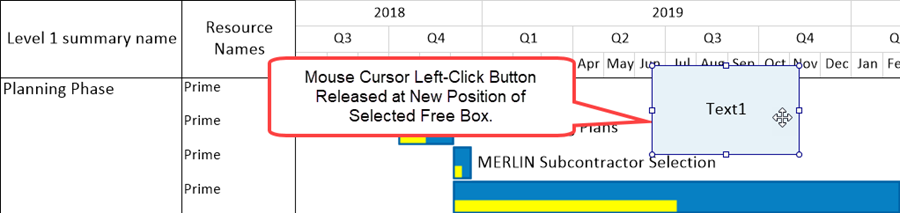
Note that the mouse cursor is changed to the four-pointed arrow when the mouse is left-clicked inside the selected Free box shown above. Release the left-click mouse button and the Free box is re-positioned as shown below:
Resizing a Free Box
To resize a Free box, left-click to select it and position the mouse cursor on one of the eight (8) grab boxes or grab circles shown below:
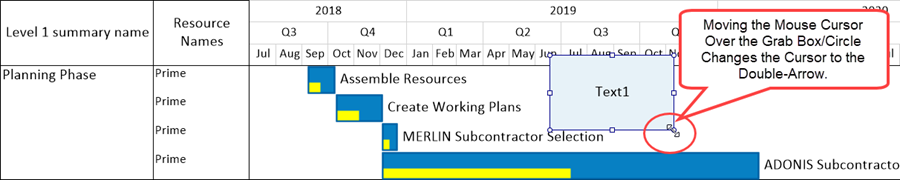
When you do this, the mouse cursor changes shape to a Plus sign as shown below:

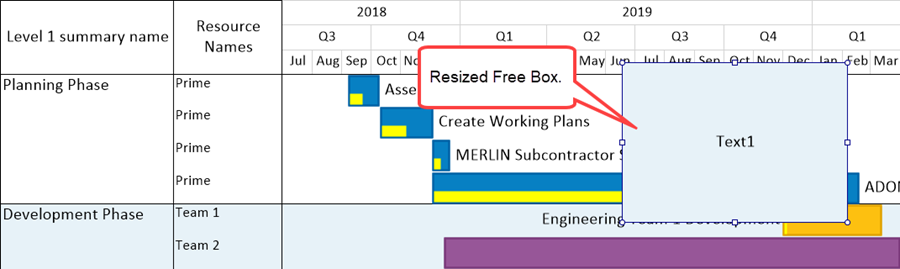
Drag the mouse cursor so that the Free box is resized to the desired dimensions in the direction of the grab box you are using as shown below:
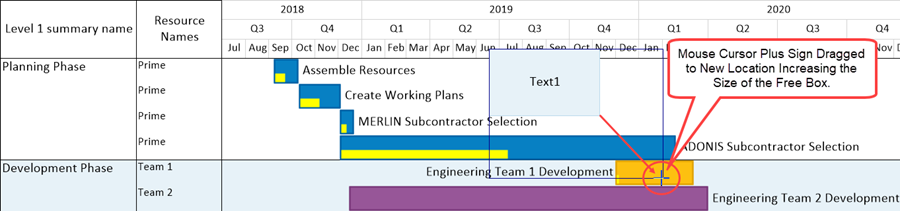
When the desired dimensions are achieved, release the mouse button and the Free box is resized as shown below:
Using the Free Box's Right-Click Context Menu
To use these functions, select the box with the mouse and right-click to access the free box right-click context menu shown below:
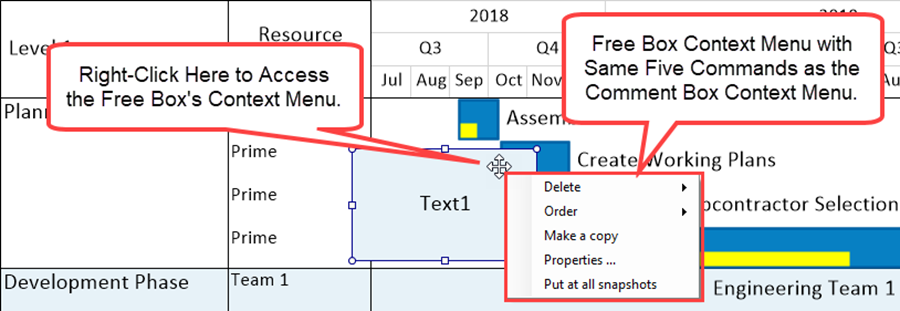
The free box right-click context menu has the same five (5) commands as the Comment box right-click context menu and these commands along with the sub-commands on the Delete and Order sub-commands function in the same way for both types of boxes.
This similarity in commands, sub-commands, and function being the case, please use the Comment box editing instructions in the article at: Creating and Managing Comment Boxes
For more specific information on the use of the Delete and Order commands shown in the free box right-click context menu above, please use the links below:
| Deleting a Free Box |
| Ordering Free Boxes |
Discussions for the three (3) remaining commands in the free box right-click content menu are covered below at these links:
| Make a Copy |
| Properties ... Command |
| Putting Free Boxes in All Snapshots |
Using the OnePager Home Ribbon Tool Bar Tab's Font, Format, and Alignment Control Groups for Editing Free Boxes
As an alternative, you can use several of the controls on the Home tab shown below to change the properties of text within Free boxes.

Editing Free Box Text Fonts
There are eight (8) controls in the Font control group shown above which are standard in most applications involving text editing.
These controls include:
- The Font Style, implemented on the ribbon as a dropdown list, includes the font styles installed on your computer.
- The Font Size control is a dropdown list of possible sizes from 1 to 48. You can also click in this window and type in a desired font size integer value.
- The Bold button is a toggle that sets the selected text string as Bold text.
- The Italics button, also a toggle, sets the selected text string as Italic text.
- The Underline button operates as a toggle that setts the selected text string as Underline.
- The Increase font size button steps the selected text string's font size up one with every click.
- The Decrease font size button steps the selected text string's font size down one with every click.
Clicking the Text Color button accesses the standard Color Chooser form.
Editing Free Box Text Formats
In the Format control group shown above only the Text Color button (shown as a paint bucket) is enabled when a Free box is selected. The Format... button shown above as a color palette icon is disabled as Free boxes are not supported by the Change Task/Milestone Properties form.
Editing Free Box Text Alignments
There are two (2) sets of three alignment buttons in the Alignment control group shown above related to the text strings in Free boxes. The top three (3) alignment buttons align the selected text string in a Free box vertically within the space enclosed by the Free box. The bottom three (3) alignment buttons align the selected text string in a Free box horizontally within the space enclosed by the Free box. When the size of the Free box changes either in a horizontal or vertical direction, the vertical and horizontal text string alignments are maintained. OnePager automatically increases or decreases the number of lines of the text string within the Free box to prevent the text string from overlapping a Free box boundary.
Free Box Right-Click Context Menu Options
Right-clicking on a displayed Free box accesses its right-click context menu as shown below:
Deleting a Free Box
To Delete a Free box, right-click on the selected Free box and choose Delete from the free box right-click context menu shown below. You have two (2) option to consider to Delete the Comment box as shown below:
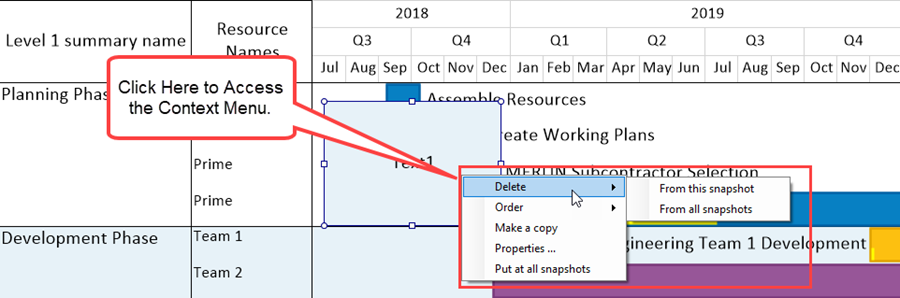
From This Snapshot
The From this snapshot sub-command causes the selected Free box to be deleted from the current snapshot only. The same Free box appearing in other snapshots are not deleted and remain available when the snapshot is displayed in the Chart Editor. These remaining Free boxes can be individually edited and all edits are applied to the identical Free box appearing in other snapshots. A Free box once deleted from one or more snapshots can be restored to appear in all snapshots by selecting the Free box in a snapshot in which it appears, accessing the Free box's context menu and clicking the Put in all snapshots command.
From All Snapshots
The From all snapshots sub-command causes the selected Free box to be deleted from all snapshots associated with the chart. When a Free box is deleted from all snapshots it can no longer be accessed in any snapshot. Generally, it is more common to delete a Comment box from all snapshots, unless you want it to reappear in a different snapshot later on.
Ordering Free Boxes
Free boxes, when created, are automatically displayed in front of all other graphics as shown here:
Send to Back Example
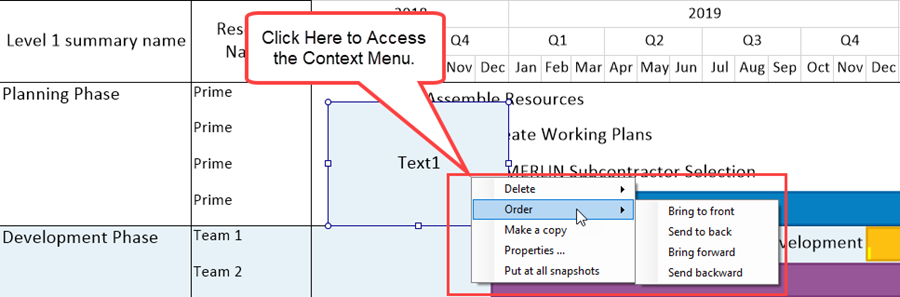
If you want to avoid covering up task bar/milestone symbol or text labels, for example, you can use the Order command in the free box right-click context menu to adjust the display of Free boxes on the Z-Axis as described below:
1) Right-click on the selected Free box and then click on the Order command as shown in the illustration above.
2) Mouse over the Order command to access the four sub-commands as shown above.
3) As shown above, the Free box appears to be hiding task bars.
4) If you want the task bars to appear on top of the Free box, click the Send to back sub-command and the chart looks like this:
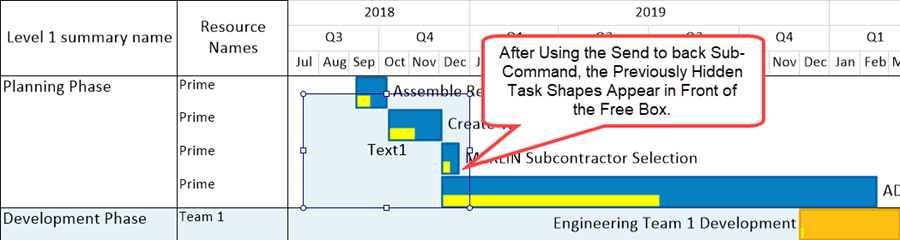
The Free box in the illustration above is using its default Background color to better illustrate the Send to back sub-command.
Bring to Front
In a similar way, the Bring to Front sub-command results in the selected Comment box to appear over the baseline element in this illustration:
Bring Forward and Send Backward
The Bring forward sub-command is treated as a stepping feature since the Z-Axis in the Chart Editor display on your screen consists of several layers. You can step-wise bring the Free box forward one step at a time by successively using the Bring forward sub-command. You can do this until the display of the selected Free box is at a desired Z-Axis layer. Similarly, the Send backward sub-command is also treated as a stepping feature like the Bring forward sub-command discussed above. You can step-wise send the Free box backward one step at a time by successively using the Send backward sub-command. You can do this until the display of the selected Free box is at a desired Z-Axis layer.
Make a Copy
You can create more than one Free box from an already created Free box by using the free box right-click context menu Make a copy command. To accomplish this, use the Make a copy command accessed by selecting the existing Free box, right-clicking to access the free box right-click context menu, and then click the Make a copy command. These actions access the Shape properties form where you can specify the new Free box’s text label and other properties as simply illustrated here:
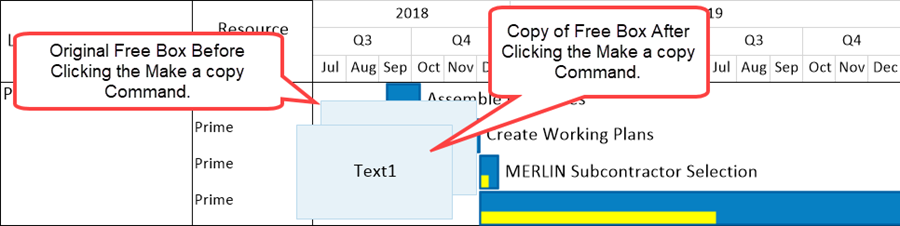
This copied Free box possesses all the attributes of any Free box created in the chart. From this Free box even additional Free boxes can be copied. Copied Free boxes can be edited, moved, resized, replicated in all snapshots, and deleted as any other Free box in the chart.
Properties ... Command
Considering again the free box right-click context menu accessed when a Free box is right clicked, the Properties ... command accesses the Shape Properties form as shown below:
After accessing the Shape Properties form, you can edit all the available properties for the selected Free box as described in this article. Clicking the OK button at the bottom right of the form applies your edits to the selected Free box in the current snapshot and in any other snapshot that the selected Comment box appears.
Putting Selected Free Boxes in All Snapshots
Use the Put in all snapshots context menu command shown below to assure that the selected Free box appears in all currently available and future snapshots in the chart.
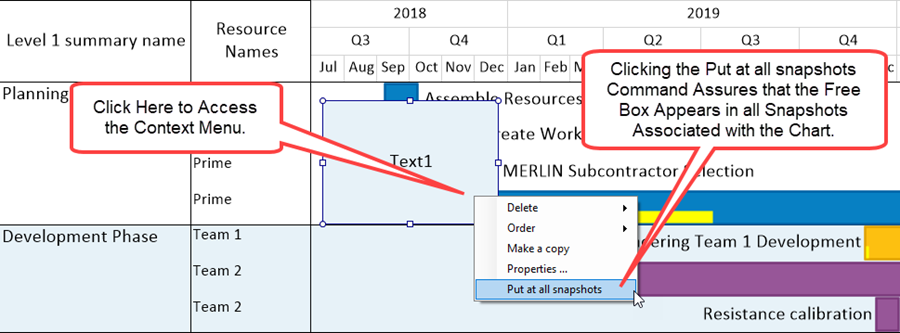
As discussed above, once a Free box is proliferated to other snapshots it can be edited, moved, resized, replicated in all snapshots, and deleted as any other Free box in the chart. The default setting for created Free boxes is to put the Free box in all snapshots. Sometimes a Free box is only appropriate for a selected snapshot and should not appear in all snapshots. If this is the desired result, it is necessary to selectively delete the Free box from any snapshot that you do not want the Free box to appear. Should you subsequently decide that this Free box should be included in all snapshots, right-click on the Free box and click the Put at all snapshots command in the context menu as previously demonstrated above.
Related Links
Changing Individual Task/Milestone Properties (Color, Shapes, Labels, etc.)
Creating and Managing Comment Boxes
Editing with the Chart Properties form (Portal)
(14.0.1-70)