Critical path for OnePager (OnePager Pro)
Contents
About Modifying Critical Path
A powerful feature of OnePager Pro is the ability to display the critical path through tasks on the OnePager graph.
Critical Path Representation in OnePager Pro
This feature displays segments on the top of each task showing where the critical path intersects that task. For example, the summary task below has five red segments, showing that it has five subtasks on the critical path:

The critical segments for a summary task are computed by finding subtasks that are on the critical path and have no subtasks themselves. The software then applies the same rule to subtasks of subtasks. It repeats this search until it has examined the entire work-breakdown structure beneath the summary task. To determine whether a given subtask is on the critical path, the software can use the critical path indicator, “Critical,” in Microsoft Project. Alternatively the software can use any Flag or Number field in your Microsoft Project plan. A summary task with critical path segments looks like this:

Modifying All Task Critical Path Properties in a Project View
All task critical path properties may be modified in a project view without changing the settings in the current “Template” by using the following steps:
1) Click the “Project-View Properties” button on the OnePager “Home” ribbon in the “Settings” group.
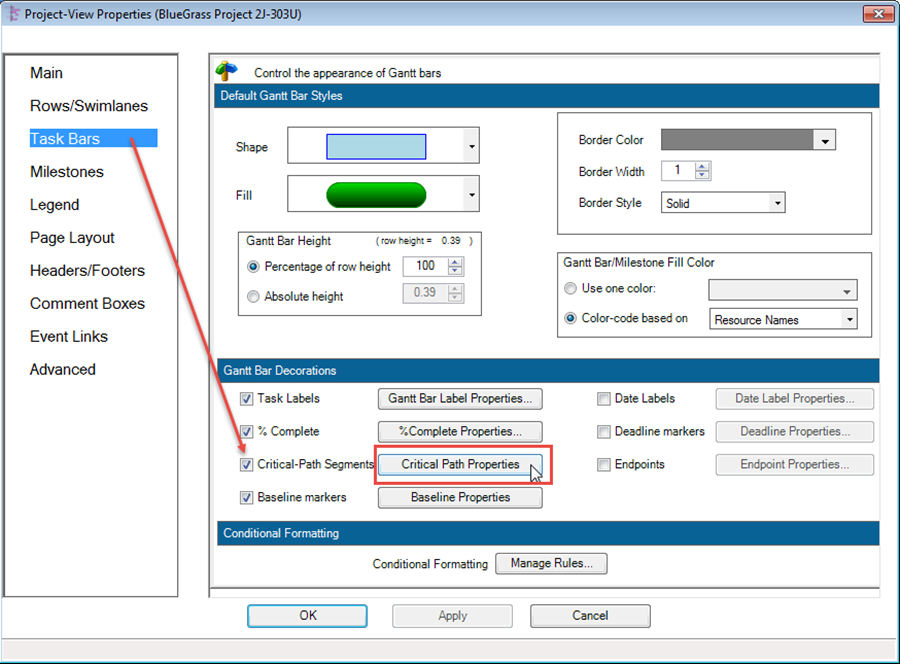
2) Then, navigate to either the “Task Bars” tab.
3) Ensure that the “Critical-Path Segments” box is checked as shown below:

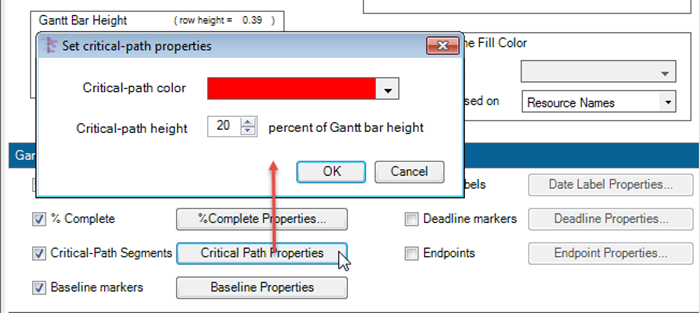
4) You can control the properties of critical-path segments by clicking the “Critical Path Properties” button which brings up the “Set critical-path properties” form shown below:

- a) In the “Set critical-path properties” form you may change the color of the critical path segment represented in a task by clicking the “Critical-path color” drop down button which will show the standard OnePager “Color Chooser” form. Additionally, you may adjust the height of the critical-path segment within the task by changing the percentage value in the “Critical-path height” control of the above form. Here is an example of tasks with the “Critical-path height” set to 50%:

- b) If you do not check the “Critical-Path Segments” check box in the “Task Bar” tab of the “Project-View Properties” dial box, you will not be able to display the critical segments because the software will not compute the critical segments as the Microsoft Project plan is imported.
5) As discussed above, it is recommended that you turn on the critical-path segment display controls in the “Template” before importing the Microsoft Project plan to create your first project view. However, you may subsequently use the controls above in the “Project-View Properties” form to display critical-path segments in follow-on snapshots. This is done by setting the “Critical-Path Segments” check box in the “Task Bars” tab of the “Project-View Properties” form to ON. With this control set ON, all subsequent project view snapshots will display critical-path segments depending on the data imported from the Microsoft Project plan.
Modifying Individual Task Critical Path Properties in a Project View
The default settings for displaying critical path information for individual tasks (milestones do not have critical path segments) can be modified by using the following steps:
1) You can select the task and right-click it to reveal the context menu with the “Format…” command or click the “Format…” button on the OnePager “Home” ribbon.
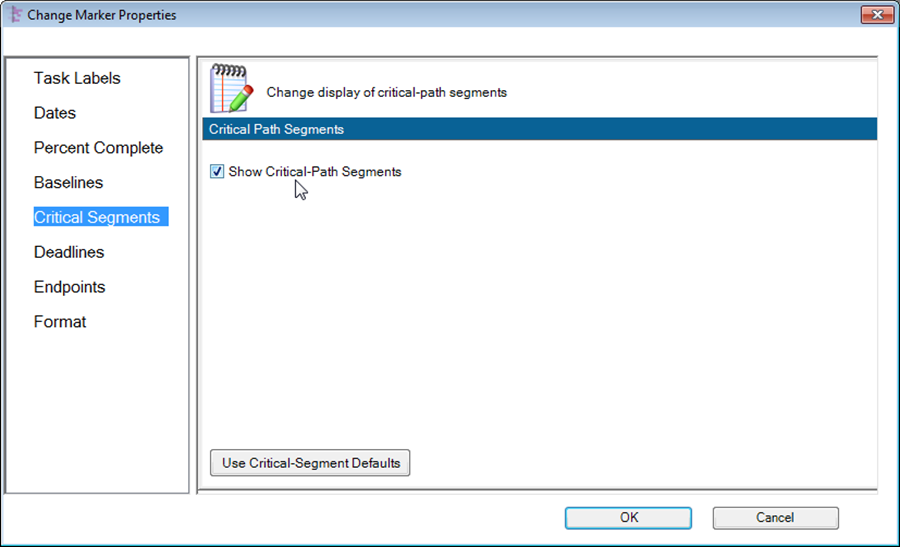
2) Either way, select the “Critical Segments” tab in the “Change Marker Properties” form which looks like this:

3) Go to the “Critical Segments” tab as shown above which controls the display of the critical path for the selected task.
- a) The “Show Critical-Path Segments” check box allows you to turn on and off the display of the critical path for the selected task.
- b) Clicking the “Use Critical-Segments Defaults” will change the selected task’s critical path segment properties to the critical path settings current in the “Project-View Properties” form for the project view.
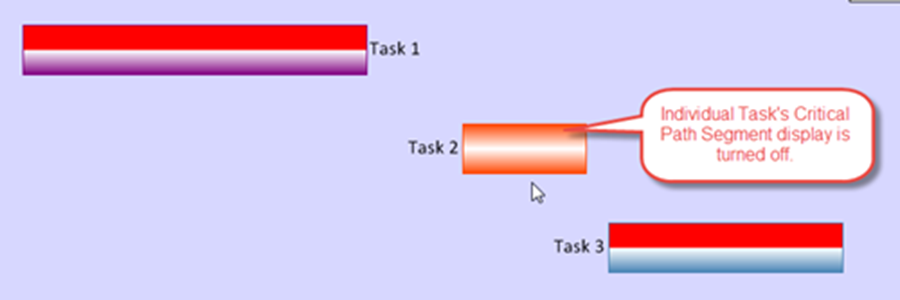
- c) Here is an example of a project view with one task’s critical path turned off:

- d) When a task is modified to not display the critical path segment as illustrated above that the task is included in a virtual summary task (VST), the task with the maverick critical path segment will be represented in the VST with the critical path displayed as shown below:

- e) There are no controls in the “Critical Segments” tab of the “Change Marker Properties” form to modify the critical path properties for an individually selected milestone.
(10.7)