Deadlines for Version 7.0 (OnePager Express)
Contents
About Editing Deadlines
OnePager translates Deadlines from your Microsoft Excel source plan into deadline shapes in the graph to indicate the deadline date for a task bar/milestone symbol. In order to import deadline date information, your Microsoft Excel source plan must have a column header with a name similar to the word deadline. OnePager Express does its best to translate similar names to deadline date information and import this data. You always have the option to specifically designate a Microsoft Excel column header name as your specific set of dates specifying deadlines. This option is available in the OnePager Express Template Properties and Chart Properties form at the Task Bars tab as is explained later in this article. To illustrate with a simple example, consider the Microsoft Excel source plan given below with three tasks containing Start and Finish dates, a deadline date, and a Flag with the header Show It set to Yes so that OnePager imports the data for all three tasks:

When a simple chart is created from the source plan above and Deadlines are turned ON, the example chart looks like this:
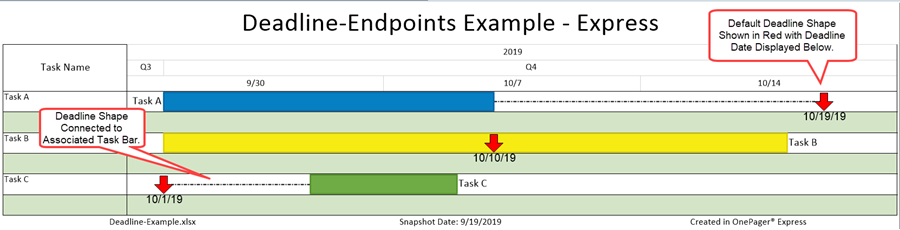
When deadlines are turned ON, they appear (by default) as red arrow shape in each task bar's row at the deadline date position with respect to the time axis. Above, deadline shapes that are not contained within their respective task bar are shown with back dash-dot connecting lines to illustrate the capability.
Editing All Deadline Properties
To display deadline dates in your charts you must first assure that the Microsoft Excel source plan has a Deadline field populated with valid dates. When deadline dates are present in the source plan they must first be turned ON as the default setting in most distributed Template Properties form is for deadlines to be turned OFF. To do this click the Chart Properties button on the OnePager Home tab to access the Chart Properties form. Next, navigate to the Chart Properties Task Bars tab and to the Task Bars Decoration control group. Check the Deadline markers checkbox ON to enable the Deadline Properties... button to the immediate right of the checkbox as shown below:

By default, deadlines are mapped to the Deadline date field in Microsoft Excel if that field is present as a column header.
Set Deadline Properties Form
To edit the format of all deadlines, click the Deadline Properties... button, to access the Set deadline properties form shown below:
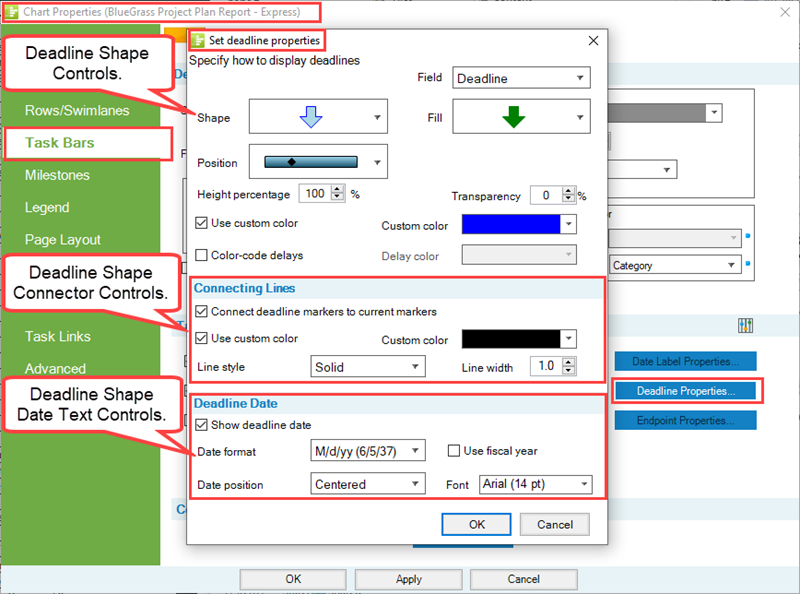
The form above provides all the editing controls for all deadline shapes that can be displayed in the chart.
Standard Basic Deadline Shape Controls
As stated previously, many of the controls in this group of the Set deadline properties form are standard. The deadline shapes available are the same as Milestone symbols found in the Milestones tab of the Template Properties and Chart Properties forms Likewise, the Fill patterns available are the same for task bars and milestone symbols also found on their respective tabs of the Template Properties and Chart Properties forms.
The Height percentage control represents the percentage of the total task bar/milestone symbol's height itself, is covered elsewhere and behaves in a standard way. The default Height percentage is 100%.
Similarly, the Transparency control for the deadline operates in the same way as transparency controls for other objects. The higher the value selected, the greater the transparency. Conversely, the low the value selected, the more solid the deadline appears.
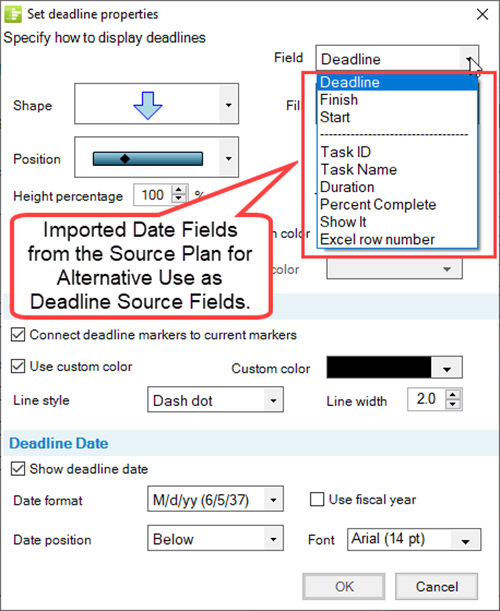
The Field dropdown in the upper right of the form allows you to select another Microsoft Excel source plan date field instead of the default Deadline field. Contents of the Field dropdown list is shown below:
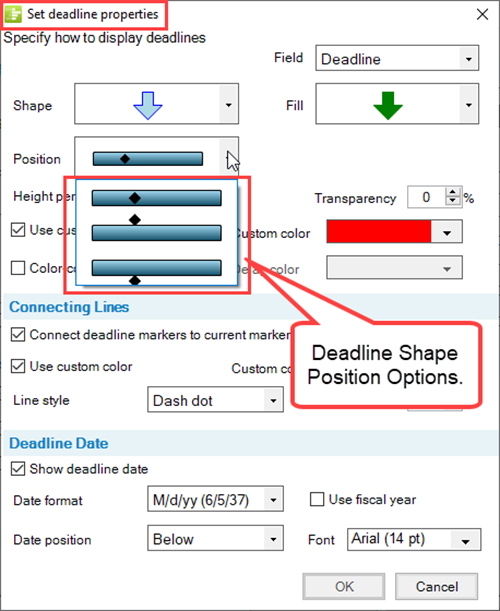
The Position of the deadline has a unique meaning. Deadlines are always associated with a task bar/milestone symbol and can be to the left, within, or to the right of the task bar/milestone ssymbol itself depending on your Microsoft Excel source plan data for the task bar’s start, finish and deadline dates. The position in this context is about where within the task bar/milestone symbol’s row area vertically the deadline should be placed. There are three (3) available positions for the placement of the deadline with respect to the task bar:
- Centered in the task bar.
- Above the task bar/milestone symbol.
- Below the task bar as shown here:
The Use custom color checkbox can be checked ON when it is desired to select a color for the deadline other than the color for its parent task bar/milestone symbol. When the Use custom color checkbox is checked ON, the Custom color dropdown is enabled. Clicking the dropdown button shows the standard Color Chooser form.
Showing Deadline Delays
The purpose of the display of Deadline Delays is to provide you with the capability to highlight deadlines that are missed as shown in the chart. When the Color-code delays checkbox is checked ON, OnePager uses the selected Delay color (determined by the selection of the delay color from the standard Color Chooser form) to show all deadlines that are missed:
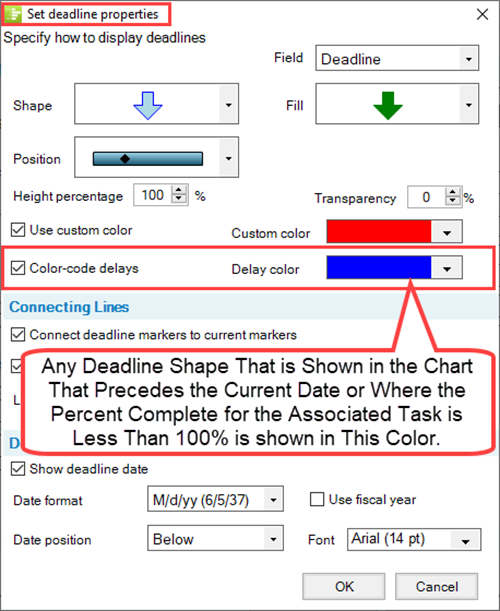
The deadline delay feature follows this logic. The deadline is set to the selected Delay color if, for any deadline:
- The Color-code delays checkbox is checked ON,
- The deadline date is earlier than the current snapshot date,
- And the percent (%) complete for the parent task bar/milestone symbol is less than 100%.
If any of the conditions stated above are not met, the color of the deadline is set to the default color, unless a custom color is otherwise specified.
Example Deadline Date Delay
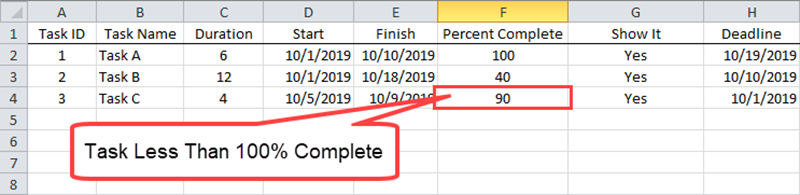
To illustrate the operation of the Color-code delay feature, let's set the stage by supposing that a project of three tasks is has the following initial conditions:
- Project Start Date – 10/1/2019
- Project Finish Date (Estimated) – 10/18/2019
- First Status Date – 9/11/2019
- Task A Deadline Date – 10/19/2019 (Task A Finish Date projected before Deadline Date)
- Task B Deadline Date – 10/10/2019 (Task B Finish Date beyond Deadline Date)
- Task C Deadline Date- 10/1/2019 (Task C Start Date beyond Deadline Date)
With these initial conditions, the Microsoft Project source plan looks like this:
If we take a snapshot using the above source plan as of 10/10/2019 the chart looks like this:
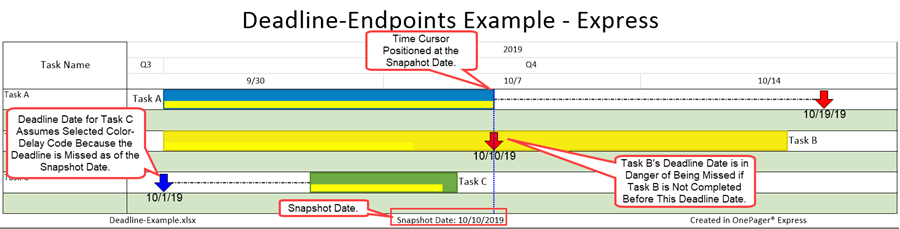
OnePager Express treats the snapshot date similar to the way Microsoft Project treats its Status date field.
Connecting Lines
The Connecting Lines control group of the Set deadline properties form deals with connecting lines properties when you require that deadline shapes are tied to their parent task bar/milestone symbol. The controls available are shown below:
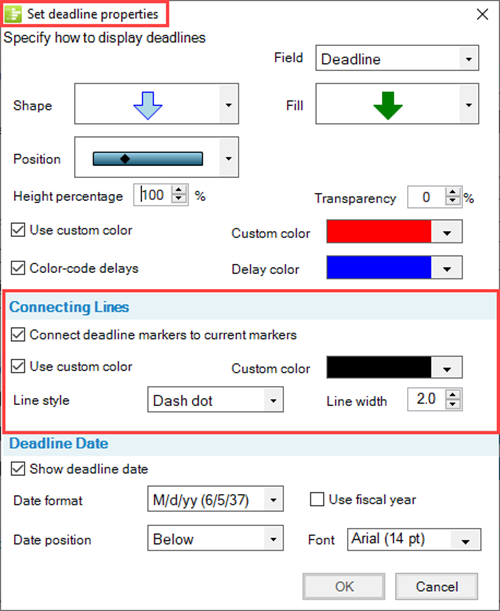
To enable deadline shape connection lines, check the Connect deadline markers to current markers checkbox ON as shown above. A default color, line style, and line width is established from your current Template. If you wish to specify a custom color, check the Use custom color checkbox ON and use the Custom color dropdown button to access the standard Color Chooser form.
You also have the option of selecting from a variety of line styles by clicking on the Line style dropdown button.
There are five (5) standard line styles to select from which are the same as used to connect Baselines to their parent task bars/milestone symbols as described in the section of the article at: Baselines for OnePager Express - Connect Baselines and Actual Task Bar/Milestone Symbols
The value dial to the right of the Line style dropdown provides the capability to edit the width of the deadline shape connection line. The form above shows the extent of control that you have over the lines that can be used to connect a deadline to its parent task bar/milestone symbol. These include the specification of a custom color, line width and line style.
Deadline Dates
The Deadline Dates control group in the Set deadline properties form provides the controls for turning ON and positioning the deadline date text labels as shown below:
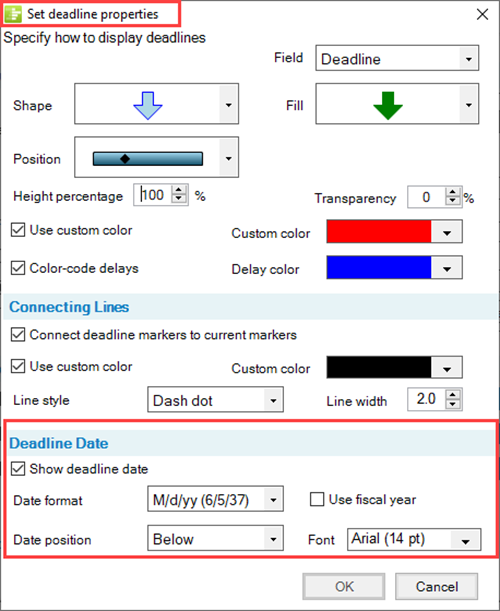
The form above shows the extent of control that you have over the display of date labels for deadlines. These are the same controls as for other decoration date specifications and include controls for date format, the use of the fiscal year feature, the positioning of the date label text, and the font properties for the date label text.
For more specific information about the controls in this control group, please reference the corresponding section for Baseline Decorations at: Baselines for OnePager Express - Showing Baseline Dates
Editing Individual Task Deadline Properties
Deadline displays are normally turned OFF in distributed Template Properties forms. In addition to the capabilities for editing all Deadline properties using the Template Properties and/or Chart Properties forms, you can select and individually edit Deadline properties showing in the chart. As a prerequisite for editing individual deadline properties it is the necessity for deadline data to be imported from the Microsoft Project source plan.
Selecting Individual Task Bar or Bars
Some individual task deadline properties can be edited by selecting the desired task bar or task bars with a left-click operation and then right-clicking one of the selected task bars to show the task bar right-click context menu below:
Before you can do so, you must confirm that the Deadline markers checkbox in either the Template Properties or Chart Properties form's Task Bars and/or Milestones tab is checked ON.
Accessing the Change Task/Milestone Properties Form
Select the Format… command which access the Change Task/Milestone Properties form. Next, navigate to the Deadlines tab, which displays the deadline control options shown below:
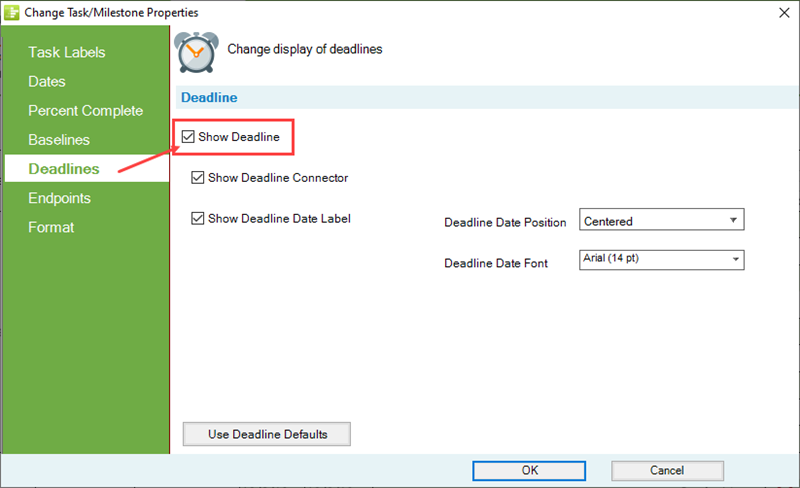
The Deadlines tab, shown above controls the display of deadline connectors and deadline text dates for the selected task bar/milestone symbol and the placement of the deadline text dates with respect to the deadline shape. The Show Deadline checkbox allows you to turn ON and OFF the display of deadline information for the selected task bar/milestone symbol. When the Show Deadline checkbox is checked ON, you have the option to specify the display of the connector and the display of deadline date for the selected task bar/milestone symbol. When the Show Deadline Date Label checkbox is checked ON you have access to control over the Deadline Date Position selection dropdown and Deadline Date Font selection button as discussed above related to editing all task bar/milestone symbol deadline information. There are five (5) standard deadline date label positions to select from. Clicking the Deadline Date Font button accesses the standard Font properties form where edits of the deadline date text can be made.
Individually Edited Deadline Shape Example
Below is an example of a single task bar's deadline information using the chart previously shown in this article:

The controls at the Deadline tab of the Change Task/Milestone Properties form for the Show Deadline Date, that is, the Position and Font controls operate exactly as described for other start/finish date displays in OnePager.
For more information describing the use of these controls for the Percent Complete tab of this form, please see the section in the article at: Percent complete for OnePager Express - Example
There are no controls available in the Deadline tab of the Change Task/Milestone Properties form to edit the properties of the connector line for an individually selected task bar/milestone symbol.
Related Links
Manual Editing Task/Milestone Shapes and Text Labels (Portal)
Changing Individual Task/Milestone Properties (Color, Shapes, Labels, etc.)
Labeling Task/Milestone Dates for OnePager Express
Percent complete for OnePager Express
Baselines for OnePager Express
Editing with the Chart Properties form (Portal)
(10.10.1-70)