Editing, Repositioning Legend Items, and Formatting the Legend for Version 7.0
Contents
About Repositioning and Formatting the Legend
1) Groups of tasks and milestones that share an entry in the legend can have their color and shape modified in one simple operation.
2) This is a fast way of changing several tasks or milestones at once.
3) It is an alternative to some of the other methods discussed elsewhere at Manual Editing Task/Milestone Shapes and Text Labels (Portal) 9.0.1-70
4) The following steps show you how to edit, re-position legend items, and reformat the legend:
Editing Legend Items
1) To change the color and shape of an item in the legend, right click it so that the Edit Legend Item form appears, as shown below:
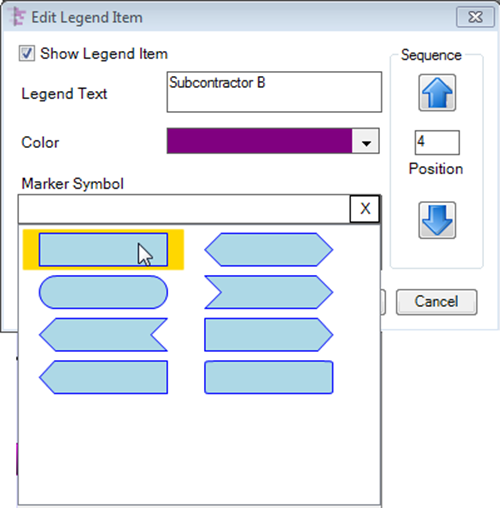
2) Change the color or shape of the legend item as previously described with the Color Chooser, the Shape Symbol dropdown button, and then click OK.
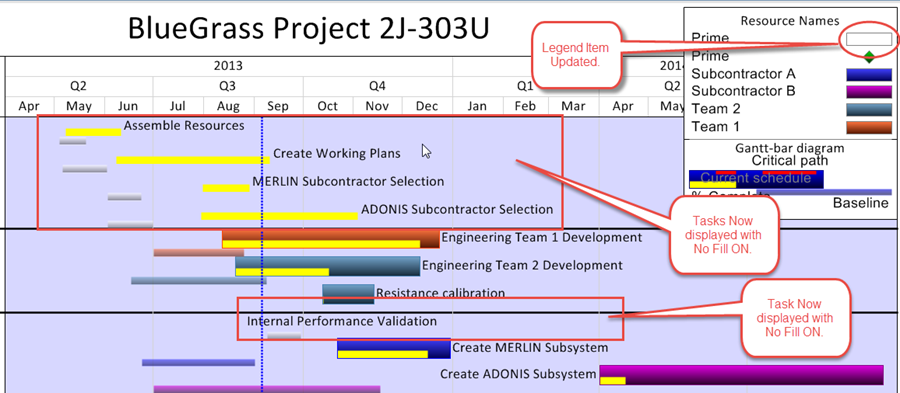
3) The legend item, and all associated tasks or milestones, in the chart are automatically reformatted to match the change.
4) You can also edit the name of the item in the legend. Changing the name in the legend does not change any underlying data in your Microsoft Project or Microsoft Excel source plan.
Re-positioning Legend Items
Items in the legend can also be re-positioned by clicking the up and down arrows on the right hand side of the Edit Legend Item form in the Sequence group of controls shown above.
Formatting the Legend
1) In addition to changing the format of individual items in the legend, you can also make adjustments to the overall format of the legend itself.
2) Most of these settings can be accessed by right clicking near the legend title so that the following context menu appears:
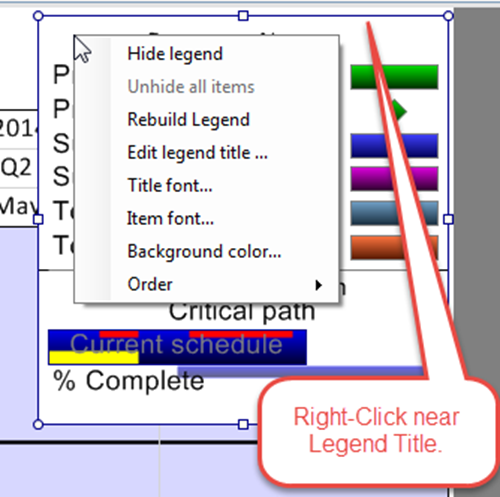
3) The context menu allows you to do the following:
- a) Hide Legend. Clicking the Hide legend command causes the legend to disappear.
- i) To retrieve the legend, go to the View tab and check the Legend checkbox in the Graphic Elements group.
- ii) You can also go to the Chart Properties form’s Legend tab and check the Show legend checkbox.
- b) Unhide all items. With the legend visible, clicking this command makes all previously hidden legend items again visible.
- c) Rebuild Legend. The Rebuild Legend command tells OnePager to rebuild the legend from scratch, incorporating any changes that were made to specific tasks/milestones properties. This is normally not necessary, but can be used if you think that the legend has gotten out of sync with what is currently in the chart area.
- d) Edit legend title. This command lets you make a change to the title of the legend using the Edit text form as shown below:

- e) Title font. This lets you make changes to the font of the legend title using the Font properties form as shown below:
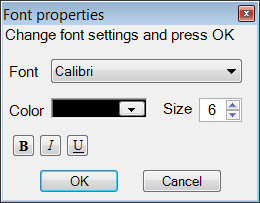
- f) Item font. This command lets you change the font of the legend items (as opposed to the legend title) using the same Font properties form as shown above.
- g) Background color. This commands lets you select the color of the legend background by bringing up the standard Color Chooser.
- h) Order. Clicking the Order command displays an additional sub-context menu as shown below:
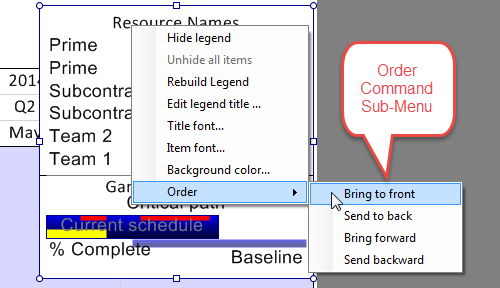
- The sub-menu for the Order command allows you to select any of the four sub-commands as follows:
- i) Bring to front. This puts the legend box in front of all other shapes in the chart area.
- ii) Send to back. This puts the legend box behind all other foreground shapes in the chart area (but not behind background shapes).
- iii) Bring forward. Selecting the Bring forward option steps the legend box forward by one increment of Z-level. This is not very useful.
- iv) Send backward. This steps the legend box backward by one Z-level. This also is not very useful.
Activating the No Fill Option
1) You can use editing on individual legend items to activate the No Fill option for those tasks/milestones represented by a particular legend item. This is an efficient way to apply the No Fill feature to multiple tasks/milestones. To use the No Fill feature through the legend follow these steps:
- a) Right click the shape for the desired task/milestone.
- b) Go to the Color window and click the dropdown button to bring up the Color Chooser form with the No Fill checkbox as shown below:
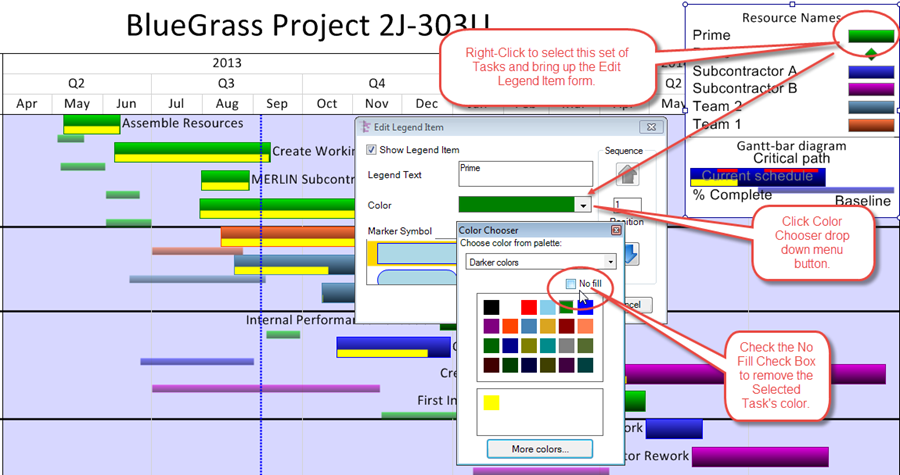
- c) When you check the No Fill checkbox the Color Chooser form closes.
- d) Click OK on the Edit Legend Item form and the result is as shown below:
2) Note. Unchecking the No Fill checkbox is a three step process described in the article at this link: Changing Individual Task/Milestone Properties (Color, Shapes, Labels, etc.) 9.2.1-70
(15.3.1-70)