Hiding/Unhiding/Moving/Finding/Changing/Resizing Tasks/Milestones
Contents
Hiding and Unhiding Task/Milestone Labels
You may want to hide one or more of the task/milestone labels.
- a) To do this, make a selection on the screen and right-click one of the tasks/milestones.
- b) Hide the task/milestone’s label by clicking the “Format…” command. Then navigate to the “Task Labels” tab where you’ll see the “Show marker label” check box as shown below:
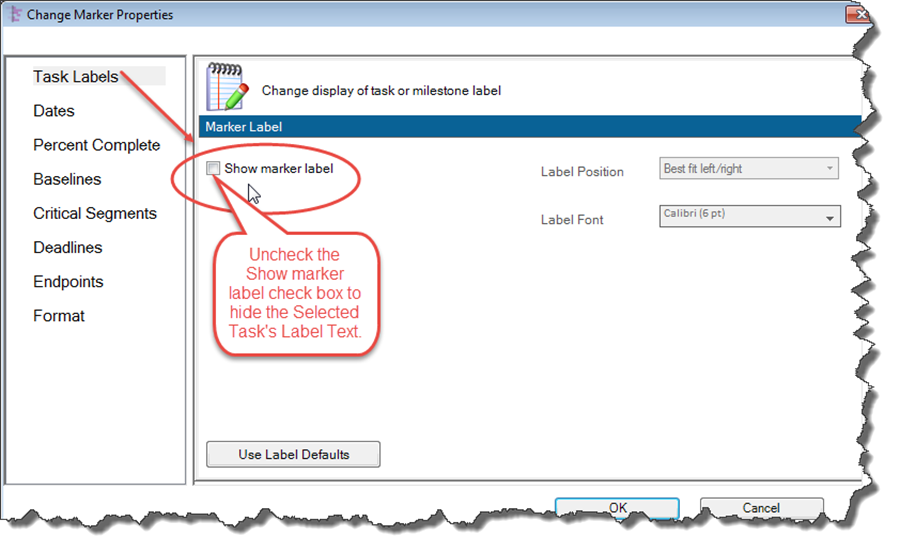
- c) Uncheck the “Show marker label” check box as shown above to hide the selected task/milestone’s label text.
Alternatively, you can simply click the “hide label” icon as shown below to hide the label text for the selected task/milestone.

If you have previously hidden the labels of any tasks or milestones, you can make them visible again by navigating back to the “Task Labels” tab of the “Change Marker Properties” form shown above and re-checking the “Show marker label” check box. Or you can simply click any label position icon in the “Position” group.
Hiding and Unhiding Tasks/Milestones
Sometimes you will want to hide the entire task or milestone (not just the label).
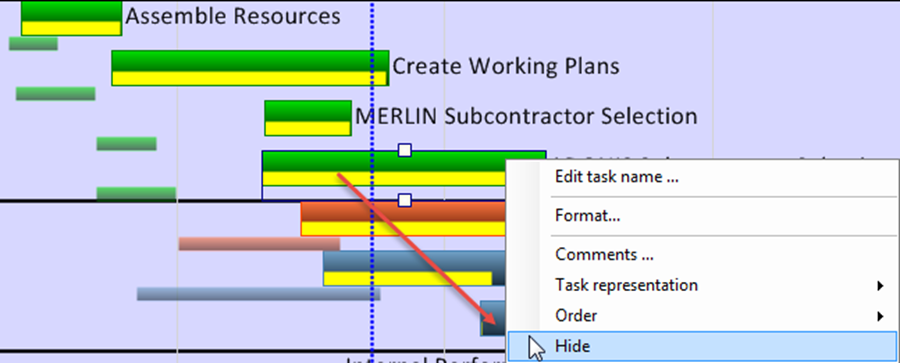
- a) To do this, select one or several tasks or milestones. Right-click the selection and then click the “Hide” command to cause the task/milestone to become hidden. The context menu is shown below:
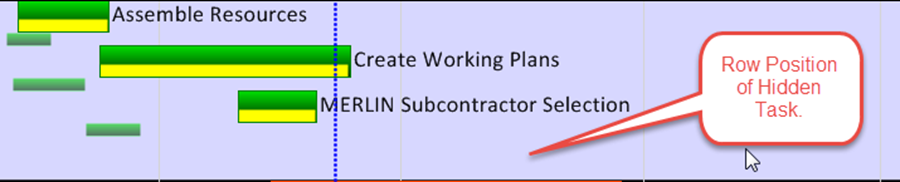
- b) When the operation is complete the project view looks like this:
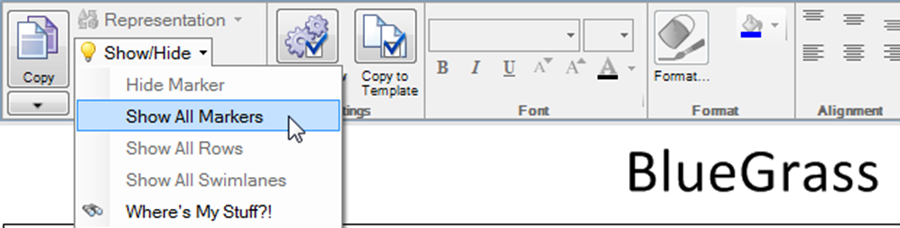
If you have hidden some tasks/milestones and want to make them all visible again, go to the OnePager “Home” ribbon’s “Editing” group and click the “Show/Hide” command. Then click the “Show All Markers” sub-command as shown below:
Moving Tasks/Milestones to Different Rows
A lot of the power of OnePager comes from its efficient handling of space on the screen. To manage vertical space, it is often very useful to move tasks/milestones so that several of them occupy the same row. To do this, select one or multiple tasks or milestones. From here you can change row position assignments several ways:
Drag with the Mouse. Drag tasks/milestones up or down to a new row position. Note that it is not possible to drag tasks/milestones left or right. This prohibition is to protect the integrity of the data received from the Microsoft Project plan which provided the task/milestone’s original Start and Finish dates.
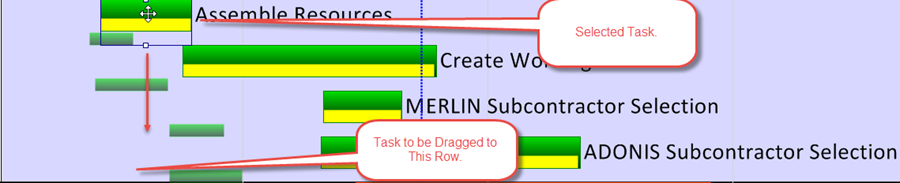
- a) To move any task/milestone from a row to another, first left-click the task/milestone to select it.
- b) With the left-click button in place, drag the selected task/milestone to the desired row as show in the before and after illustrations below:
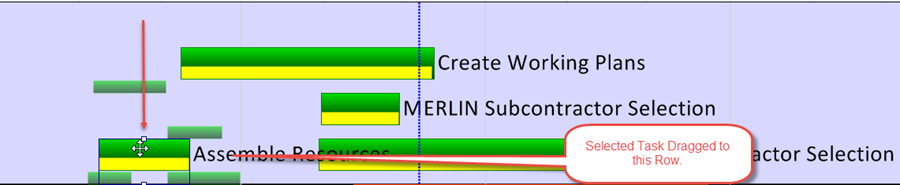
- c) You can select several tasks/milestones and drag them as a group to different rows. The selected multiple task/milestones selected retain their relative positions when dragged up or down to different rows.
Use the Arrow Keys. Move tasks/milestones to new rows by using your keyboard’s up/down arrow keys. As noted above, you can move several tasks/milestones at once using this method.
Changing the Representation of Tasks/Milestones
Task bars can also be represented as milestone either at the start date or finish date of the task. You may select the type of task representation globally or on an individual task/milestone basis.
An individual task bar can be changed to a milestone by right-clicking the task and selecting “Task representation” command as shown below:
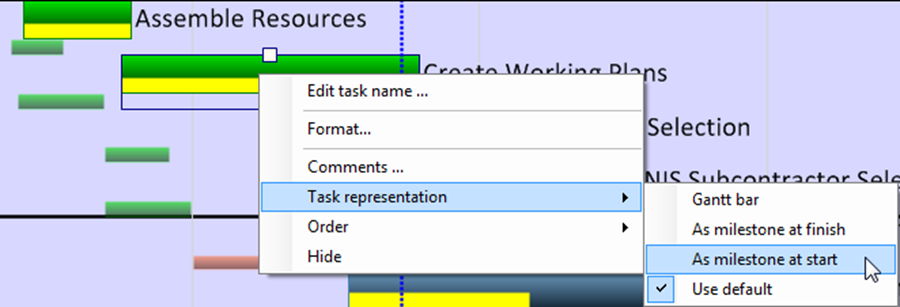
There are four options available that can be applied to the selected task.
- a) Selecting the “Gantt bar” option makes the selected task/milestone into a task bar.
- b) Selecting the “As milestone at finish” option turns a selected task into a milestone positioned at the task’s Finish date.
- c) Selecting the “As milestone at start” option turns a selected task into a milestone positioned at the task’s Start date.
- d) Selecting the “Use default” option turns a selected task/milestone into the default type specified in the current “Template” form in the “Advanced” Tab within the “Task Representation” group.
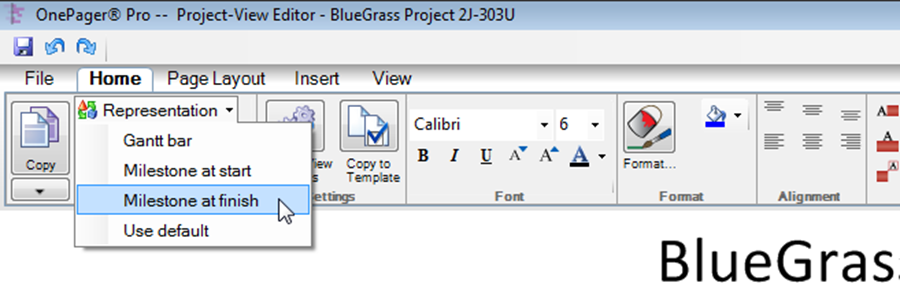
You can also change representation on the “Home” tab by clicking the item called “Representation.”
Changing the representation of a selected task/milestone or set of tasks/milestones creates what we refer to as “representation maverick.”
If you wish to change the global task/milestone representation (as opposed to changing representations manually), please read the Global Editing section.
To make global changes to task/milestone representation use the following steps:
- a) Open the “Project-View Properties” form and go to the “Advanced” tab as shown below:

- b) These settings are overridden by the “Task/Milestone threshold” setting on the same page. This setting automatically converts short-duration tasks into milestones to make them easier to see. The default value for this setting is 0.10%, meaning that any task which takes up less than 1/10 of 1% of the horizontal space on the screen will automatically be rendered as a milestone. To reduce this effect, increase the number (e.g. to 50%).
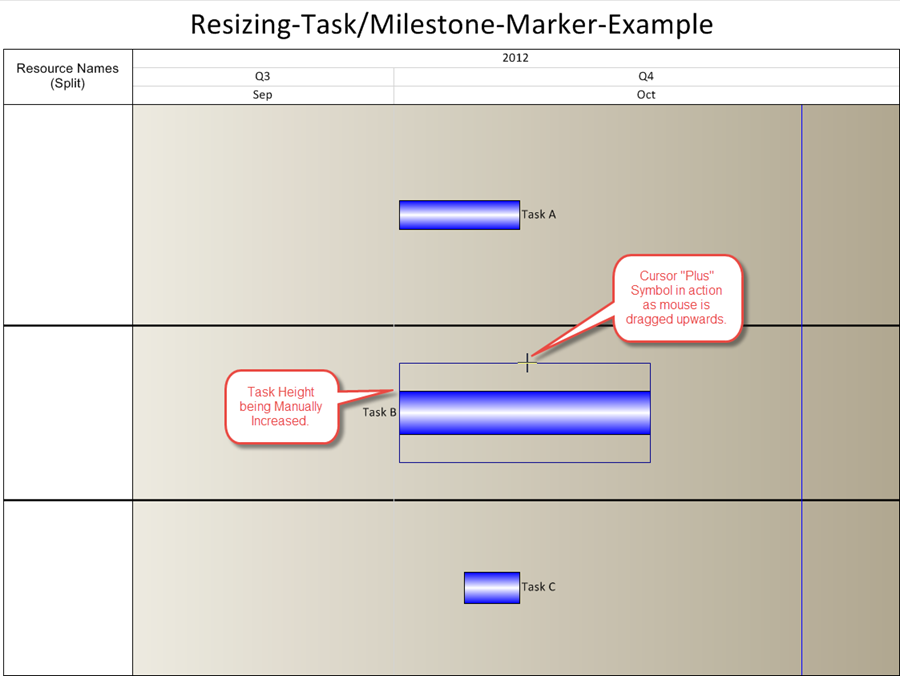
Resizing the Height of Tasks/Milestones
OnePager provides the capability to change the height of a task/milestone by first selecting it and then dragging the grab box at the top or bottom of the selection box, as shown below.
When the height is increased, both the top and bottom of the task or milestone expand. Conversely both the top and bottom of the task/milestone contract when you reduce the task/milestone’s height:
If you prefer to set a fixed height for a task or milestone instead of dragging it, simply right click the task or milestone and choose the “Format….” command. This will launch the “Change Marker Properties” form, where you will have the option to adjust the “Height” control:

- a) The “Height” controls allow you to select whether you want the selected task/milestone’s height to be a percentage of the row height (recommended) or if you want the task/milestone’s height to be in terms of absolute height in inches or centimeters.
- b) The quantity in parentheses, (row height = 0.38) tells you the current height of the row that contains the task/milestone.
Changing the height of an individual task/milestone creates a “height maverick.”
If you wish to change the global task/milestone height (as opposed to making height mavericks), please read the Global Editing section.
(9.3)