Linking Tasks and Milestones (Adding, Deleting, Modifying) for OnePager Live Beta 2
Contents
About Links and Linking Tasks/Milestones
19.0.1-OPL2 from 19.0.1-60 7/14/2017
If you need to show dependencies, OnePager provides a means for you to link one task or milestone with others. OnePager Pro and OnePager Express do not import dependency information from Microsoft Project or Microsoft Excel.
Adding Links
Adding links manually to the project view requires you to identify the two task/milestones that will serve as the link pair.
1) Select two (and only two) links by clicking the first task or milestone and then clicking the second task or milestone while holding down the CTRL key.
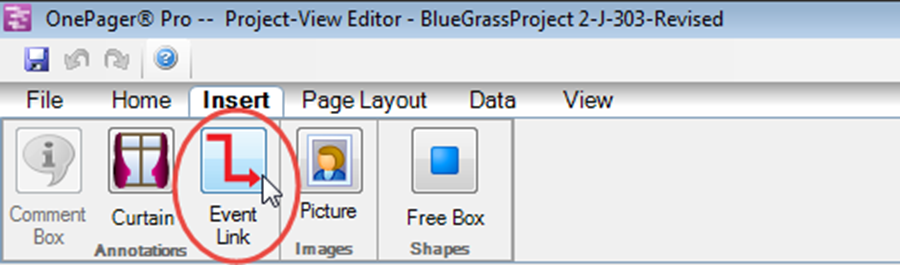
2) Go to the Insert tab on the ribbon and click the Event Links button:
3) The Specify Event Links form will appear, allowing you to customize the style of the link:

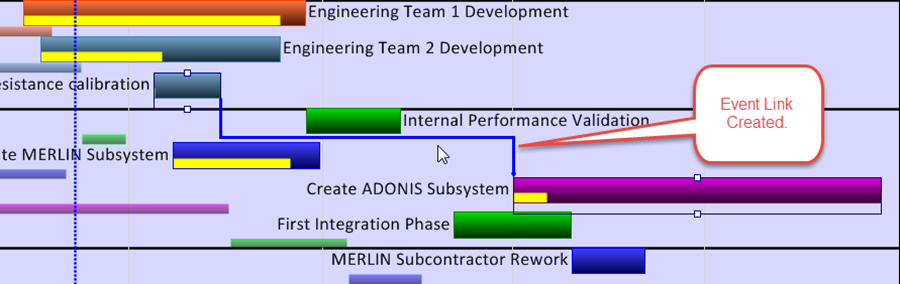
4) Make the changes desired to the settings in the form and then click OK. The link will appear in the project view between the two selected tasks or milestones:
5) You may edit a link by right-clicking the link and selecting the appropriate command from the context menu that appears.
Deleting Links
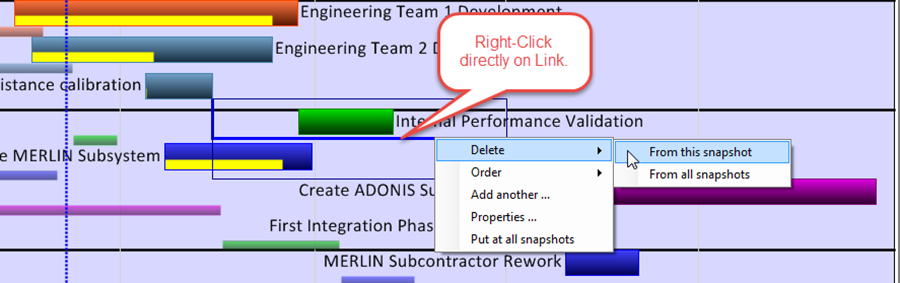
6) To delete a task/milestone link either from the current snapshot or all snapshots, right-click on the link and choose one of the Delete options as shown below:
Ordering Links
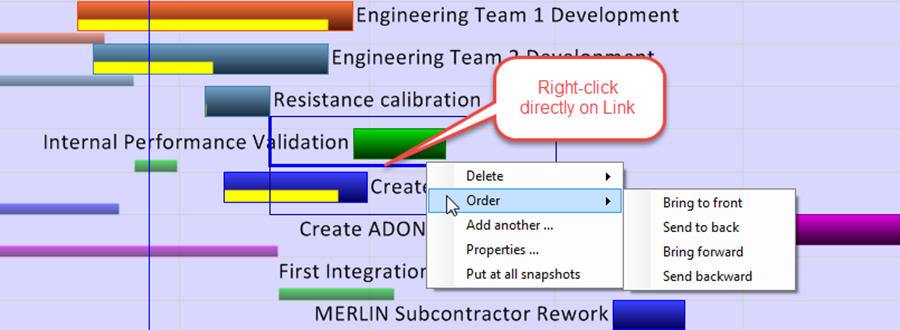
7) The Order command allows you to place the link within the display area relative to other graphics in the Z-Level.
- a) This command operates similar to other Order operations.
- b) Please see the article on Deleting, Ordering, and Changing Images 20.4.1-OPL2 in the Background Images (Portal) 20.0.1-OPL2 group of articles.
- c) The Order command appears like this when you right-click a link:
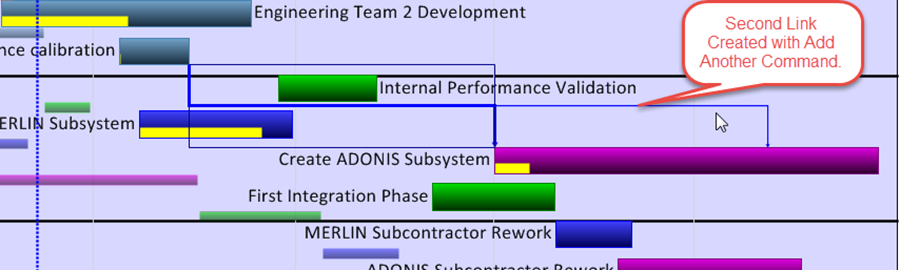
Adding Another Link
8) This command, when selected, will bring up the Specify Event Link form for the selected tasks/milestones.
- a) This allows you to add another link between the two selected task/milestones with different properties.
- b) The example below shows a second link added that is positioned further to the right of the first link:
Modifying Link Properties
9) The Properties … command is discussed more extensively in the Modifying Link Formatting discussion below.
Putting Links in all Snapshots
10) This command will assure that in a multi-snapshot project view that the selected link is included in all snapshots where the two participating tasks appear. To have links appear in only some snapshots they must be first established in all snapshots and manually deleted from those snapshots where the links are not desired.
- a) You have the option, as noted in the Delete links discussion above, to delete links from individual snapshots.
- b) To do this requires going to the desired snapshot and specifically using the Delete command with the From this snapshot sub-command to achieve the desired result.
- c) This option works in the same way as deleting curtains from specific snapshots.
- d) Please see this article for reference: Creating and Managing Curtains 16.0.1-OPL2.
Modifying Link Formatting
Once a task/milestone link is created, its properties can be modified as shown by the steps below:
1) Begin by right-clicking the link, and choosing Properties … command. This will bring up the same Specify Event Links form.
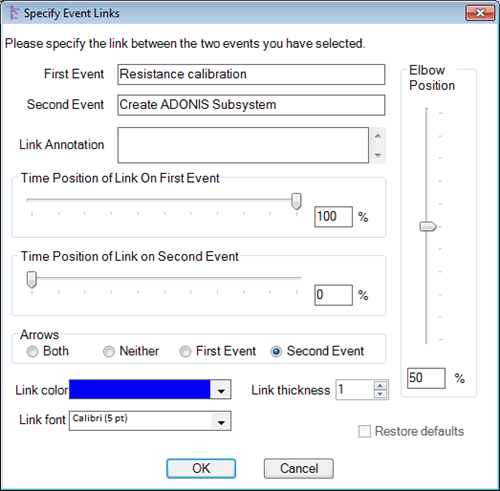
2) The following link properties may be modified:
- a) Link annotation. This window allows for the insertion of optional text that labels the task/milestone link. See Link font below for instructions for changing the text in the Link annotation window.
- b) Time position of link on first task/milestone. This slider bar allows you to position the starting point of the link on the first task bar. You can show a that a link starts somewhere in the interior of a task/milestone.
- c) Time position of link on second task/milestone. This slider bar allows you to position the ending point of the link somewhere in the interior of the second task/milestone.
- d) Elbow position. This slider bar allows you to position the horizontal elbow of the link. This is useful for making sure that the link annotation is not obscured by something else.
- e) Arrows. This radio buttons allows you to specify arrow point at the start and/or finish of the link.
- f) Link color. This control allows you to specify the color of the link line segment. The Link color dropdown button provides access to the Color Chooser form. This form also provides access to alternative palettes and the No Fill feature.
- g) Link thickness. This control sets the thickness of the link line segment. Line thickness is measured in the units established in the Template (i.e., inches or centimeters).
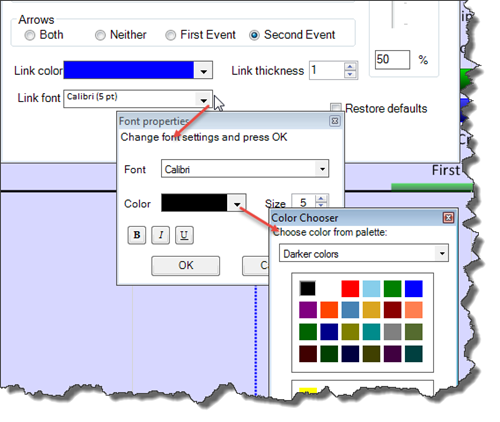
- h) Link font. This control gives you access to the Font properties form for controlling the font properties of the link annotation (i.e., link label text) as shown below:
3) The No Fill feature applies to links and can be useful for representations of thick link segments.
(19.0.1-OPL2)