OnePager Import of Data from Wrike for Version 7.2
Contents
- 1 Introduction
- 2 About Connecting and Importing Wrike Data to OnePager
- 3 Selecting Tasks for Import into OnePager
- 4 Intelligent Changes Made to OnePager Current Template Properties Forms
- 5 Missing Columns, Column Headers, or Misspelled Column Headings
- 6 Missing Task Start/Finish Dates
- 7 OnePager Chart Representation of Virtual Columns
- 8 Representation of Project Scheduling Data Columns from Wrike Source Plans
- 9 Related Links
Introduction
The purpose of this article is to provide you one place with as much information as possible about how OnePager is used to create OnePager charts with data imported from Wrike.
In most cases OnePager handles data fields from Wrike very much like data coming from Microsoft Excel. This article focuses on two major topics:
- 1) Connecting to and importing Wrike data into OnePager.
- 2) OnePager’s handling of specific Wrike column data once those data are imported.
As a convention, whenever we refer to the OnePager in the context of Wrike, we'll just say OnePager when it’s absolutely clear that we are discussing OnePager with Wrike. Since only the Standalone edition of OnePager connects to Wrike files online, we'll just leave the suffix "Standalone" off.
About Connecting and Importing Wrike Data to OnePager
OnePager imports data from Wrike by first making the connection from OnePager to your Wrike account online. Therefore, you must first have a Wrike account and login credentials so OnePager can access your account, your Wrike files, and be able to download selected file or files to your computer.
Detailed information on setting up you Wrike data for import to OnePager and other topics related to getting started using OnePager Bundle can be found at this article:
| Using Wrike with OnePager |
Data Imports to OnePager
OnePager expects that you created a Wrike Project formatted file from one of the many available Wrike templates. In most cases, the column headings for the Project formatted file look like this:
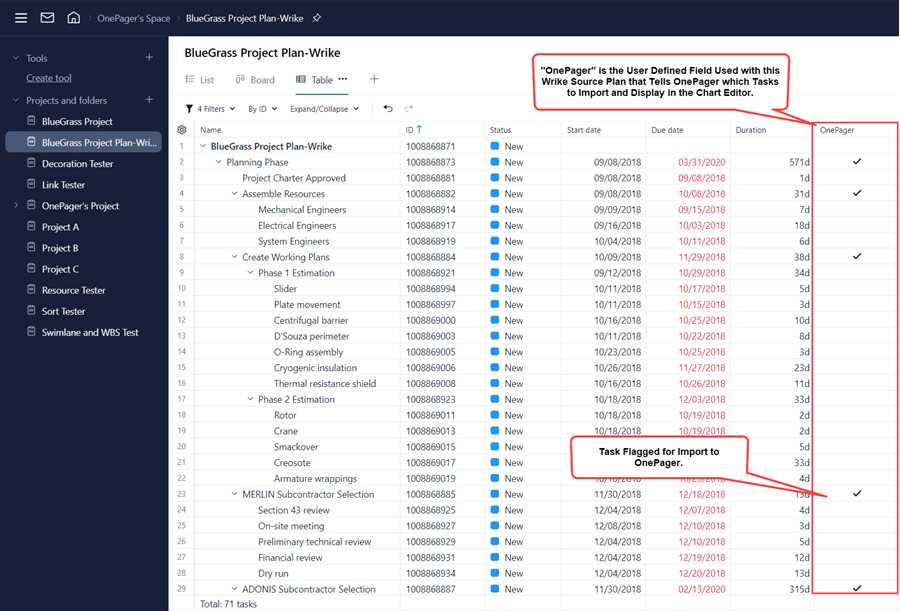
Minimum Column Names and Flag Column Definition
The minimum Column names needed by OnePager are the Name, Start date, and Due date. Additionally, You should add a user defined field as a Boolean field specifically to facilitate the interface between Wrike and OnePager. Setting the checkboxes for tasks that you want to import to OnePager ON assures that OnePager can identify these tasks and successfully import them. An example is shown here:
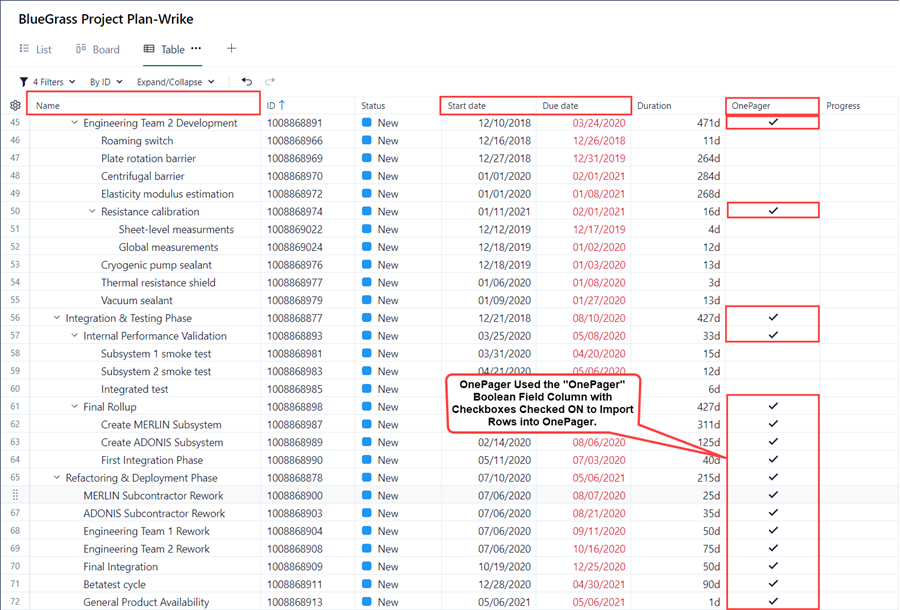
In the example above, the OnePager column’s purpose is to instruct OnePager on which rows to process when importing the Wrike Project formatted file. OnePager expects to see either ON or OFF appropriately entered in the cells of the OnePager column indicating which rows to import (ON) and which rows not to import (OFF or blank).
OnePager Recognized Data Types
What follows is a short discussion of how OnePager applies it’s built in intelligence functions with respect to Wrike’s Internally Defined Columns. The goal here is to provide an understanding of the process so you know what to expect from OnePager when various column heading names and data (column) types are encountered by OnePager in your Wrike source plan. There are four (4) column types that OnePager looks for when importing data from Wrike:
- Dates
- Numbers
- Boolean (TRUE or FALSE)
- Text Strings (A through Z, 0-9, special characters)
All data provided by the Wrike interface to OnePager, regardless of data type, are imported from Wrike Project formatted files. OnePager begins this analysis from top-left to bottom-right. Once the column headers are located and the data types are analyzed, OnePager associates these columns with specific usages in the OnePager choices (OPC) form as illustrated below. Using the second page of the OPC form shown below, you can change the column usage by selecting another column to serve the function from the dropdown list provided. The dropdown list is built from all the column headers that OnePager found during its analysis pass. An example of a dropdown list of column header names taken from a Wrike source plan is shown here:
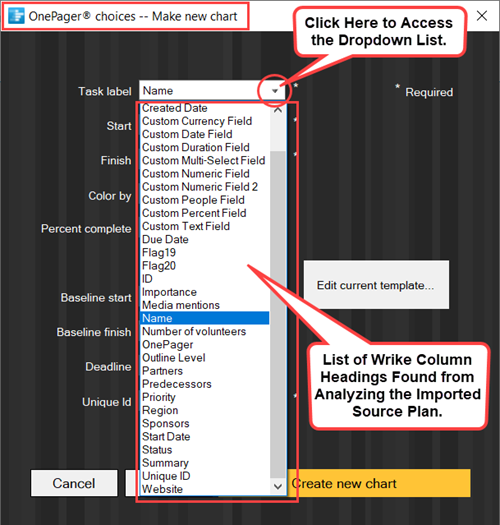
Highlighted above is the second page of the OnePager choices form showing a dropdown list of Wrike available column names along with virtual column names created by OnePager.
Selecting Tasks for Import into OnePager
Since OnePager is connected to your Wrike account, it has access to your Project formatted files. Anyone of these files can be imported into OnePager and a chart created. The benefit derived from OnePager is that you can select the tasks you which to display in your OnePager chart along with other decorations and features that are best for presentation in a schedule discussion.
A way to set up a Wrike Project formatted file for import to OnePager is to include the Wrike OnePager field in your source plan and set the Boolean value of ON in the cells for each row in your source plan that you want OnePager to import. For illustration here we’ve define the Wrike defined column called OnePager as a checkbox column and with inserted “Checkmarks” and “Unchecked Boxes” to indicate to OnePager which tasks we wish to import. This is illustrated in the source plan portion below:
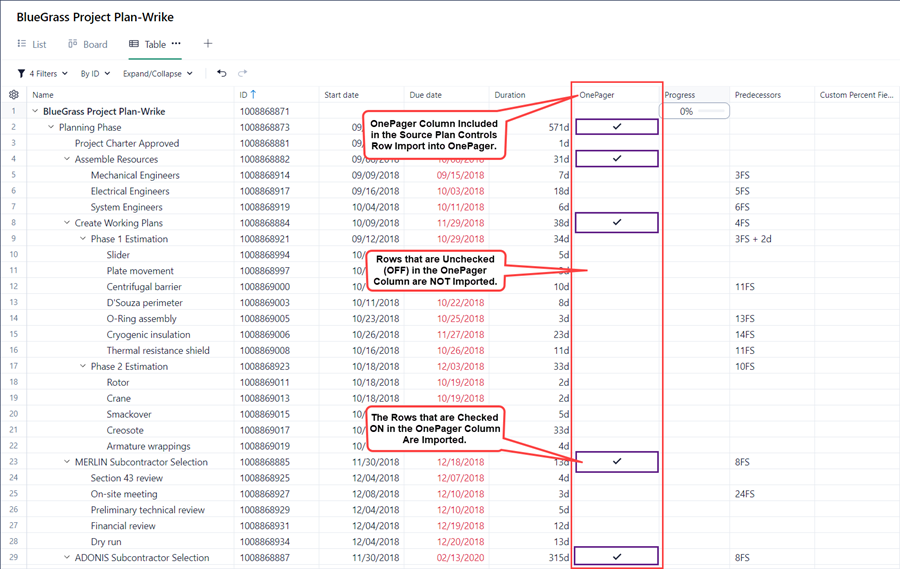
When making your first chart, we strongly recommend that you import 50 or fewer Tasks. Please note that OnePager is shipped with a number of fully populated templates that are based on the Wrike source plan used in the Tutorial shipped with the product – BlueGrass Project Plan. Three column headings must always be present as a minimum: Name, Start date, and Due date.
Once you’ve made the determination which source plan tasks to import you can launch OnePager and create your OnePager chart.
This discussion continues at this link:
| Launching OnePager Using Wrike for the First Time |
There are three (3) selection options available for controlling OnePager’s import of task data. These are discussed in the subsections that follow:
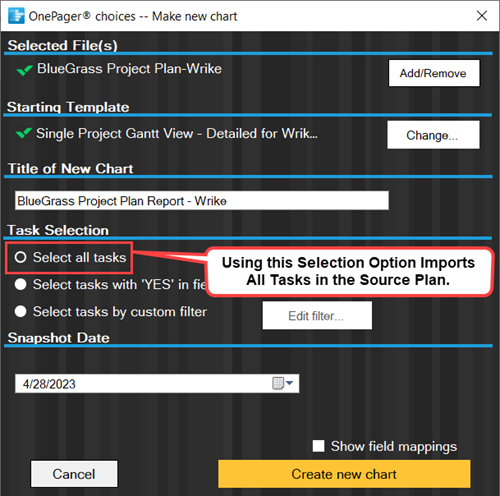
Task Selection Option (1): Select All Tasks
Wrike source plans like the one shown above with many tasks results in a very large OnePager chart usually not suitable for detailed schedule conversations. Accordingly, we do not recommend importing more than 50 tasks so that the resulting chart is a useful one page rendering of the source plan. However, for small projects where the number of tasks falls below the recommended maximum, using the Select all tasks shown in the Task Selection sub-control group of the OnePager choice form below is an easy way to specify this option:
Task Selection Option (2): Select Tasks with ‘Yes’ in field:
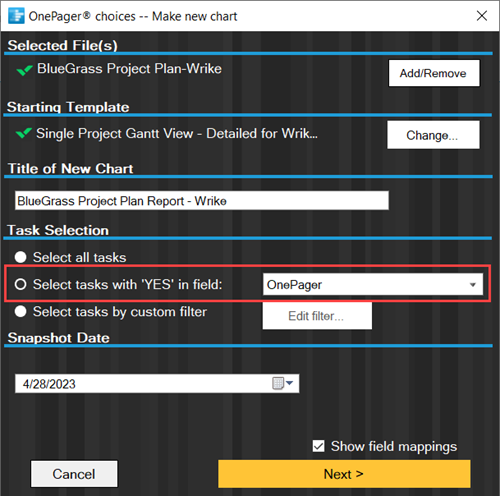
As mentioned above, one method for telling OnePager which tasks to import is to use a Flag column. As shown in the previous section, the Wrike source plan has a User Defined Column Boolean field named OnePager and when the associated checkbox is checked ON that task is imported into OnePager. Here is an illustration of the OnePager choices form where a Flag column is used to select tasks from the source plan:
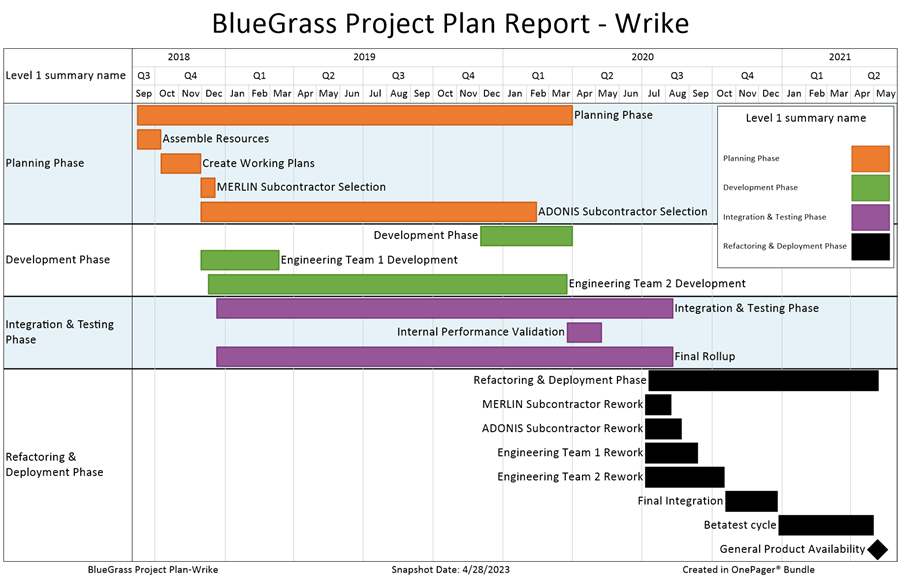
When this is done for the source plan shown above, and other appropriate settings are made for OnePager, the resulting chart looks like this:
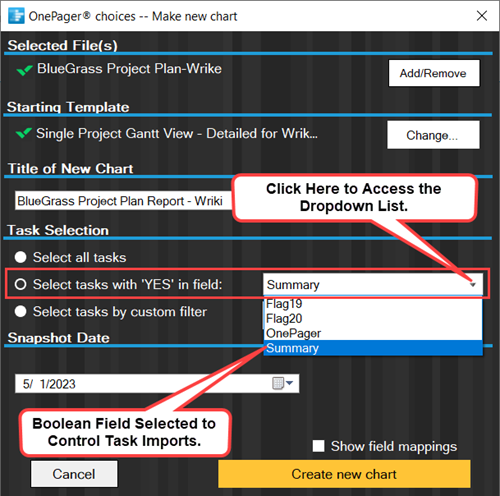
As mentioned earlier, you can also use a Wrike checkbox with a unique column header name. OnePager recognizes the checkbox column as a possible flag column and makes it available in the OnePager choices form in the dropdown list for the Select task with ‘Yes’ in field: option as shown below:
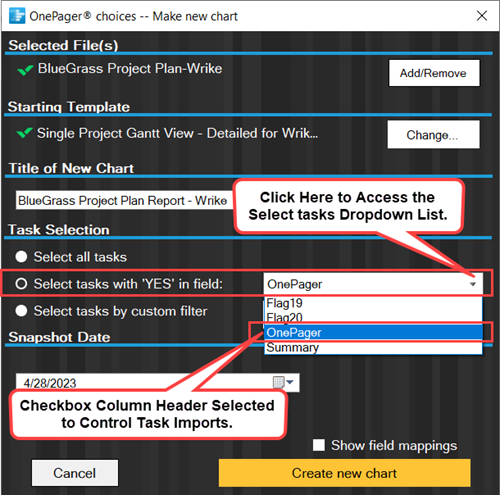
When the column heading called OnePager is selected in the form above, OnePager imports rows where the OnePager checkbox is checked ON.
Task Selection Option (3): Select Tasks by custom filter: (Conditional Import Rules)
You can use the Conditional Import feature to fine tune the tasks you want to import. Assuming that you’re familiar with the Conditional Import feature, the Conditional Import Rules form can be accessed by selecting the Select tasks by custom filter: radio button as shown in the illustration below. Using the Conditional Import Rules form as shown here, it is possible to select tasks between specified Start Dates and Due Dates including those where OnePager is TRUE.
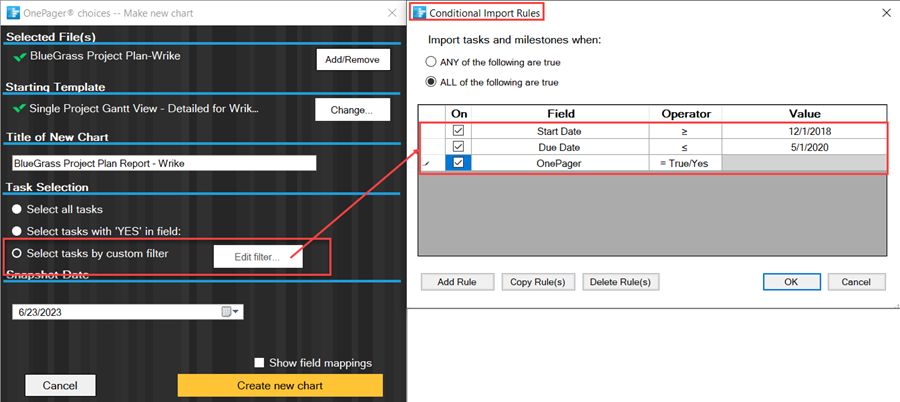
When the above Conditional Import rules are used in the selection process, the resulting chart looks like this:

Any Wrike column found in your source plan can be used as a Field in a Conditional Import rule.
For more detailed information on the Conditional Import feature, we recommend that you read the articles on this subject under:
| Conditional Import Filters (Portal) |
Using Other Columns as Flag Columns in Wrike
OnePager offers a wide range of Wrike column and data types to be used as a flag for controlling the import of rows for making OnePager charts as shown below:
OnePager is set to recognize only “Boolean” situations that resolve to either TRUE import to OnePager or FALSE do not import to OnePager.
Integers Used as Flag Columns in Wrike
You can use a Wrike number column with an integer as a flag if its contents are 1’s in those cells that are intended to be imported as tasks. Similarly you can use 0’s as flags for those tasks that you do not wish to import.
Decimal Numbers Used as Flag Columns in Wrike
Number columns that contain an integer and decimal fraction are eligible to become flag when their contents are either 1.0 or 0.0. However, such fields are not picked up by OnePager as a flag as discussed above for Wrike text fields. Therefore, we do not recommend that Number columns be used for the purpose of general task selection. Accordingly, it is still useful to consider number columns for task selection if the values contained in these number column cells need to be used for decision making on which tasks should be imported.
Checkboxes Used as Flag Columns in Wrike
As an alternative you can use a Wrike checkbox where the row to import is represented by the box checked ON as shown here:

OnePager recognizes Checkbox columns in Wrike as possible flag columns and makes the column available in the flag column selection process discussed later in this article.
Intelligent Changes Made to OnePager Current Template Properties Forms
OnePager is shipped to you with a predefined set of Template Properties forms. This means that all column usage settings within these shipped Template Properties forms are based upon a typical Wrike source plan. Since the flexibility of Wrike is considered in the design of OnePager, it is necessary to update the current Template Properties form based upon your Wrike source plan. Accordingly, OnePager uses the analysis techniques discussed above to modify the current Template Properties form. OnePager makes intelligent choices and recommendations on Wrike source plan column usage based on the findings of the intelligent engine.
You can change or override these findings as follows:
- 1) You can click the Edit current Template… button on the second page of the OnePager choices (OPC) form shown here:
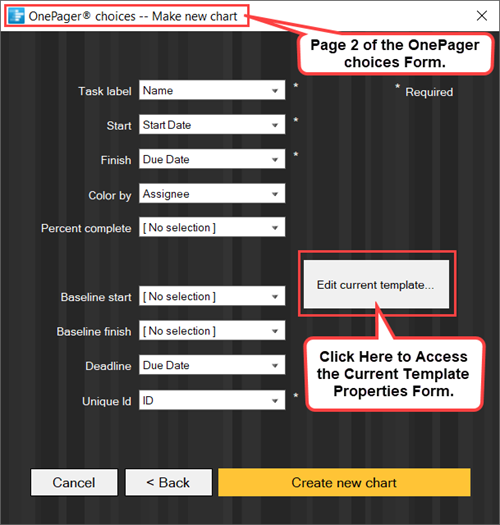
- 2) Clicking this button accesses the Template Properties form so you can navigate to the Rows and Swimlanes tab.
- 3) The settings found in the Row & Swimlanes tab are determined by the current Template Properties form and by the intelligent analysis described above.
- 4) If your Wrike source plan contains a column heading that exists in the Template Properties form, OnePager uses that column.
- 5) Otherwise, it makes an intelligent recommendation from the column headings it discovers.
The illustration below shows that several of the settings in the Template Properties form’s Rows & Swimlanes tab reflect the decisions that OnePager made concerning column usage. These settings are consistent with the selections displayed in the OPC form.
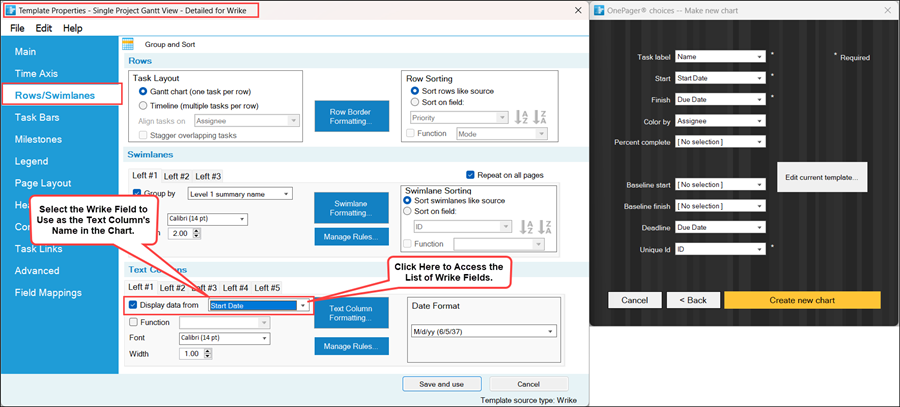
The illustration above shows that the Start Date column from the Wrike source plan is selected as the text column to appear in the chart. You can change the Row & Swimlanes tab settings as well as settings in any of the other tabs. When you are ready, click Save and use button to make these changes part of the current Template Properties form.
In other tabs of the Template Properties form, OnePager has adjusted settings in a similar way to be consistent with its intelligent engine’s analysis of the Wrike source plan column headers and data types. If OnePager cannot find a column header name in the Wrike source plan that can be correlated with a specific OnePager purpose, it makes as intelligent a choice as possible and you are then able to make any change necessary. You are cautioned that all current Template Properties forms are altered when used in this way. We recommend that unique Template Properties form names be subsequently given to such modified Template Properties form for future reference and for sharing these modified Template Properties form with others.
For more information on the management of Template Properties forms, please see the article at:
| Managing Templates (Portal) |
Missing Columns, Column Headers, or Misspelled Column Headings
OnePager also checks column headings when importing data in UPDATE mode. If the column was used in previous snapshots for any purpose, OnePager checks to assure that the new import for the snapshot has those same columns. When OnePager cannot find the expected columns, one or more column heading names are missing or blank, the column heading is recognizably misspelled, or the data type is different from the previous snapshot, OnePager provides a warning message as shown in the example below:
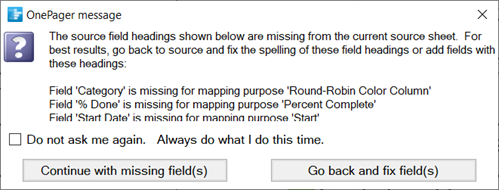
This can occur when you inadvertently attempt to update a chart from the incorrect Wrike source plan or the desired Wrike source plan was altered to the extent that OnePager cannot find the columns needed to accomplish the UPDATE functions. You are given two choices when the message above is displayed:
Continue with missing field(s)
By selecting the Continue… button, the import proceeds. OnePager blanks some values that it cannot find. Note: The results can be unexpected.
Go back and fix field(s)
Selecting the Go back… button tells OnePager to stop the import process and return control to Wrike. You can now correct the Wrike source plan or select another one and start the UPDATE process again.
Missing Task Start/Finish Dates
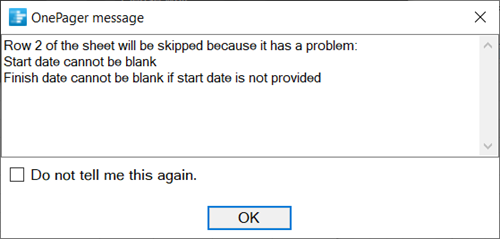
OnePager requires that, at a minimum, a row from Wrike needs to have a task Name, a Start Date date, and a Due Date date. The row is ignored if the Name is not provided even if Start Date and Due Date dats are present. When a row is missing either a Start Date date or a Due Date date, even if the Name is provided, OnePager provides the warning message shown below:
OnePager Chart Representation of Virtual Columns
OnePager imports all Wrike columns at the beginning of the chart building process and analyzes them for data type and how they may be used in charts. Wrike has many predefined columns. Wrike also supports User Defined Columns. The OnePager intelligent preprocessor imports all available columns and analyzes them to set up dropdown lists of imported columns that are available within OnePager’s control scheme.
OnePager also builds additional “virtual” columns for use in your charts that are constructed based upon data imported from your Wrike Project formatted file. These virtual columns are provided in OnePager so that you can use all the features of OnePager when designing your charts.
Levels 1 through 10 Summary ID/Name Virtual Columns for Wrike
OnePager Pro and OnePager Express users have found it beneficial to use many of the OnePager virtual columns in their charts as shortcuts. For example, take the Wrike source plan below that has indented task names that establishes a Work Breakdown Structure:
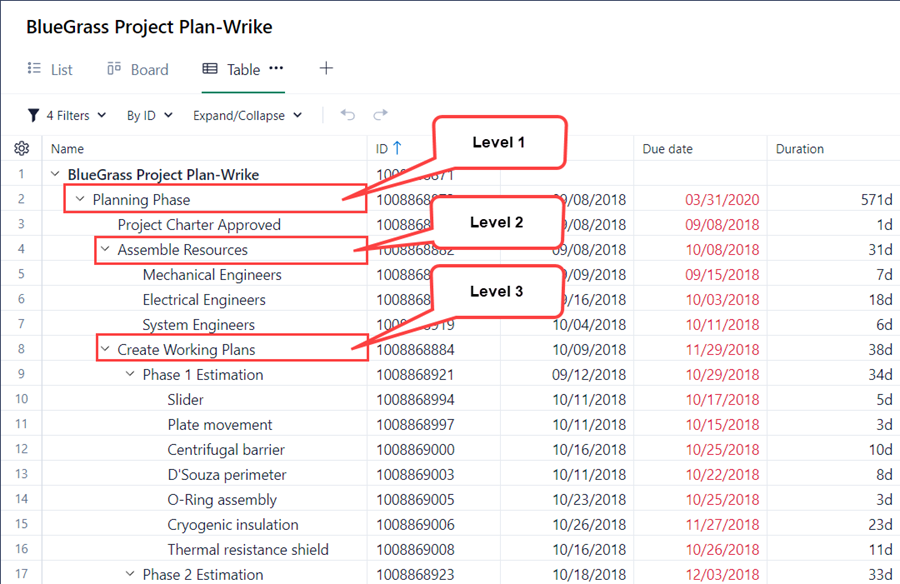
Creating the OnePager chart from the Wrike source plan above, we get this:
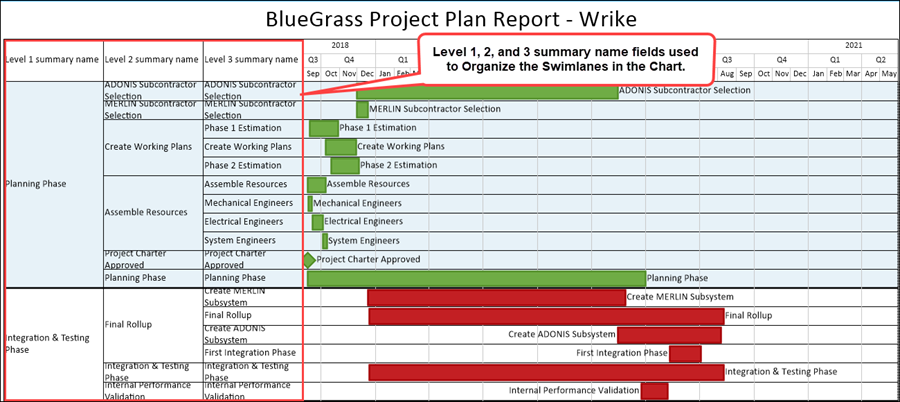
This is just one example of the use of OnePager virtual columns.
The OnePager virtual columns used in the example above represent only three of the virtual columns available for use in charts. OnePager can represent up to ten (10) levels for Summary name and Summary ID. The list of Level “x” Summary name and Level “x” Summary ID is shown in this illustration of a Swimlane Group by dropdown list:
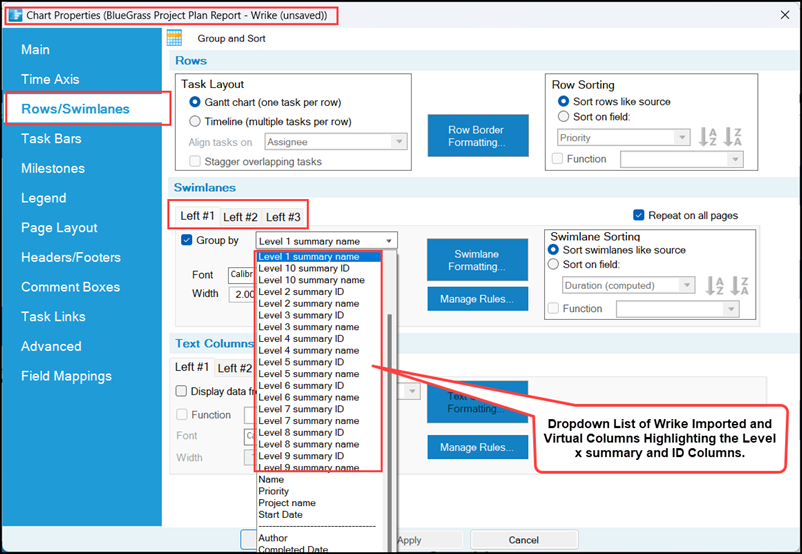
For more information on the use of Rows and Swimlanes, please see the articles at:
| Creating and Editing Rows and Swimlanes (Portal) |
| Rows/Swimlane Tab |
Other OnePager Virtual Column for Wrike
As mentioned above, OnePager adds virtual columns, and in most cases, populates these virtual column cells with data imported from your Wrike source plan as illustrated above.
There are additional virtual columns available in OnePager charts built with Wrike source plans are discussed in the sub-section below:
- Outline level
- Summary
- Level n summary ID
- Level n summary name
- Project name
Outline level Virtual Column for Wrike
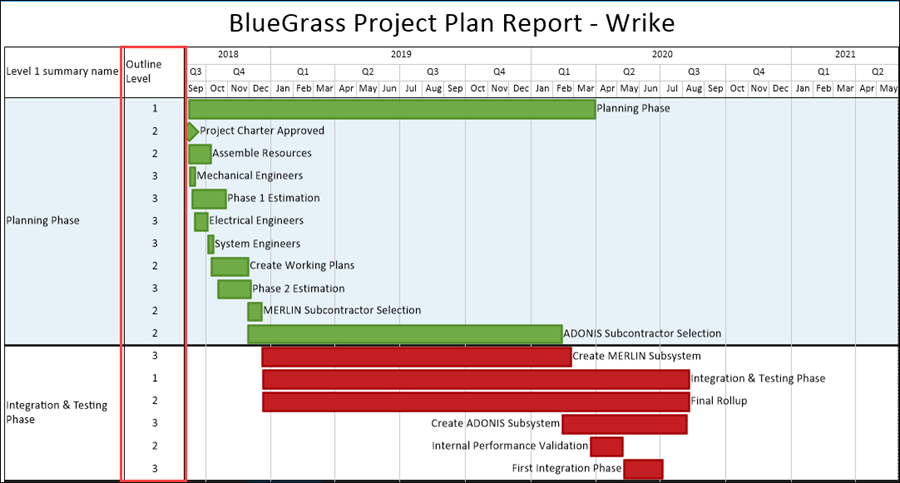
The Outline level virtual column is populated from your Wrike source plan from imported data. The illustration below shows a source plan with defined Outline Level noted:
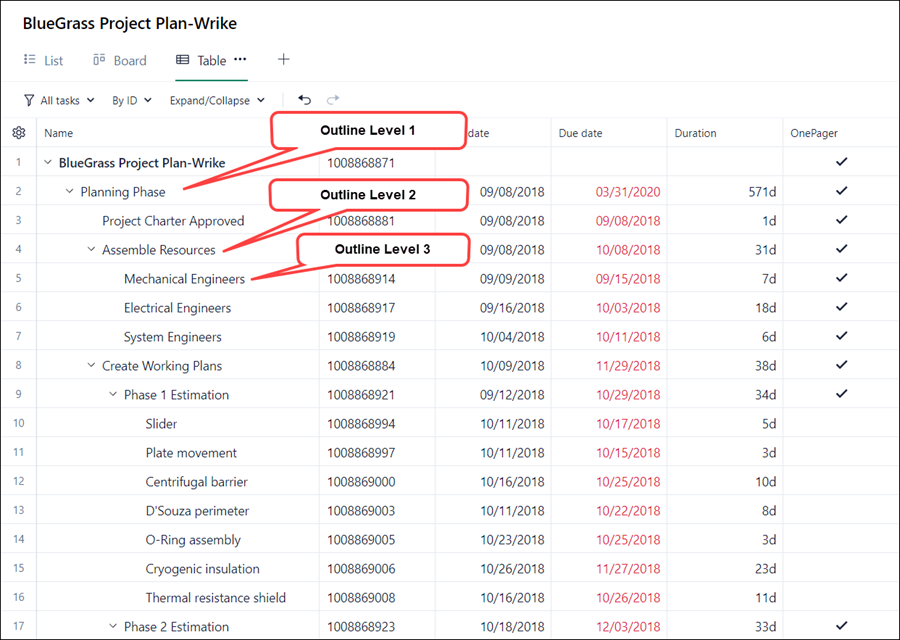
In the chart created from the above source plan the Outline Level is shown in the text column below:
Summary Virtual Column for Wrike
In Wrike Summary tasks are tasks that have sub-tasks below them as shown here:
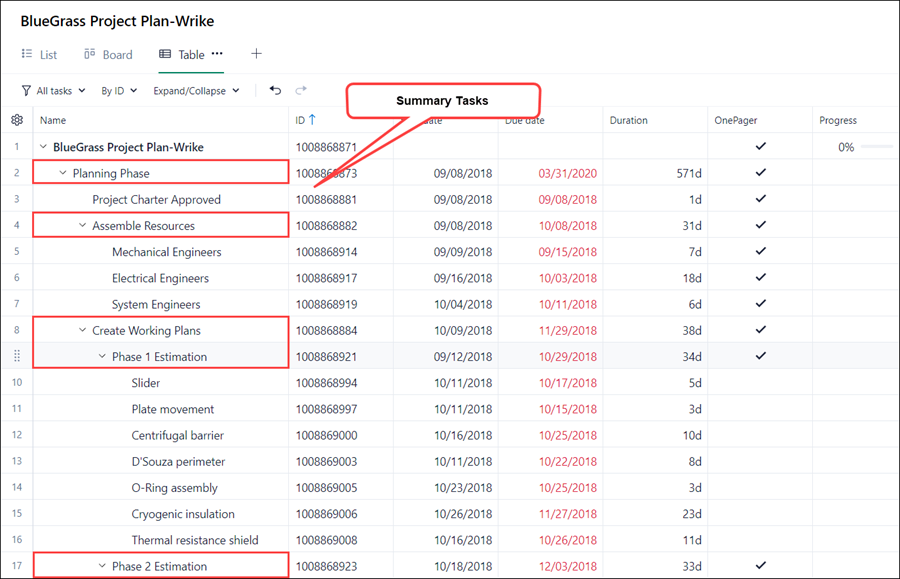
The Summary column is a Boolean column taking on the value of TRUE if the associated task is a summary task, that is, with subordinate-tasks organized below it and FALSE if the associated task does not have subordinate-tasks organized below it. Using the above Wrike source plan to create the OnePager chart, we can show the values from the Summary column as shown below:
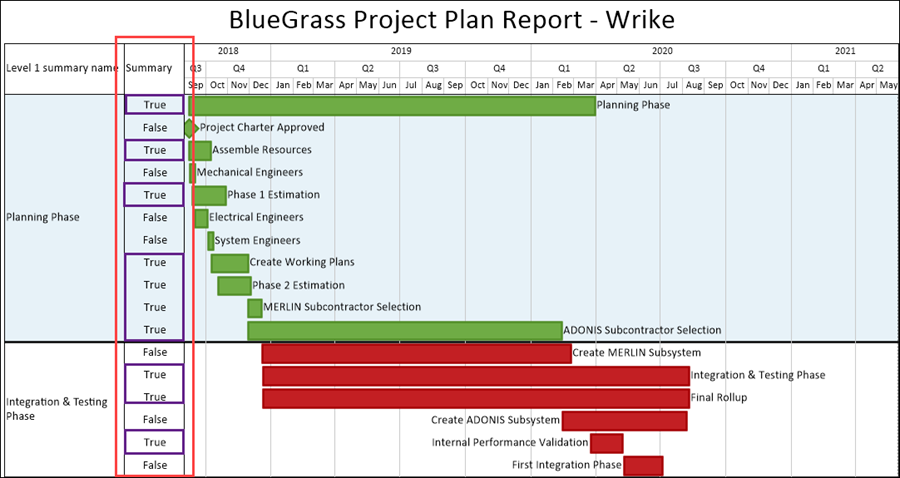
The above chart shows which displayed task bars are Summary tasks (TRUE) and which are Non-Summary tasks (FALSE).
Level n Summary ID and Level n Summary Name Virtual Columns for Wrike
There are up to ten (10) Level n summary ID and Level n summary name virtual fields available in OnePager. The number available in your OnePager chart is determined by the amount of indention or Outline levels in your source plan. Outline levels are discussed above. Typically, Level n summary names are used to designate swimlanes in the chart for organizational purposes. The chart shown below, has it's three swimlane levels designated by the Level 1 summary name, the Level 2 summary name, and the Level 3 summary name:

Project name Virtual Column for Wrike
The Project name virtual field is usually taken from the first line of the Wrike source plan as shown below:
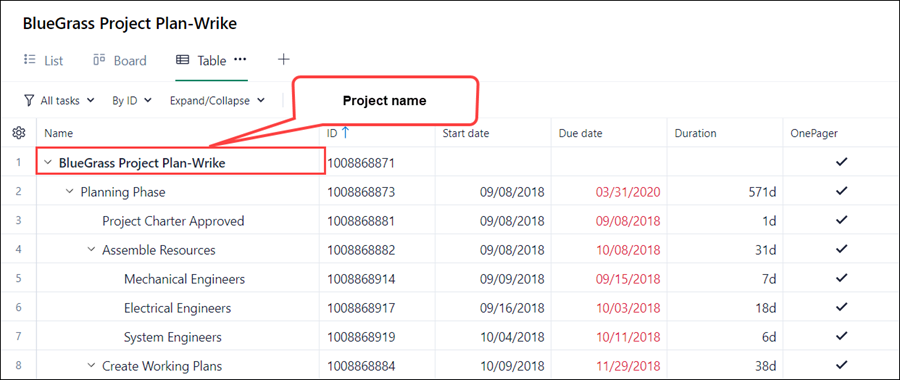
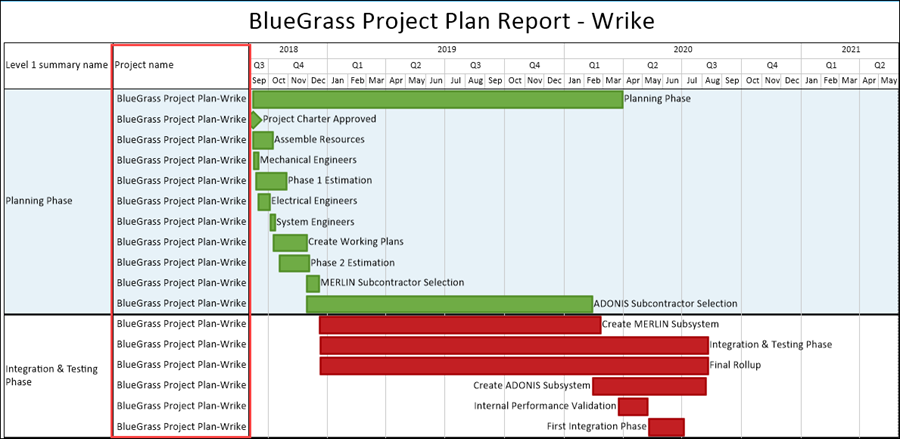
Although the Project name virtual field is a single value it still can be shown in the chart as a text column entity as shown here:
Representation of Project Scheduling Data Columns from Wrike Source Plans
Representing Percent Complete
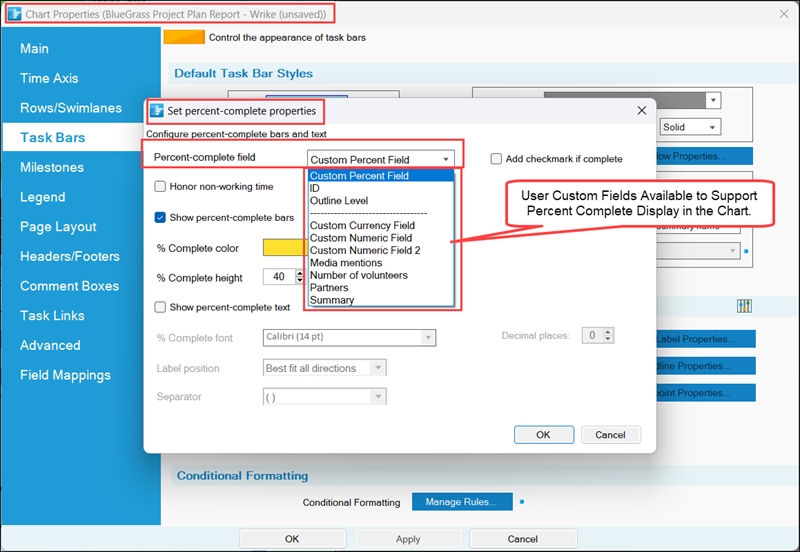
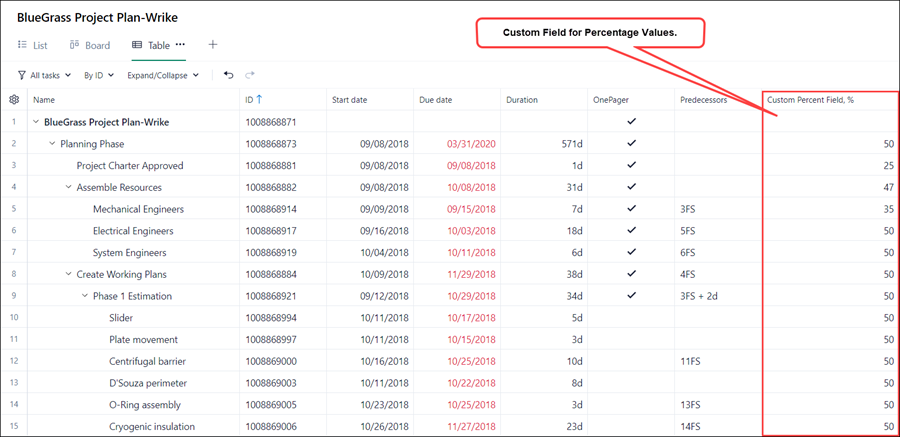
Wrike projects represent progress at the project level and not at the task level. For that reason OnePager Bundle does not have the Wike generated percent complete data available to display percent complete at the task bar level. We do support controls whereby you can define a User custom field in Wrike as a numeric field and populate that field with your own percent complete data. Using the Set percent-complete properties form accessed from the Chart Properties form's Task Bars or Milestones tabs you can establish the relationship between the Wrike source plan's user custom field and OnePager Bundle as shown below:
A sample portion of a Wrike source plan looks like this with the Custom Percent Field column highlighted:
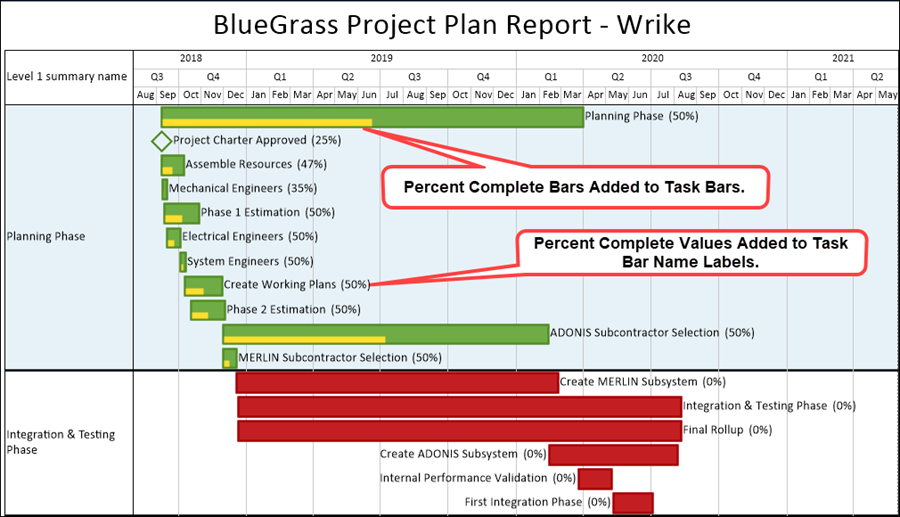
The OnePager chart created from the above Wrike source plan showing the percent complete bars within the task bars and the percent complete numeric values with the task bar name labels looks like this:
Since Wrike has a defined column called Percent Complete, it is our recommendation that you use this Wrike defined column in your charts to represent percent complete for tasks and milestones.
For more information on using the percent complete feature, please see the article at:
| Percent complete for OnePager |
Representing Baseline Data
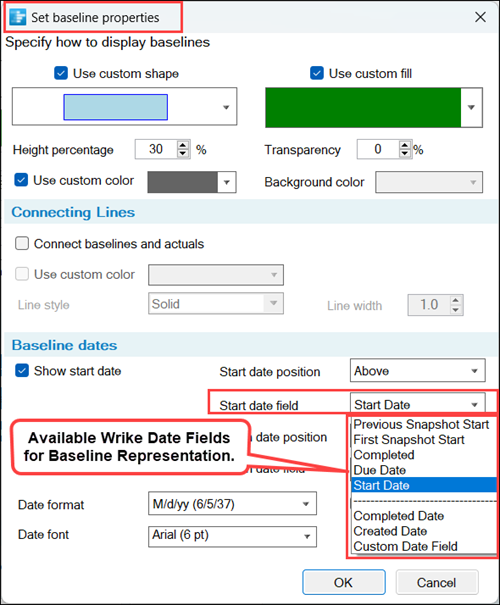
Wrike does not specifically appear to support baseline related fields for baseline start or baseline finish dates. OnePager Bundle attempts to build a list of dates that it imports from the source plan. The options look like this:
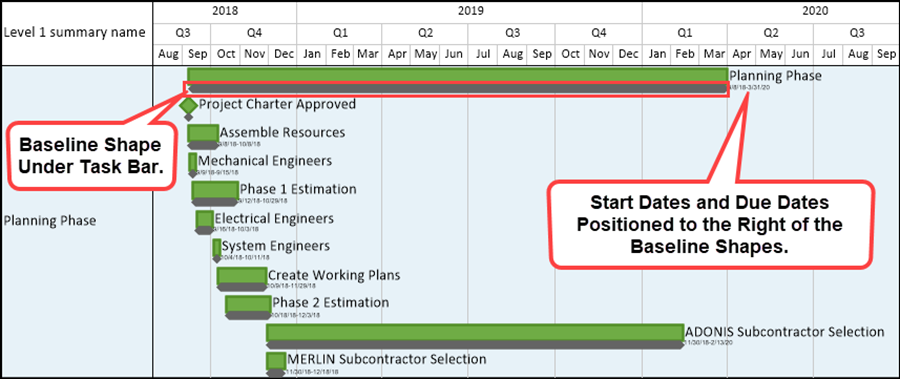
When the Wrike source plan is configured with baseline start/finish dates, OnePager can represent them in the chart when the Chart Properties form’s Task Bars and/or Milestones tabs are configured to do so as shown below:
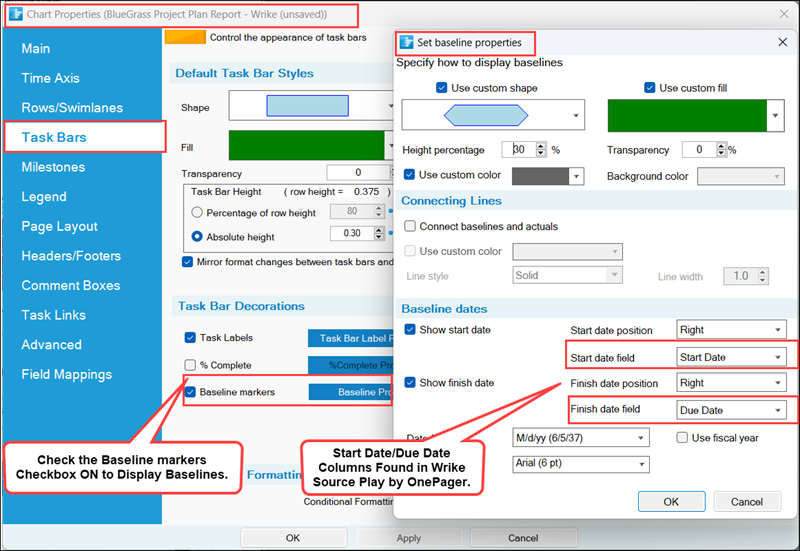
When the Baselines function is enabled and the Start Date/Due Date combination are displaced to the right of the baseline shape, the chart looks like this:
For more information on Baseline representation, please see the article:
| Baselines for OnePager |
OnePager Bundle Cannot Represent Critical Path Segments with Wrike
Wrike's exterior interface does not provide their critical-path segment data to OnePager. As a result, OnePager cannot import critical-path segment data and does not provide the capability to represent critical-path segments in the chart.
Using the OnePager Deadline Representation Feature
OnePager has a feature that lets you display a deadline symbol in the chart that represents the latest finish date for the task or when the milestone must be met. A portion of a chart with deadline symbols looks like this:

When deadlines are turned ON, they appear (by default) as down-arrow symbols in each task bar's row at the deadline date position with respect to the time axis. Above, deadline symbols that are not contained within their respective task bar are shown with black dash-dot connecting lines to illustrate the capability.
It is highly recommended that if you want to use the deadlines feature that you define a Deadlines column in your Wrike source plan and populate it with appropriate dates. When OnePager imports your source plan the intelligent engine recognizes “Deadline” as containing the dates for this purpose and populates the appropriate dropdown lists.
Controls for displaying deadline symbols are provided in the Template Properties and Chart Properties form’s Task Bars and Milestones tabs where you can specify the Wrike source plan column to represent deadline dates and specify their graphical representation in the chart.
For convenience, OnePager assumes that the Wrike Project formatted file’s Planned Finish column is the default column that OnePager uses to represent deadline symbols in the chart. This setting is established in all Wrike distributed Template Properties forms.
The deadline setting is established in all Wrike distributed Template Properties form’s Field Mappings tab as shown below:
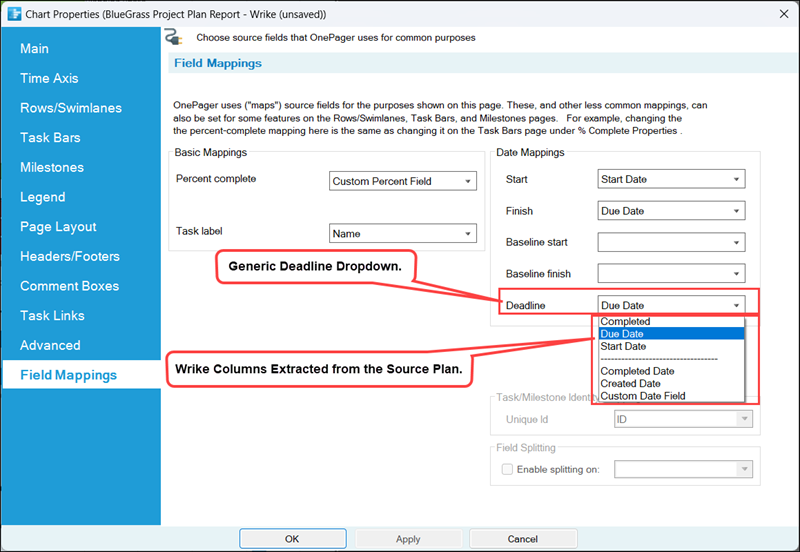
As shown above, the Deadline date column name can be changed before the chart is created by using the Template Properties form’s Field Mappings tab to select another preferred Project formatted date column. Changing the Deadline date column name after the chart is created requires using the Field Mappings tab in the Chart Properties form.
For more information on using Deadline symbols, please see the article at:
| Deadlines for OnePager |
Using the OnePager Endpoints Representation Feature
OnePager also has a feature that lets you display a multiple endpoint symbols in the chart that represent potentially important dates for a task. A portion of a chart with four (4) endpoint symbols associated with each task bar looks like this:
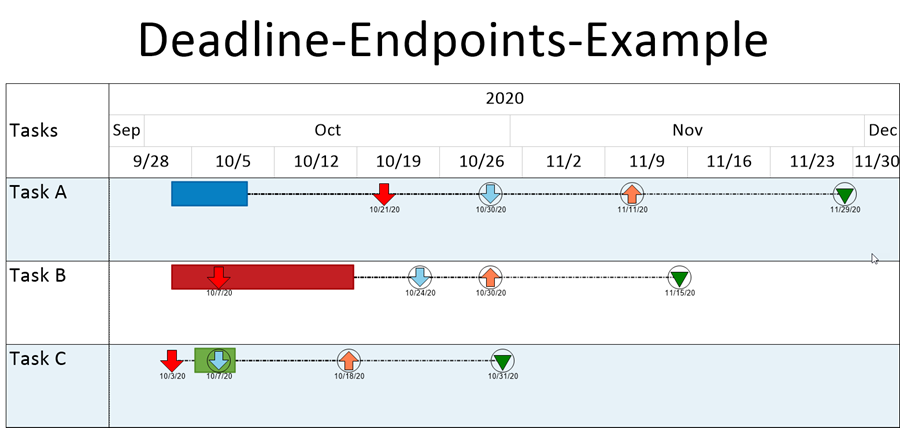
When one or more endpoints are turned ON, they appear (by default) as down-arrow symbols in each task bar's row at the endpoint’s date position. Above, endpoint symbols that are not contained within their respective task bar are shown with black dash-dot connecting lines to illustrate the capability.
Controls for displaying endpoint symbols are provided in the Template Properties and Chart Properties form’s Task Bars and Milestones tabs where you can specify the Wrike source plan column to represent endpoint dates and specify their graphical representation in the chart.
For convenience, OnePager assumes that the following Wrike Project formatted date columns are the default columns that OnePager uses to represent endpoint symbols in the chart:
- Endpoint 1: Planned Start
- Endpoint 2: Planned Finish
- Endpoint 3: Budget Start
- Endpoint 4: Budget Finish
These setting are established in all Wrike distributed Template Properties form’s Task Bars tab in the Task Bar Decorations sub-control group at the Endpoints button. (Milestones do not display Endpoint symbols.) Checking the Endpoints checkbox ON and clicking the Endpoints Properties… button accesses the Set endpoint properties form where the default endpoint dates can be changed before the chart is created. Following the same path in the Chart Properties form to the Set endpoint properties form can accomplish the same result after the chart is created.
For more information on using Endpoint symbols, please see the article at:
| Endpoints for OnePager |
Representing Task Links
OnePager displays Task Links in the chart when the “master switch” for Task Links in the Template Properties form’s Task Link tab is checked ON as shown below:
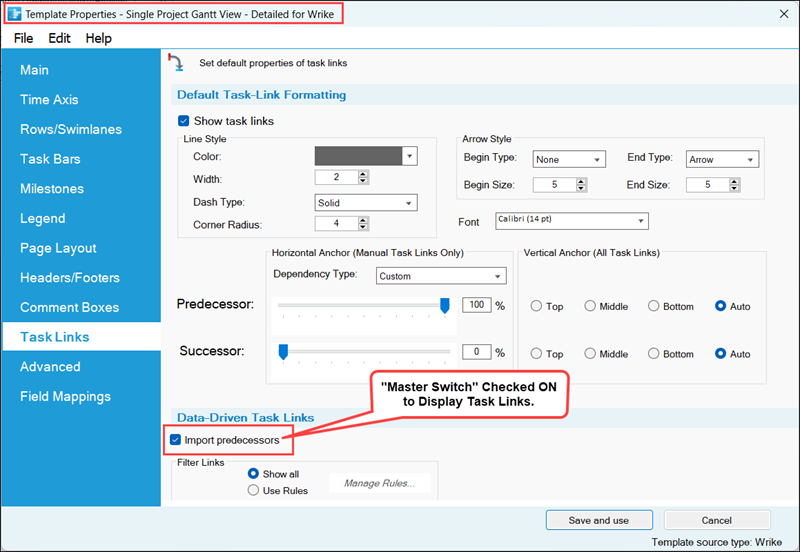
When the “master switch” is checked ON, Task Links are enabled and can be shown in the chart after the Show data-driven links checkbox is checked ON in the Chart Properties form’s Task Link tab and the source plan column containing the task link predecessor data is set in the from window as shown below:
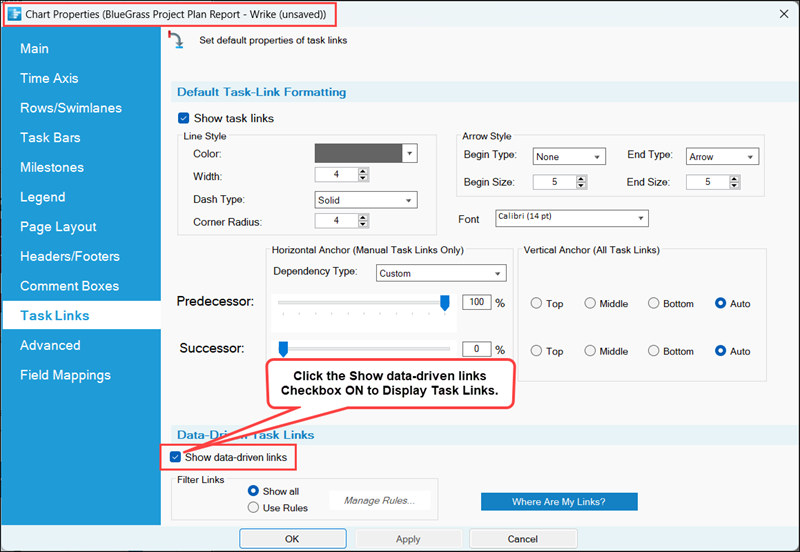
You can use the above form to change the properties of the Task Links to meet your schedule discussion needs. When the chart is created, the Task Links look like this:
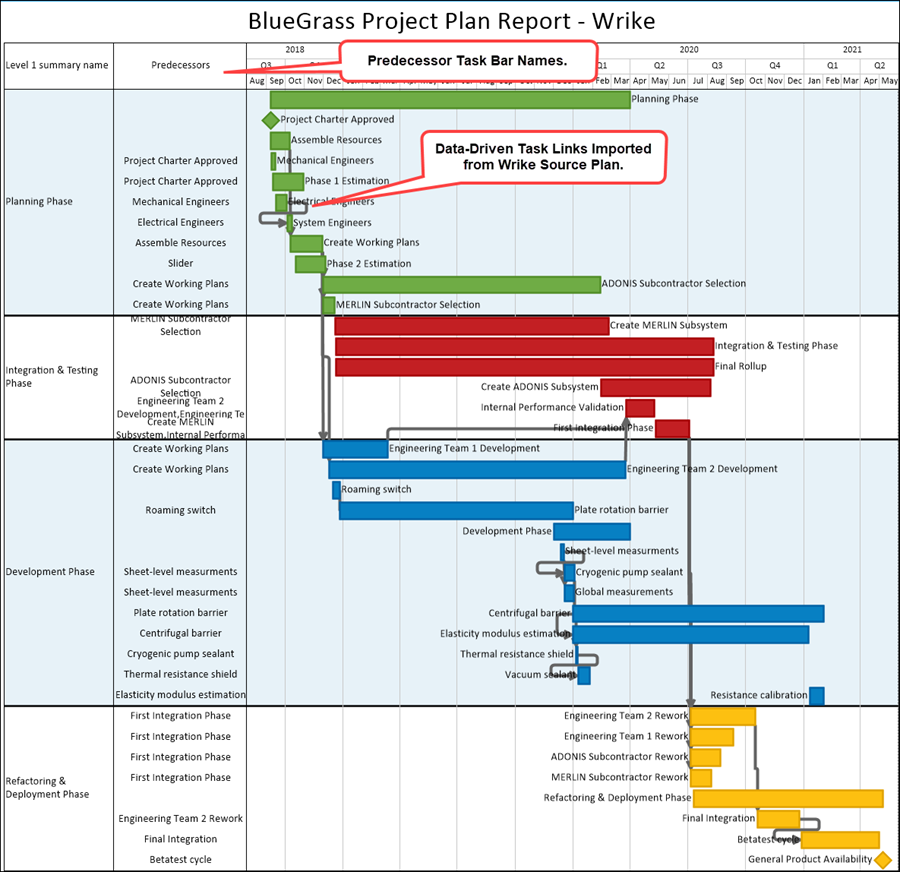
In the chart shown above, the Predecessor column is shown as a Left#1 text column to indicate the task bar that is the predecessor for the task link. The Line identifier column is shown as the Left#2 text column to help identify the predecessor row.
For more information on Task Links, please see the articles at:
| Linking Task and Milestone Using Manual and Data-Driven Task Links (Portal) |
Related Links
(4.0.1.15-72)