Page Layout Tab for OnePager Live Beta 2
Contents
About the Page Layout Tab
21.8.1-OPL2 from 21.8.1-60 7/17/2017
The Project-View Properties (PVP) form's Page Layout tab controls the features of OnePager multi-page capability.
The tab has four sections as shown below.
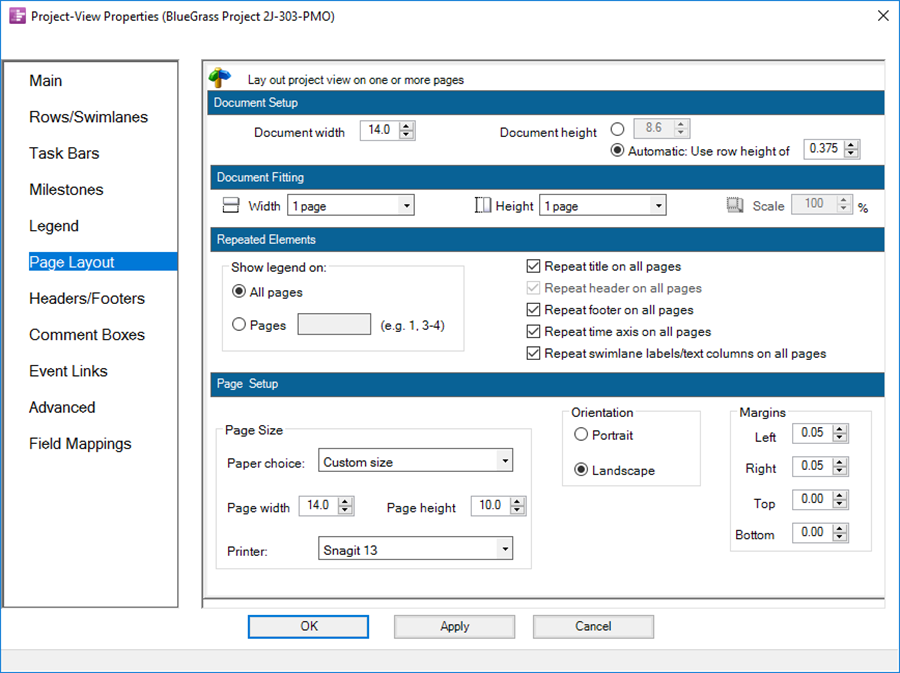
Document Setup
1) These two settings (e.g., Document width and Document height) determine the document’s size in inches or centimeters irrespective of page count.
- a) The overall document size consists of the graph area plus all Adornment areas (i.e., header, footer, time axis area(s), title, text columns, swimlane labels, margins).
- b) Document width is always automatic in that OnePager makes no attempt to keep the width constant as you change swimlane label widths, text column widths, or horizontal margins.
- c) Because the number of rows/swimlanes is very dynamic, there are two modes for managing document height:
- (1) Automatic height mode. When the Automatic: Use row height of: radio button is clicked, the document height adjusts when rows/swimlanes are added/hidden. Likewise the document height adjusts if you change the title height, time-axis height(s), header/footer heights, or vertical margins. This mode is the preferred option because it preserves the heights of tasks and milestones shapes.
- (2) Fixed height mode. When the Document Height radio button is clicked, the document height is kept constant in the following situations:
- (a) Creation of the project view from a Template.
- (b) Update of the project view by adding or replacing snapshots.
- (c) Automatic cropping of blank rows using the Crop button on the ribbon.
- (d) Change of parameters on the Row/Swimlanes tab of the PVP form.
2) In all these situations, the document height is kept constant by adjusting the heights of all the rows and swimlanes to take up the slack.
- a) This is how OnePager behaved in releases prior to version 5.1.
- b) This behavior has the disadvantage that adding many new rows causes tasks/milestones to get very short and hiding many rows causes task/milestones to get very tall.
3) Even in this fixed height mode, manual insertion/hiding of rows/swimlanes, changes to header heights, changes to title height, and changes to time axis heights will alter the document height.
4) To preserve the heights of all the tasks and milestones in the graph area, you can always restore the old document height by entering it in the document-height numerical window control.
Document Fitting
5) The document fitting group determines the number of pages vertically and horizontally. For more information and examples at the Document Fitting, Page Setup, and Repeating Elements please see the articles at this link: Creating Multi-Page Project Views with OnePager Live 8.6-OPL2.
Repeated Elements
6) The repeated elements group has two sets of controls:
- (1) for repeating the legend on multiple pages and
- (2) for controlling the repetition of other Adornments on multiple pages.
7) For a discussion of the controls for repeating the legend on multiple-page and for a discussion of the controls for repeating view Adornments, please see the article at this link: Editing with the Project-View Properties form (Portal) 21.0.1-OPL2. The controls discussed above are also available on the OnePager ribbon’s Page Layout tab.
Page Setup
8) The page setup group contains controls for:
- (1) specifying physical page size of output,
- (2) setting the output page’s orientation (portrait or landscape), and
- (3) establishing the physical page’s margins.
9) The page size group has the following controls:
- a) Paper choice. This list is built from the available choices associated with the printer selected. See below.
- b) Page width and height. Displays the dimensions of the current page size selection and lets you specify custom page dimensions.
- c) Printer. Contains a list of printers known to Microsoft Windows.
10) The orientation group has two radio buttons which you can use to select the orientation of the output page as either portrait or landscape.
11) The margin group provides four window controls for you to set the left, right, top, and bottom margins in inches or centimeters.
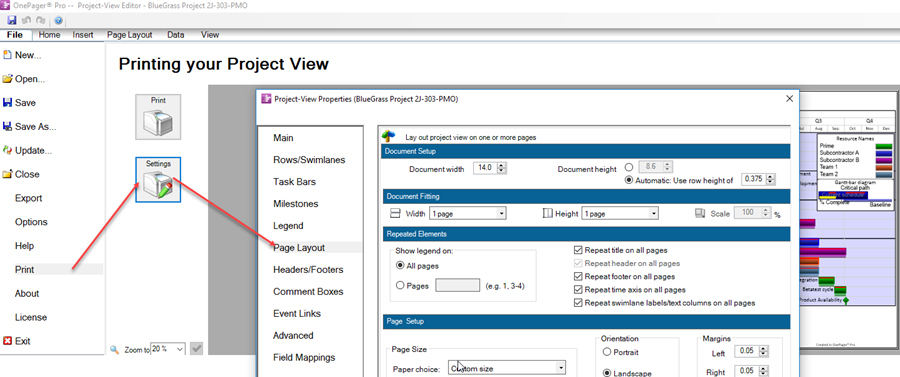
12) When controls in the Page Setup group of the Page Layout tab are changed, OnePager will update the corresponding controls in the Print form accessed through the File tab on the OnePager ribbon.
10) These controls, discussed just above, are available on the OnePager ribbon’s File tab by first clicking the page’s Print tab button and then the Settings button which will bring up the PVP form’s Page Layout tab. The steps and results are shown below:
Related Link
Creating Multi-Page Project Views with OnePager Live 8.6-OPL2
Editing with the Project-View Properties form (Portal) 21.0.1-OPL2
(21.8.1-OPL2)