Difference between revisions of "Automatically Hiding Empty Rows for OnePager Pro for Version 7.0"
(→Using the Home Tab Hide Rows Button on the OnePager Ribbon) |
(→Using the Template/Chart Properties Form's Advance Tab's Row Hiding Options Button) |
||
| Line 42: | Line 42: | ||
9) In the above illustration, please note that when '''rows are hidden''' that make up a '''swimlane''', that the '''swimlane''' too is '''hidden'''. | 9) In the above illustration, please note that when '''rows are hidden''' that make up a '''swimlane''', that the '''swimlane''' too is '''hidden'''. | ||
| − | === | + | ===Automatically Hiding Empty Rows=== |
| − | 4) | + | 4) You also have the option to set up and use the '''row hiding''' feature in an '''automatic mode'''. |
| − | 5) | + | 5) That is, you can establish a set of '''options''' in the '''Template Properties''' form before charts are created to '''automatically hide empty rows''' under the conditions you wish. |
| + | |||
| + | 6) Additionally, you can use the same controls found in the '''Chart Properties''' form to set or alter these '''options''' after charts are created. | ||
| + | |||
| + | 7) Since the controls for '''automatically hiding rows''' are the same for both the '''Template Properties''' and '''Chart Properties''' form's, the example below uses the '''Chart Properties''' form. | ||
| + | |||
| + | |||
| + | ===Setting Up the Chart Properties Form's Advance Tab's Row Hiding Options=== | ||
| + | |||
| + | 8) These controls for setting up the '''automatic row hiding options''' are found in the '''Chart Properties''' form's '''Advanced''' tabs at the '''Row hiding options''' button shown below: | ||
<center>[[File:P61-12_14_1-61-(5)-11292018.png]]</center> | <center>[[File:P61-12_14_1-61-(5)-11292018.png]]</center> | ||
Revision as of 21:35, 7 July 2020
Contents
Overview
1) When you are moving task bars/milestone symbols to different rows and swimlanes, you can end up with unoccupied rows that you can hide, if desired.
2) Rows can become empty for other reasons such as a change made to the chart's Date Range (i.e., the chart's Start Date and Finish Date) or because a new snapshot is not importing one or more task bars/milestone symbols that were present in previous snapshots.
3) OnePager provides the option for you to manually hide rows in the chart or to specify automatic hiding of rows through controls in the Template Properties and Chart Properties form as explained in this article.
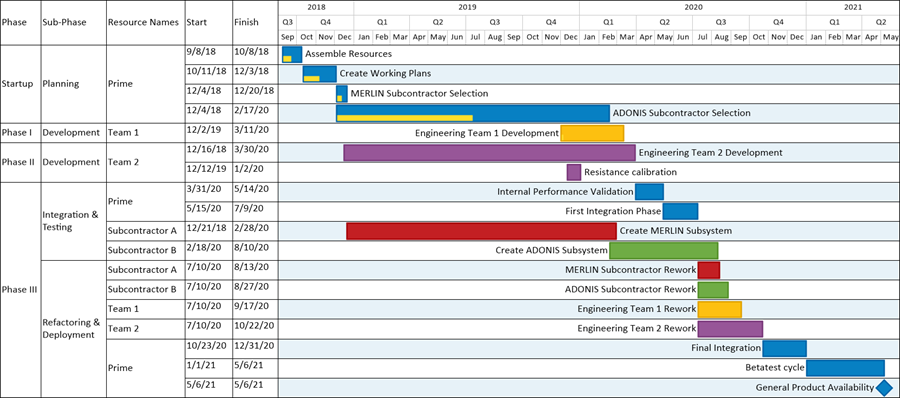
4) For the purpose of illustration, this article uses the OnePager Pro chart below as the starting point for the discussions of manual row hiding and automatic row hiding provided in the sub-sections that follow:
Manually Hiding Empty Rows
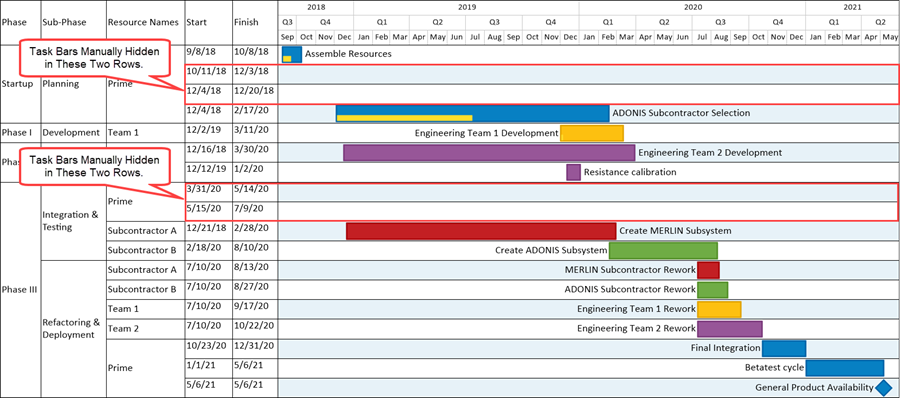
3) In the examples that follow, two task bars each are hidden in the top Left#1 swimlane level cell and in the bottom Left#1 swimlane level cell as shown below:
4) To use the manual row hiding feature, click the Hide button on the OnePager Home ribbon tool bar tab, which is enabled when the chart has empty rows, as shown below:

4) Clicking the Home ribbon tool bar tab's Hide button accesses the Row hiding choices form shown here:
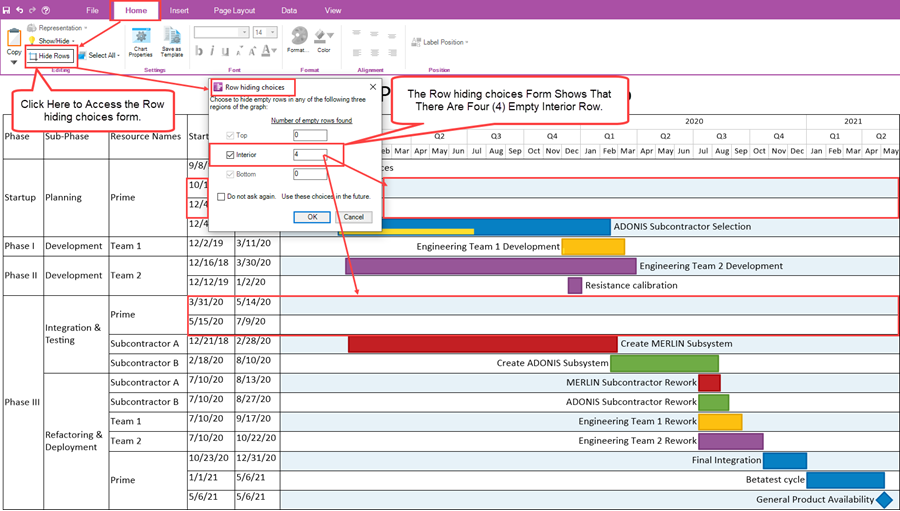
5) The Row hiding choices form shown above shows that four (4) Interior rows are empty and can be hidden.
6) Interior rows are rows that neither are the top most rows in the chart nor the bottom most rows in the chart.
7) Top and Bottom value boxes shown in the Row hiding choices form shown above, count consecutive empty rows from the top of the graph and the bottom of the graph respectively.
8) Clicking the OK button on the Row hiding choices form hides the empty row as is done in the illustration below:
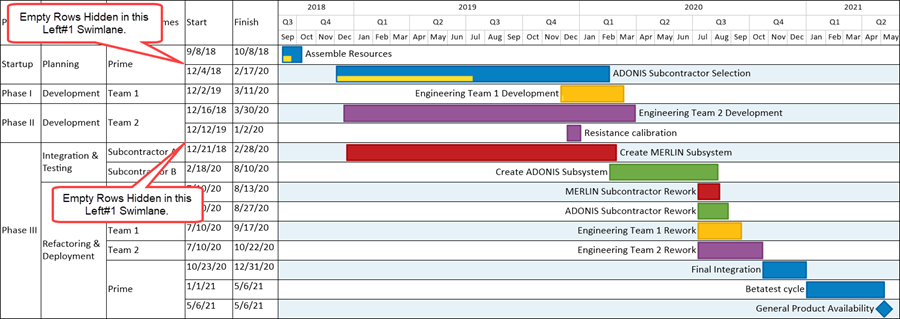
9) In the above illustration, please note that when rows are hidden that make up a swimlane, that the swimlane too is hidden.
Automatically Hiding Empty Rows
4) You also have the option to set up and use the row hiding feature in an automatic mode.
5) That is, you can establish a set of options in the Template Properties form before charts are created to automatically hide empty rows under the conditions you wish.
6) Additionally, you can use the same controls found in the Chart Properties form to set or alter these options after charts are created.
7) Since the controls for automatically hiding rows are the same for both the Template Properties and Chart Properties form's, the example below uses the Chart Properties form.
Setting Up the Chart Properties Form's Advance Tab's Row Hiding Options
8) These controls for setting up the automatic row hiding options are found in the Chart Properties form's Advanced tabs at the Row hiding options button shown below:
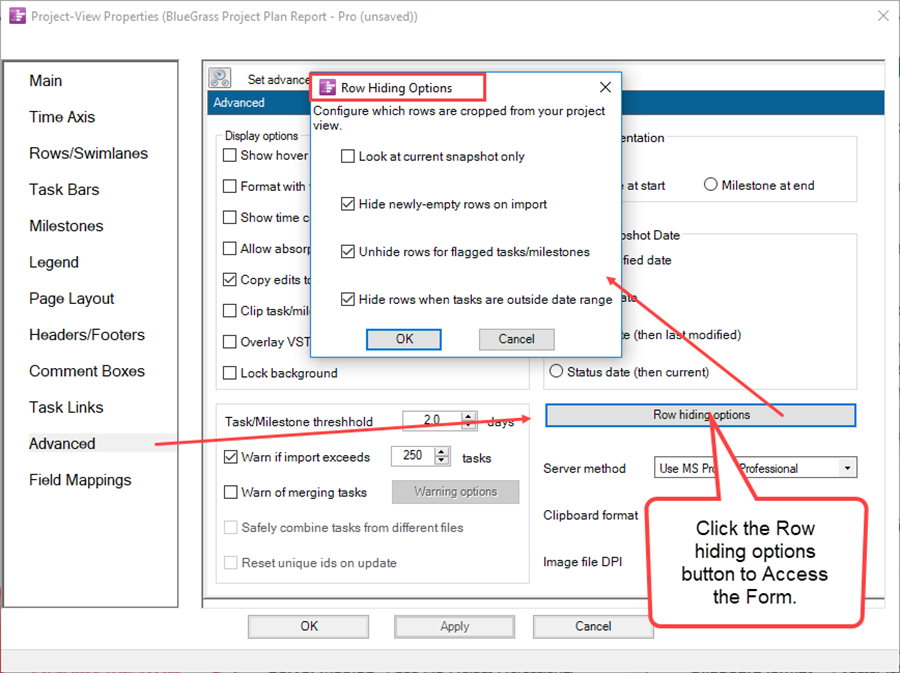
6) These controls have the following effects:
- a) Look at current snapshot only. When this checkbox is checked ON, OnePager looks only at the current snapshot to determine which rows are empty. When this checkbox is not checked or in the OFF setting, OnePager looks at all snapshots before deciding that a row is empty. In either case, please note that any rows that are hidden are hidden in all snapshots.
- b) Hide newly-empty rows on import. When this checkbox is checked ON, OnePager automatically hides any rows that become empty when you add or update a snapshot. This can happen when a task or milestone is present at some snapshots but is missing from the snapshot that you are currently updating. Bear in mind, however, that the hidden rows are now being hidden in all snapshots and not just in the snapshot you are updating.
- c) Unhide rows for flagged tasks/milestones. When this checkbox is checked ON, OnePager automatically unhides tasks/milestones, rows, and swimlanes that were hidden in previous snapshots if any of the tasks/milestones are flagged for import on the current snapshot. This assures that in new snapshots you see all previously hidden tasks/milestones and their previously hidden rows and swimlanes. If the checkbox is not checked or OFF, OnePager continues to hide previously hidden rows and swimlanes as the new snapshot is created. The default setting for this feature is with the checkbox checked ON.
- d) Hide rows when dates are outside the date range. When this option is checked ON, clicking the Hide button hides rows that appear empty because the task/milestones occupying those rows are outside the start-end dates for the chart (See Advanced Tab for OnePager Pro 21.13.1-70). When this option is checked ON, OnePager knows that you want rows where tasks/milestones are not within the start-end dates range of the chart to be hidden when you click the Hide button on the ribbon.
5) As with the Look at current snapshot only row hiding action, the row hiding does not occur until you click the Hide button on the Home ribbon tab.
Finding Hidden Rows
1) If rows are hidden, for any reason, they can be found by using the Where’s My Stuff?! feature accessed from the Show/Hide button on the Home ribbon.
2) An example of a “Where’s My Stuff?!” form where out of range rows are hidden is shown below:
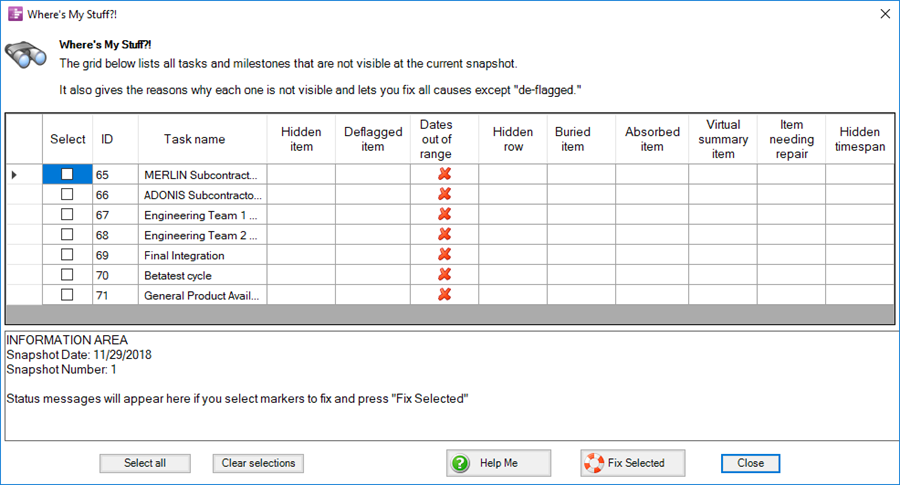
3) For more information on the use of the Where's My Stuff?! feature and form, please see the article at: Managing Hidden Tasks and Milestones Using "Where's My Stuff?!". 9.4.1-70
Related Links
Advanced Tab for OnePager Pro 21.13.1-70
Managing Hidden Tasks and Milestones Using "Where's My Stuff?!" 9.4.1-70
(12.14.1-70)