Conditional Import for OnePager Pro Desktop for Version 6.0
Contents
- 1 Overview
- 1.1 Adding a Filter Rule to the Conditional Import Rules Form
- 1.2 Editing an Existing Filter Rule in the Conditional Import Rules Form
- 1.3 Copying an Existing Filter Rule in the Conditional Import Rules Form
- 1.4 Deleting an Existing Filter Rule in the Conditional Import Rules Form
- 1.5 Switching from Flag Fields to New Conditional Import Filters Rules
- 1.6 Switching from Conditional Import Filters Rules to Flag Fields or Selecting all Tasks
- 1.7 Adding, Editing, Copying, and Deleting Conditional Import Filters Rules
- 2 A Simplified Workflow Example Using Conditional Import Filters Rules
- 3 An Advanced Workflow Example Using Conditional Import Filters Rules
- 4 Related Links
Overview
An overview article with examples is available at: Conditional Import Filters for OnePager . The article is recommended reading before you advance to this article or any other of the product specific articles in this series.
The Conditional Import Filters feature supports imports from all locations and configurations of Microsoft Project source plans including those from your computer, from the cloud; as a single source plan, Integrated Master Schedules (IMS), or multiple separate Microsoft Project source plans.
This article provides details on the use of the Conditional Import Filters feature for OnePager Pro (OPP) Desktop edition.
- (1) First, we’ll provide information on how to create Conditional Import Filters rules using the Conditional Import Rules form.
- (2) Then, we'll cover a couple of examples on how you might use the Condition Import Filters feature in your every day use of OnePager in preparation for your schedule presentations and discussions.
Adding a Filter Rule to the Conditional Import Rules Form
1) The Conditional Import Rules form resembles to the Conditional Formatting form in look and function. In this form you can add, copy, change, and delete Conditional Import Filters rules. The form is accessed from the OnePager choices (OPC) form as shown below:
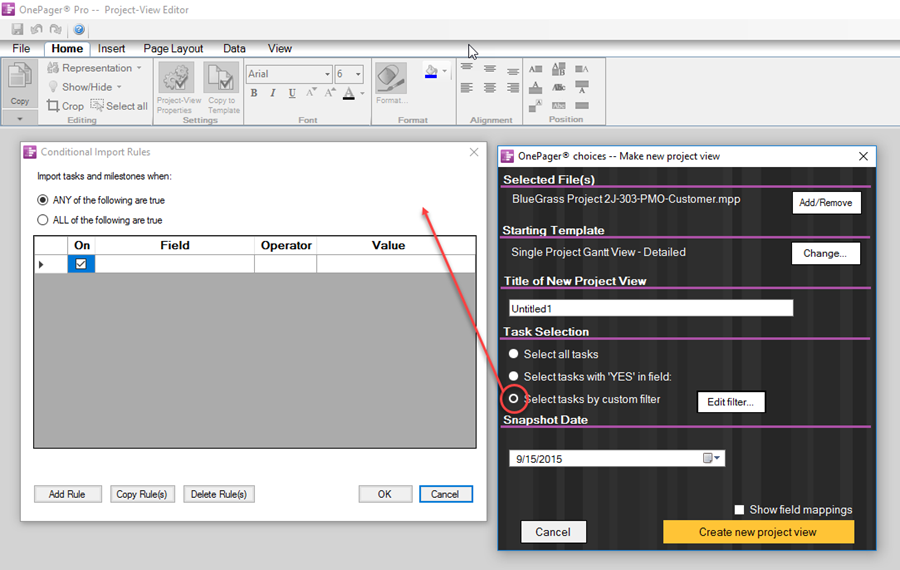
- a) The Conditional Import Rules form is shown in its initial blank state above. The rules entered become part of any project view subsequently created or updated and are saved with the project view. If you later, create or update a snapshot using a flag field, OPP will save the flag field and clear the Conditional Import Filters rules.
- b) Conditional Import Filter rules are typically entered when a project view is first created in the NEW workflow.
- c) After a project view is created, rules may be added later for the UPDATE workflow via the OnePager Choices form invoked either from the OnePager Start form or the Project View Editor (Custom Update… button. These workflows are described later in this article.
2) With the Custom Import Rules form visible and blank, click the Add Rule button to create a new empty row as shown below:
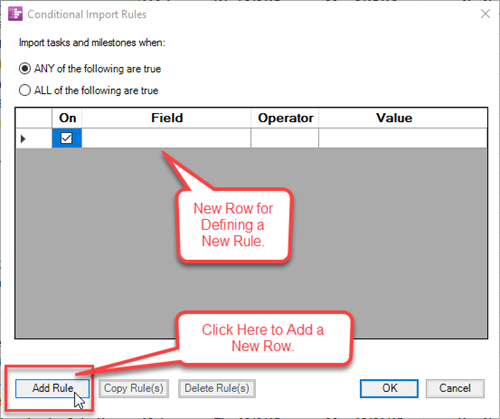
- a) There are five cells shown for the new rule row above. The first two cells are used as follows:
- i) The first two cells are used as selection cells.
- ii) The first left-most cell, when clicked, allows you to use the Copy Rule(s) or the Delete Rule(s) buttons.
- iii) The second cell from the left is a checkbox used to allow you to activate or deactivate the rule. If the checkbox is unchecked, OPP will not apply the rule when performing the import function.
- b) The Field cell of a row (third from the left) has a dropdown menu that allows you to select a Microsoft Project source plan field to use in creating the selected criterion. When the dropdown menu is selected, the Field cell will look something like this:
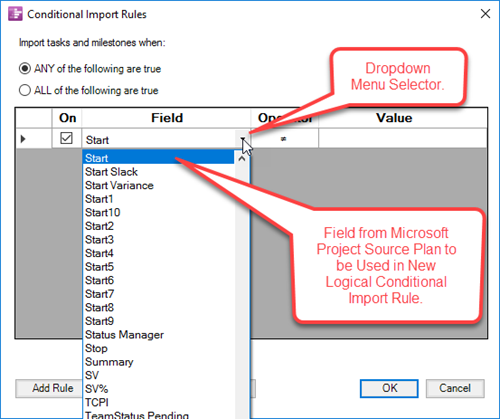
- c) When a Microsoft Project source plan field is selected, the name will be displayed in the Field cell of the new Custom Import rule row.
- d) The look of the rest of the new Conditional Import Filters rule depends on the type of the Microsoft Project source plan field selected. These types are discussed next.
3) Date and Numeric Fields – When Microsoft Project date or numeric types are selected in the Field cell of the rule row, the Operator field dropdown will provide the options shown below:
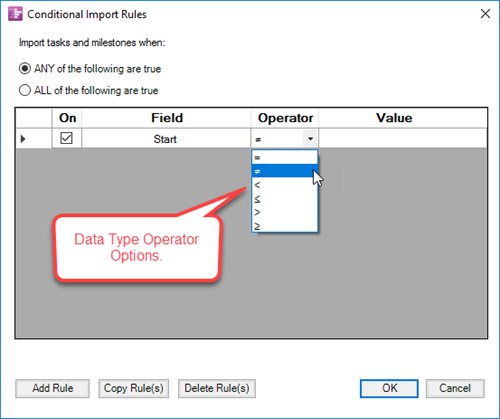
- a) These are the conventional six (6) logical operators used consistently in OPP for date and numeric types. They are the same Operators used in OPP for Conditional Formatting. See the article at Conditional Formatting Overview for OnePager Pro for complementary details on the use of these logical operators.
- b) When the logical statement evaluates to TRUE on the selected Field in a Microsoft Project source plan row, the row is imported. Otherwise it is skipped.
4) Text Fields – When Microsoft Project text types are entered in the Field cell of the Conditional Import Filters rule row, the Operator field dropdown will provide the options shown below:
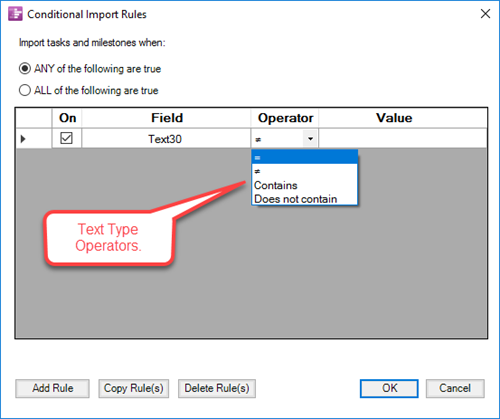
- a) These are the conventional four (4) logical operators used consistently in OPP for the text type. They are the same Operators used in OPP for Conditional Formatting. See the article at Conditional Formatting Overview for OnePager Pro for complementary details on the use of these logical operators.
- b) When the logical statement evaluates to TRUE on the selected Field in a Microsoft Project source plan row, the row is imported. Otherwise it is skipped.
5) Boolean Fields – When Microsoft Project Boolean types are entered in the Field cell of the Conditional Import Filters rule row, the Operator field dropdown will provide the options shown below:
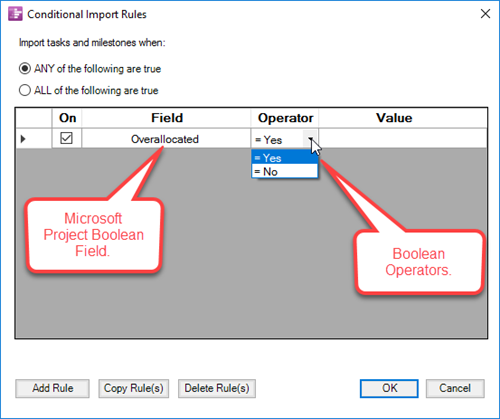
- a) These are the two (2) conventional Boolean logical operators used consistently in OPP for the Boolean type. They are the same Operators used in OPP for Conditional Formatting. See the article at Conditional Formatting with Boolean Fields for OnePager Pro for compeimentary details on the use of these logical operators.
- b) Boolean types are a special case as the operator and the value in OPP are combined into one cell of the Conditional Import Filters rule row - the Operator cell.
- c) When the selected Field is TRUE (or Yes) in a Microsoft Project source plan row, the row is imported. Otherwise it is skipped.
6) Flag1 Through Flag20 Fields – OPP treats Microsoft Project fields from Flag1 through Flag20 as Boolean types in the same way as described in the previous sub-section.
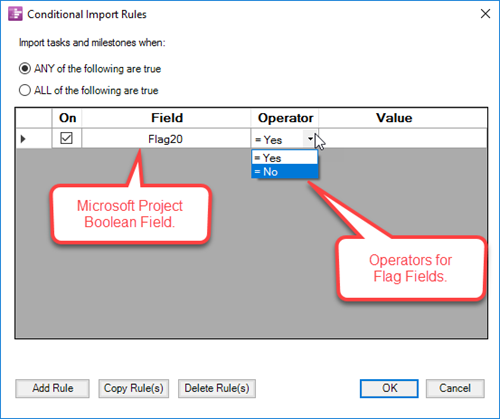
7) We want to emphasize the flexibility that Conditional Import Filters adds to the way you can import rows from your Microsoft Project source plan. You can formulate sets of Conditional Import Filters rules to controls imports using all available types of Microsoft Project fields and use operators that let you select ranges of values and more complicated combinations of criteria.
Editing an Existing Filter Rule in the Conditional Import Rules Form
8) Suppose you’ve composed several Conditional Import Filters rules in an open Conditional Import Rules form as shown below:
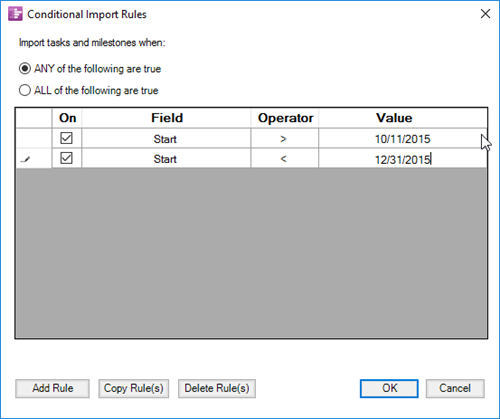
- a) Now further suppose, after reviewing these two rules, that you realize that you may not be able to capture any tasks/milestones that happen to Start on 12/31/2015 because the current rule is based on the less than logical Operator.
- b) To make the change in the Operator cell, click on the cell’s contents which will highlight the cell in blue and reveals the dropdown menu button which you should click. When you do the Conditional Import Rules form should look like this:
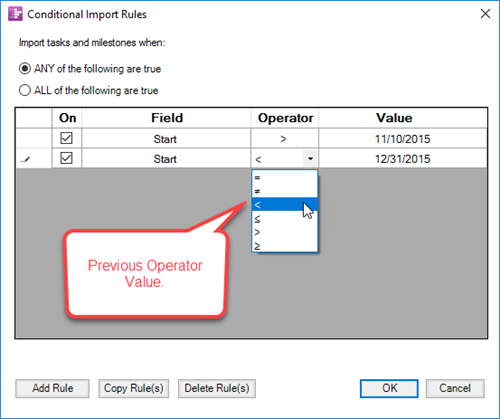
- c) To change the rule, click the desired Operator in the dropdown menu, in this case the less than or equal Operator, and it will be displayed in the Operator cell of the second rule as shown here:
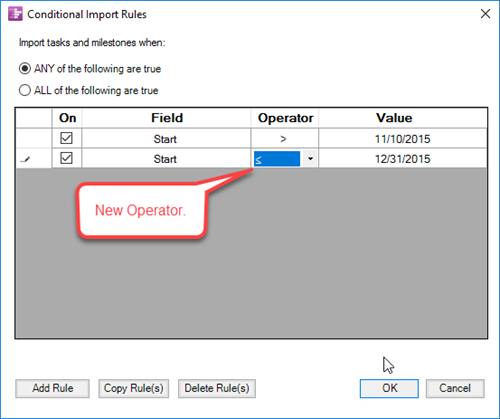
- d) Any Field, Operator, or Value cell may be edited in this way. Additionally, the On cell may be toggled to control the Conditional Import Filters rule's participation in the import process. Finally, you may switch between the two radio buttons at the top of the form in order to change the relationship among the rules from OR to AND or vice versa.
- e) The edits described above may be made to the Conditional Import Rules form regardless of the OPC mode in which you are working (i.e., NEW and UPDATE). Also, you may bring up the Conditional Import Rules form from the OPC form as many times as needed to accomplish your presentation goal. OPP saves the content of the last edit you make to the Conditional Import Rules form.
- f) When satisfied with the structure of your import rules, click the OK button at the bottom of the form to return to the OPC form. Now you are ready to create a new project view.
Copying an Existing Filter Rule in the Conditional Import Rules Form
9) The Copy Rule(s) button is provided in the Conditional Import Rules form to facilitate the creation of additional rules.
- a) To copy a rule to create a new rule, first select the rule row from which you wish to copy as shown below:
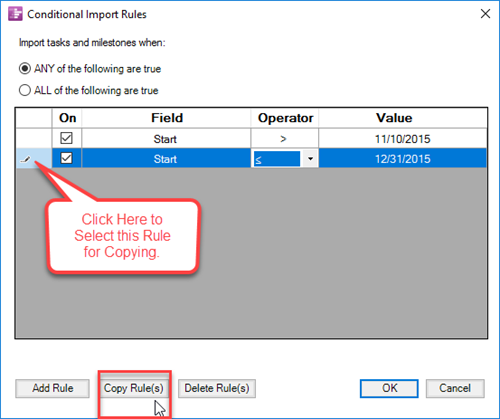
- b) Once the desired row is selected, clicking the Copy Rule(s) button will copy the contents of the rule selected as indicated by the highlighted left-most cell in the desired rule as shown below:
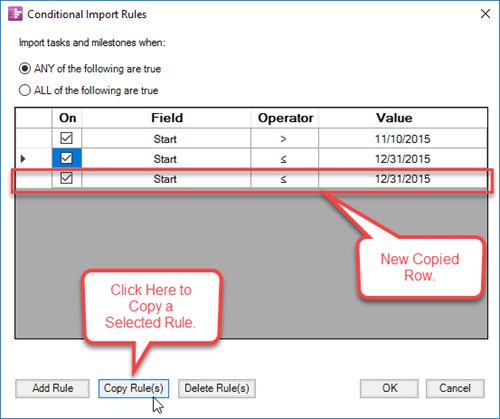
- c) At this point you may edit the copied row in the manner described previously. When you are finished, the new set of three rule rows may look like this:
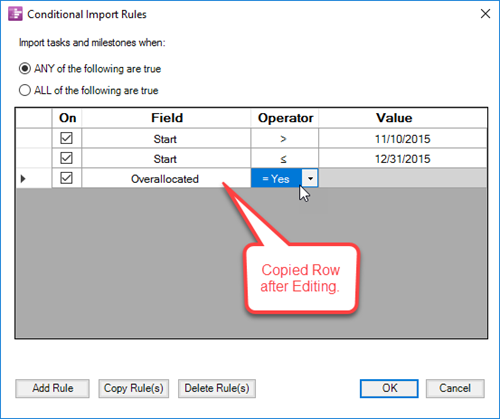
- d) When satisfied with the structure of your import rules, click the OK button at the bottom of the form to return to the OPC form. Now you are ready to create a new project view.
Deleting an Existing Filter Rule in the Conditional Import Rules Form
10) There are times when a particular Conditional Import Filters rule will no longer serve its purpose. You can select the rule row to be deleted and click the Delete Rule(s) button.
- a) The process for deleting a rule parallels the process for copying a rule row in that the you must select the desired row to delete by clicking the left-most cell in that rule’s row.
- b) Once the selection is made, click the Delete Rule(s) button and OPP will first put up a warning message asking if you really want to delete the rule row as shown below:
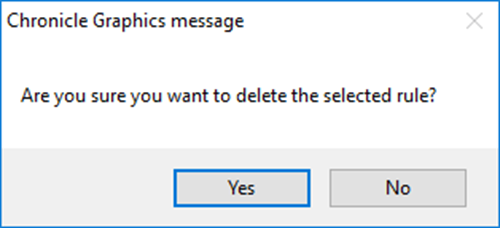
- c) If you select the No option, OPP will abandon the rule deletion operation and the warning message will disappear leaving the selected rule row still selected.
- d) If you select the Yes option, OPP will remove the warning message, delete the selected rule row, and leave the Conditional Import Rules form showing the remaining rule rows, if any.
- e) When satisfied with the structure of your import rules, click the OK button at the bottom of the form to return to the OPC form.
Switching from Flag Fields to New Conditional Import Filters Rules
11) When you click the NEW button, the OPC form will appear as shown below. The process for building a new project view with Conditional Import Filters is the same with the exception that instead of using flag field from your Microsoft Project source plan you will, instead, invoke the Conditional Import Rules form from the OPC form as shown below:

- a) In the illustration above, in the Task Selection section of the form, the Select task by custom filter radio button is clicked. This action brings up the Conditional Import Rules form also shown above.
- b) At this point you may Add Rules to the form, Copy Rules, Delete Rules, or edit existing rules.
Switching from Conditional Import Filters Rules to Flag Fields or Selecting all Tasks
12) If you subsequently decide after composing one or more Conditional Import Filters rules and clicking OK on the Conditional Import Rules form that you want to use flag fields instead, you may revert back to either of the two other Task Selection options provided in the OPC form shown above.
- a) To do this, click either of the other two radio buttons to Select all tasks, or Select task with ‘Yes’ in field:
- b) When you click the Select all tasks button there is no further action you need to take on the OPC form.
- c) However, if you click the Select tasks with ‘Yes’ in field: you will need to select a field from your Microsoft Project source plan as shown below:
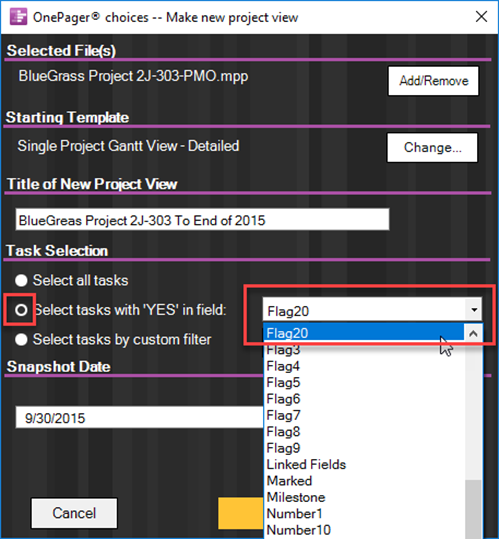
- d) In these circumstances where you’ve switched from using Conditional Import Filters rules to either selecting all tasks, or selecting tasks using a flag field, OPP will discard any Conditional Import Filters rules associated with the project view.
Adding, Editing, Copying, and Deleting Conditional Import Filters Rules
13) Managing Conditional Import Filters rules was discussed in previous sub-sections of this article. Please follow the reference links provided below for details on adding, editing, copying, and deleting of Conditional Import Filters rules:
- a) Adding a new rule: Adding a Filter Rule to the Conditional Import Rules Form.
- b) Editing an existing rule: Editing an Existing Filter Rule in the Conditional Import Rules Form.
- c) Copying a rule: Copying an Existing Filter Rule in the Conditional Import Rules Form.
- d) Deleting a rule: Deleting an Existing Filter Rule in the Conditional Import Rules Form.
A Simplified Workflow Example Using Conditional Import Filters Rules
XXXX
XXXX
XXXX
An Advanced Workflow Example Using Conditional Import Filters Rules
YYY
YYY
YYY
Related Links
Conditional Formatting (Portal)
Using the OnePager "Data" Tab's "Selected file(s)" Button
OnePager Express Import of Data from Microsoft Excel
Message to Assist with Setting Import Flags When No Data Are Imported
Understanding Project Views and Snapshots for OnePager Pro
(7.18.1.2-60)