Difference between revisions of "Editing Text Columns or Swimlane Labels for Version 6.0"
(Created page with "By default, row '''text columns''' and swimlane '''labels''' are generated automatically based on data in the Microsoft Project or Microsoft Excel source plan. However, they c...") |
|||
| Line 1: | Line 1: | ||
| − | By default, row '''text columns''' and swimlane '''labels''' are generated automatically based on data in the Microsoft Project or Microsoft Excel source plan. However, they can be edited manually. | + | By default, row '''text columns''' and swimlane '''labels''' are generated automatically based on data in the Microsoft Project or Microsoft Excel '''source plan'''. However, they can be edited manually. |
Use the following two step procedure: | Use the following two step procedure: | ||
| − | ==Editing Text Column Cells== | + | ==Editing Individual Text Column Cells== |
| − | 1) Right clicking a row '''text column''' will bring up the following '''context menu''': | + | 1) Right clicking a row '''text column''' cell will bring up the following '''context menu''': |
<center>[[File:P60-12_3_1-60-(1)-11152016.png]]</center> | <center>[[File:P60-12_3_1-60-(1)-11152016.png]]</center> | ||
| Line 14: | Line 14: | ||
<center>[[File:P60-12_3_1-60-(2)-11152016.png]]</center> | <center>[[File:P60-12_3_1-60-(2)-11152016.png]]</center> | ||
<center>P60-12_3_1-60-(2)-11152016.png</center> | <center>P60-12_3_1-60-(2)-11152016.png</center> | ||
| + | |||
| + | ==Editing All Text Column Cells in a Row Using the OnePager Tool Bar== | ||
| + | |||
| + | 1) When a project view has multiple '''Text Columns''' displayed you may find it more efficient to edit the text in these cells using the '''editing tools''' on the OnePager tool bar. | ||
| + | |||
| + | 2) Suppose we want to change the font size and font color of the '''text column''' cells in a particular row. We can do this in a few steps: | ||
| + | |||
| + | :a) First use the mouse left click to select the row by clicking in either of the '''text column''' cells as shown below: | ||
| + | |||
| + | <center>[[File:P60-12_3_1-60-(2A)-01312016.png]]</center> | ||
| + | <center>P60-12_3_1-60-(2A)-01312016.png</center> | ||
| + | |||
| + | :b) Once the '''text column''' cells are selected, go to the '''Font''' section of the tool bar and, for example, increase the font sizes in these two cells as shown below: | ||
| + | |||
| + | <center>[[File:P60-12_3_1-60-(2B)-01312016.png]]</center> | ||
| + | <center>P60-12_3_1-60-(2B)-01312016.png</center> | ||
| + | |||
| + | :c) Finally, we'll change the selected '''text column''' cell's context by changing the text's color from black to red. To do this we will use the OnePager tool bar's text '''Color Chooser''' as shown below to do this:: | ||
| + | |||
| + | <center>[[File:P60-12_3_1-60-(2C)-01312016.png]]</center> | ||
| + | <center>P60-12_3_1-60-(2C)-01312016.png</center> | ||
| + | |||
| + | |||
==Editing Swimlane Labels== | ==Editing Swimlane Labels== | ||
Revision as of 17:28, 31 January 2017
By default, row text columns and swimlane labels are generated automatically based on data in the Microsoft Project or Microsoft Excel source plan. However, they can be edited manually.
Use the following two step procedure:
Editing Individual Text Column Cells
1) Right clicking a row text column cell will bring up the following context menu:
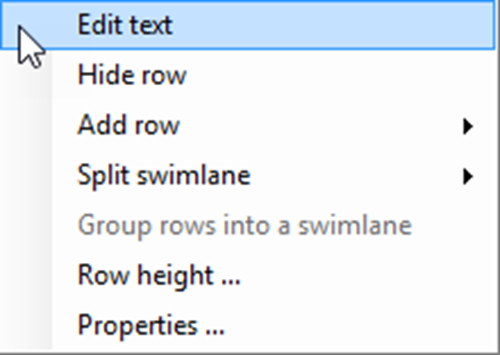
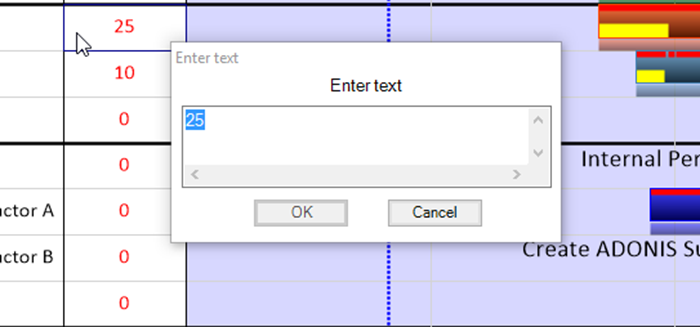
2) Choose the Edit text command to edit a text column cell. The Enter text form (shown below) will appear in which the text column cell information can be added, changed, or deleted.
Editing All Text Column Cells in a Row Using the OnePager Tool Bar
1) When a project view has multiple Text Columns displayed you may find it more efficient to edit the text in these cells using the editing tools on the OnePager tool bar.
2) Suppose we want to change the font size and font color of the text column cells in a particular row. We can do this in a few steps:
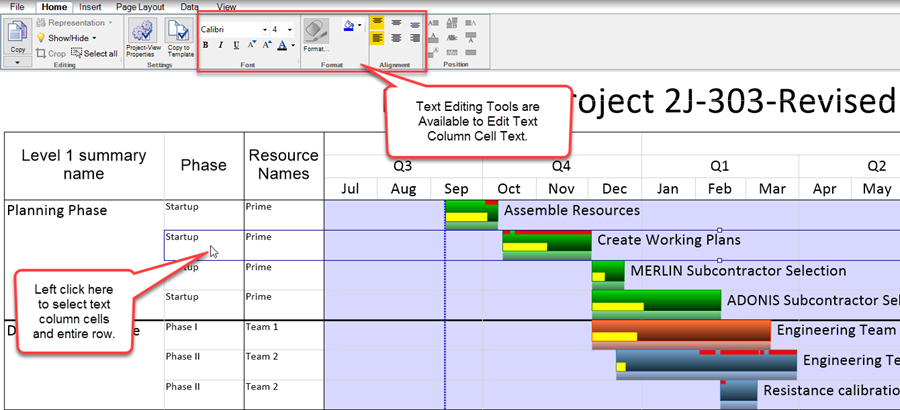
- a) First use the mouse left click to select the row by clicking in either of the text column cells as shown below:
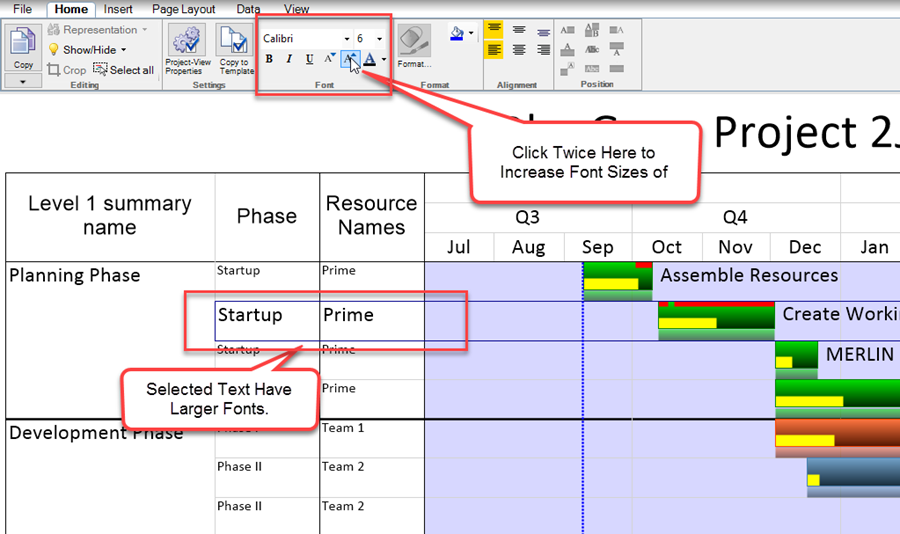
- b) Once the text column cells are selected, go to the Font section of the tool bar and, for example, increase the font sizes in these two cells as shown below:
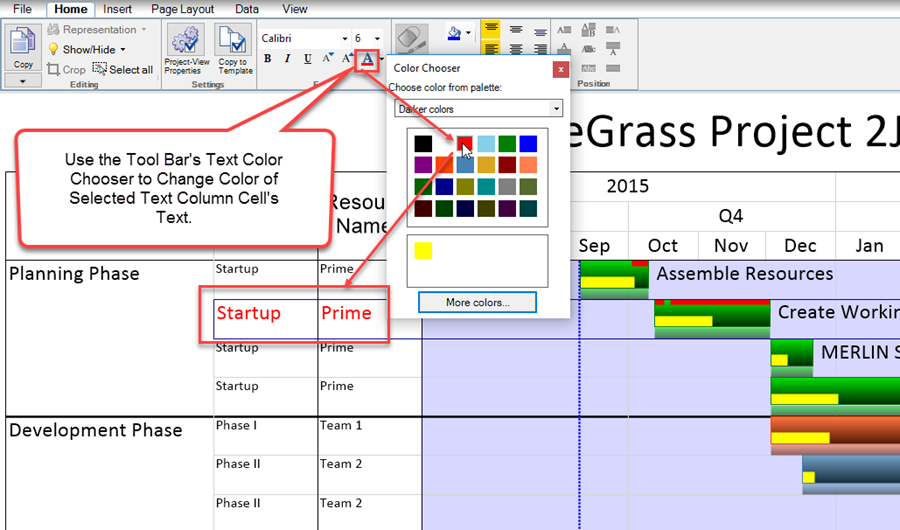
- c) Finally, we'll change the selected text column cell's context by changing the text's color from black to red. To do this we will use the OnePager tool bar's text Color Chooser as shown below to do this::
Editing Swimlane Labels
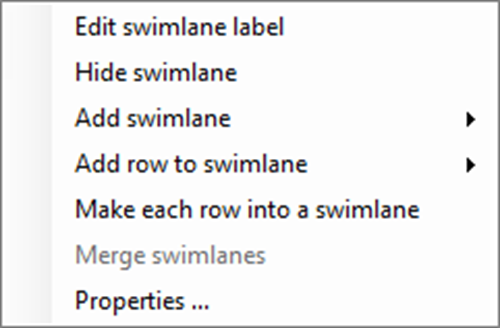
1) Right clicking a swimlane label will bring up the following context menu:
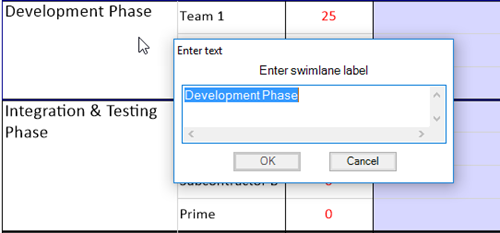
2) Choose the Edit swimlane label command to edit the swimlane label. The Enter text form (shown below) will appear in which the label text can be added, changed, or deleted.
(12.3.1-60)